Post-processing
Post-processing refers to any user-defined processes performed on the default endpoint output after the main API process has been executed.
Since such processes are not reflected in the API information (Swagger UI) screen or the OpenAPI openapi.json file, there may be differences between the displayed information and the actual specifications. Therefore, we recommend that you note the custom specifications in the endpoint description.
You can access the post-processing settings for each endpoint by clicking [Post-processing] in the corresponding row:

Post-processing settings
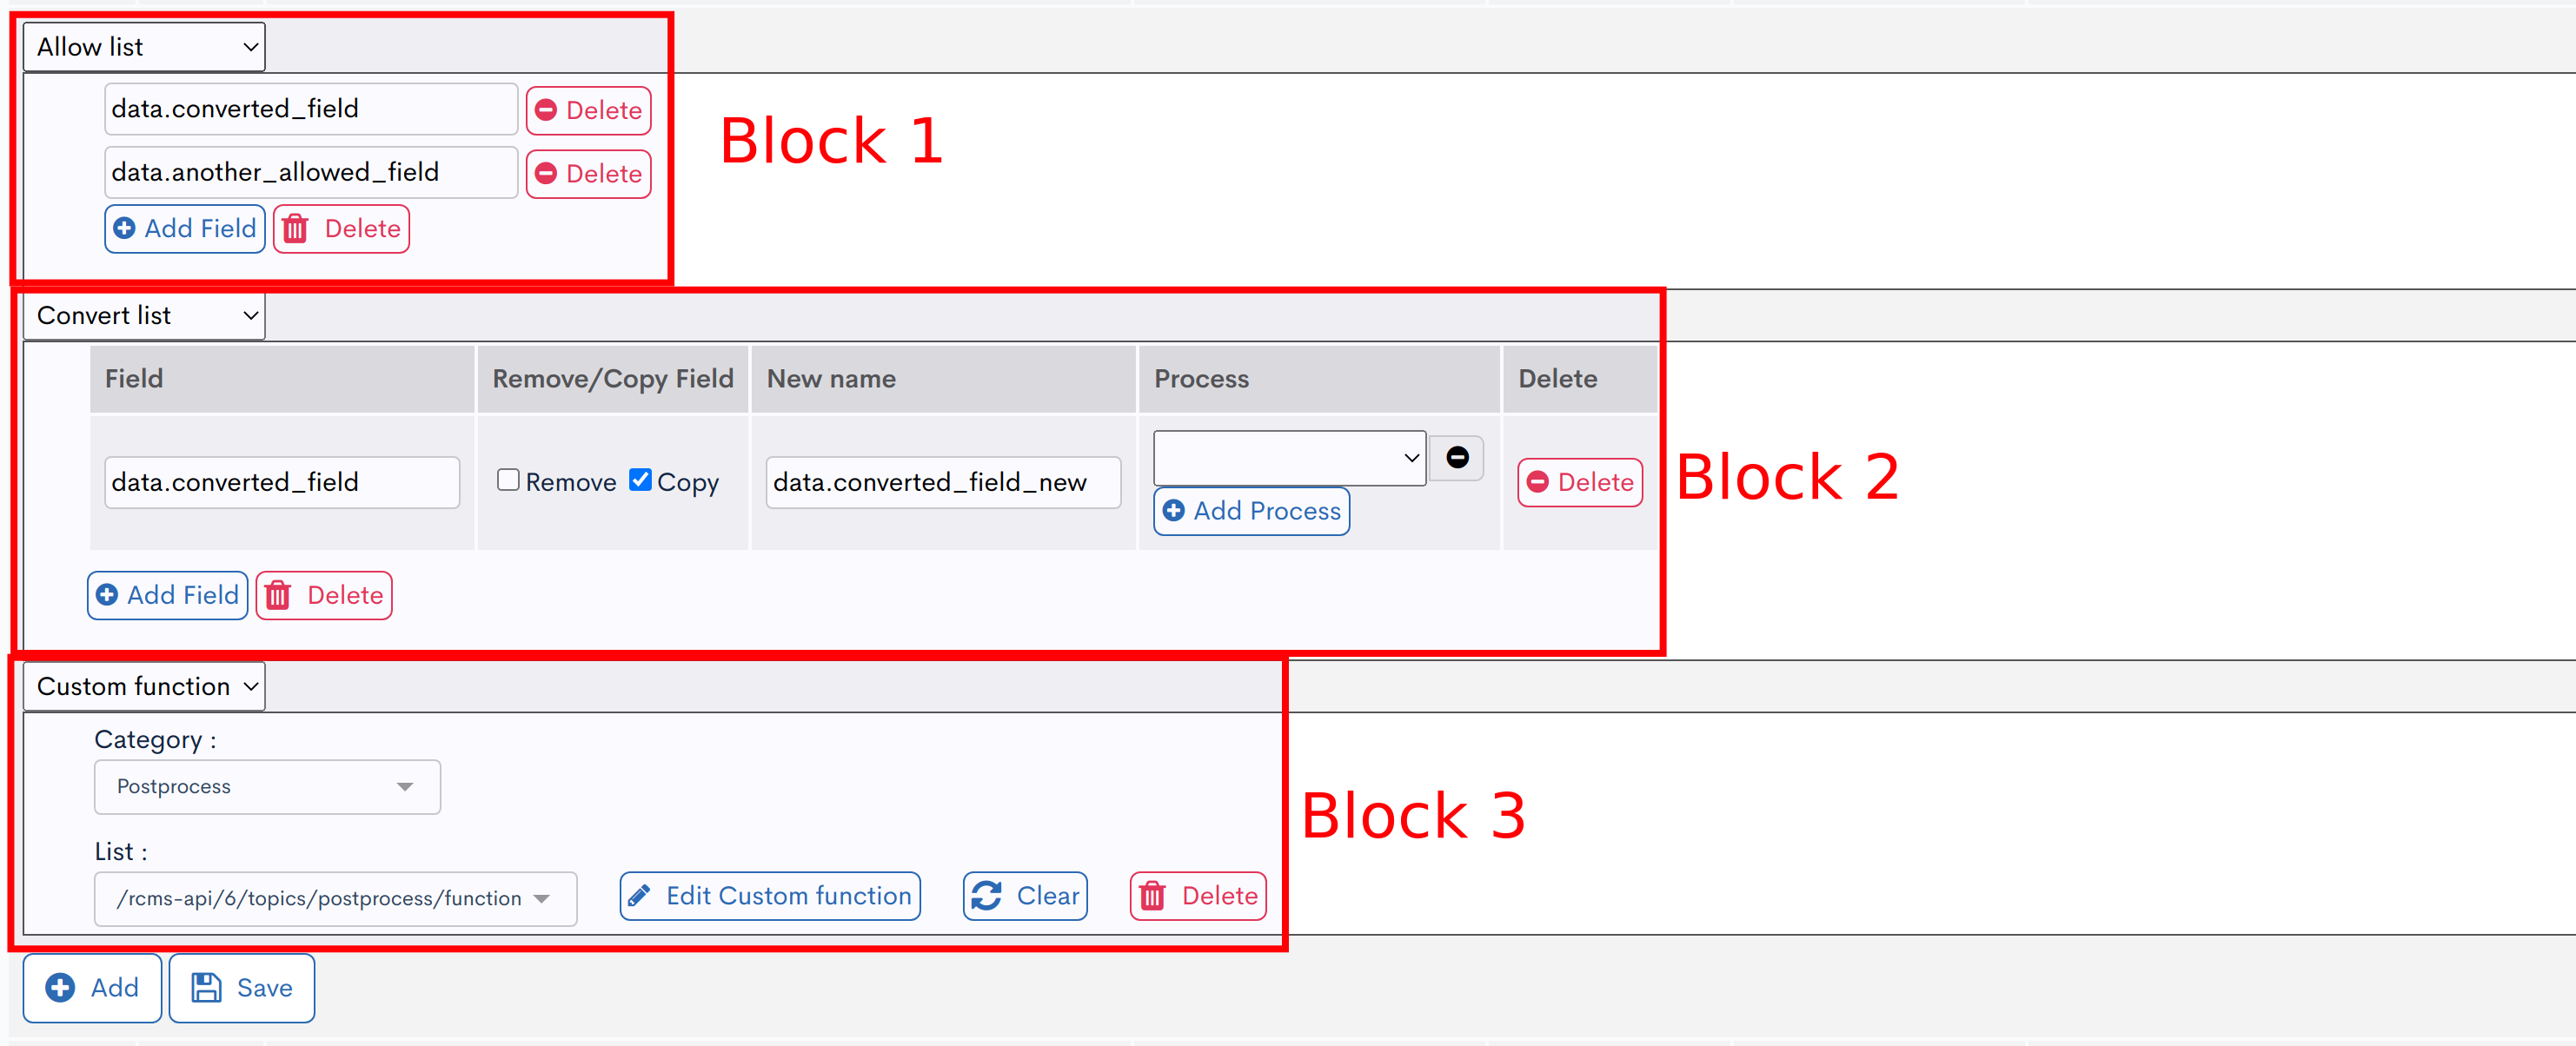
Post-processes are broken down into blocks. You may define any number of processing blocks, which will be executed in a series based on the order of definition.
Each block takes the results of the execution of the previous block as input. Click [Add] to append a new empty block at the end of the series.
The output allow list, when executed before other processes (such as custom processing), also affects internal processes like SQL.
Since it can improve performance, it is recommended to set the output allow list at the highest level whenever possible.
Block types
Currently, Kuroco supports three types of blocks:
| Block name | Description |
|---|---|
| Allow list | Whitelist filter. Define a list of fields to retain in the output - all other fields will be omitted. |
| Convert list | Option to remove a field, rename its key, and/or to apply a function (from the list of predefined functions) to its value. |
| Custom function | Write the program as a function and link it to the endpoint (similar to post-processing). |
See below for the details of each type.
Allow list
The allow list is a simple field filter. A list or details API returns a lot of information, some of which you may wish to make optional or hidden from users.
You can think of it as a whitelist: only the fields you set here will be returned. Therefore, you should list all the fields used by your front-end application.
For a blacklist feature instead of a whitelist, see Convert list.
Field settings
Specify the full path to the field in the JSON output, starting from the root. Skip over arrays and only specify objects - the filter will be applied to all objects in an array.
If your allow list does not specify any field or contains an error in the path name, the endpoint will output an empty JSON object.
Example scenario
{
  "list": [
    {
      "subject": "First article",
      "contents": "The contents of the first article",
      "sponsors": ["Company X"]
    },
    {
      "subject": "Second article",
      "contents": "The contents of the second article",
      "sponsors": ["Company Y"]
    }
  ],
  "pageInfo": {
    "totalCnt": 7,
    "pageNo": 1,
    ...
  }
}
For example, in the above sample code, we would like to remove sponsors only.
The three fields we are keeping, including all root and child fields, are:
list.subjectlist.contentspageInfo
Your configuration should look like this:
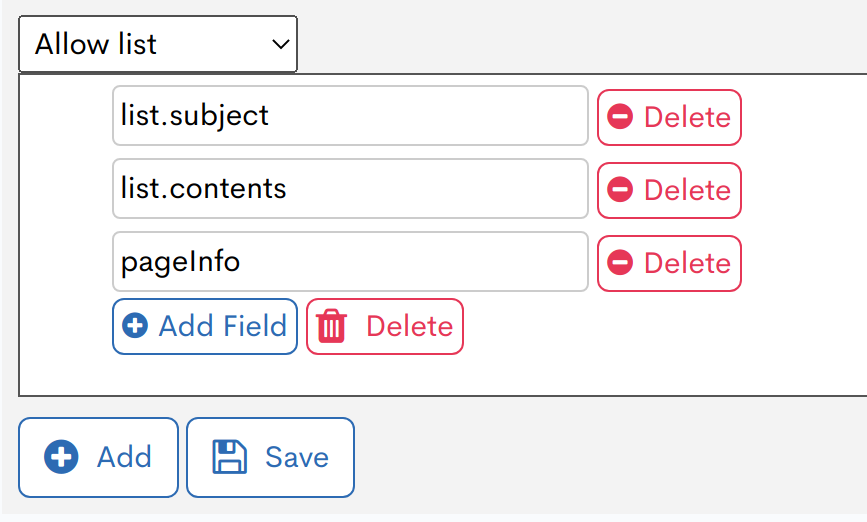
- Make sure to denote nested JSON objects using
.and ignore all arrays. - When specifying with a wildcard, configure it as
list.images-*.
The drawback to this simple filter is a lack of flexibility. If you need more in-depth customization, see Convert list and Custom function.
Convert list
This block allows you to add processes to each field by choosing among available options.
Click [Add field] to add a sub-block defining a process for a specific field. Note the two different [Delete] functions in this block: the one to the right (a) deletes the corresponding sub-block row, while the one at the bottom (b) deletes the entire block.
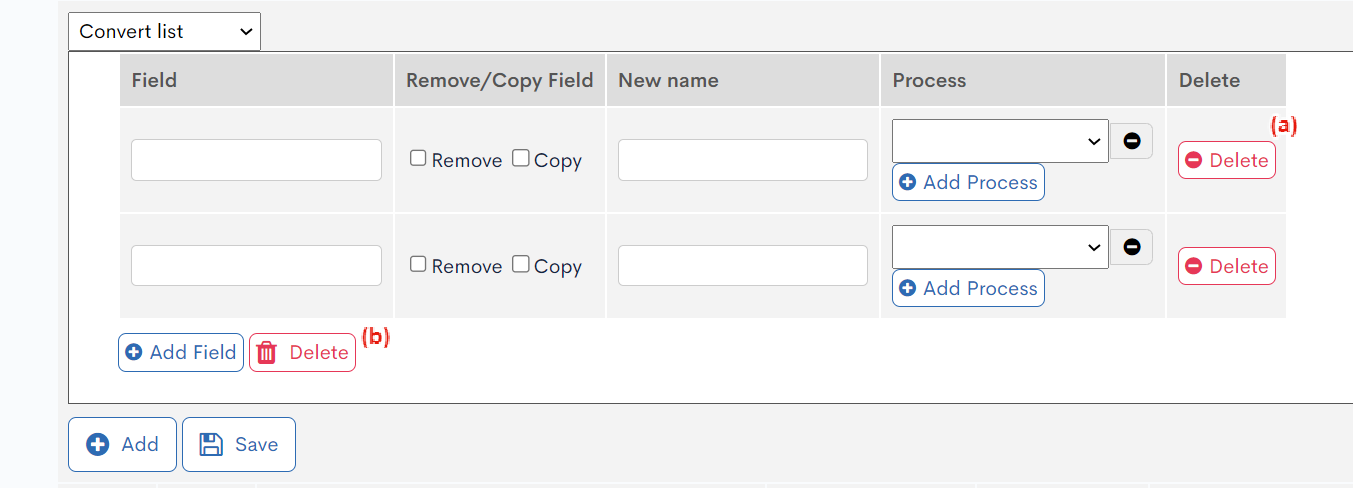
Field settings
| Field | Description |
|---|---|
| Field | Specify the field path in the same way as for allow lists, using dot-separated nested objects and skipping over lists. The filter will be applied to all elements in a list.
|
| Remove/copy field |
|
| New name | Specify the new name of the field. A field with the new name will be added to the same parent object.
|
| Process | Select one or more optional transformation(s) to apply to the field. In cases of multiple transformations, they will be applied in the order of selection. The specific actions of each process are listed below.
|
| Delete | Remove the current processing sub-block. |
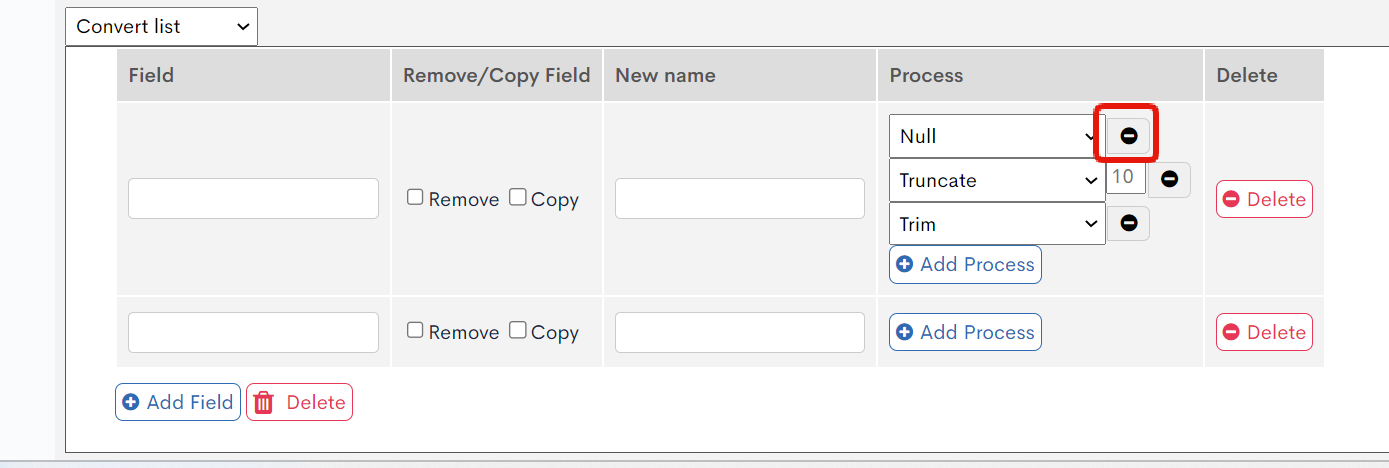
Transformation processes
| Process name | Action(s) |
|---|---|
| Null | Copy the original value as is (no transformation). |
| Truncate | Truncate the value to a maximum of N characters. Specify the length in the input box on the right.
|
| Trim | Remove all spaces/tabs from the start and the end of the string.
|
| Strtotime | Apply the strtotime PHP function to the value. |
| Date format | Apply the date PHP function to the value to format it as a Unix timestamp. |
| Locale Date Format | Apply the specialized pg_dateformat function to the value. |
| Uppercase | Cast every character to its uppercase variant, if any. |
| Lowercase | Cast every character to its lowercase variant, if any. |
| Sprintf | Apply the sprintf PHP function to the input. The existing value is used as a second argument, which you can access using %s or other specifiers. |
| Nl2br | Insert <br /> before all new lines (\n, \r and \r\n) in a string. Useful when rendering to html. |
| FileSize | Retrieve the bytesize of a file if it exists at the specified path. |
| ImageSize | Retrieve the bytesize of an image if it exists at the specified path. |
Example scenario
Consider the same sample code as before:
{
  "list": [
    {
      "subject": "First article",
      "contents": "The contents of the first article",
      "sponsors": ["Company X"]
    },
    {
      "subject": "Second article",
      "contents": "The contents of the second article",
      "sponsors": ["Company Y"]
    }
  ],
  "pageInfo": {
    "totalCnt": 7,
    "pageNo": 1,
    ...
  }
}
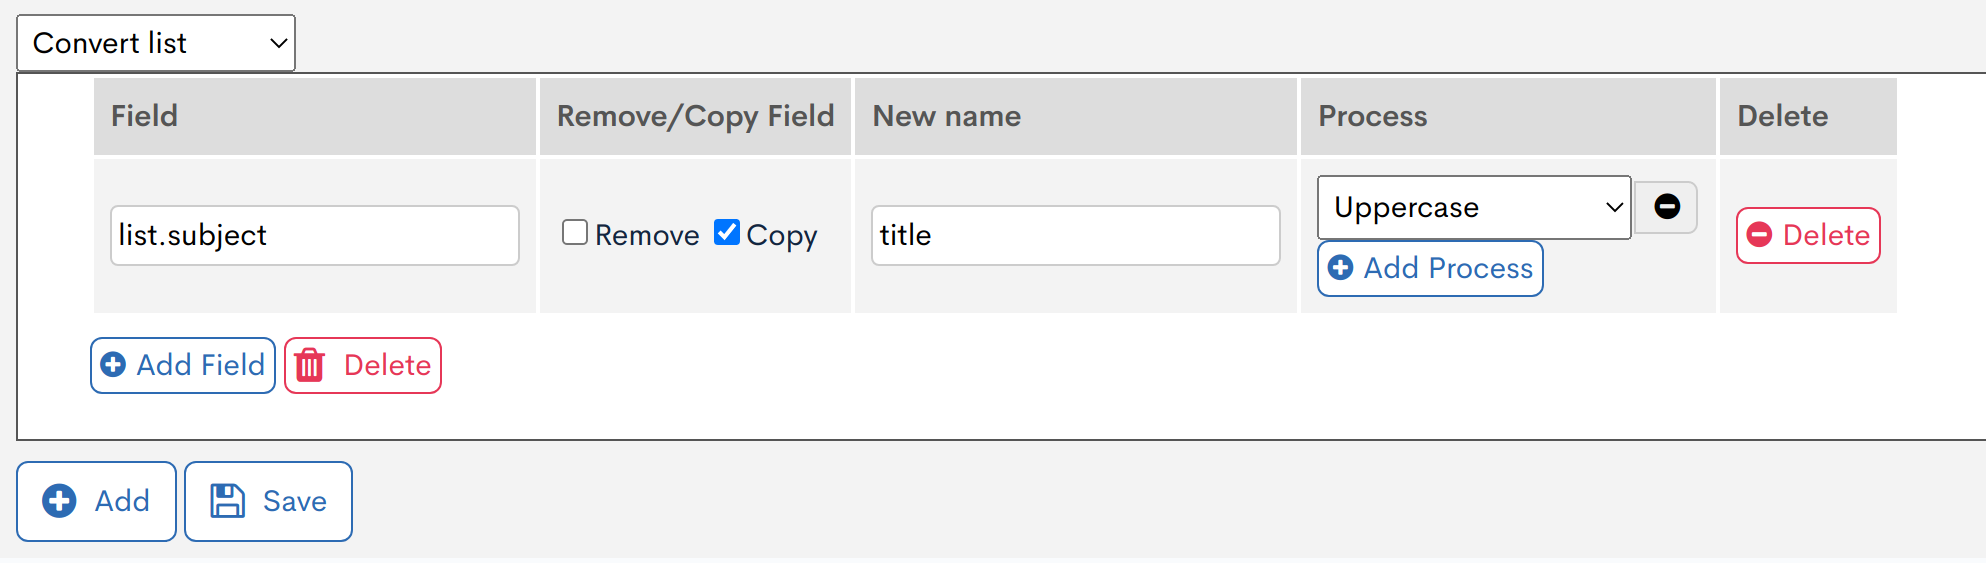
Suppose you want to add a new field called title, which contains the uppercase version of the contents of subject. Configure your field settings as follows:
| Field | Description |
|---|---|
| Field | list.subject |
| Remove/copy field | Select "Copy". |
| New name | title |
| Process | Uppercase |
Your configuration should look like this:
 New output:
{
"list":
  [
    {
      "subject": "First article",
      "contents": "The contents of the first article",
      "sponsors": [
        "Company X"
      ],
      "title": "FIRST ARTICLE"
    },
    {
      "subject": "Second article",
      "contents": "The contents of the second article",
      "sponsors": [
        "Company Y"
      ],
      "title": "SECOND ARTICLE"
    }
  ],
"pageInfo":
  {
    "totalCnt": 7,
    "pageNo": 1
  }
}
Custom function
If your API requires more in-depth features, write a custom function defining how your data should be transformed and link it to your endpoint.
Custom function creation
Please create a custom process to be used in post-processing, referring to the custom processing as a reference.
 To avoid confusion with custom functions used in other modules, we recommend setting it up as follows:
- Create a custom function category dedicated to post-processing in advance and set it as the category of the function.
- Match the title of the custom function with the path name of the endpoint.
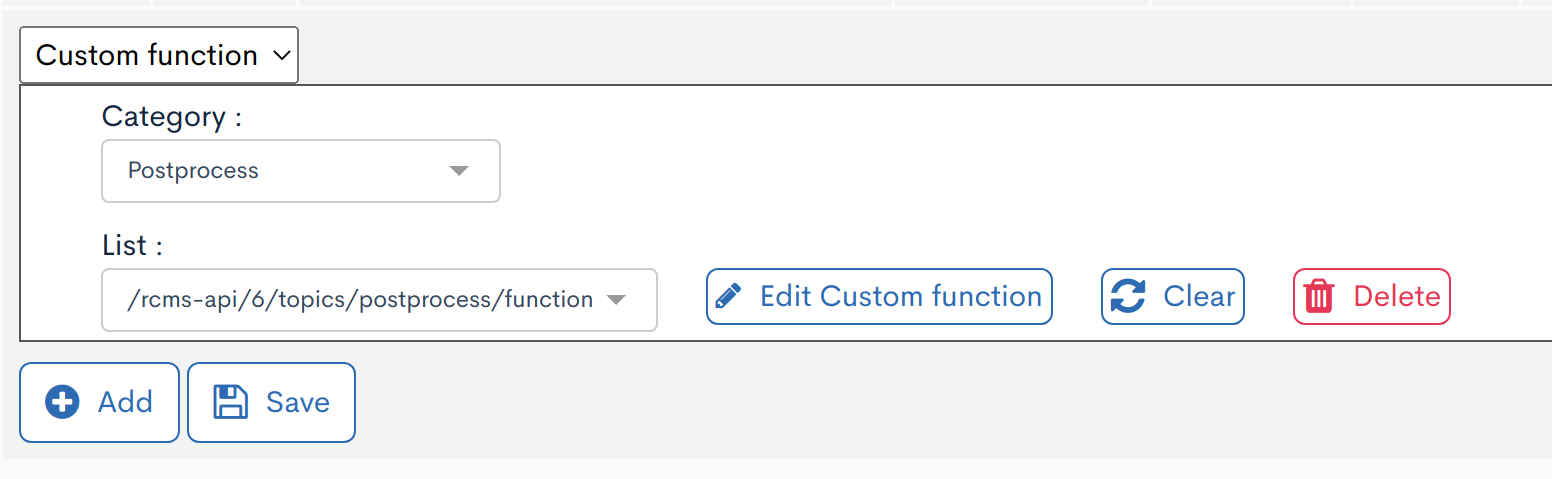
Linking the function to the target endpoint
- In the left sidebar menu, click [API] and select the target endpoint list screen.
- Select the target endpoint from the list and click [Post-processing].
- In the dropdown list, select [Custom function] and choose the correct category and function name (list).
- Click [Save].
Double check to make sure you have linked the function correctly. If you made a mistake, the endpoint may not work as expected.
Example configuration:
Post-Processing Variables
There are reserved keywords with special meanings among the variables used in post-processing. By using these variables, you can customize the behavior of the endpoint.
| Variable Name | Type |
|---|---|
$json | Reference |
$processed_json | API Control |
$errors | API Control |
$http_code | API Control |
Reference Variables
Assigned Variables
The following variables are reference variables that are always assigned by default when post-processing is executed.
| Variable Name | Type | Description |
|---|---|---|
$json | object | The original JSON output of the API |
Request Variables
To handle request variables in post-processing, use the following syntax:
- GET variables:
$smarty.get.hoge - POST variables:
$smarty.post.foo
Additionally, you can use combined request variables:
- Request variables:
$smarty.request.piyo
When using $smarty.request in post-processing, extended content fields may be assigned as ext_X instead of slug.
Variables for API Control
| Variable Name | Requirement | Type | Description |
|---|---|---|---|
$processed_json | Required | object | Assign the JSON value to be returned as the response to this variable. |
$errors | Optional | object | If you assign a value to this variable, the endpoint will return an error. The assigned value will be used as the message field in the response. |
$http_code | Optional | int | When a value is assigned to errors, assigning a value to this variable will override the original HTTP code. |
The available HTTP status codes are as follows:
| Code | Name | Meaning |
|---|---|---|
| 400 | Bad Request | The request from the client is invalid. |
| 401 | Unauthorized | The request failed due to missing user authentication (not logged in). |
| 403 | Forbidden | The request failed due to lack of access rights to the content (user is authenticated, unlike 401). |
| 404 | Not Found | The request failed because the specified endpoint content does not exist. |
| 405 | Method Not Allowed | The error occurs when the request uses an unsupported HTTP method. |
| 406 | Not Acceptable | The error occurs when the server cannot generate a response matching the request's conditions. |
| 500 | Internal Server Error | The request from the client is valid, but an error occurred on the server side. |
When in trouble
If a post-process is not working as expected, verify the following:
- The post-processing custom function has been linked properly.
- You have linked the correct custom function.
- The variable name is correct.
- The variable data is stored in the correct format.
- The custom function contains no syntax errors.
Related documents
Support
If you have any other questions, please contact us or check out Our Slack Community.