Model Context Protocol (MCP) Integration with Kuroco
Kuroco implements Model Context Protocol (MCP) so LLM clients can call your public API endpoints over HTTP. This guide explains how to expose Kuroco endpoints via MCP in two practical parts:
- Enrich LLM responses by providing Kuroco data
- Create and update content using an LLM
Use these instructions as a detailed reference when publishing Kuroco tools for AI clients.
What is Model Context Protocol (MCP) in Kuroco?
MCP is an open protocol for connecting AI clients to tool servers. Kuroco exposes MCP servers so clients such as Claude, ChatGPT, and IDE assistants can discover your APIs as typed tools and invoke them with structured inputs. Any API operation can be exposed with MCP; this document focuses on read and write operations for content.
Key features
- HTTP transport: MCP in Kuroco uses streamable HTTP transport and conforms to the MCP specification.
- Highly customizable: Combine Kuroco APIs and custom functions to expose tailored tools for many use cases.
- Works with existing endpoints: You can publish any Kuroco API endpoints as an LLM tool.
Restrictions
- Authentication: LLM clients can use public APIs and endpoints secured by access tokens, but not all clients support setting tokens in headers. Refer to the MCP Client Configuration Reference for client compatibility.
Prerequisites
Kuroco environment
-
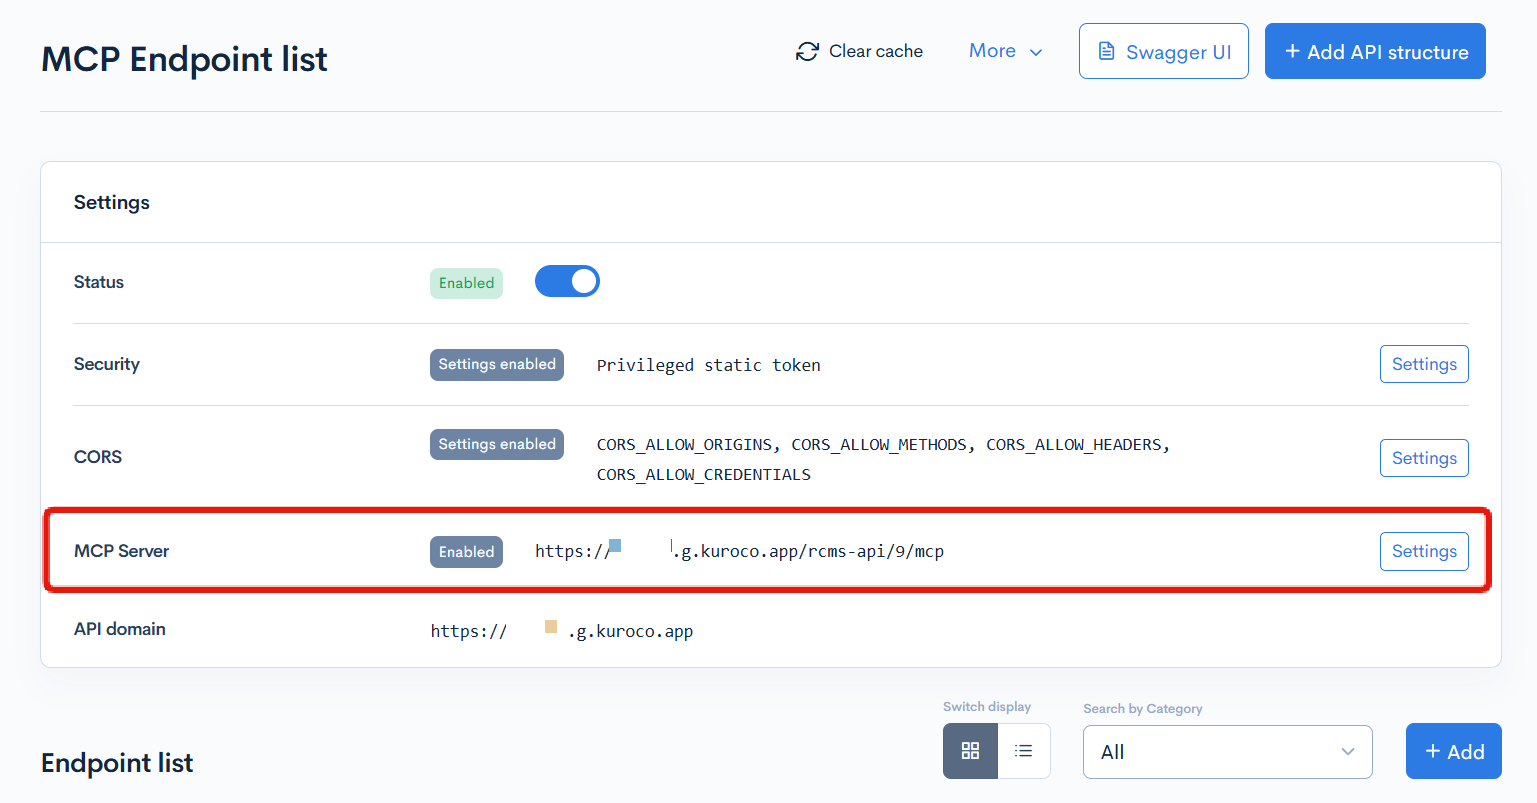
An API definition with security set to privileged static token, with the MCP server setting enabled
-
A content structure that you want to surface in LLM responses or allow LLMs to create/update content for
Supported LLM clients
Check client compatibility and find setup instructions in the MCP Client Configuration Reference.
Enrich LLM responses with Kuroco content
Expose read-only endpoints (e.g., content list/detail, News list) as MCP tools so LLMs can retrieve structured content during conversations.
Create a data schema
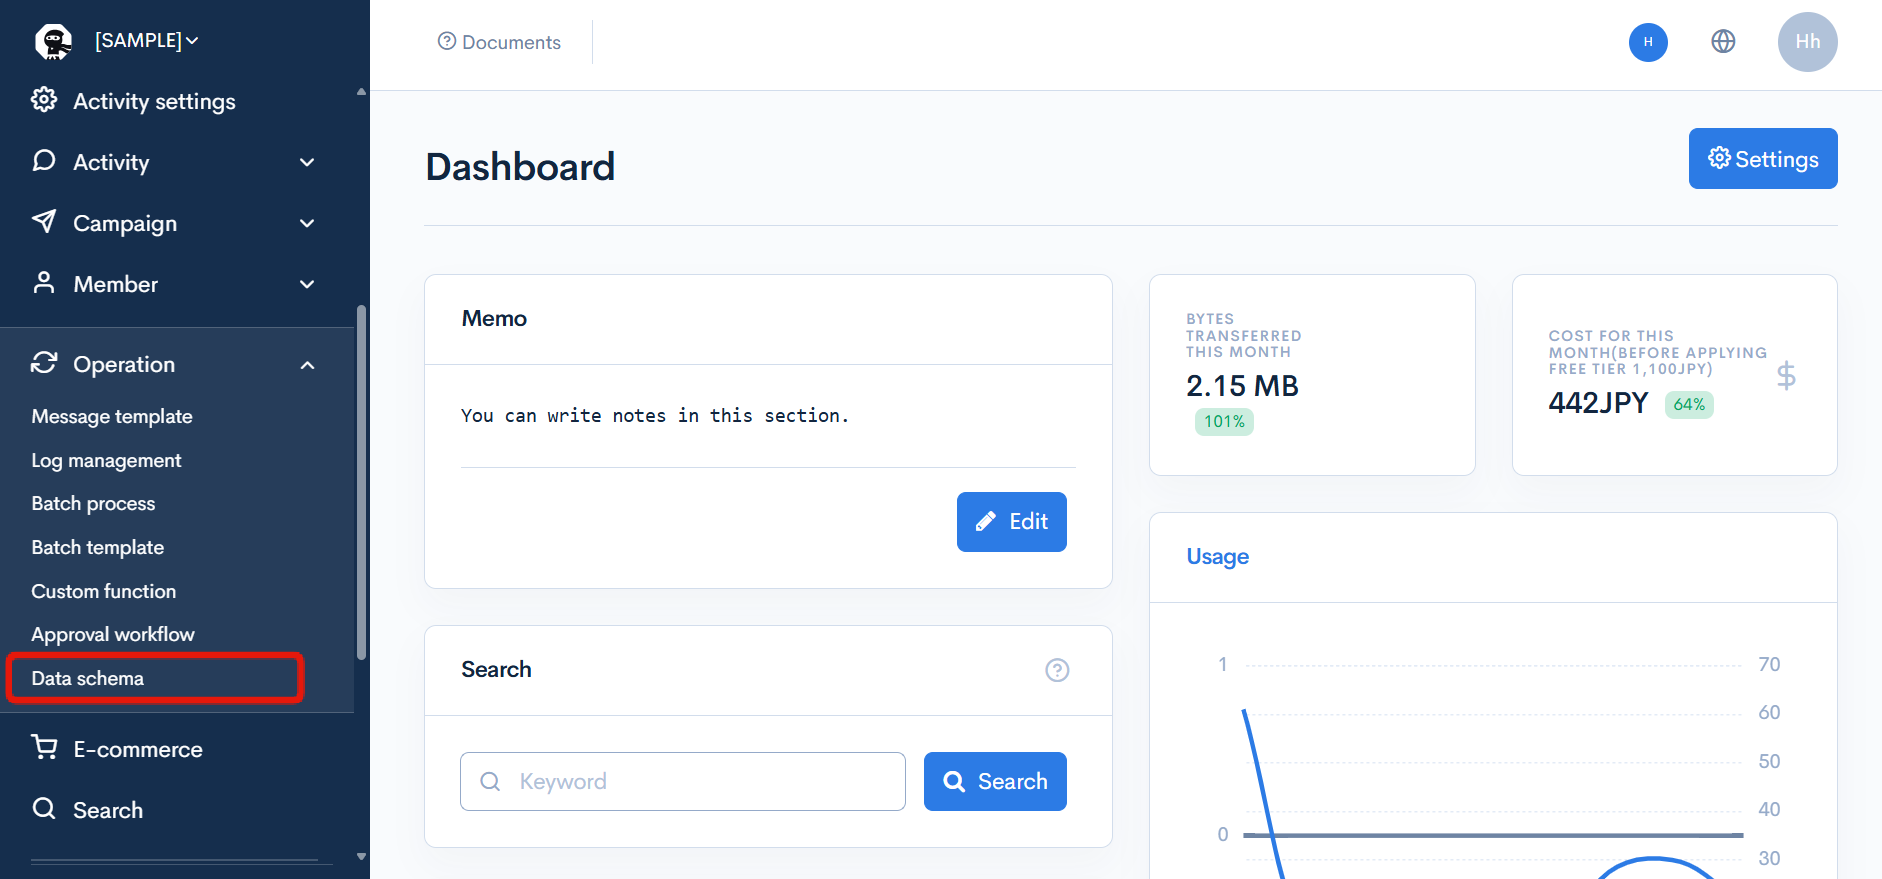
Creating a data schema is required for MCP-enabled endpoints. By defining a schema, you explicitly specify the parameters the LLM can pass, limiting them to only what is necessary. This can be achieved using json or zod schemas. To generate a data schema that you can use anywhere in Kuroco, access the [Operation]->[Data schema] tab.
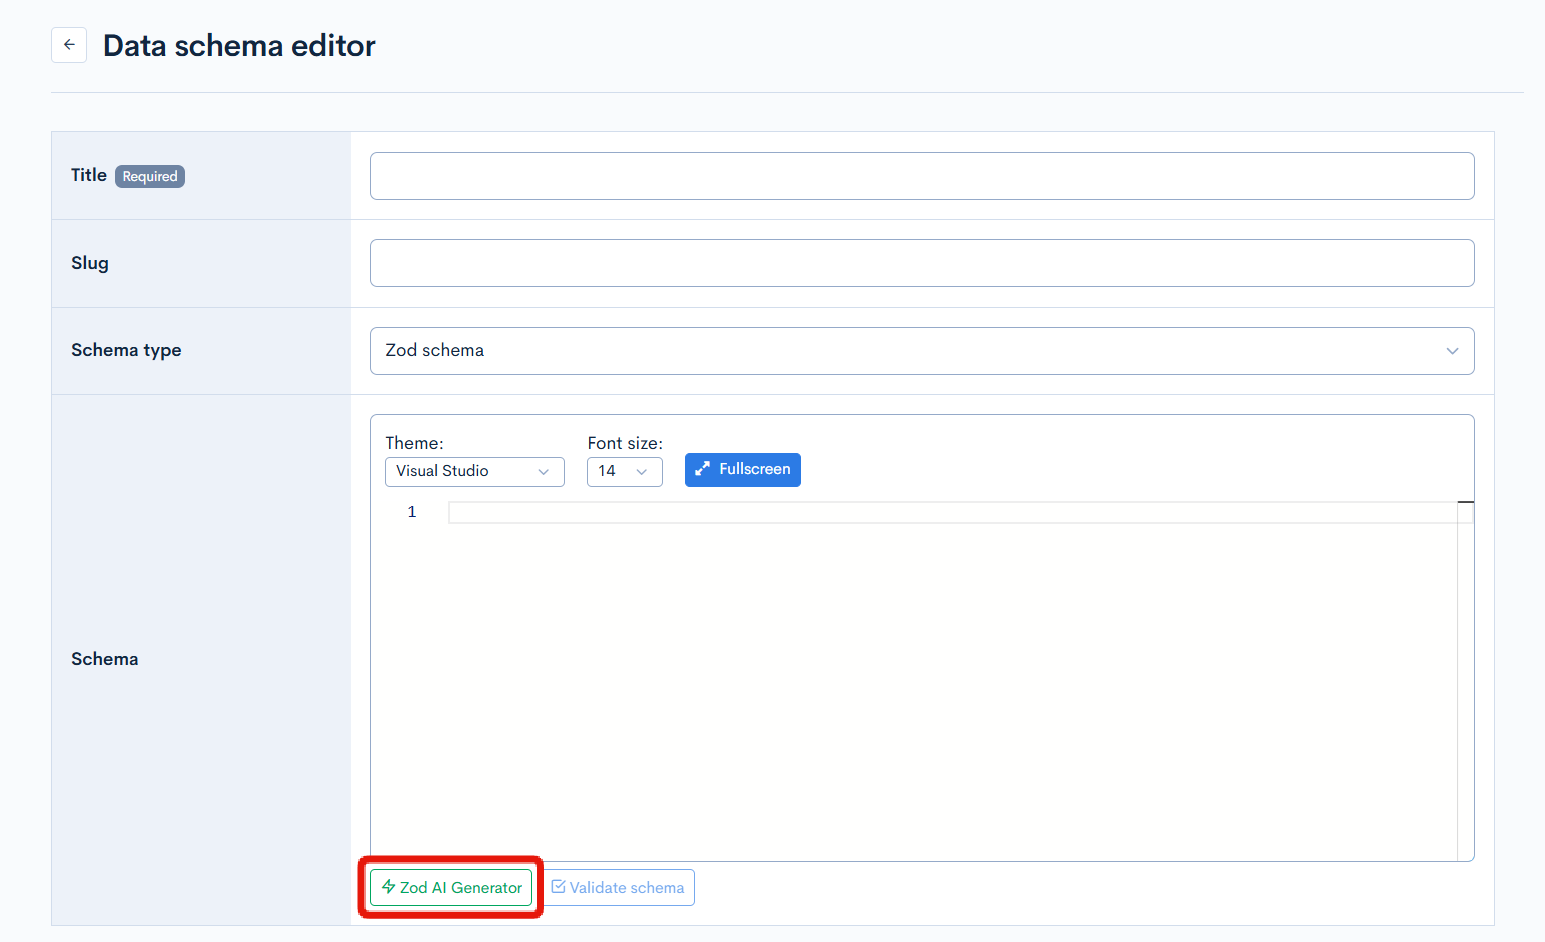
Writing schemas by hand can be tedious, so we suggest using the "Zod schema" validator. It can be used whether you intend to work with json or zod schemas, because zod schemas are automatically converted. Click [Add data schema], then click the "Zod AI generator" at the bottom of the page to open the tool:
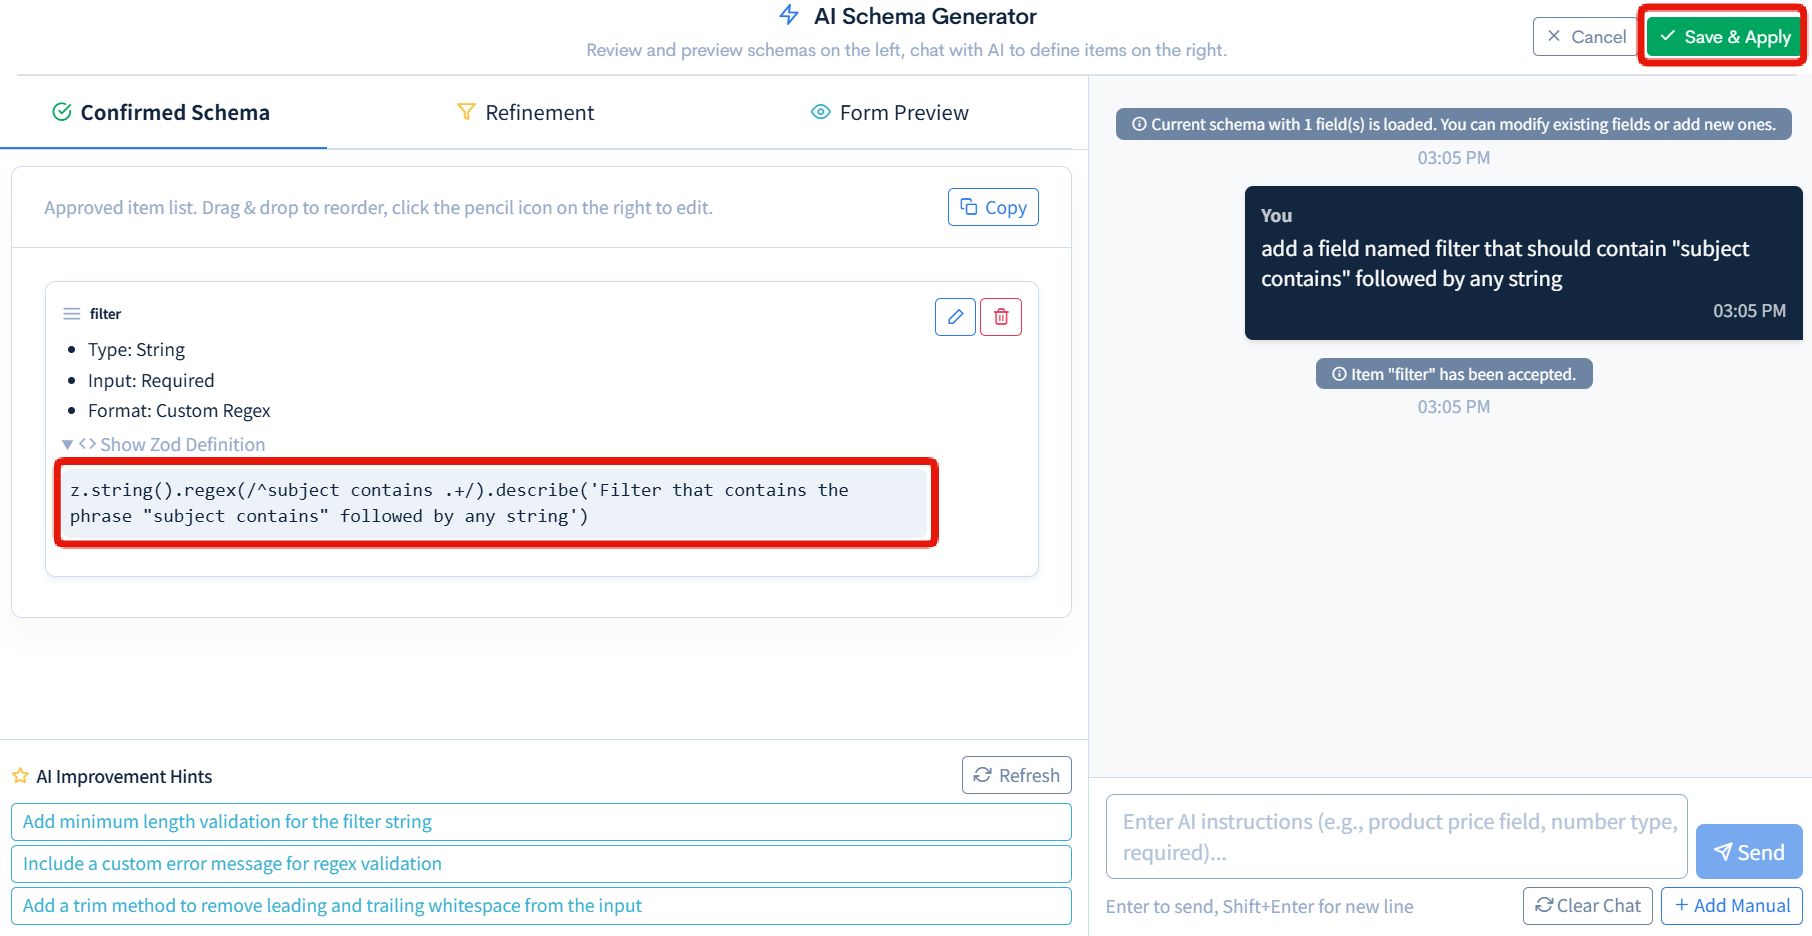
Now, we want to use the filter query to search for any string in the subject, let's tell the AI:
add a field named filter that should contain "subject contains" followed by any string
After applying the generated schema, check the Zod definition — the schema correctly generates a regex match against the subject field for the input string. Click the "Save & apply" button at the top right of the tool to apply the schema to Kuroco's data schema edit screen.
Finally, click [Add] at the bottom of the page to save the data schema.
The values used in this tutorial are as follows:
| Title | Value |
|---|---|
| Name | Tutorial |
| Slug | () |
| Schema type | Zod schema |
| Schema | z.object({filter: z.string().regex(/^subject contains .+/).describe('Filter that contains the phrase "subject contains" followed by any string')}) |
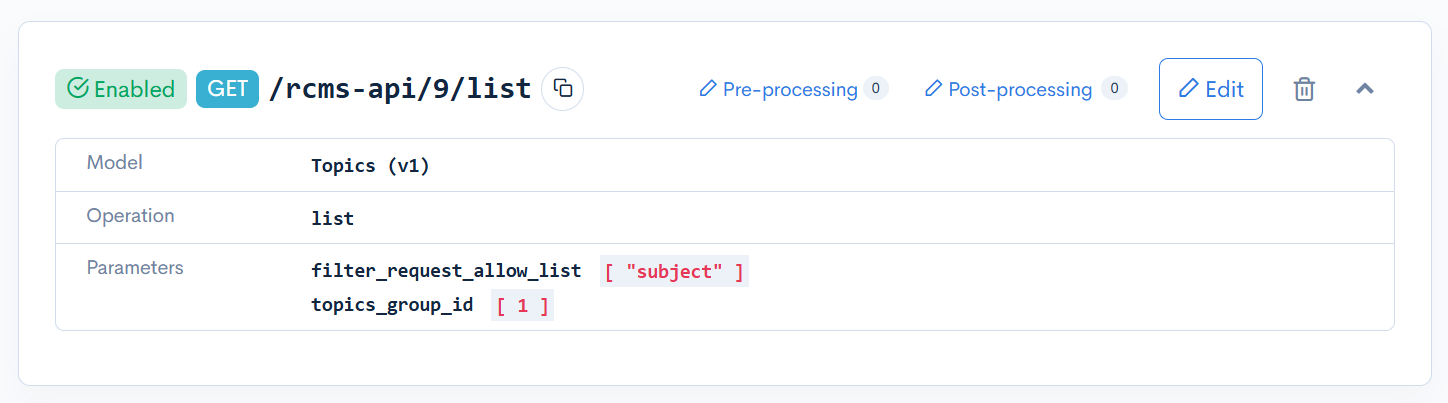
Create the read endpoints
On your Endpoint list screen, click [Add], then set:
| Field | Input |
|---|---|
| Path | list |
| Category → Model → Operation | Content → Topics (v1) → list |
| Parameters | topics_group_id: (target group ID)filter_request_allow_list:subject |
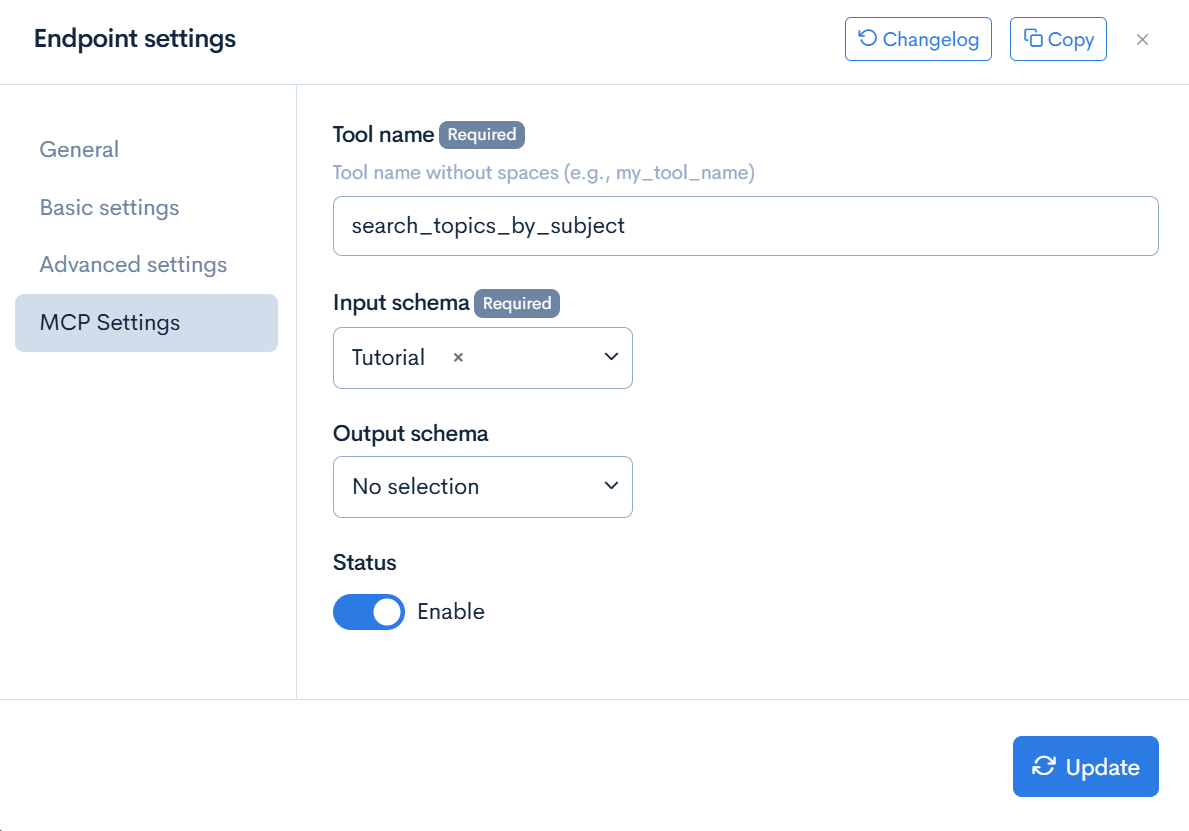
Enable MCP on the read endpoint
- Open the endpoint settings and navigate to the MCP settings section/tab.
- Tool name: Enter a unique, descriptive name(e.g.,
search_topics_by_subject). - Input schema: Select the schema that you created at the previous step. Output schema is optional and will not be used for this tutorial.
- Status: Check the status (enable) checkbox to publish the tool.
- Use specific tool names that clearly describe what the tool does (e.g.,
search_topics_by_subject). - If you need different operations such as list and detail, configure MCP on each endpoint separately.
For optimal results, make sure to fill in the endpoint summary and description.
Create and update content using a LLM
Expose write-capable endpoints (e.g., content create/update) as MCP tools so supported clients can create or edit content.
Create a data schema
As with the GET endpoint, generate a schema suitable for the content definition following the same procedure. Register the data definitions as shown below.
z.object({
  subject: z.string(),
  open_flg: z.number().int().gte(0).lte(1),
  ext_1: z.string()
});
Create the write endpoints
Create endpoint
On your Endpoint list screen, click [Add], then set:
| Field | Input |
|---|---|
| Path | topics-create |
| Category → Model → Operation | Content → Topics (v1) → insert |
| Parameters | topics_group_id: (target group ID) |
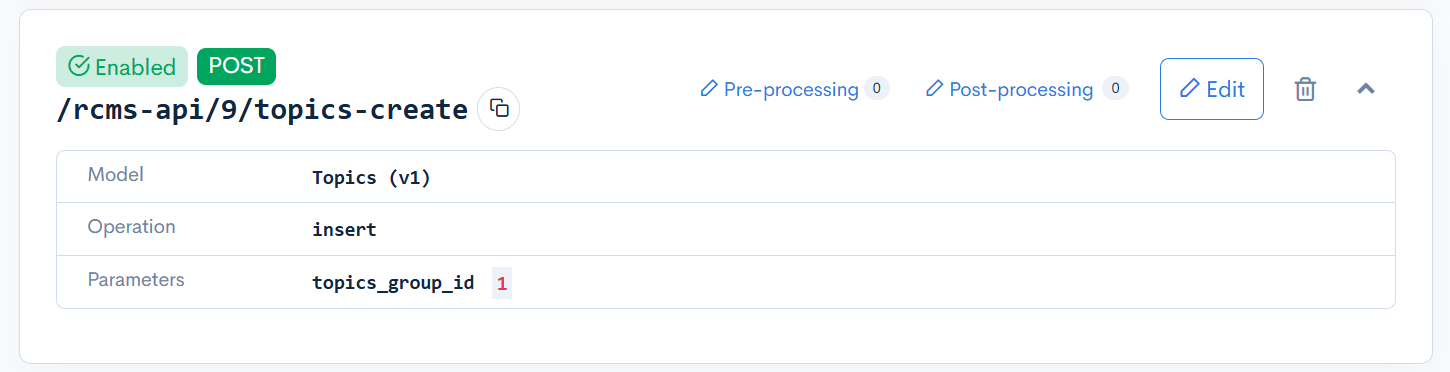
Click [Add] to save.
Update endpoint
On your Endpoint list screen, click [Add], then set:
| Field | Input |
|---|---|
| Path | topics-update/{topics_id} |
| Category → Model → Operation | Content → Topics (v1) → update |
| Parameters | topics_group_id: (target group ID) |

Enable MCP on the write endpoints
- Open the endpoint settings and navigate to the MCP settings section/tab.
- Tool name: Enter a unique, descriptive name(e.g.,
create_blog_post,update_blog_post). - Input schema: Select the schema that you created at the previous step. Output schema is optional and will not be used for this tutorial.
- Status: Check the status (enable) checkbox to publish the tool.

Write operations require dynamic authentication. Make sure your LLM client allows setting headers in the MCP configuration. Use the API swagger to generate a token for the client you want to use, then set it as a header in the client-side configuration.
For optimal results, make sure to fill in the endpoint summary and description.
Testing the MCP server using Claude Code
Claude Code supports remote HTTP transport and header authentication, making it easy to test read and write operations.
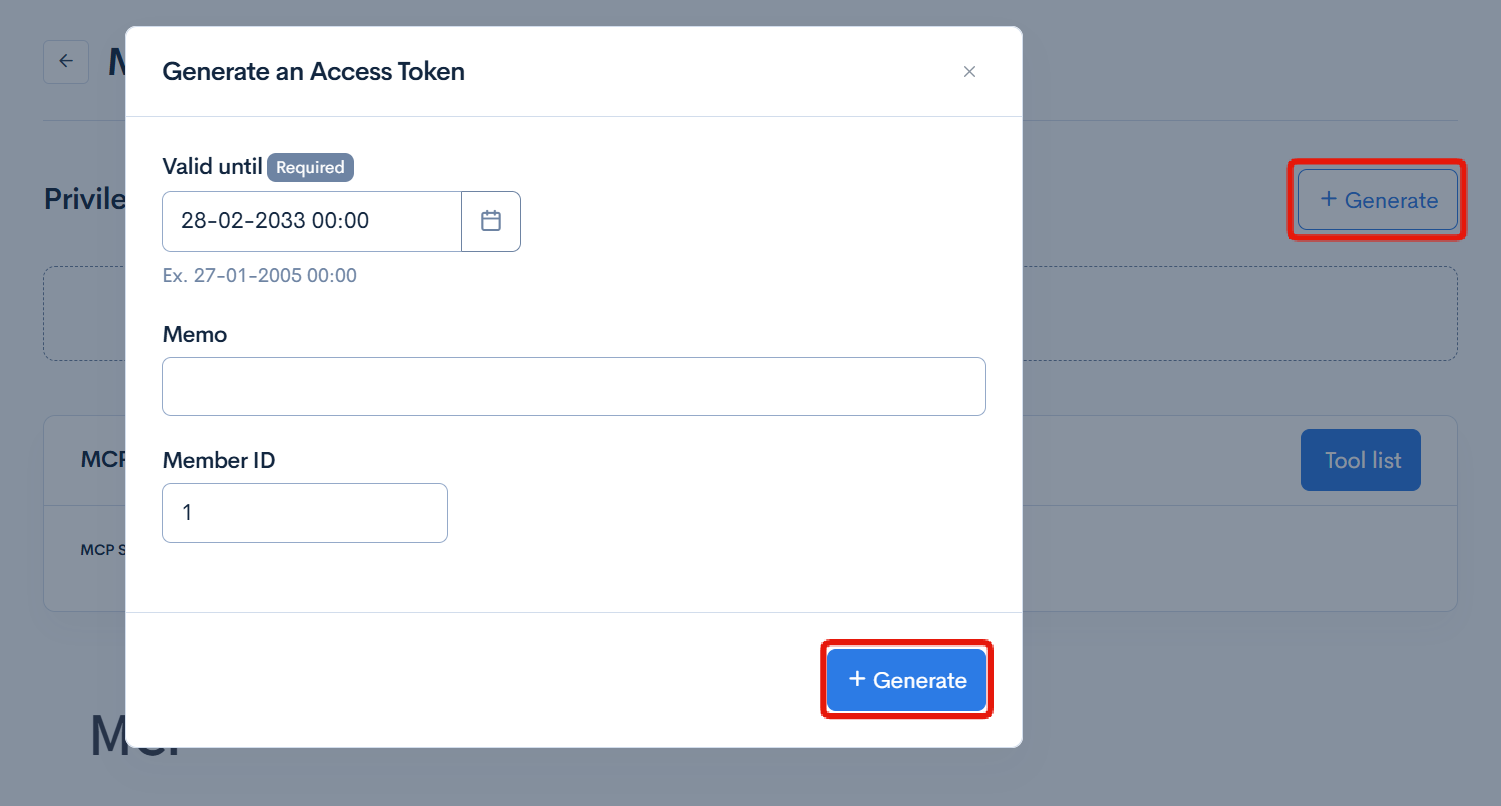
First, generate a token for your API. Access the Swagger UI of the target API, click the [Generate] button in the upper right corner, fill in the required information, and copy the generated token.
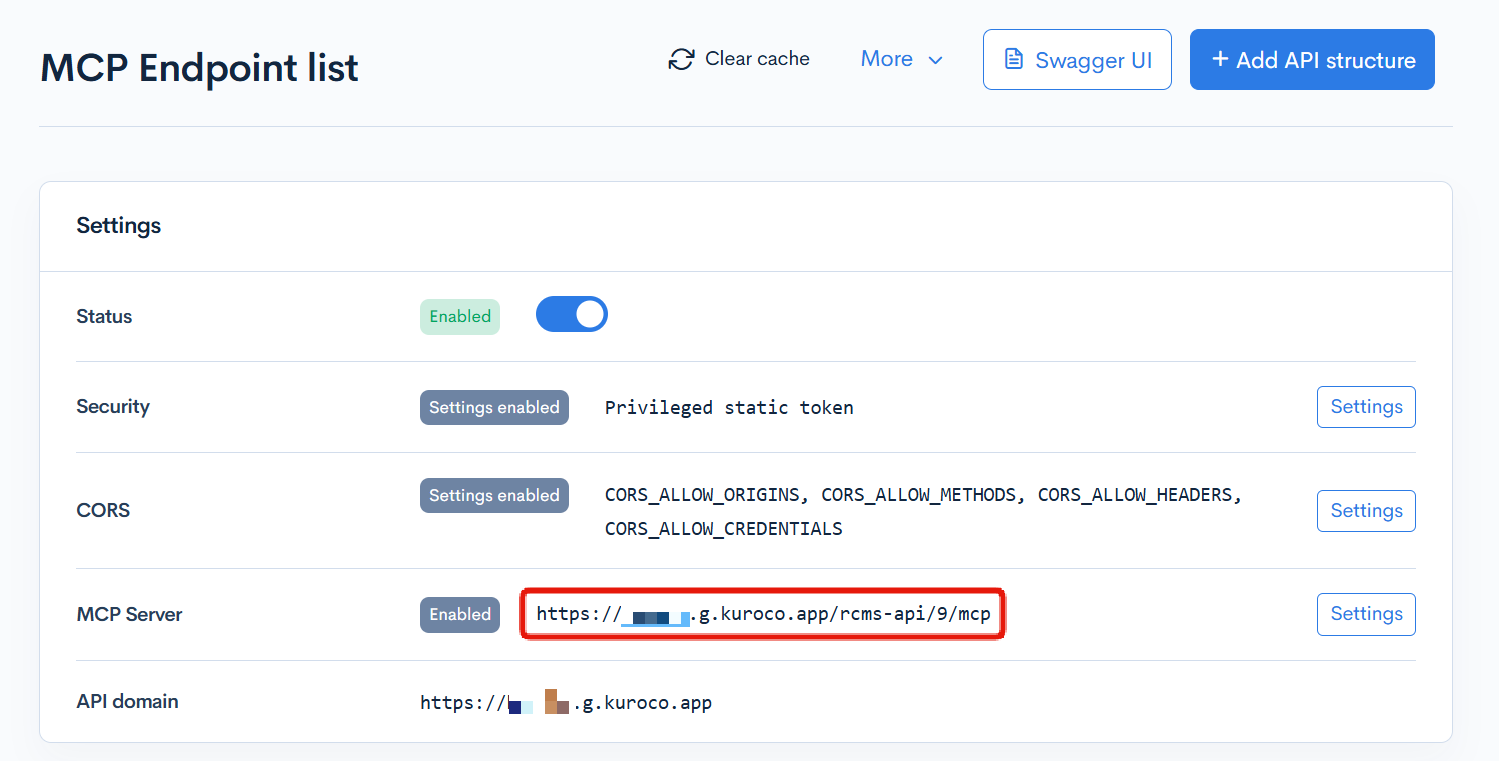
Next, confirm your MCP server URL. Open the API settings where you enabled the MCP server and copy the URL displayed there.
Register the Kuroco MCP server with Claude Code using the following command:
claude mcp add --transport http kuroco https://your-kuroco-domain.com/mcp --header "X-RCMS-API-ACCESS-TOKEN: <your-token>"
Once registered, you can retrieve Kuroco content or create and update content directly from Claude Code's chat.
Example prompt for reading:
Tell me about specialty foods from Hokkaido.
Example prompt for writing:
Create an article with the title "Test post" and ext_1 "This is a test post".
If the endpoint summary and description are properly configured, Claude Code will automatically select and call the appropriate MCP tool without needing to explicitly mention "from Kuroco" or similar phrases.
To verify that the MCP tools are correctly registered:
claude mcp list
To remove the MCP server after testing:
claude mcp remove kuroco
Client configuration
Detailed setup steps for each client are available in: MCP Client Configuration Reference.
The reference includes major chat/coding clients (Claude, ChatGPT Apps, Copilot, Codex/Cursor/Zed, GitHub Copilot, Jan, and custom implementations).
Support
If you have any other questions, please contact us or check out Our Slack Community.