Building a login page
This tutorial explains how to build a login page in your Nuxt.js project using Kuroco. As an example, we will implement a process that makes the content list screen viewable only by logged-in users as follows:
- Create an API and the corresponding endpoints
- Implement the login form
- Implement the login process (for each API security option)
This tutorial is written with the following versions:
Nuxt3: v3.8.0
Before you start
Nuxt.js project
This tutorial assumes that you have already created a Nuxt.js project using Kuroco. If you have not done so, see Tutorial: Creating a content list page with Kuroco and Nuxt.js.
API security
Kuroco offers 4 options for API security.
 The "None" option allows users to fetch data from the API without login, but all the other options require users to log in.
This tutorial walks you through how to build a login form on the front-end with the following security options:
- Cookies
- Dynamic access token
See: Management screen - API security for details on each of the security options.
See: Tutorial - How to check the API security using Swagger UI for details on the security settings.
Recommended browser
We recommend using Google Chrome for this tutorial, as you will be using Chrome developer tools for operation checks.
Creating your API and endpoints
Create an API
First, navigate to Kuroco's API management screen and click [Create new API].
 In the API editor dialog, enter the following setting values and click [Add].
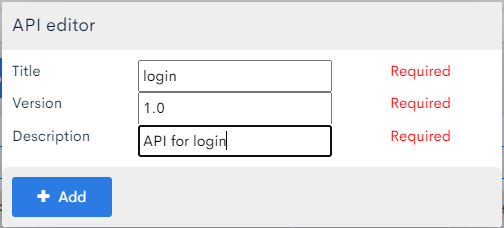
| Item | Setting |
|---|---|
| Title | login |
| Version | 1.0 |
| Description | API for login |
Refresh the screen to see the new API.
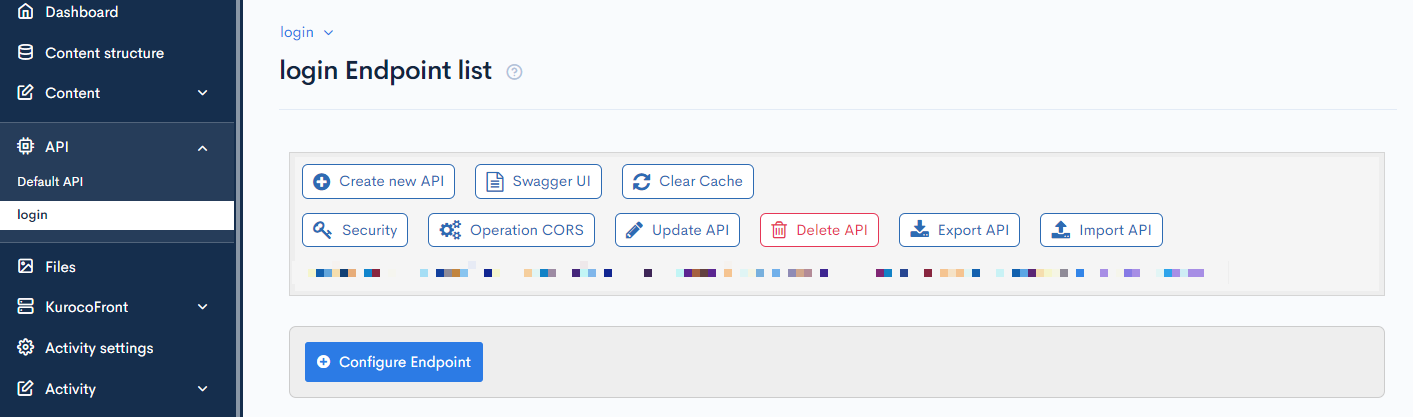
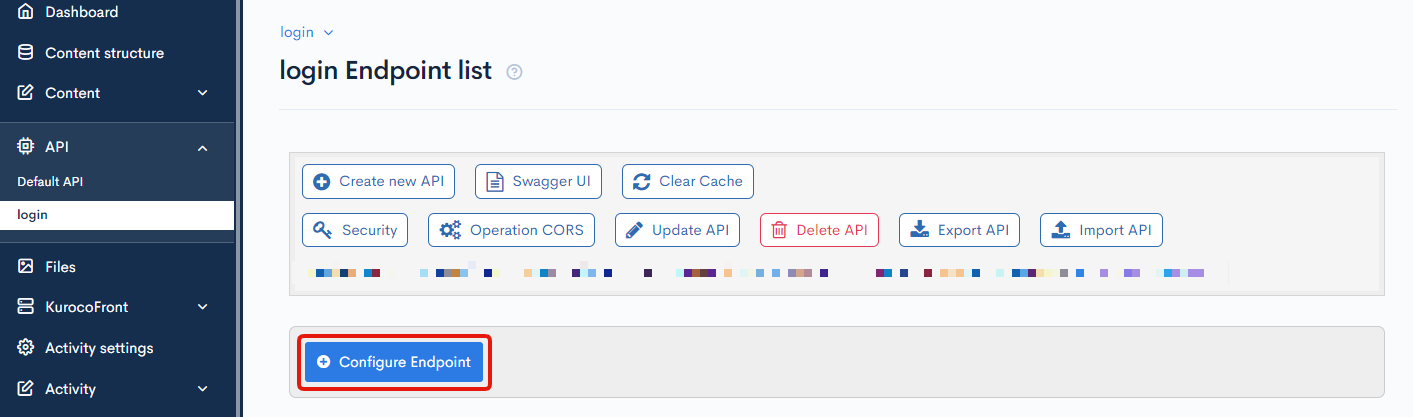
Create the endpoints
Next, create the following endpoints:
loginprofilelogouttoken(only for the "Dynamic access token" API security option)
Click the [Configure endpoint] button to create new endpoints.
A. Login endpoint
Use the settings below for the login endpoint.
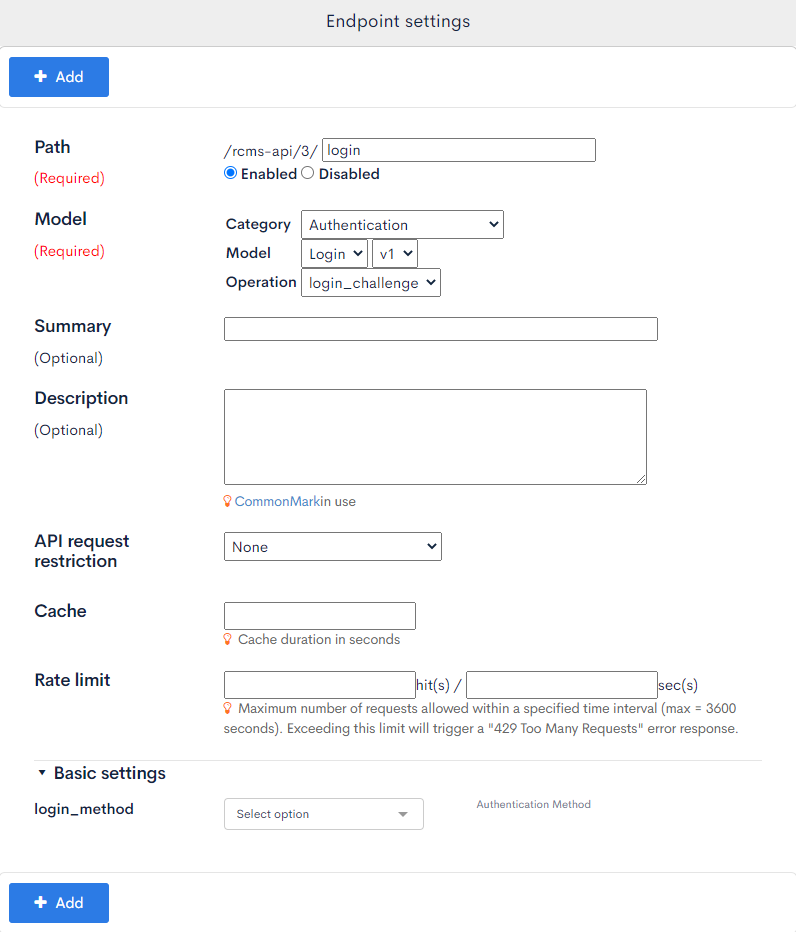
| Item | Setting |
|---|---|
| Path | login |
| Category | Authentication |
| Model | login v1 |
| Operation | login_challenge |
Click [Add] to save the endpoint.
B. Profile endpoint
Use the settings below for the profile endpoint.
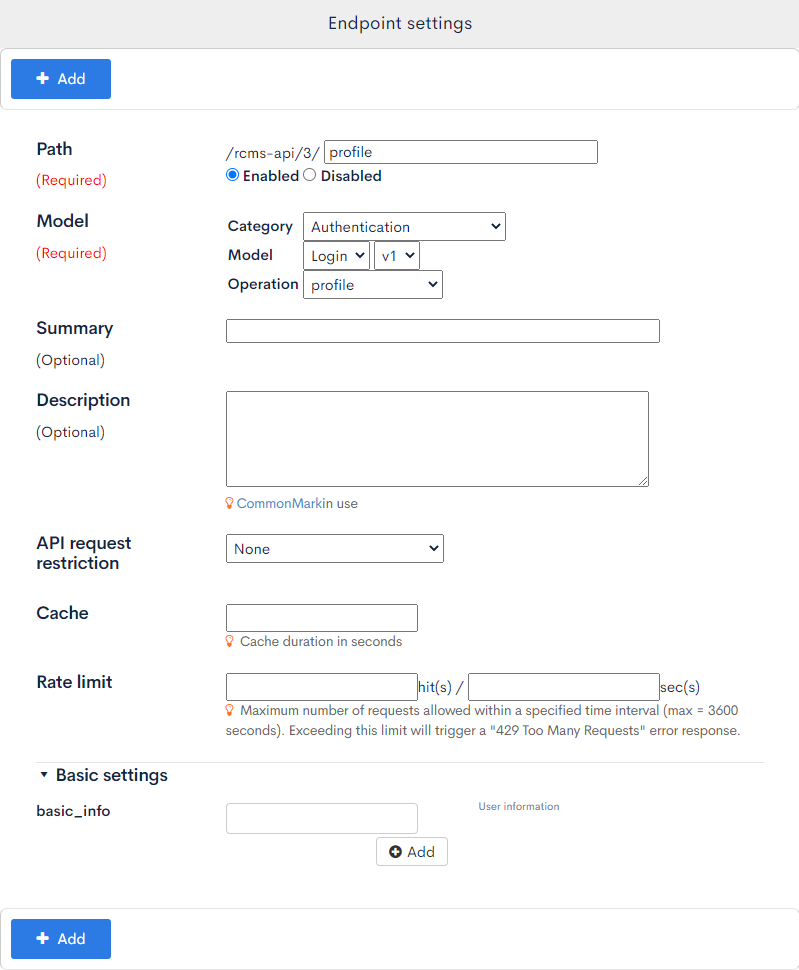
| Item | Setting |
|---|---|
| Path | profile |
| Category | Authentication |
| Model | login v1 |
| Operation | profile |
| API request restriction | GroupAuth: groups
|
| Basic settings: basic_info |
|
Click [Add] to save the endpoint.
The profile endpoint can easily retrieve accessing information on the user. Since we configured the authentication with GroupAuth, if a user is not logged in, the endpoint will return an error.
In the above example, we configured the endpoint to retrieve the values email, name1, and name2. In addition to returning basic user information, the endpoint also verifies if the active user is actually logged in when it is restoring the user's login status.
C. Logout endpoint
Use the settings below for the logout endpoint.
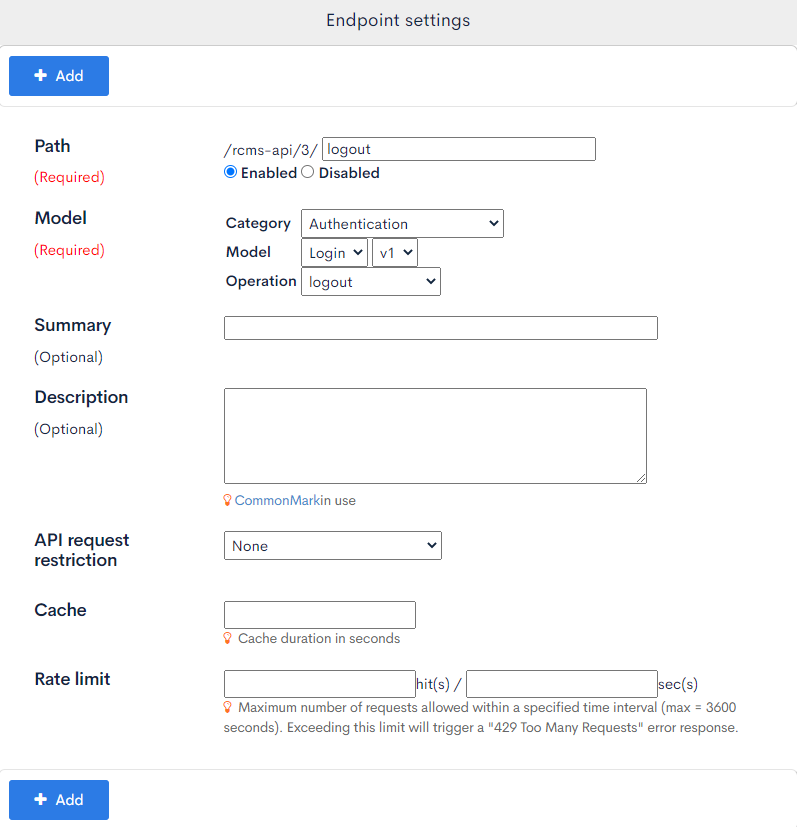
| Item | Setting |
|---|---|
| Path | logout |
| Category | Authentication |
| Model | login v1 |
| Operation | logout |
| API request restriction | None |
Click [Add] to save the endpoint.
D. Token endpoint
Use the settings below for the token endpoint.
This endpoint is only required when you are using dynamic access tokens. You do not need to create a token endpoint if you are using cookies.
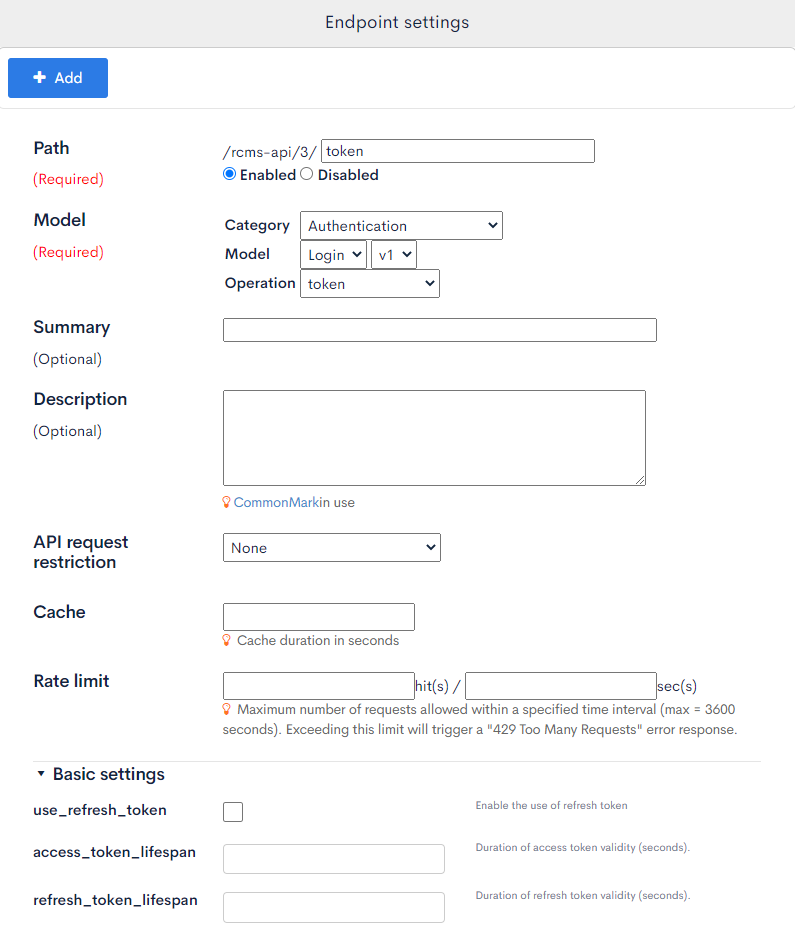
| Item | Setting |
|---|---|
| Path | token |
| Category | Authentication |
| Model | login v1 |
| Operation | token |
| API request restriction | None |
Click [Add] to save the endpoint.
Implementing the login form
After setting up all the necessary endpoints, implement a login form on the front-end according to the steps below.
Implement a dummy login form
First, we will create a login screen component without integrating with the API and implement a dummy login process. We will also restrict access to the notification list based on user login flags, and users who are not logged in will be redirected to the login screen.
To create the login screen component, make a new pages/login/index.vue file and paste the following code into it:
<template>
  <form @submit.prevent="login">
    <input v-model="email" name="email" type="email" placeholder="email" />
    <input
      v-model="password"
      name="password"
      type="password"
      placeholder="password" />
    <button type="submit">Login</button>
  </form>
</template>

<script setup>
  const config = useRuntimeConfig();

  const email = ref('');
  const password = ref('');

  function login() {
    console.log(email.value, password.value);
  }
</script>
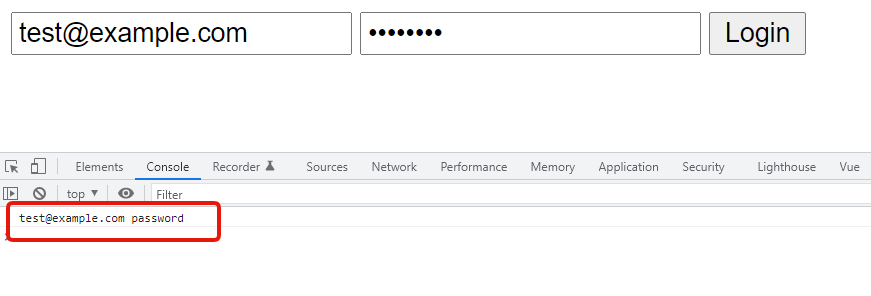
Run npm run dev in the command line and go to http://localhost:3000/login in your browser. You will see the simple login screen shown below.

With the Chrome Developer Tools console open, fill out the form and click [Login].
- Email:
test@example.com - Password:
password
Verify the console log. It should display the email and password you entered.
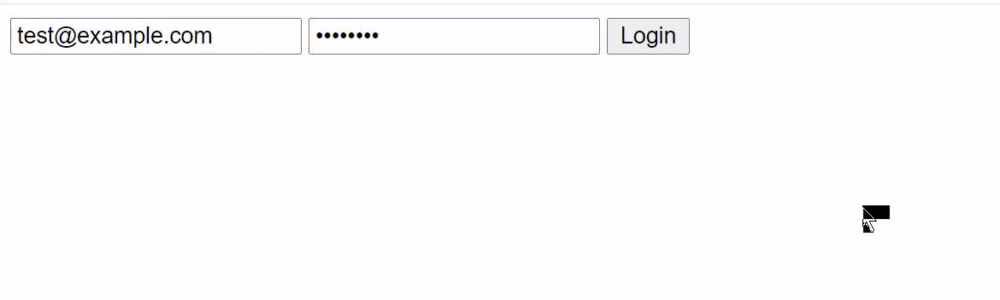
Then, send a request to the login API with the above values. For now, we will implement a temporary API integration just to verify the post-login operations. To do this, create a dummy process that sends a 1-second request, and modify it so that "Login successful" appears on the screen when the login request is successful:
<template>
  <form @submit.prevent="login">
+    <p v-if="loginStatus !== null" :style="{ color: resultMessageColor }">
+      {{ resultMessage }}
+    </p>
+
    <input v-model="email" name="email" type="email" placeholder="email" />
    <input
      v-model="password"
      name="password"
      type="password"
      placeholder="password"
    />
    <button type="submit">Login</button>
  </form>
</template>

<script setup>
const config = useRuntimeConfig();

const email = ref("");
const password = ref("");
+const loginStatus = ref(null);
+const resultMessage = ref(null);

+let resultMessageColor = computed(() => {
+  switch (loginStatus.value) {
+    case "success":
+      return "green";
+    case "failure":
+      return "red";
+    default:
+      return "";
+  }
+});
+
-function login() {
-    console.log(email.value, password.value)
+async function login() {
+  // Dummy request(Succeed/fail after 1 sec.)
+  const shouldSuccess = true
+  const request = new Promise((resolve, reject) =>
+      setTimeout(
+          () => (shouldSuccess ? resolve() : reject(Error('login failure'))),
+          1000
+      )
+  )
+  try {
+      await request
+      loginStatus.value = 'success'
+      resultMessage.value = 'Login successful'
+  } catch (e) {
+      loginStatus.value = 'failure'
+      resultMessage.value = 'Login failed'
+  }
}
</script>
You should see the message "Login successful" after a 1-second delay.
 Now, verify the operation when the login fails. In the source code, change
 shouldSuccess = true to shouldSuccess = false. This should return an error when you click [Login].
 Afterwards, make sure to change the source code to
 shouldSuccess = true again.
Store user login status
Prerequisites
You need to install Pinia package to create a store that will keep all your login related processes. Install pinia by using this command:
npx nuxi@latest module add pinia
This will add both @pinia/nuxt and pinia to your project. If you notice that pinia is not installed, please install it manually with your package manager: npm i pinia.
If you're using npm, you might encounter an ERESOLVE unable to resolve dependency tree error. In that case, add the following to your package.json:
"overrides": {
  "vue": "latest"
}
Now you need to add it to modules in your nuxt.config.js file:
// nuxt.config.js
export default defineNuxtConfig({
  // ... other options
  modules: [
    // ...
    '@pinia/nuxt',
  ],
})
Additionally, please add a plugins/pinia.js file.
import { createPinia } from 'pinia';
export default defineNuxtPlugin((nuxtApp) => {
  const pinia = createPinia();
  nuxtApp.vueApp.use(pinia);
});
A. Create a store
First, create a store to maintain the user's login status across the entire web app first that can be referenced by other screens.
Make a new stores/authentication.js file and paste the code below into it:
import {defineStore} from 'pinia';

export const useStore = defineStore('authentication', {
  state: () => ({
    profile: null,
  }),
  actions: {
    setProfile(profile) {
      this.profile = profile;
    },
  },
  getters: {
    authenticated: (state) => state.profile !== null,
  },
});
The authenticated state under getters returns a value of true or false, depending on whether the profile data (which you will generate later) is empty.
If it is non-empty, the status will recognized as logged in. The profile data will be automatically retrieved when logging in later or when restoring the login state. A value will not be set in other cases, such as when the user logs out.
B. Create middleware
Next, create a new middleware/auth.js file containing the following code:
import { useStore } from '~/stores/authentication';

export default defineNuxtRouteMiddleware((to) => {
  const store = useStore();

  // Define public paths that don't require authentication (add any login pages that don't require authentication)
  const publicPaths = ['/login'];

  // Allow access if the current path is public
  if (publicPaths.some(path => to.path.startsWith(path))) {
    return;
  }

  if (!store.authenticated) {
    return navigateTo('/login');
  }
});
"Middleware" refers to the operation before the source page/*.vue process for each screen. A value of false for the authenticated parameter of the store redirects the user to the login screen.
C. Verify the middleware operation
Insert the following code into pages/login/index.vue to add a link to the news list page:
         <button type="submit">
             Login
         </button>
+
+        <div>
+            <nuxt-link to="/news">
+                news list
+            </nuxt-link>
+        </div>
     </form>
 </template>
Also, modify the source code in pages/news/index.vue to apply the middleware.
<script setup>
+  definePageMeta({
+    middleware: ["auth"],
+  });
...
With this process in place, users will have to log in to access the news list page. Non-logged-in visitors will be redirected to the login screen.
Next, modify pages/login/index.vue so that the profile object under store is not null:
<script setup>
+import { useStore } from "~/stores/authentication";
+const store = useStore();

...
             try {
                 await request
+                store.setProfile({}); // Apply the dummy object to store.state.profile
+
                 loginStatus.value = 'success'
                 resultMessage.value = 'Login successful'
             } catch (e) {
Verify that you can access the news list page after logging in.
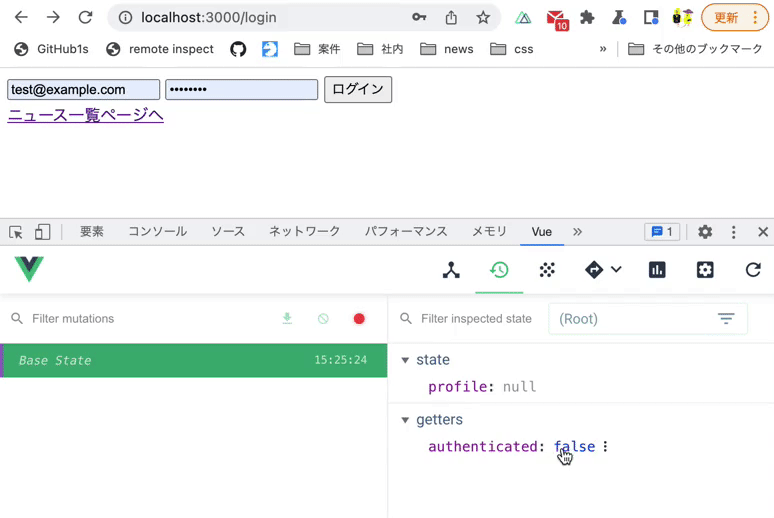
Use Vue.js devtools to verify the above operation.
Implement a restore function for login status
The above steps implement the normal login process. However, one problem remains: When users refresh the screen or access the URL directly, they are redirected to the login page even if they have already logged in. In the above operation, the profile object under store becomes null when Nuxt is initialized. Therefore, logged-in users appear to be logged out to Nuxt.
We will implement the following two-part solution for this problem:
- Once the user logs in, we set a flag in LocalStorage.
- A flag value of
trueapplies dummy data to theprofileobject instore.
First, modify the code in /stores/authentication.js as shown below:
    setProfile(profile) {
        this.profile = profile
    },
+    async restoreLoginState() {
+      const authenticated = localStorage.getItem("authenticated");
+      const isAuthenticated = authenticated ? JSON.parse(authenticated) : false;
+
+      if (!isAuthenticated) {
+        throw new Error("need to login");
+      }
+      try {
+        this.setProfile({}); // Store the dummy object.
+      } catch {
+        throw new Error("need to login");
+      }
+    },
   },
   getters: {
     authenticated: (state) => state.profile !== null,
Also, modify /middleware/auth.js as follows:
 import { useStore } from '~/stores/authentication';

-export default defineNuxtRouteMiddleware((to) => {
+export default defineNuxtRouteMiddleware(async (to, from) => {
   const store = useStore();

   // Define public paths that don't require authentication (add any login pages that don't require authentication)
   const publicPaths = ['/login'];

   // Allow access if the current path is public
   if (publicPaths.some(path => to.path.startsWith(path))) {
     return;
   }

   if (!store.authenticated) {
-    return navigateTo('/login');
+    try {
+      await store.restoreLoginState();
+    } catch (err) {
+      return navigateTo('/login');
+    }
   }
 });
Verify 4 behaviors on the news list page:
- When the
authenticatedvalue in LocalStorage isfalse, you are redirected to the login screen. - When the
authenticatedvalue in LocalStorage istrue, you are NOT redirected to the login screen. - When the
authenticatedvalue in LocalStorage istrueand you refresh the page, you are NOT redirected to the login screen. - When the
authenticatedvalue in LocalStorage isfalseand you refresh the page, you are redirected to the login screen.
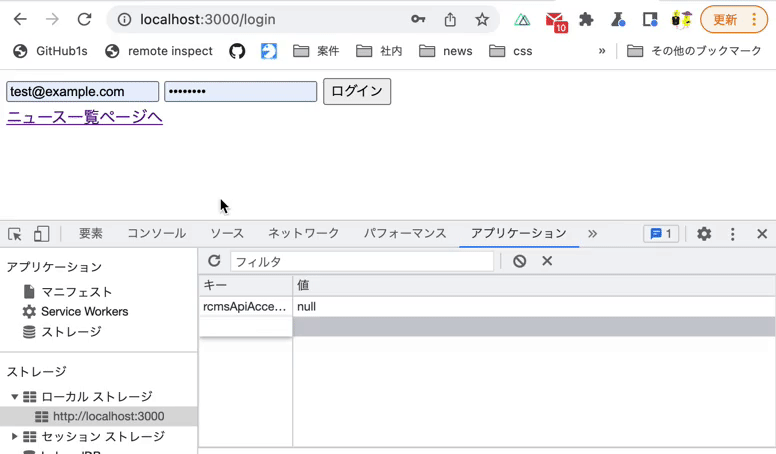
This time, we will check the state of LocalStorage using the [Application] tab in Chrome Developer Tools.
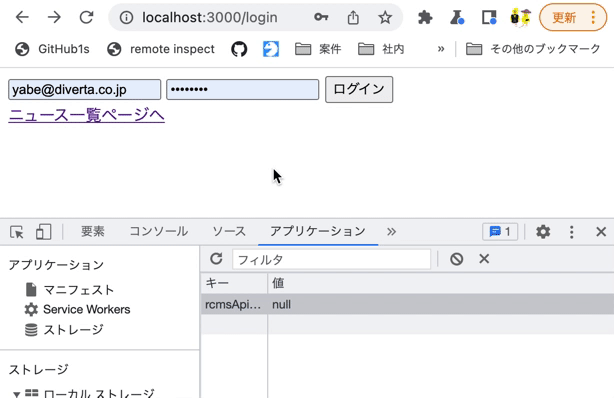
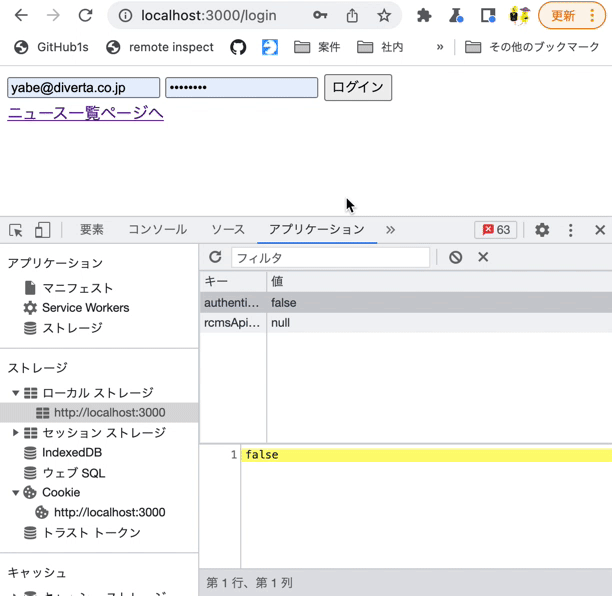
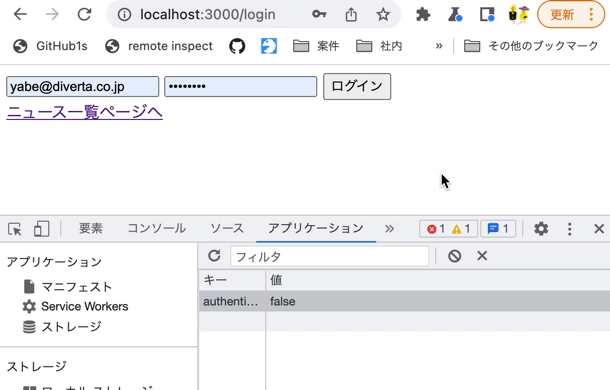
Click the [Application] tab in Chrome Developer Tools, then navigate to [Storage] -> [Local Storage] -> [http://localhost:3000].
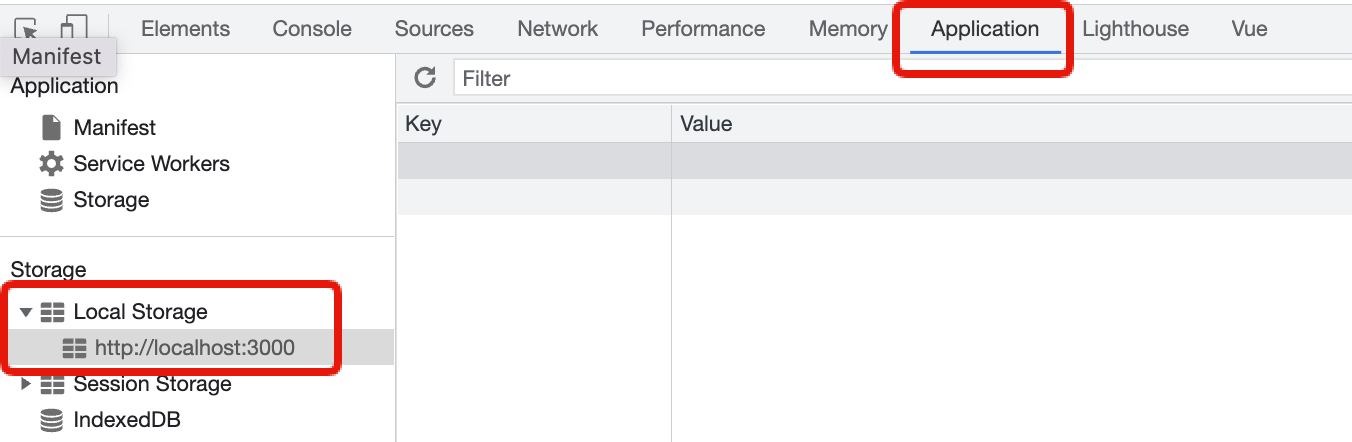
After logging in from the login page, enter authenticated as the Key and true or false as the Value, and confirm the four actions mentioned above.
Configure the login operation
Next, configure the login operation so that authenticated in LocalStorage takes a value of true when the login is successful. Also, move some parts of the login process to store for future revisions. Modify /pages/login/index.vue as follows:
 async function login () {
-    // Dummy request(Succeed/fail after 1 sec.)
-    const shouldSuccess = true
-    const request = new Promise((resolve, reject) =>
-        setTimeout(
-            () => (shouldSuccess ? resolve() : reject(Error('login failure'))),
-            1000
-        )
-    )
-
     try {
-        await request
-        store.setProfile({}) // Apply the dummy object to store.state.profile
+        const payload = {
+            email: email.value,
+            password: password.value
+        }
+        await store.login(payload)

         loginStatus.value = 'success'
         resultMessage.value = 'Login Successful'
And modify /stores/authentication.js as shown below:
...
  actions: {
     setProfile (profile) {
         this.profile = profile
     },
+    updateLocalStorage(payload) {
+      Object.entries(payload).forEach(([key, val]) => {
+        if (val === null || val === false) {
+          localStorage.removeItem(key);
+        } else {
+          localStorage.setItem(key, JSON.stringify(val));
+        }
+      });
+    },
+    async login (payload) {
+        // dummy request(succeed/fail after 1 sec.)
+        const shouldSuccess = true
+        const request = new Promise((resolve, reject) =>
+            setTimeout(
+                () => (shouldSuccess ? resolve() : reject(Error('login failure'))),
+                1000
+            )
+        )
+        await request
+
+        this.setProfile({}) // Apply the dummy object to store.state.profile
+        this.updateLocalStorage({ authenticated: true })
+    },
     async restoreLoginState () {
         const authenticated = JSON.parse(localStorage.getItem('authenticated'))
Verify that an authenticated key value of true is returned upon successful login.
After the front-end implementation, the next step is to implement the API. The method to do this differs depending on the API security option selected.
This tutorial explains the implementation process for cookie and dynamic access token authentication. Refer to the correct process below for your API security settings:
- A. Cookies
- B. Dynamic access token
A. Login process implementation (Cookies)
The next step is to modify the above dummy login process to access the login endpoint.
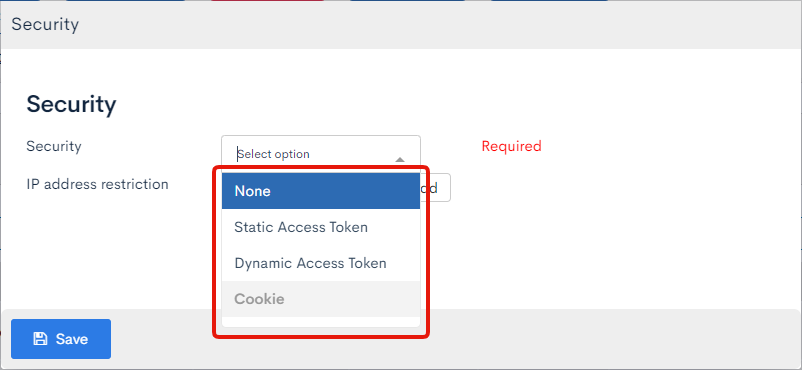
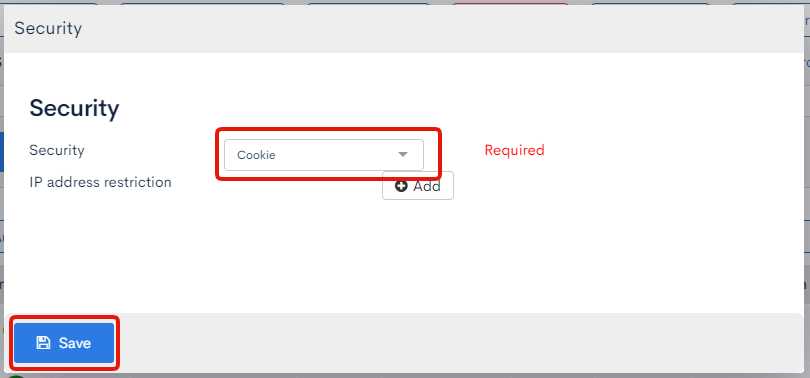
In the Kuroco admin panel sidebar, click [API] -> [login]. Then click [Security] on the endpoint list screen.
 In the
 Security dropdown list, select [Cookie] and click [Save].
Implement requests to the login endpoint
Modify stores/authentication.js as shown below:
...
     async login(payload) {
-      // dummy request(succeed/fail after 1 sec.)
-      const shouldSuccess = true;
-      const request = new Promise((resolve, reject) =>
-        setTimeout(
-          () => (shouldSuccess ? resolve() : reject(Error("login failure"))),
-          1000
-        )
-      );
-      await request;
+      await $fetch("/rcms-api/1/login", {
+        method: "POST",
+        body: JSON.stringify(payload),
+        baseURL: useRuntimeConfig().public.apiBase,
+        credentials: "include",
+      });

       this.setProfile({}); // Apply the dummy object to store.state.profile
       this.updateLocalStorage({ authenticated: true})
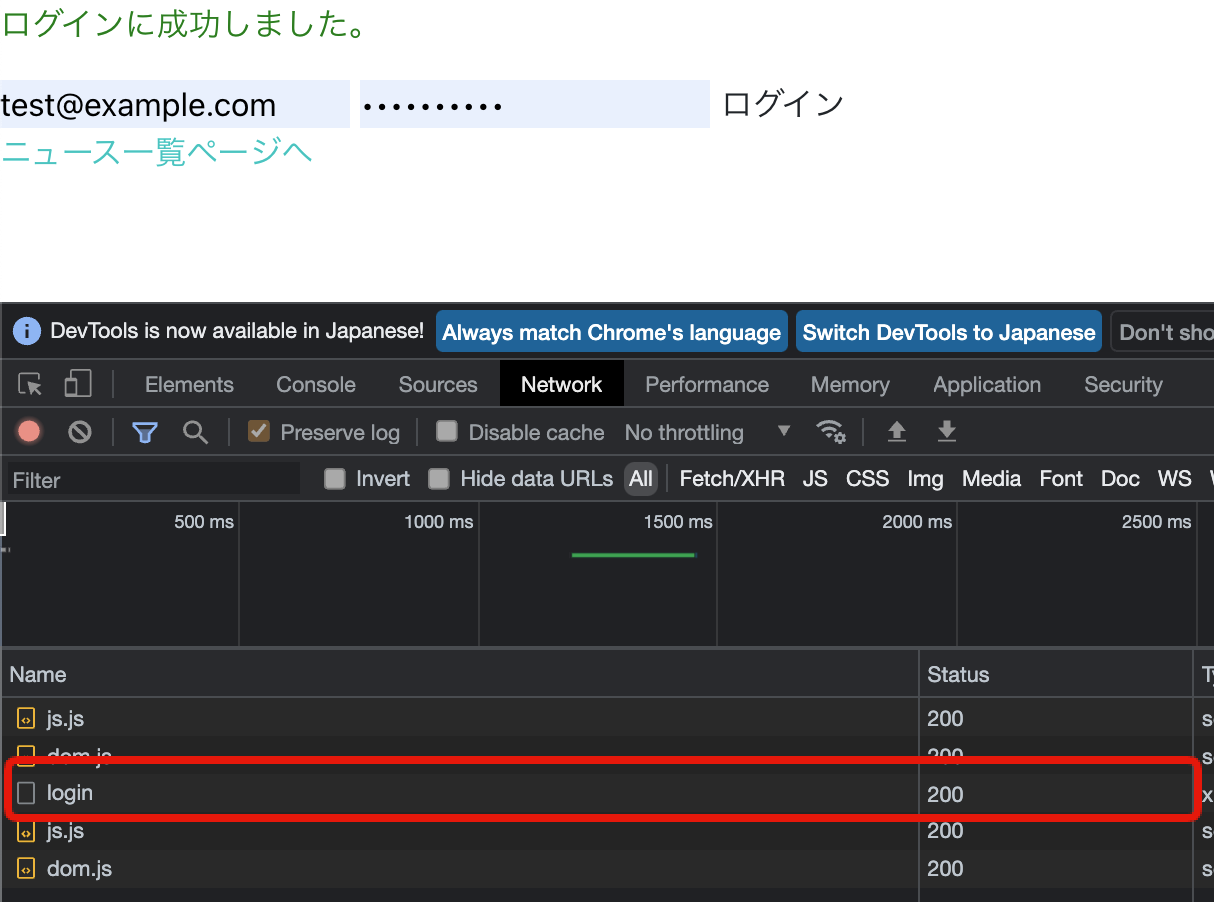
Next, verify if the login endpoint is receiving the request.
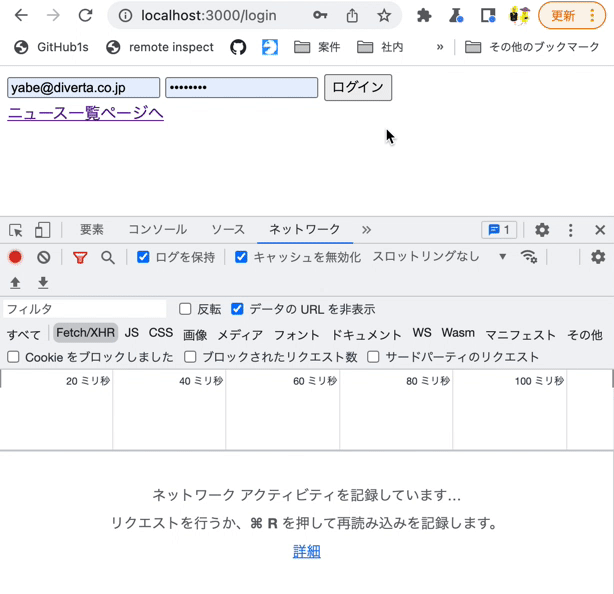
Log in from the login page with the Chrome developer tools [Network] tab open. You should see the request sent to the login endpoint.
Implement request/handling to the profile endpoint
In the above implementation, you have been using the authenticated flag of the browser's local storage to determine if a user is logged in. However, LocalStorage can be easily altered in the browser. Also, depending on the expiration date of the session, a request to other endpoints may return an access error even when the value of authenticated is true. To prevent such errors, we will implement an additional check by accessing the API.
Double-checking does not necessarily have to be done via the profile endpoint, but since many use cases require data returned by the profile—such as displaying the logged-in user's name—it has become standard practice to use the profile endpoint.
To do this, modify /stores/authentication.js as shown below:
...
 actions: {
   async login(payload) {
      await $fetch("/rcms-api/1/login", {
        method: "POST",
        body: JSON.stringify(payload),
        baseURL: useRuntimeConfig().public.apiBase,
        credentials: "include",
      });
-    this.setProfile({}) // store a dummy object.
+    const profileRes = await $fetch("/rcms-api/1/profile", {
+        baseURL: useRuntimeConfig().public.apiBase,
+        credentials: "include",
+      });
+    this.setProfile(profileRes)
     this.updateLocalStorage({ authenticated: true })
   },
   async restoreLoginState() {
     const authenticated = JSON.parse(localStorage.getItem("authenticated"));

     if (!authenticated) {
       throw new Error('need to login')
     }
     try {
-      this.setProfile({}); // Store the dummy object.
+      const profileRes = await $fetch("/rcms-api/1/profile", {
+        baseURL: useRuntimeConfig().public.apiBase,
+        credentials: "include",
+      });
+      this.setProfile(profileRes);
     } catch {
       throw new Error("need to login");
     }
   },
  },
  getters: {
    authenticated: (state) => state.profile !== null,
  },
});
After logging in, refresh your browser and navigate to the news list page. Verify that the login status is restored.
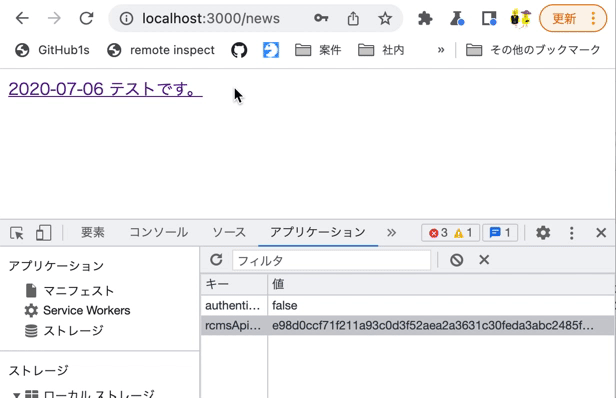
On the login page, log in with the Chrome developer tools [Application] tab open. You should see that authenticated has a value of true.
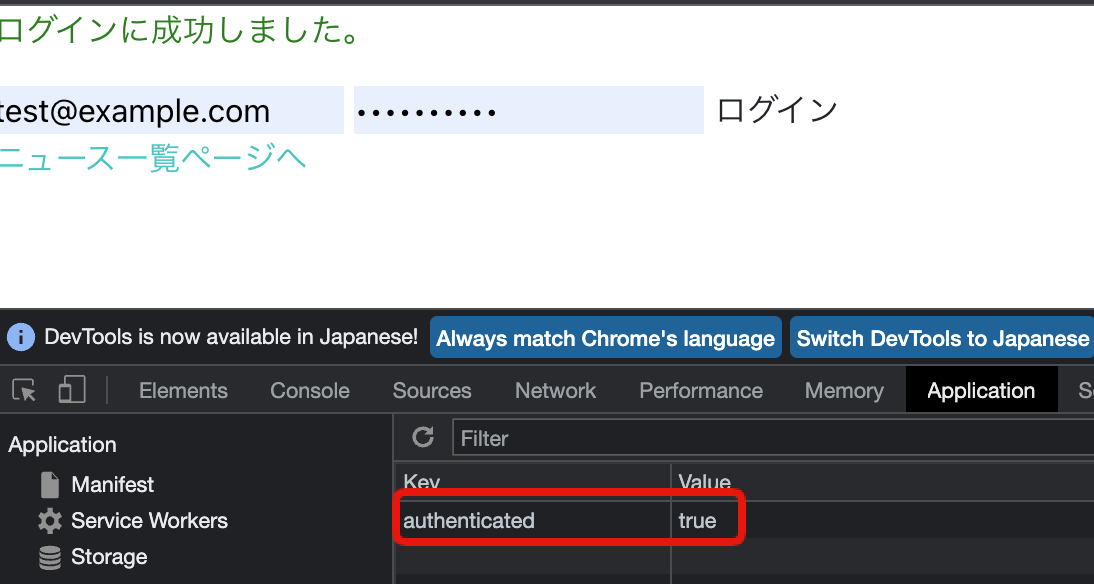
Then, verify that the value remains true even if you click the link back to the news list page.
Implement request/handling to the logout endpoint
The next step is to implement the logout process.
Sometimes, you may encounter unexpected behaviors, such as when you log in again on the front-end side during an ongoing session on Kuroco's back-end. Therefore, to determine if a user is logged in, you need to send a logout request to the API.
To do this, modify /stores/authentication.js as shown below:
...
-    async restoreLoginState () {
+    async logout() {
+      try {
+        await $fetch("/rcms-api/1/logout", {
+          method: "POST",
+          baseURL: useRuntimeConfig().public.apiBase,
+          credentials: "include",
+        });
+      } catch {
+        /** No Process */
+        /** When it returns errors, it consider that logout is complete and ignore this process. */
+      }
+      this.setProfile(null);
+      this.updateLocalStorage({ authenticated: false });
+
+      navigateTo("/login");
+    },
+    async restoreLoginState () {
         const authenticated = JSON.parse(localStorage.getItem('authenticated'))

         if (!authenticated) {
           throw new Error('need to login')
         }
         try {
         const profileRes = await $fetch("/rcms-api/1/profile", {
           baseURL: useRuntimeConfig().public.apiBase,
           credentials: "include",
         });
         this.setProfile(profileRes);
       } catch {
+        await this.logout();
         throw new Error("need to login");
       }
     },
   },
   getters: {
    authenticated: (state) => state.profile !== null,
  },
});
And add a logout button to the news list page as follows:
<template>
   <div>
+    <button type="button" @click="logout">Logout</button>
     <p>News list</p>
     <div v-for="n in response.list" :key="n.slug">
       <nuxt-link :to="`/news/${n.topics_id}`">
@@ -10,6 +11,7 @@
</template>

<script setup>
+import { useStore } from "~/stores/authentication";
 definePageMeta({
   middleware: ["auth"], // Use the 'auth' middleware defined in middleware/auth.ts
 });
 const config = useRuntimeConfig(); //please add this line if not added already
@@ -18,4 +20,6 @@ const { data: response } = await useFetch("/rcms-api/1/news", {
   baseURL: config.public.apiBase,
   credentials: "include",
 });
+const store = useStore();
+const logout = () => store.logout();
</script>
After logging in, go to the news list page and click the logout button. Verify the following behaviors:
- The logout endpoint receives a request.
- You are redirected to the login page.
- If you access the news list page without logging in, you are also redirected to the login page.
This concludes the login process implementation for cookie-based API authentication.
B. Login process implementation (Dynamic access token)
The next step is to modify the above dummy login process to access the login endpoint.
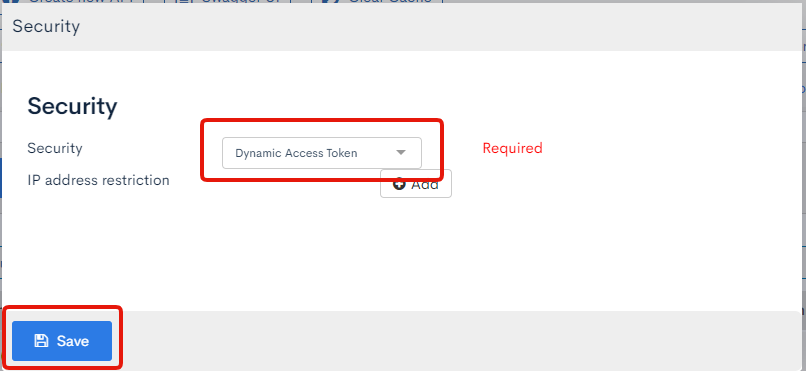
In Kuroco's admin panel sidebar, click [API] -> [login]. Then click [Security] on the endpoint list screen.
In the Security dropdown list, select [Dynamic access token] and click [Save].
Implement requests to the login and token endpoints
Modify stores/authentication.js as shown below:
...
     async login(payload) {
-      // dummy request(succeed/fail after 1 sec.)
-      const shouldSuccess = true;
-      const request = new Promise((resolve, reject) =>
-        setTimeout(
-          () => (shouldSuccess ? resolve() : reject(Error("login failure"))),
-          1000
-        )
-      );
-      await request;
+      const { grant_token } = await $fetch("/rcms-api/1/login", {
+          method: "POST",
+          baseURL: useRuntimeConfig().public.apiBase,
+          credentials: "include",
+          body: payload,
+      });
+      const { access_token } = await $fetch("/rcms-api/1/token", {
+          method: "POST",
+          baseURL: useRuntimeConfig().public.apiBase,
+          credentials: "include",
+          body: { grant_token: grant_token },
+      });

        this.setProfile({}) // Apply the dummy object to store.state.profile
        this.updateLocalStorage({ authenticated: true })
Next, verify if the login and token endpoints is receiving the requests.
Log in from the login page with the Chrome developer tools [Network] tab open. You should see the requests sent to both endpoints.
Store the token values
Up to this point, whether the user is logged in or not has been determined by the authenticated flag in LocalStorage.
However, with dynamic access tokens, endpoints that require authentication need the actual token value.
Therefore, we will replace authenticated with token and store the token value instead.
Modify middleware/auth.js as follows:
import { useStore } from '~/stores/authentication';

export default defineNuxtRouteMiddleware(async (to, from) => {
  const store = useStore();

  // Define public paths that don't require authentication (add any login pages that don't require authentication)
  const publicPaths = ['/login'];

  // Allow access if the current path is public
  if (publicPaths.some(path => to.path.startsWith(path))) {
    return;
  }

-  if (!store.authenticated) {
+  if (!store.access_token) {
    try {
      await store.restoreLoginState();
    } catch (err) {
      return navigateTo('/login');
    }
  }
});
Next, adjust the logic so that it is also used in stores/authentication.js.
import { defineStore } from "pinia";

export const useStore = defineStore("authentication", {
  state: () => ({
    profile: null,
+    access_token: "",
  }),
   actions: {
    ...
+    updateLocalStorage(payload) {
+      Object.entries(payload).forEach(([key, val]) => {
+        if (val === null || val === false) {
+          localStorage.removeItem(key);
+        } else {
+          localStorage.setItem(key, JSON.stringify(val));
+        }
+      });
+    },
     async login (payload) {
        const { grant_token } = await $fetch("/rcms-api/1/login", {
        method: "POST",
        baseURL: useRuntimeConfig().public.apiBase,
        credentials: "include",
        body: payload,
      });
      const { access_token } = await $fetch("/rcms-api/1/token", {
        method: "POST",
        baseURL: useRuntimeConfig().public.apiBase,
        credentials: "include",
        body: { grant_token: grant_token },
      });

+        this.updateLocalStorage({ rcmsApiAccessToken: access_token.value })
+        this.access_token = access_token.value
+
         this.setProfile({}) // Apply the dummy object to store.state.profile
-        this.updateLocalStorage({ authenticated: true })
     },
     async restoreLoginState () {
-        const authenticated = JSON.parse(localStorage.getItem('authenticated'))
+        const rcmsApiAccessToken = JSON.parse(localStorage.getItem('rcmsApiAccessToken'))
-        if (!authenticated) {
+        if (!rcmsApiAccessToken) {
             throw new Error('need to login')
         }
         this.setProfile({}) // store dummy object.
     }
 }
Verify the operation by logging in on the login page with the Chrome developer tools [Network] tab open. You should see the token value stored in rcmsApiAccessToken.

Implement request/handling to the profile endpoint
In the above implementation, you have been using the authenticated flag of the browser's local storage to determine if a user is logged in. However, LocalStorage can be easily altered in the browser. Also, depending on the expiration date of the session, a request to other endpoints may return an access error even when the value of authenticated is true. To prevent such errors, we will implement an additional check by accessing the API.
To do this, modify /stores/authentication.js as shown below:
export const useStore = defineStore('authentication', {
  state: () => ({
    profile: null,
    access_token: "",
  }),
  actions: {
    setProfile(profile) {
      this.profile = profile;
    },
    updateLocalStorage(payload) {
      Object.entries(payload).forEach(([key, val]) => {
        if (val === null || val === false) {
          localStorage.removeItem(key);
        } else {
          localStorage.setItem(key, JSON.stringify(val));
        }
      });
    },
    async login(payload) {
      const { grant_token } = await $fetch("/rcms-api/1/login", {
          method: "POST",
          baseURL: useRuntimeConfig().public.apiBase,
          credentials: "include",
          body: payload,
      });
      const { access_token } = await $fetch("/rcms-api/1/token", {
          method: "POST",
          baseURL: useRuntimeConfig().public.apiBase,
          credentials: "include",
          body: { grant_token: grant_token },
      });

      this.updateLocalStorage({ rcmsApiAccessToken: access_token.value })
      this.access_token = access_token.value

-      this.setProfile({}) // Apply the dummy object to store.state.profile
+      const { authFetch } = useAuthFetch(this.access_token);
+      const profileRes = await authFetch("/rcms-api/1/profile", {
+        baseURL: useRuntimeConfig().public.apiBase,
+      });
+      this.setProfile(profileRes);
    },
    async restoreLoginState() {
      const rcmsApiAccessToken = JSON.parse(localStorage.getItem('rcmsApiAccessToken'))

      if (!rcmsApiAccessToken) {
        throw new Error("need to login");
      }
+      this.access_token = rcmsApiAccessToken;
      try {
-      this.setProfile({}) // Apply the dummy object to store.state.profile
+        const { authFetch } = useAuthFetch(this.access_token);
+        const profileRes = await authFetch("/rcms-api/1/profile", {
+          baseURL: useRuntimeConfig().public.apiBase,
+        });
+        this.setProfile(profileRes);
      } catch {
        throw new Error("need to login");
      }
     }
  },
  getters: {
    authenticated: (state) => state.profile !== null,
    token: (state) => state.access_token,
  },
});
We will also implement a mechanism to attach the dynamic access token to endpoints throughout the application using a composable.
Create the following composables/authFetch.js file:
export const useAuthFetch = (accessToken = null) => {
  // If no token provided, try to get it from store
  let token = accessToken;
  if (!token) {
    const store = useStore();
    token = store.access_token;
  }

  const authFetch = (url, config = {}) => {
    return $fetch(url, {
      ...config,
      headers: {
        ...(config.headers || {}),
        "X-RCMS-API-ACCESS-TOKEN": token,
      },
    });
  };

  return { authFetch };
};
After logging in, refresh your browser and navigate to the news list page. Verify that the login status is restored.
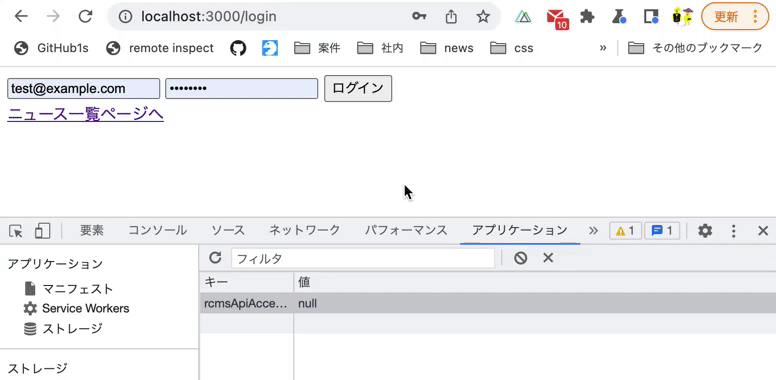
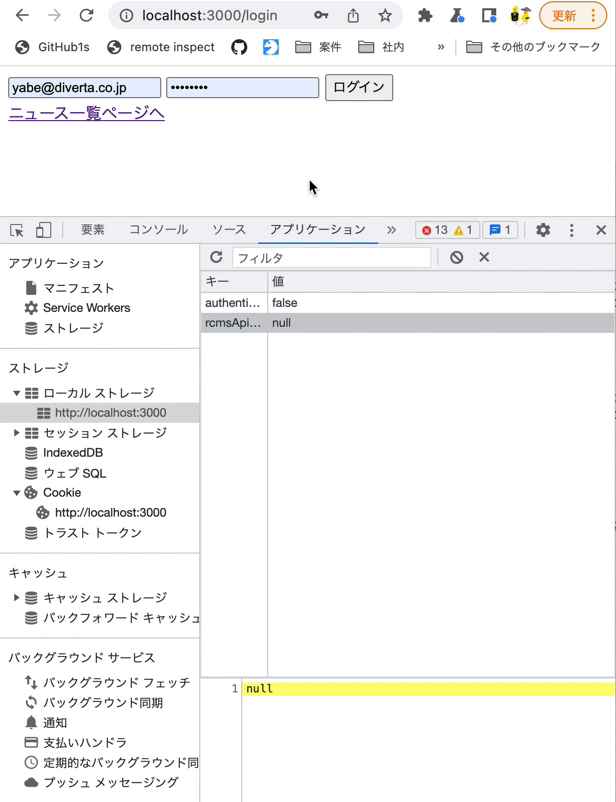
On the login page, log in with the Chrome developer tools [Application] tab open. You should see the token value stored in rcmsApiAccessToken.
Also, modify rcmsApiAccessToken in LocalStorage using the Chrome developer tools and verify that you are redirected to the login screen at the time of restoration.
Implement request/handling to the logout endpoint
The next step is to implement the logout process.
Sometimes, you may encounter unexpected behaviors, such as when you log in again on the front-end side during an ongoing session on Kuroco's back-end. Therefore, to determine if a user is logged in, you need to send a logout request to the API.
To do this, modify /stores/authentication.js as shown below:
...
-   async restoreLoginState() {
+    async logout() {
+      try {
+        const { authFetch } = useAuthFetch();
+        await authFetch("/rcms-api/1/logout", {
+          method: "POST",
+          baseURL: useRuntimeConfig().public.apiBase,
+          credentials: "include",
+        });
+      } catch {
+        /** No Process */
+        /** When it returns errors, it consider that logout is complete and ignore this process. */
+      }
+      this.setProfile(null);
+      this.access_token = "";
+      this.updateLocalStorage({ rcmsApiAccessToken: null });
+
+      navigateTo("/login");
+    },
+   async restoreLoginState() {
      const rcmsApiAccessToken = JSON.parse(localStorage.getItem('rcmsApiAccessToken'))

      if (!rcmsApiAccessToken) {
        await this.logout();
        throw new Error("need to login");
      }
      this.access_token = rcmsApiAccessToken;

      try {
        const { authFetch } = useAuthFetch(this.access_token);
        const profileRes = await authFetch("/rcms-api/1/profile", {
          baseURL: useRuntimeConfig().public.apiBase,
        });
        this.setProfile(profileRes);
      } catch {
+        await this.logout();
        throw new Error("need to login");
      }
    },
  },
And add a logout button to the news list page as follows:
diff --git pages/news/index.vue pages/news/index.vue
index dcdd806..e79e075 100644
--- pages/news/index.vue
+++ pages/news/index.vue
@@ -1,23 +1,31 @@
 <template>
     <div>
+        <button type="button" @click="logout">
+            Logout
+        </button>
         <div v-for="n in response.list" :key="n.slug">
             <nuxt-link :to="'/news/'+ n.slug">
                 {{ n.ymd }} {{ n.subject }}
             </nuxt-link>
         </div>
     </div>
 </template>

 <script setup>
+import { useStore } from "~/stores/authentication";
const config = useRuntimeConfig();
definePageMeta({
  middleware: ["auth"], // Use the 'auth' middleware defined in middleware/auth.ts
});

const { data: response } = await useFetch("/rcms-api/1/news", {
  baseURL: config.public.apiBase,
  credentials: "include",
});
+ const store = useStore();
+ const logout = () => store.logout();
 </script>
After logging in, go to the news list page and click the logout button. Verify the following behaviors:
- The logout endpoint receives a request.
- You are redirected to the login page.
- If you access the news list page without logging in, you are also redirected to the login page.
This concludes the login process implementation for dynamic access token-based API authentication.
Note
The above is an introduction on creating a login page in your Nuxt.js project using Kuroco.
For clarity, we introduced the implementation of a very simple login screen. In actual use, you may need to include more complex components such as form validation and libraries such as @nuxt/auth. Nevertheless, we hope the above tutorial can serve as an introduction to the basic login setup.
Related documents
Support
If you have any other questions, please contact us or check out Our Slack Community.