Implementing Reminder and Automatic Withdrawal Features for Members with No Login for a Certain Period
Overview
Using batch processing, we will implement reminder and automatic withdrawal features for members who have not logged in for a certain period.
Also, the feature to extend the expiration date when a member logs in will be implemented using custom processing triggered by "after login processing".
What you'll learn
We will implement reminder and automatic withdrawal features for members who have not logged in for a certain period using the following steps.
- Prerequisites
- Implementation of Reminder Feature
- Implementation of Automatic Withdrawal Feature
- Implementation of the feature to extend the expiration date when a member logs in
Prerequisites
Members and groups to be used for testing will be added as necessary.
Prerequisites
Set the expiration date for member login permission
The expiration date for member login permission will be automatically added by the custom processing that we will set up later, but for the purpose of testing, let's set it manually first.
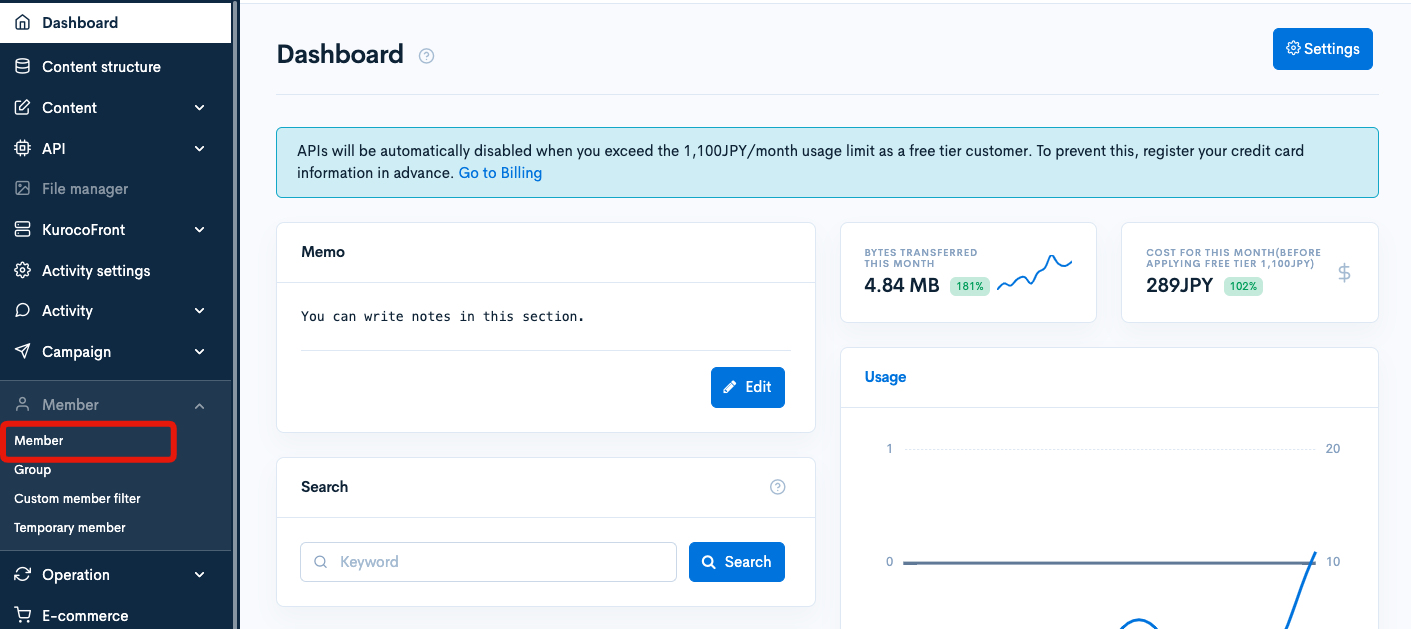
Click [Member] -> [Member].
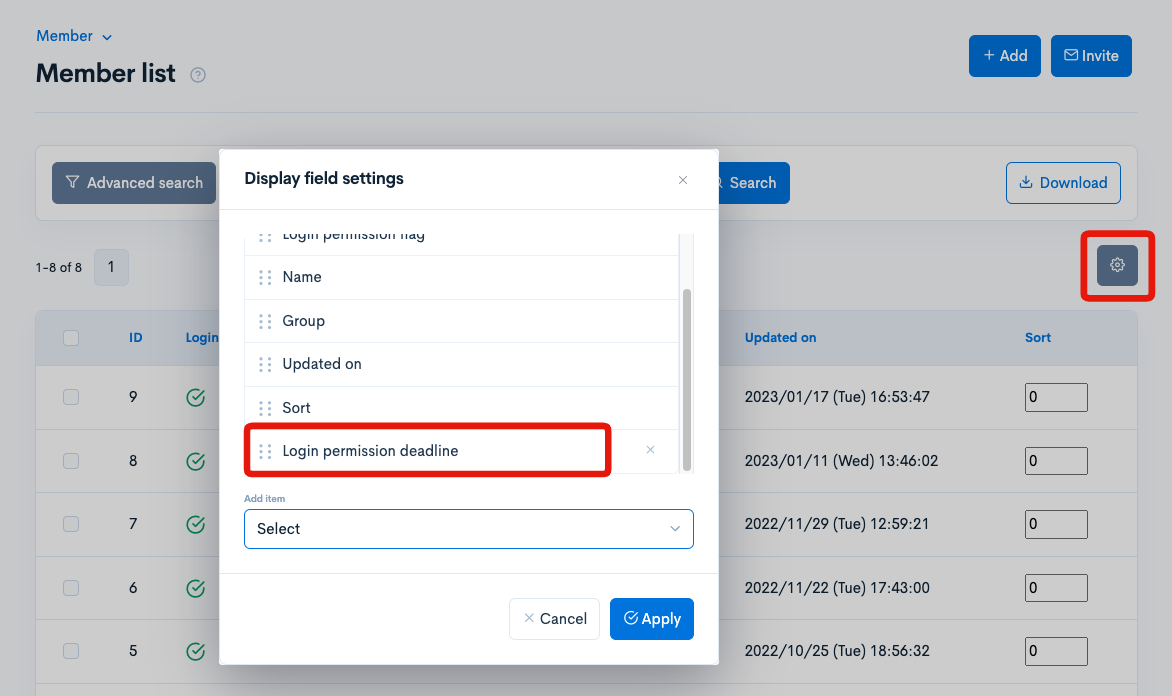
On the member list page, click the gear icon in the top right corner of the table to open the "Display Settings" and add the "Login permission deadline" field.
Click on the name of the member whose settings you want to change on the member list.

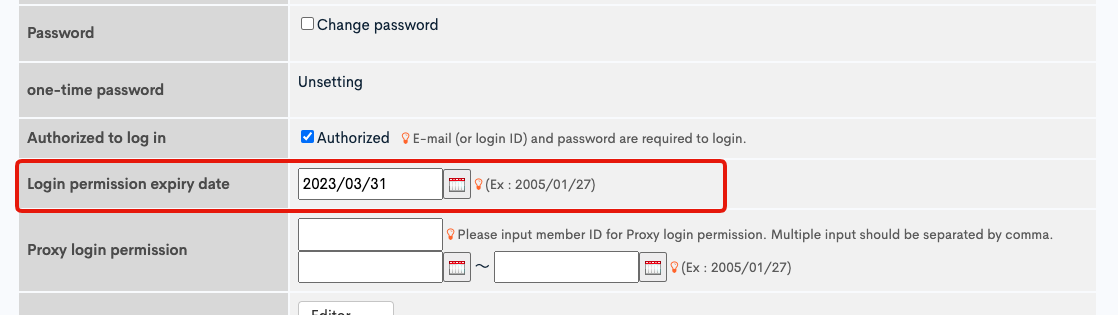
Set the login permission expiry date.
Confirm that the "Don't subscribe to notifications" is unchecked.

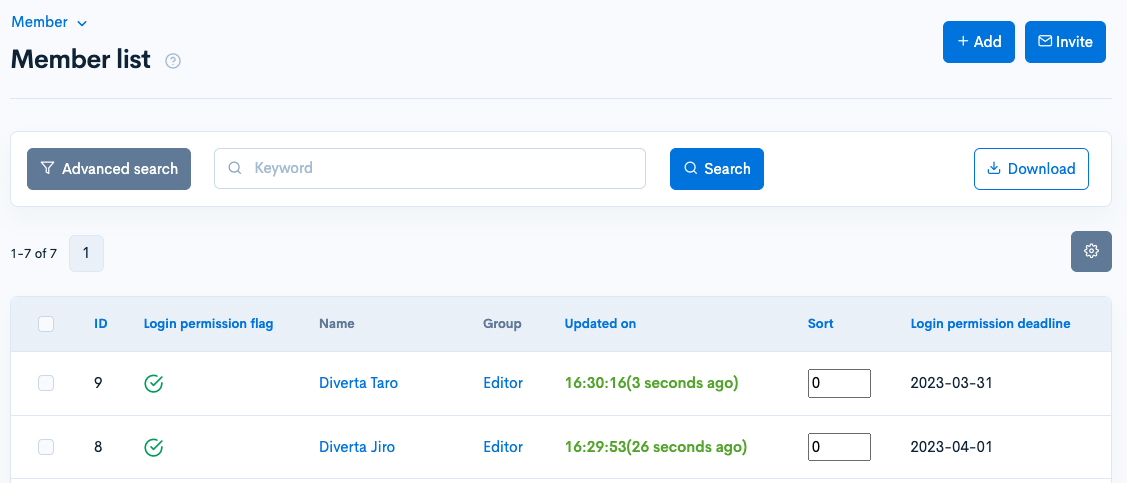
Similarly, set the login permission expiration date for the member used for testing as follows.
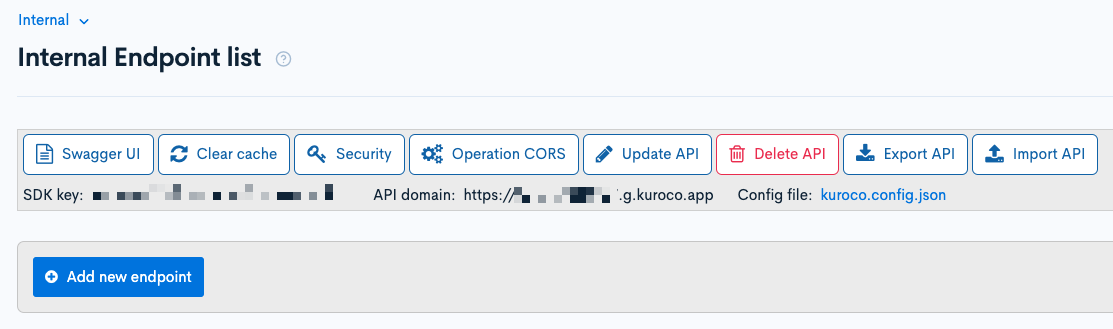
Creating an API for internal processing
It is recommended to separate APIs that are only used internally within Kuroco. Therefore, first create a new API for internal use. If it has already been added, you can skip to the next step.
Creating an API
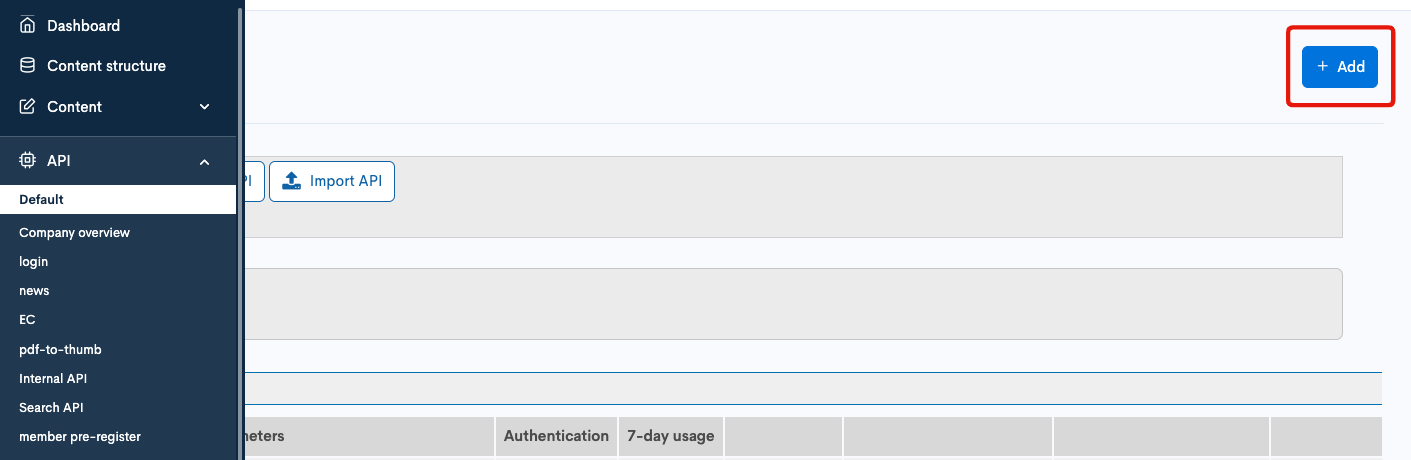
Click [Add] from the API section in the Kuroco admin panel.
On the API editor, enter the following information and click "Add".
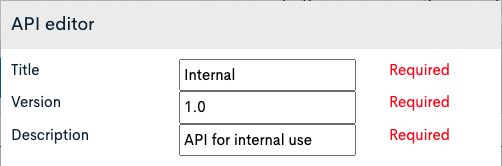
| Field | Settings |
|---|---|
| Title | Internal |
| Version | 1.0 |
| Description | API for internal use |
The API has been created.
Security settings
Next, configure the security settings. Click on [Security].
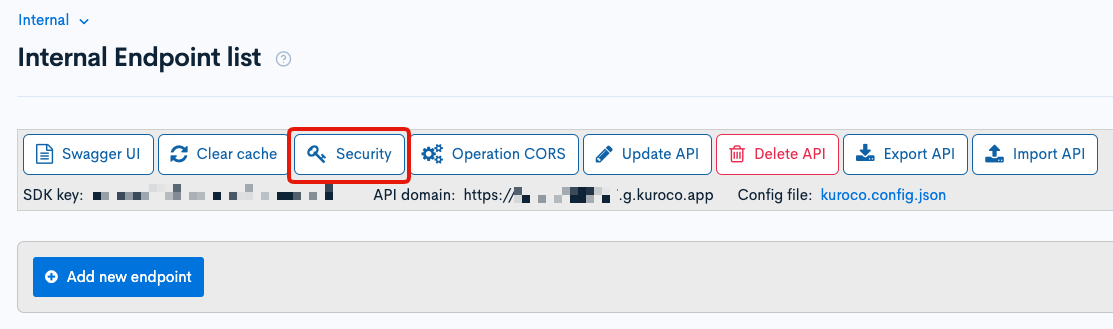
Set the security to [Dynamic Access Token], then click [Save].

After setting the security to [Dynamic Access Token], it is recommended to use the Login::token endpoint. However, if it is only used internally, you can ignore it.

CORS settings
Next, configure the CORS settings. Click on [Operation CORS].
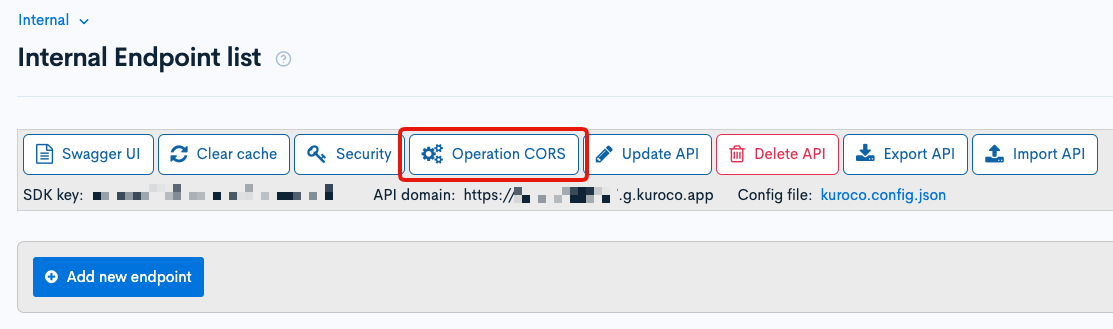
Click [Add Origin] in CORS_ALLOW_ORIGINS, and add the following:
- Admin panel URL
Click [Add Method] in CORS_ALLOW_METHODS, and add the following:
- GET
- POST
- OPTIONS
Make sure that [Allow Credentials] is checked in CORS_ALLOW_CREDENTIALS.

If there are no issues, click [Save].
Implementation of Reminder Feature
The reminder function works in the following way:
- Send a request to the endpoint by batch processing every day at 06:00.
- The endpoint sends information on the message template identifier and custom member filter ID to the configured delivery ID.
- The delivery sends the contents of the message template to the custom member filter.
Creating a Custom Member Filter
We set the recipients for the reminder email with a custom member filter.
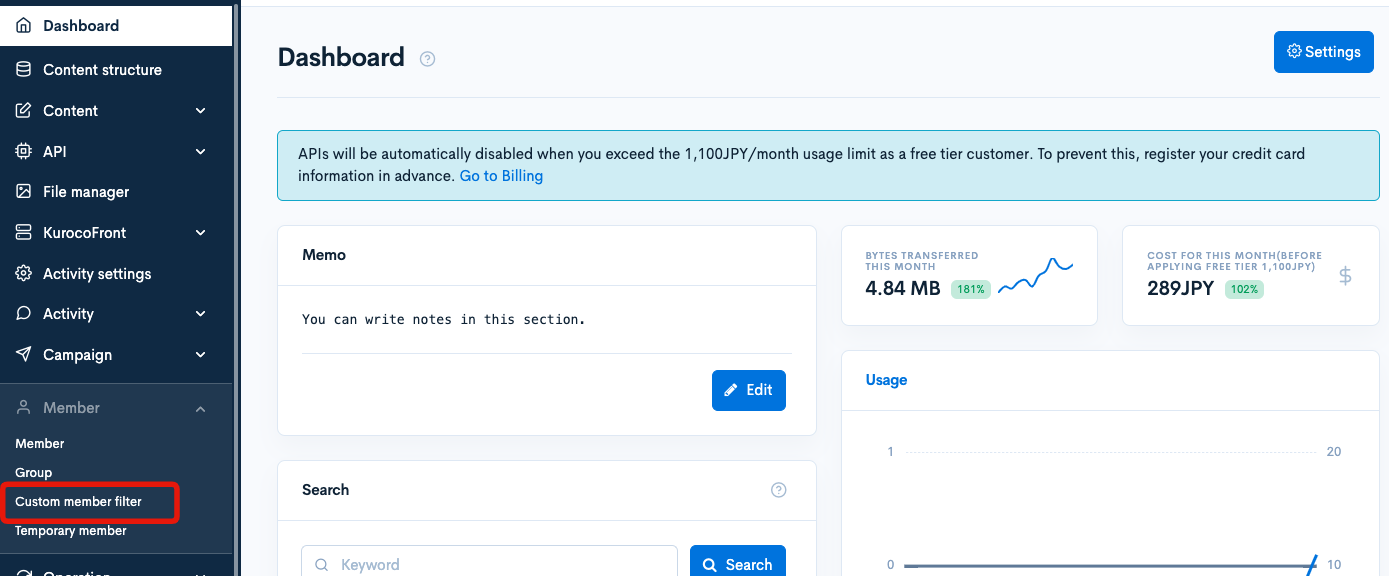
Click [Member] -> [Custom Member Filter].
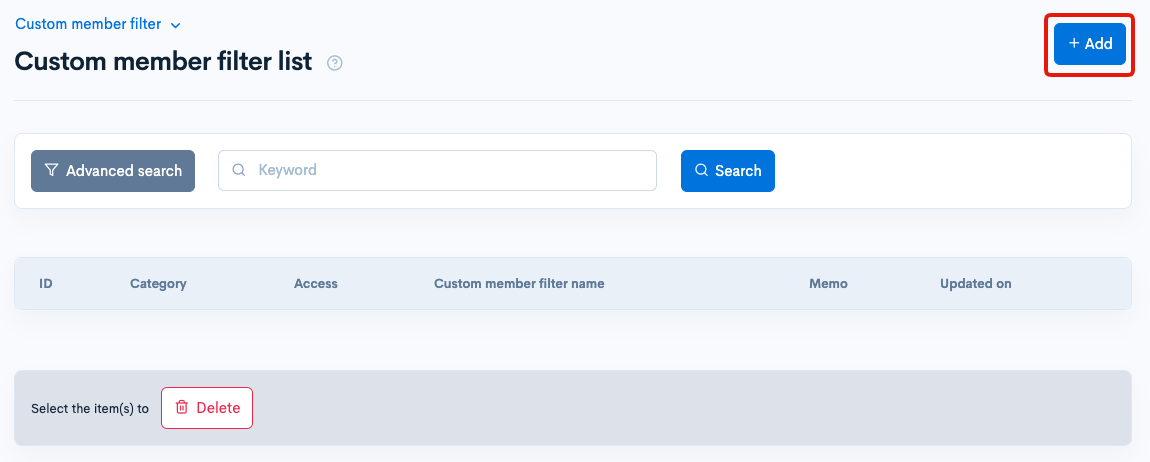
Click [Add].
Create the following filter:
The recipients of the reminder email are those whose expiration date is 30 days prior and less than 7 days.
| Item | Title |
|---|---|
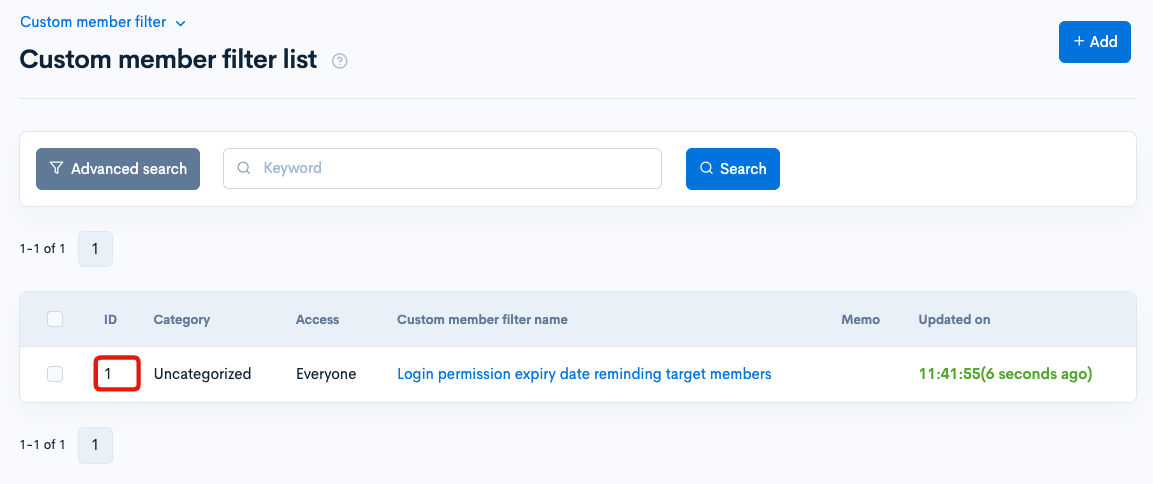
| Title | Login permission expiry date reminding target members |
| Filter | As below |
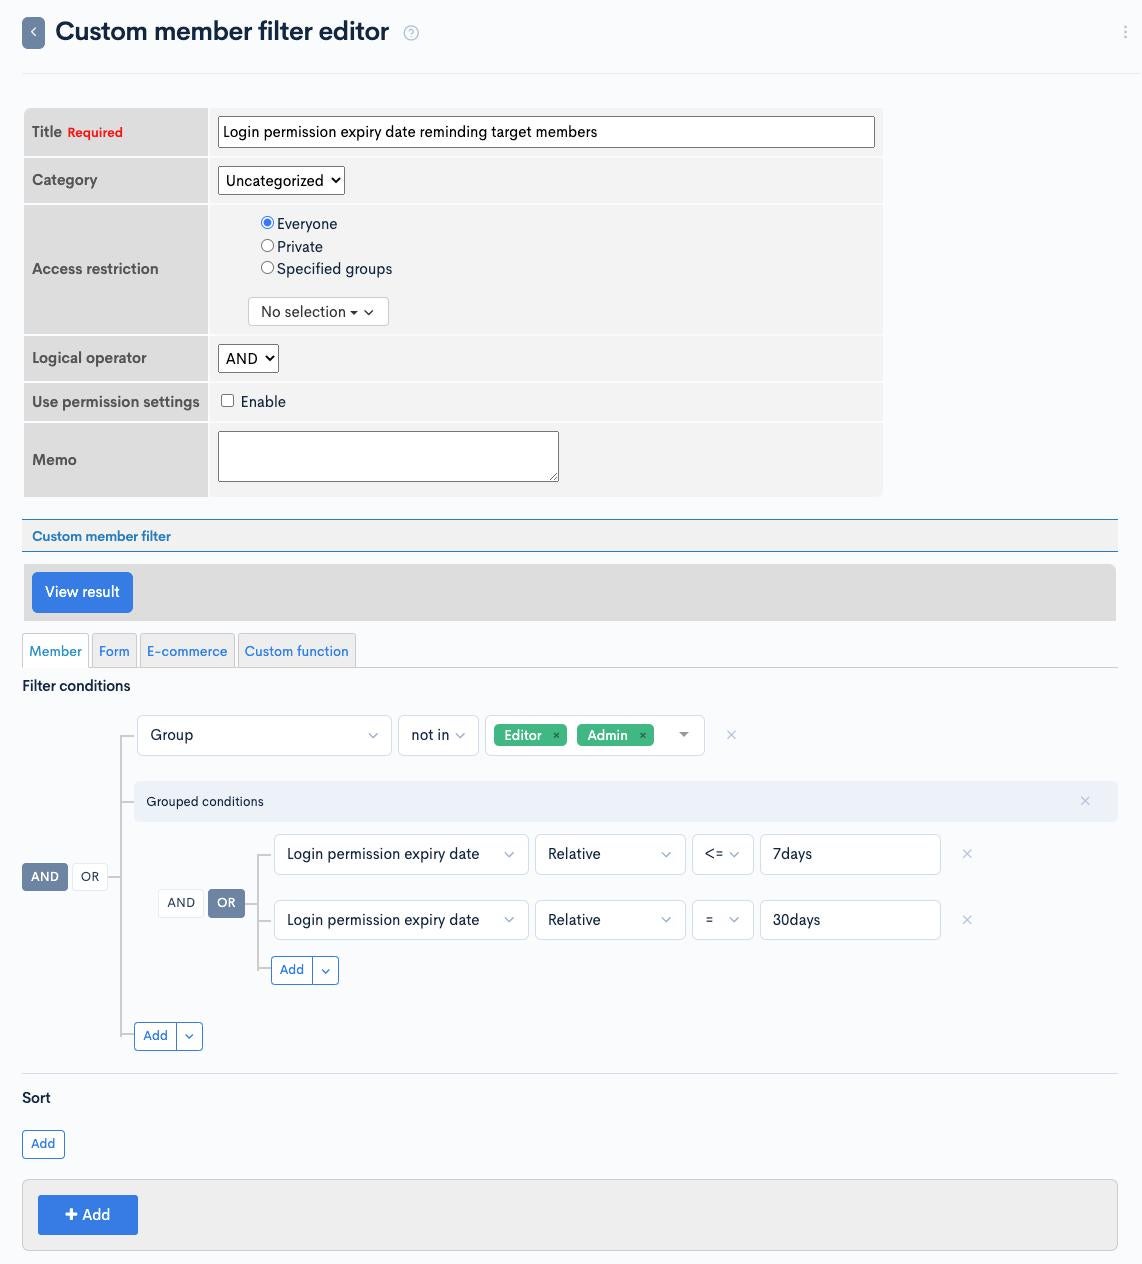
Click [View result] to see if the members you expect will hit. If you have multiple conditions, check the test member's login permit manually and check it.
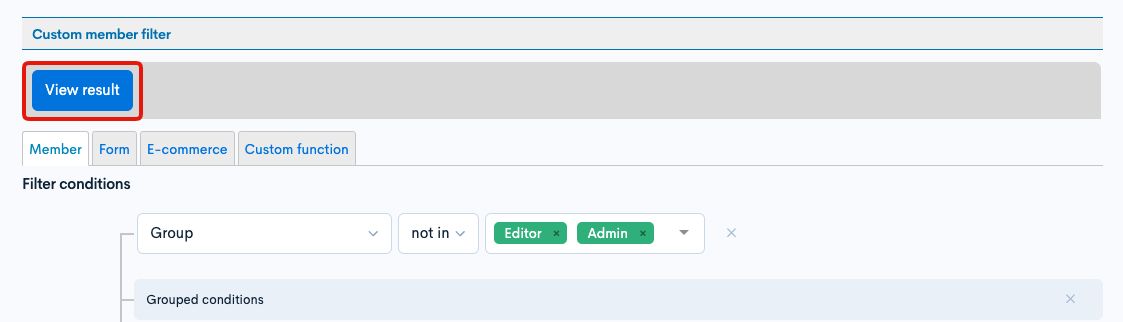
If there is no problem, click [Add] to add a custom member filter.
The ID of the created custom menber filter will be used later, so make a note of it.
Create notification
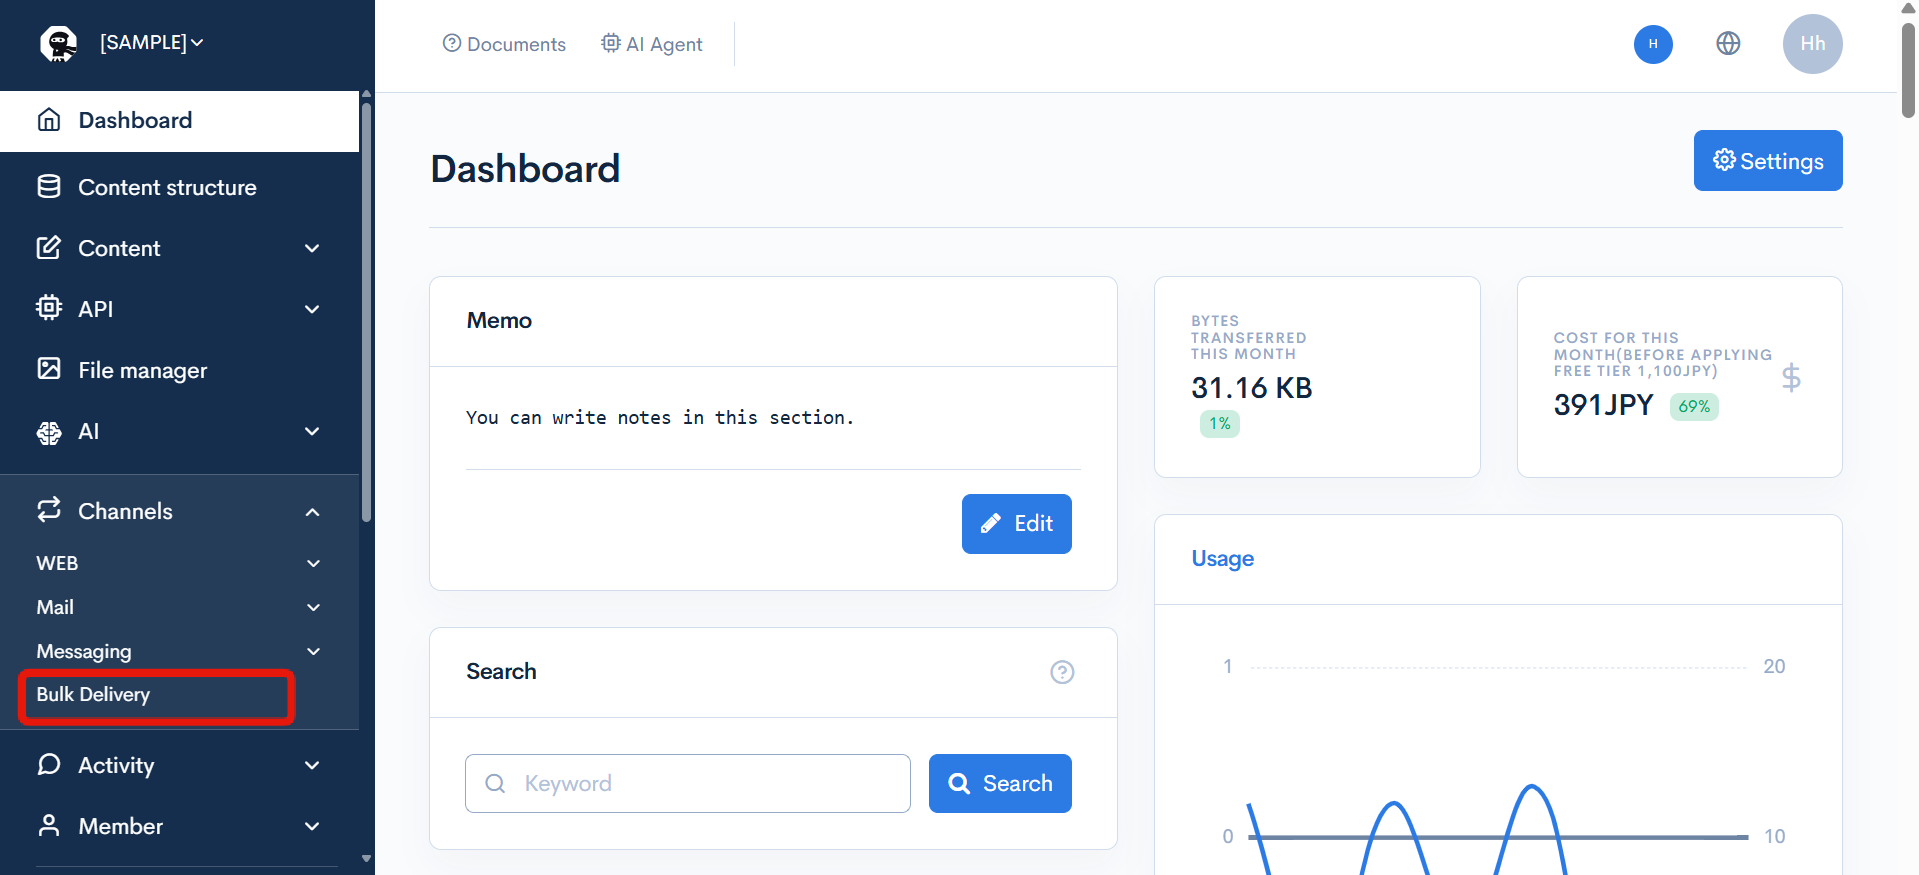
We use the notification function for sending reminder email.
Click [Channels] -> [Bulk Notification].
Click [Add].
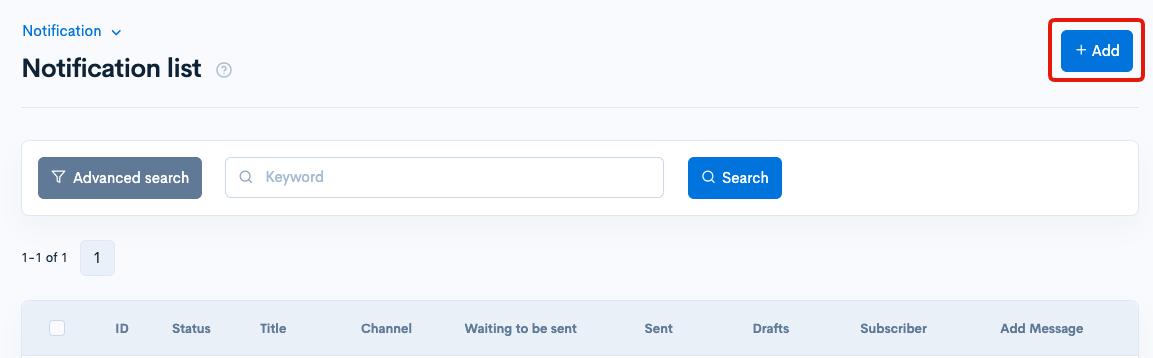
Enter as follows:
| Item | Settings |
|---|---|
| Title | Reminder of login permission expiry |
| Sender | noreply@kuroco-mail.app |
| Other settings | as default |
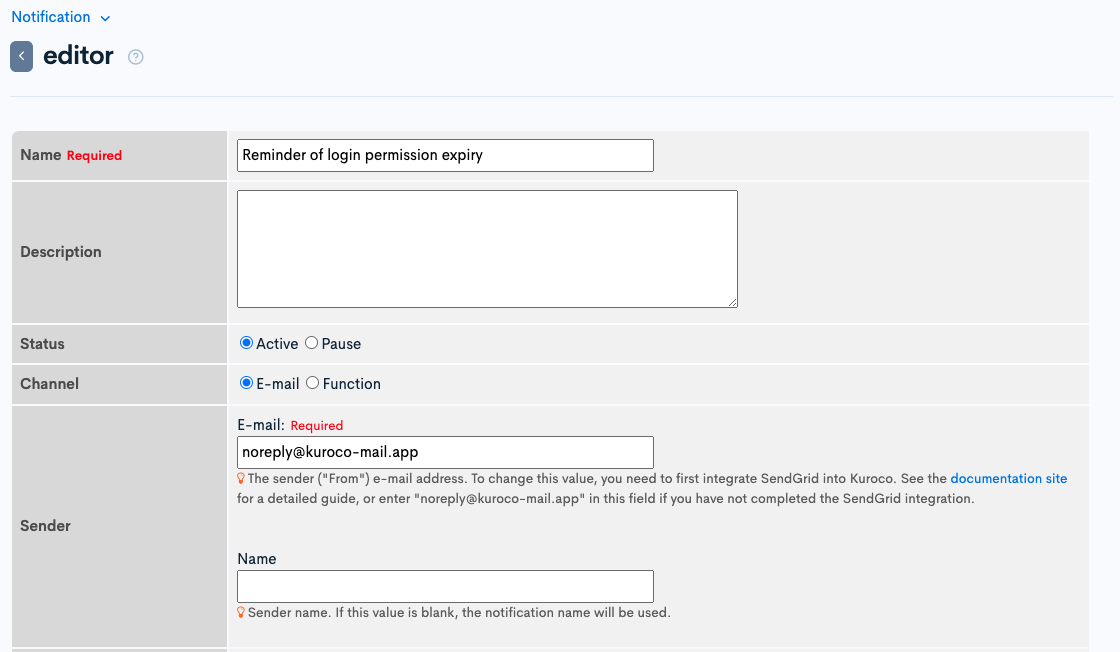
- Recipients will be set in the batch process later so you can leave it empty for now.
- If you want to change the sender's email address, link your Kuroco site with Sendgrid referring to How to link Sendgrid.
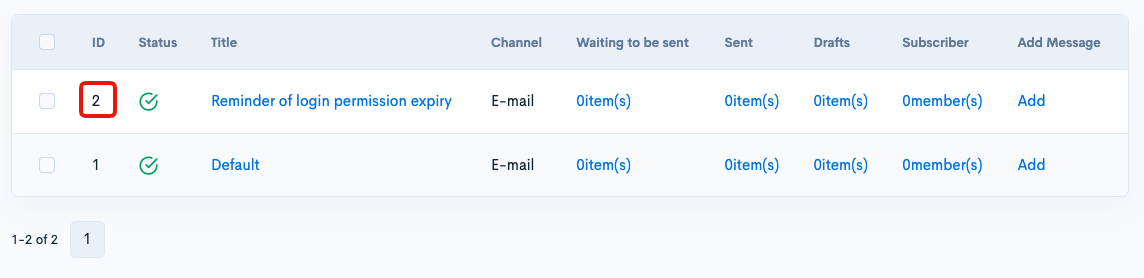
After setting, click [Add] to add the notification and make a note for the notification ID.
Create message template
We use message template to create the text of reminder message.
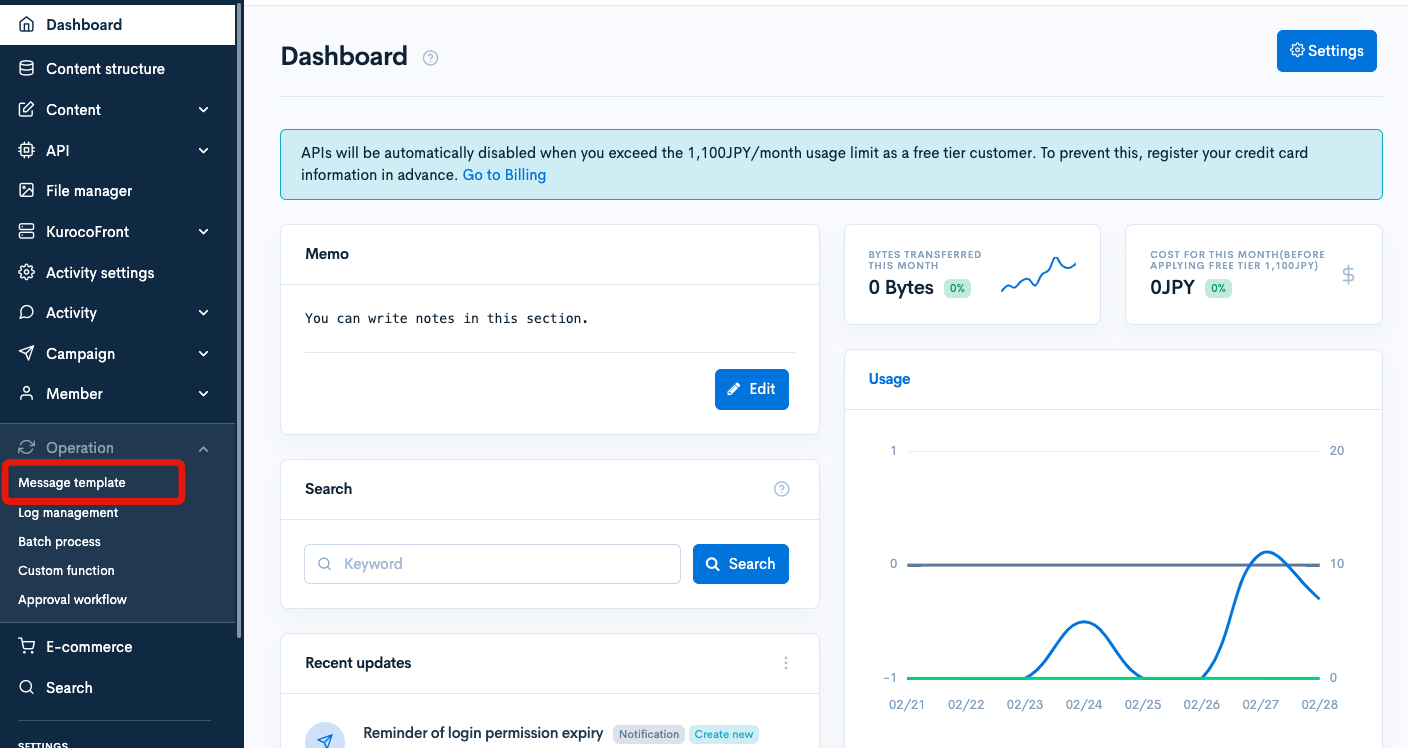
Click [Operation] > [Message template].
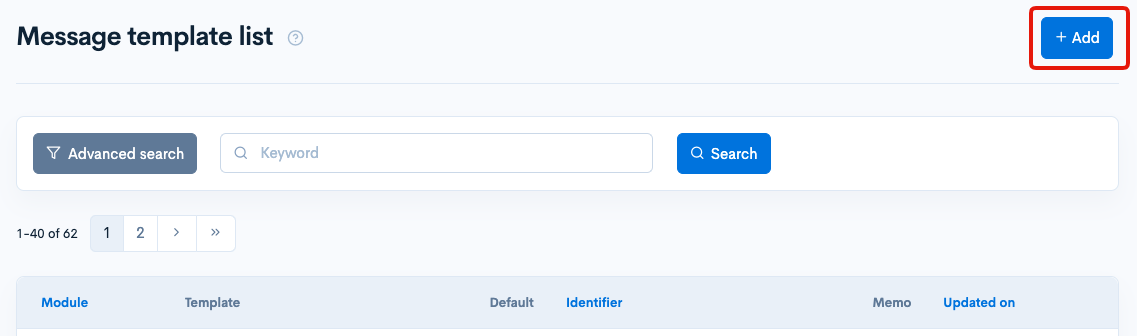
Click [Add].
Enter as follows:
| Item | Settings |
|---|---|
| Template | login permission expiry remind template |
| Identifier | expiration_remind_template |
| Body | As below |
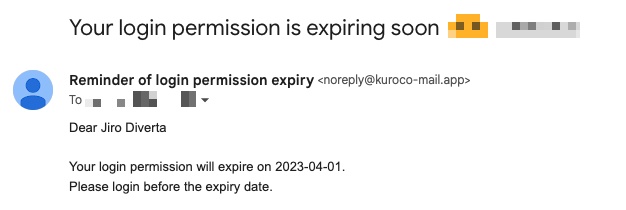
Dear %name1% %name2% <br>
<br>
Your login permission will expire on %login_ok_ymd%.<br>
Please login before the expiry date.
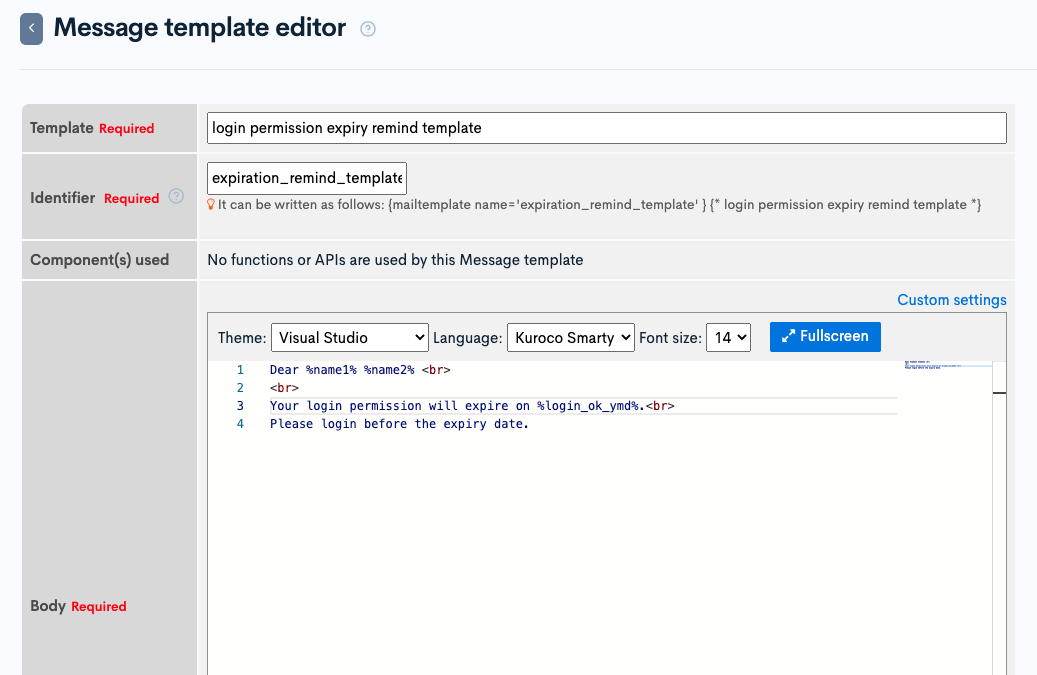
After setting, click [Add] to save the message template.
Create custom function
If you enter %name1% and %name2% in the notification message, you can display the name of the member of the destination, but if you want to add items that are not available by default such as %login_ok_ymd% or complicated processing, you need to use custom function.
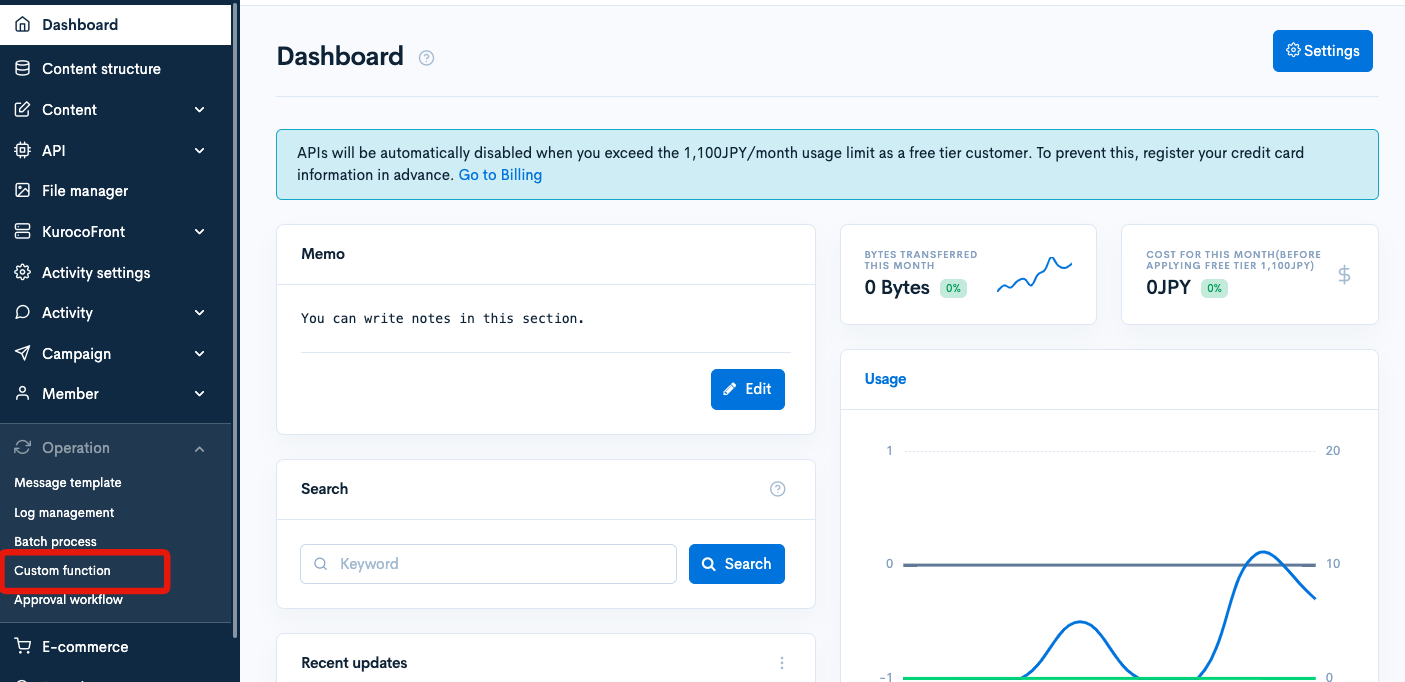
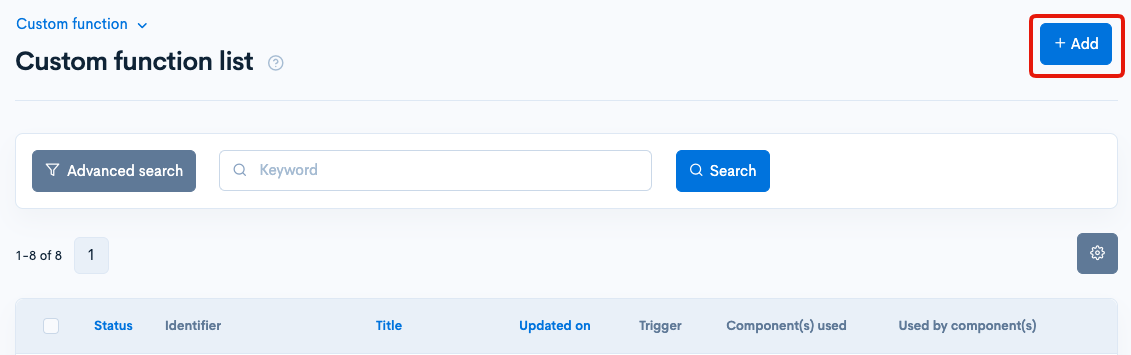
Click [Operation] -> [Custom function].
Click [Add].
Enter as follows:
| Item | Settings |
|---|---|
| Title | Notification substitution |
| Identifier | notification_substitution |
| Used by component(s) | Trigger:Notification substitution value: ID of the notification(2) |
| Process | Enter the code below |
{assign_array var=substitutions values=''}
{assign var=substitutions.name1 value=$member_info.name1}
{assign var=substitutions.name2 value=$member_info.name2}
{assign var=substitutions.login_ok_ymd value=$member_info.login_ok_ymd|date_format:'Y-m-d'}
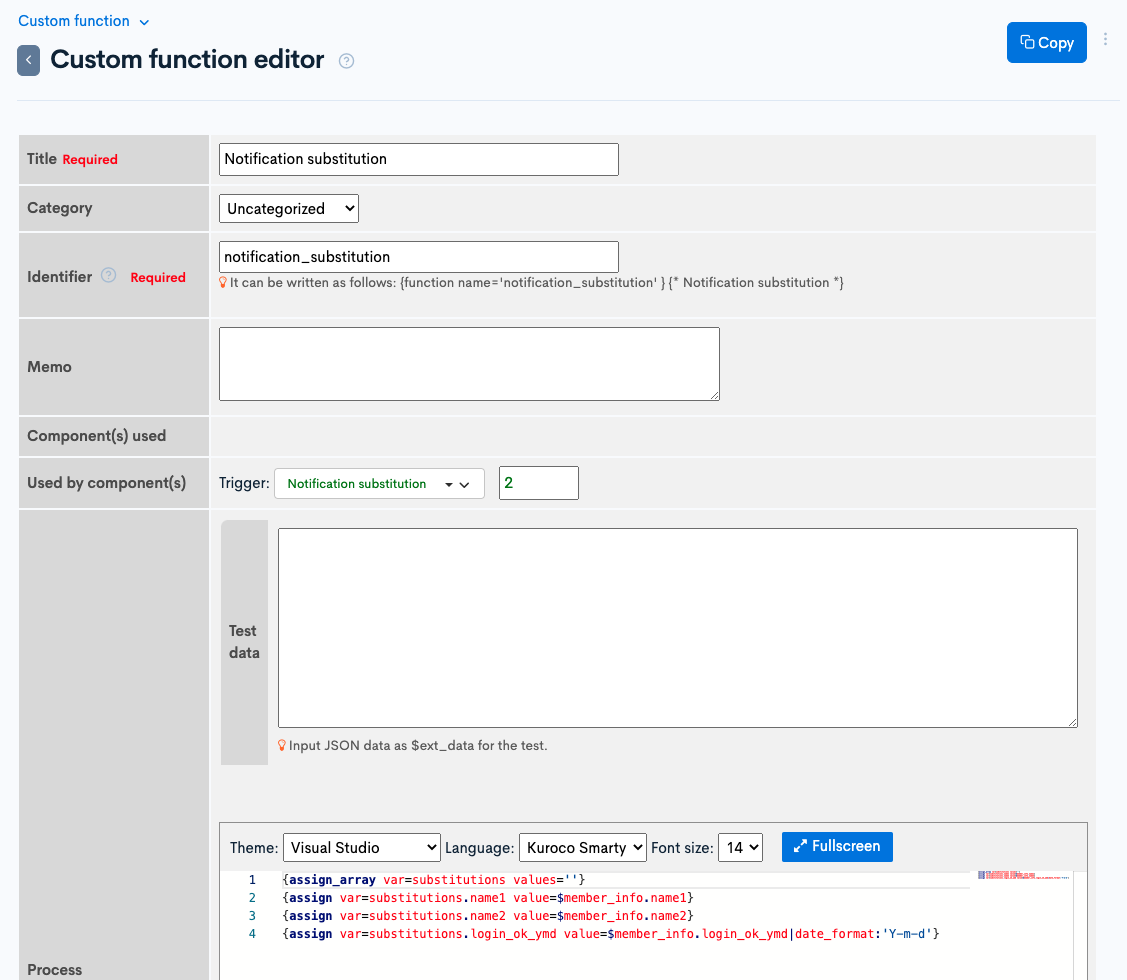
After setting, click [Add] to save the custom function.
Create endpoint
Next, we create the endpoint.
Click [Add new endpoint] from the Internal API page.
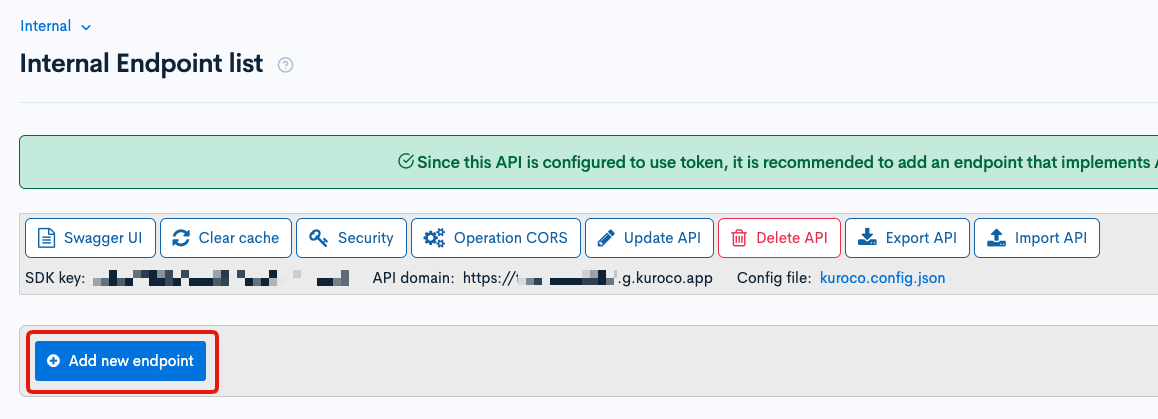
Create the following endpoint:
| Item | settings |
|---|---|
| Path | expiration_remind |
| Category | notification |
| Model | Magazine |
| Operation | send |
| destination_id | Custom member filter ID(1) |
| mail_type | 1 |
| mail_template_name | Identifier of the message template(expiration_remind_template) |
| subject | Your login permission is expiring soon |
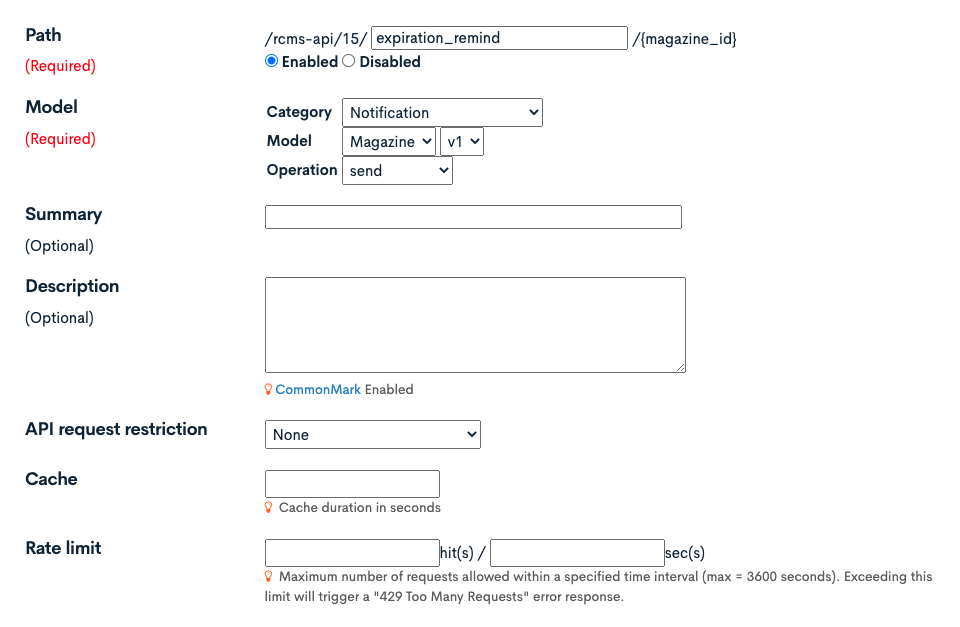
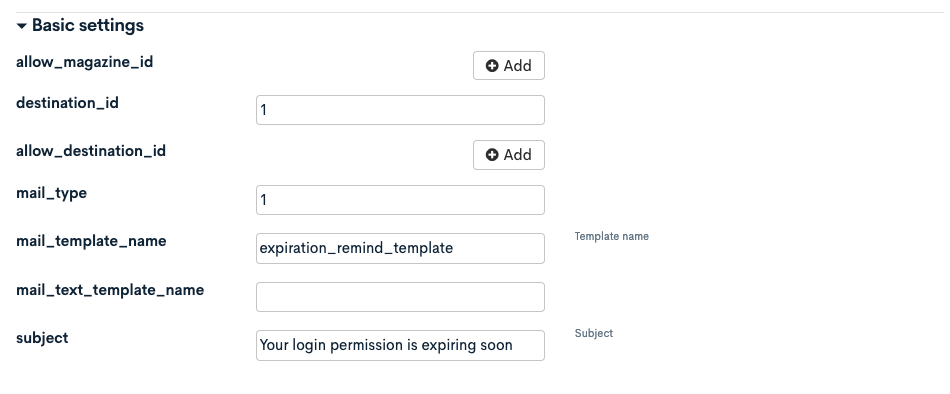
After setting, click[Add] to add the endpoint.
Create batch process
We create a reminding function using batch process and send the reminder message to target members daily.
Click [Operation] -> [Batch process].
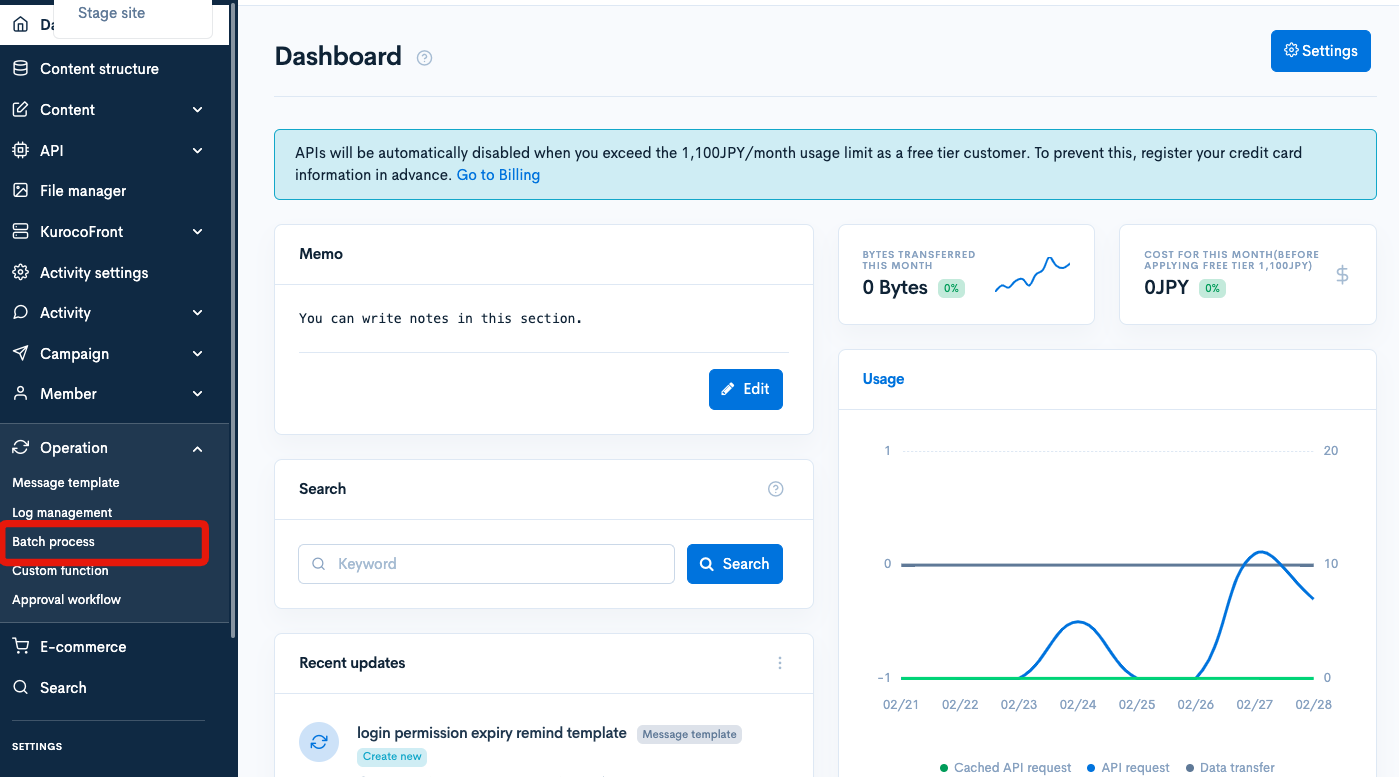
Click [Add].
Set as follows:
| Item | settings |
|---|---|
| Title | Send reminder of login permission expiry |
| Identifier | send_remind_mail |
| Batch | Every day 06:00 |
| Process | Below code |
{api_internal
    var='response'
    status_var='status'
    endpoint='/rcms-api/4/expiration_remind/2'
    method='POST'
    member_id='1'
}
Replace /rcms-api/4/expiration_remind/2 with your own endpoint.
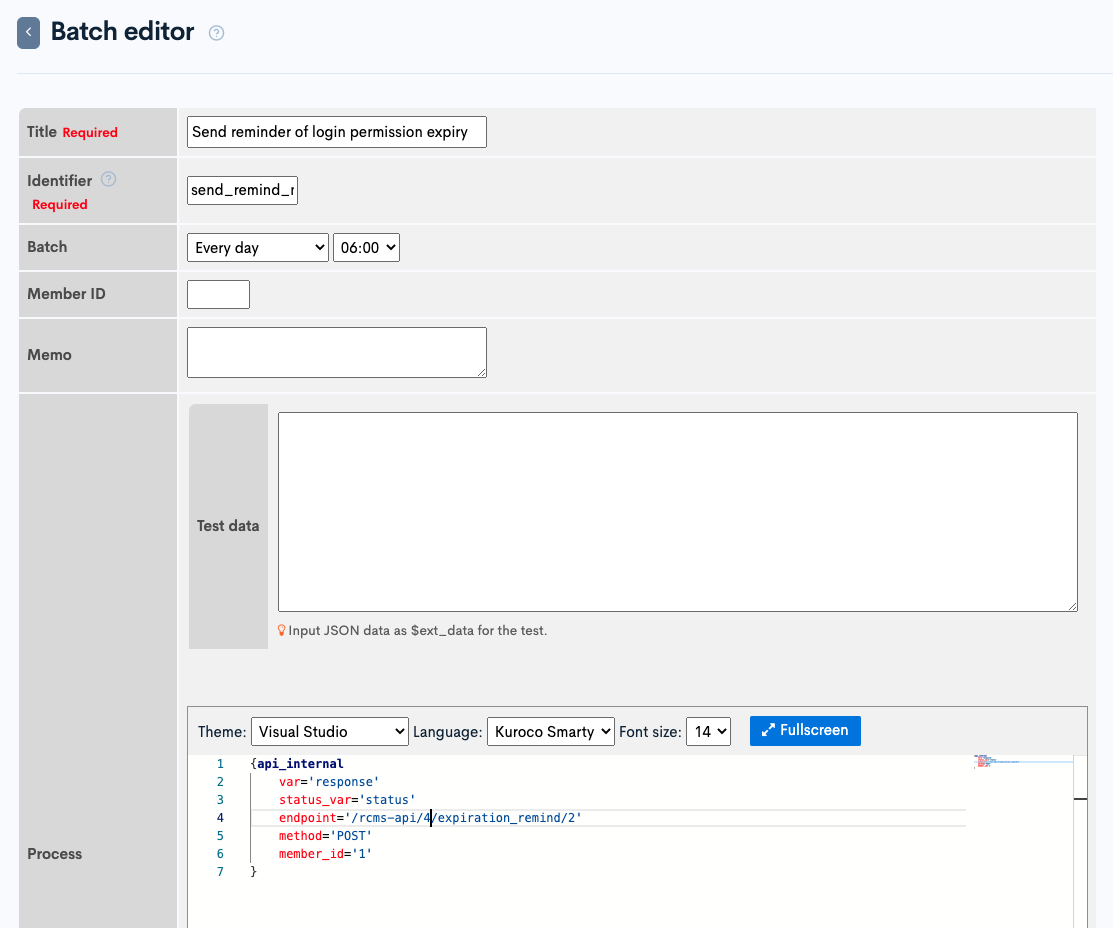
After setting, click [Add] to save the batch process.
Operation check
At last, click [Run now] to check the operation.
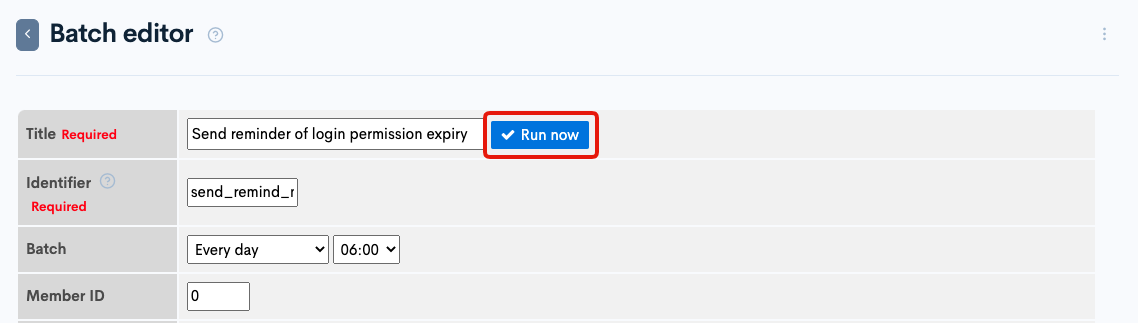
If the settings are correct, below e-mail will be sent.
Implementation of Automatic Withdrawal Feature
We create the automatic member delete function using batch process which checks for the existence of target members on a daily basis, and if the target members exist, deletes them using the Member::delete endpoint.
Creating a Custom Member Filter
We use the custom member filter to identify the target members.
Click [Member] -> [Custom Member Filter].
Click [Add].
Create the following filter:
| Item | Settings |
|---|---|
| Title | target members of automatic deletion |
| Filter | As below |
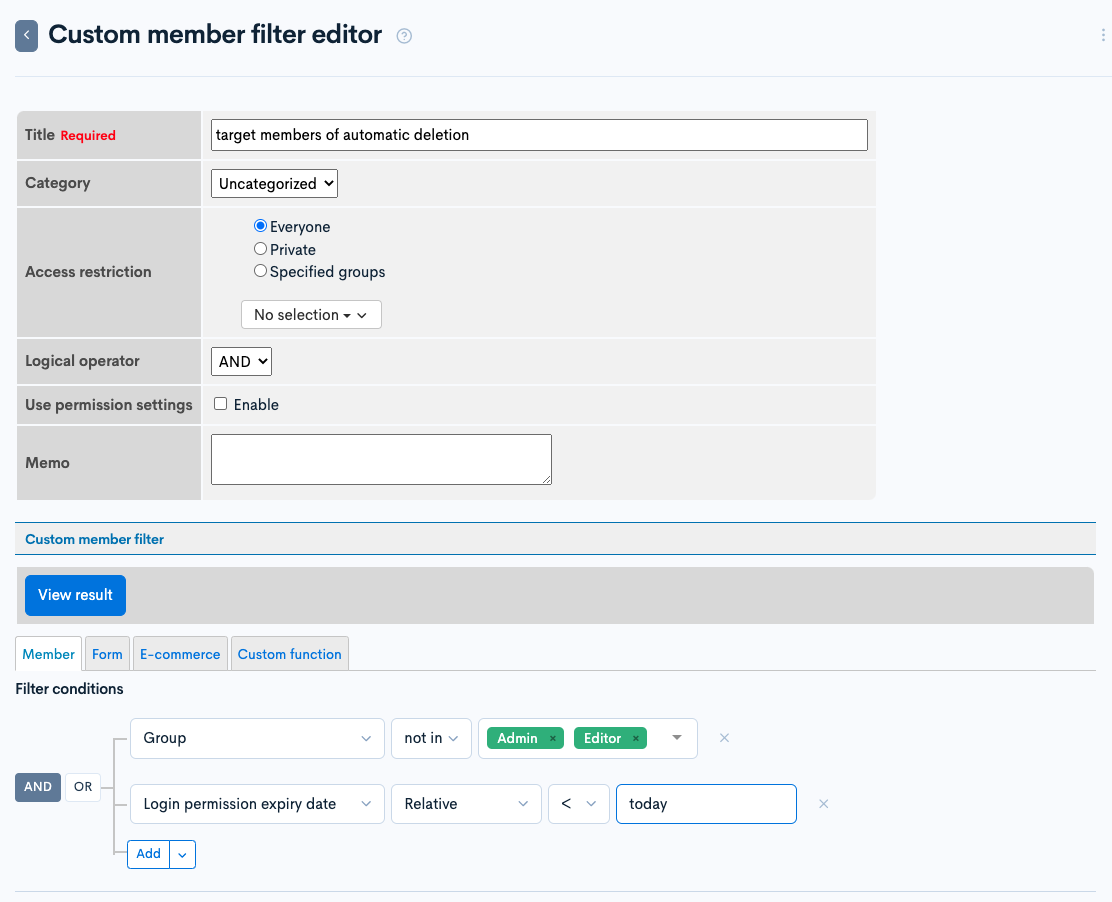
Click [View result] to check the result and if there are no issues, click [Add] to save the custom member filter.
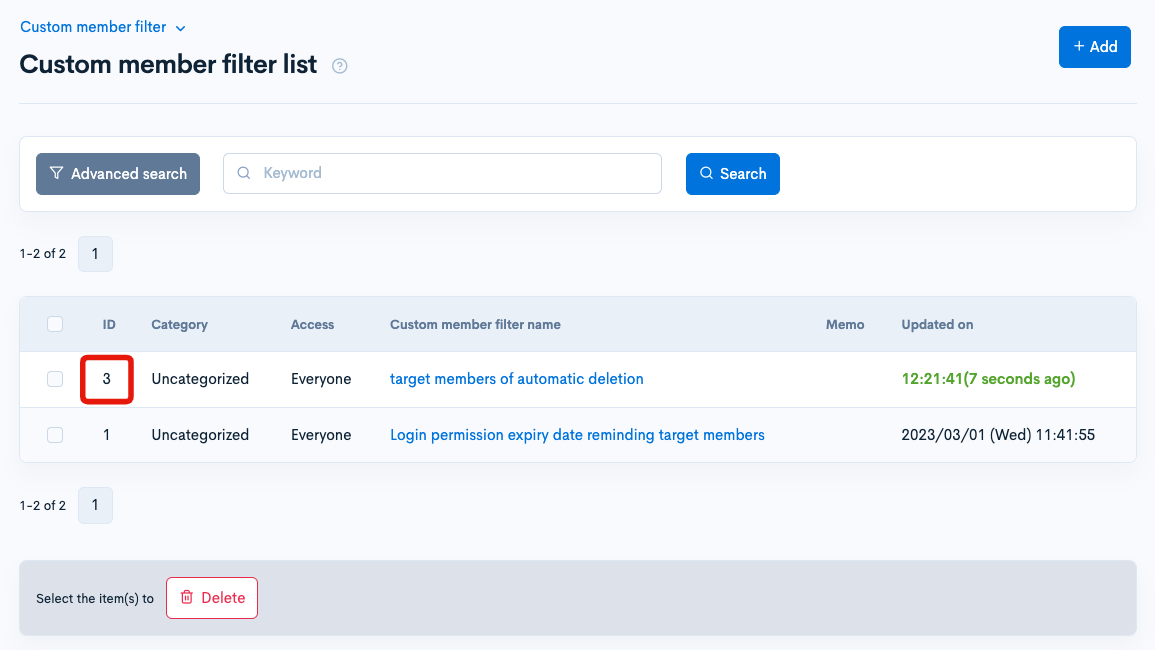
The ID of the created custom member filter will be used later so make a note of it.
Create endpoints
Create two endpoints, one to return the list of members to be deleted, and one to delete members.
Click [Add new endpoint] from the Internal API page.
Create 2 endpoints as follows:
delete_member_list endpoint
| Item | settings |
|---|---|
| Path | delete_member_list |
| Category | Member |
| Model | Member |
| Operation | list |
| custom_search_id | Custom member filter ID(3) |
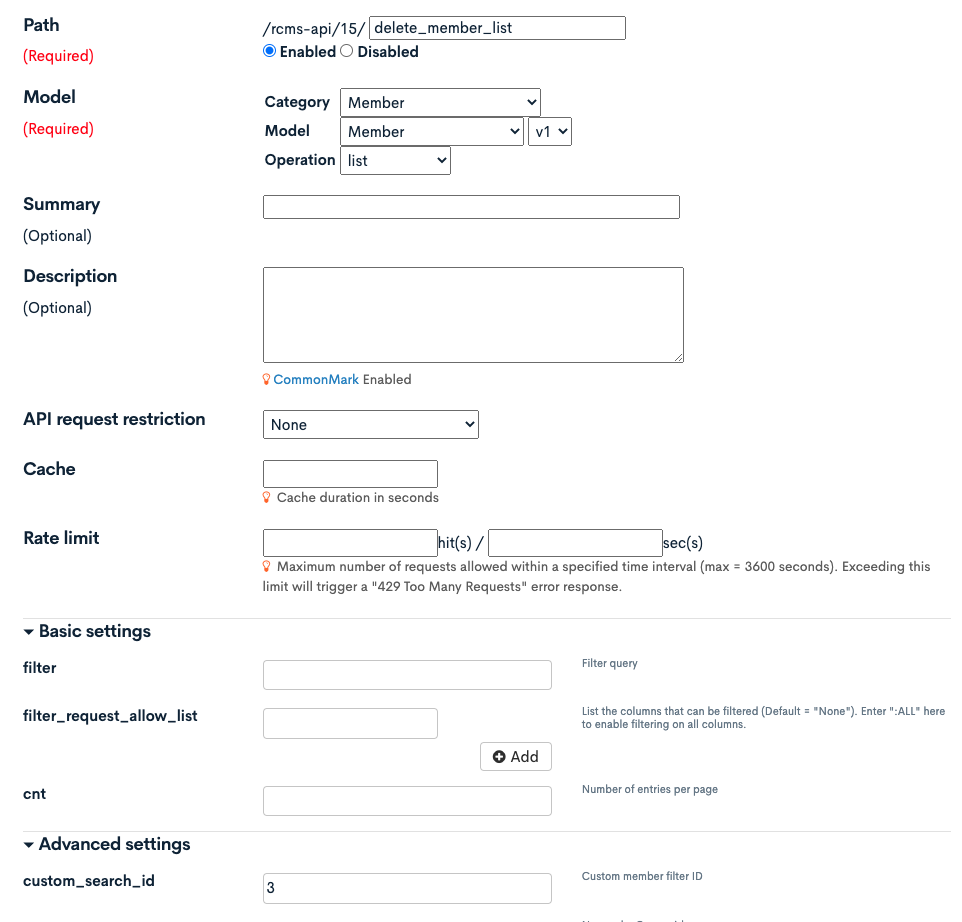
After setting, click [Add] to save the endpoint settings.
expired_member_delete endpoint
We create the endpoint to delete the target members.
| Item | settings |
|---|---|
| Path | expired_member_delete |
| Category | Memmber |
| Model | Member |
| Operation | delete |
| allowed_group_ids | Group ID in which target members belong(104) |
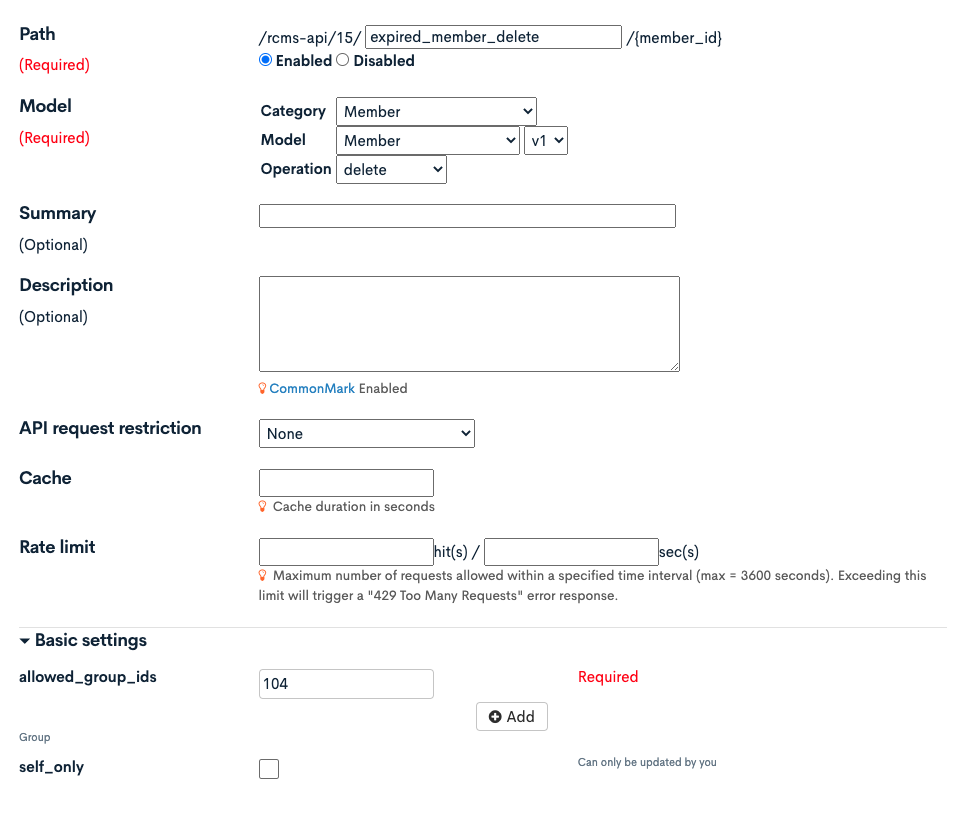
After setting, click [Add] to save the endpoint settings.
Create batch process
Next, we create a batch process.
Click [Operation] -> [Batch process].
Click [Add].
Set as follows:
| Item | settings |
|---|---|
| Title | Delete members with expired login permission |
| Identifier | delete_expired_member |
| Batch | Every day 05:00 |
| Process | Below code |
{*Get target members*}
{api_internal
    var='response'
    status_var='status'
    endpoint='/rcms-api/4/delete_member_list'
    method='GET'
    member_id='1'
}

{*Delete target members*}
{foreach from=$response.list item=n}
    {assign var='target' value="/rcms-api/4/expired_member_delete/`$n.member_id`"}
    {* member_id=1 -> admin user *}
    {api_internal
        var='response'
        status_var='status'
        endpoint=$target
        method='POST'
        member_id='1'
    }
    {logger msg1="Delete `$n.name1``$n.name2`(member_id=`$n.member_id`)" msg2=$response}
{/foreach}
Replace /rcms-api/4/delete_member_list and /rcms-api/4/expired_member_delete/ with your own endpoints.
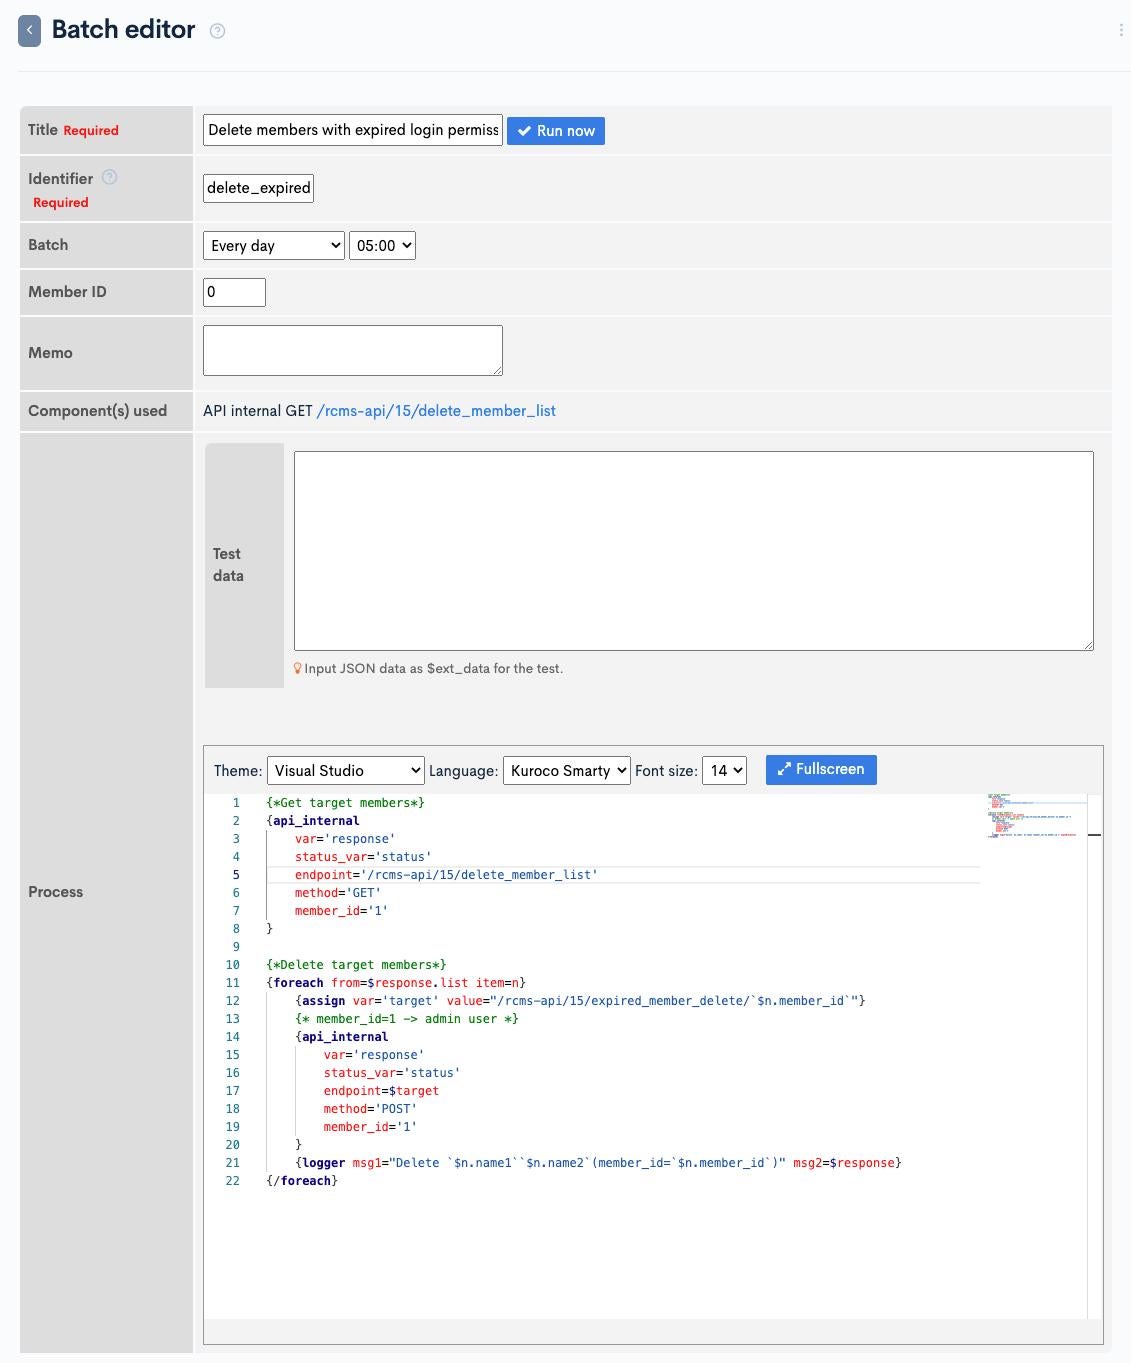
After entering above, click [Add] to save the batch process.
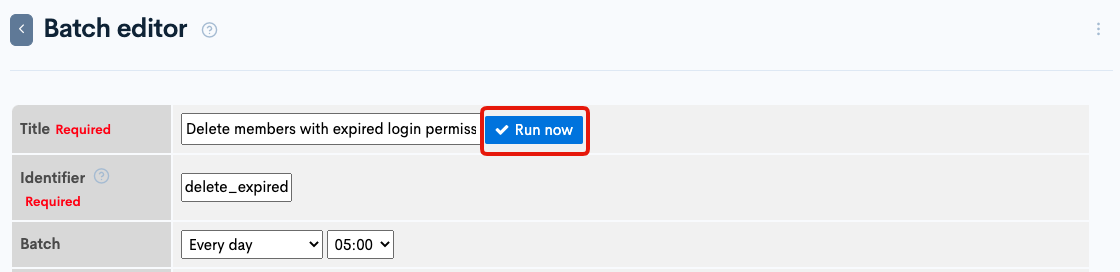
Operation check
At last, click [Run now] to check the operation.
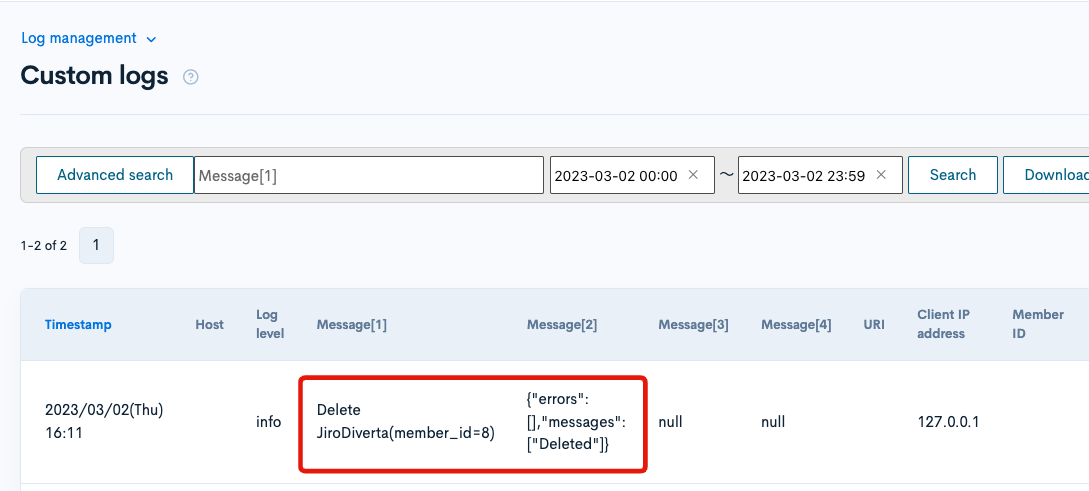
If the setting is correct, the log will remain in the custom log as follows and the members will be deleted.
Implementation of the feature to extend the expiration date when a member logs in
Finally, we implement a function that automatically extends the expiration date of the login permission after logging in.
Here, the custom process is performed after the member logging in, and the login_ok_ymd is updated at the Member::Update endpoint.
Create endpoint
Click [Add new endpoint] from the Internal API page.
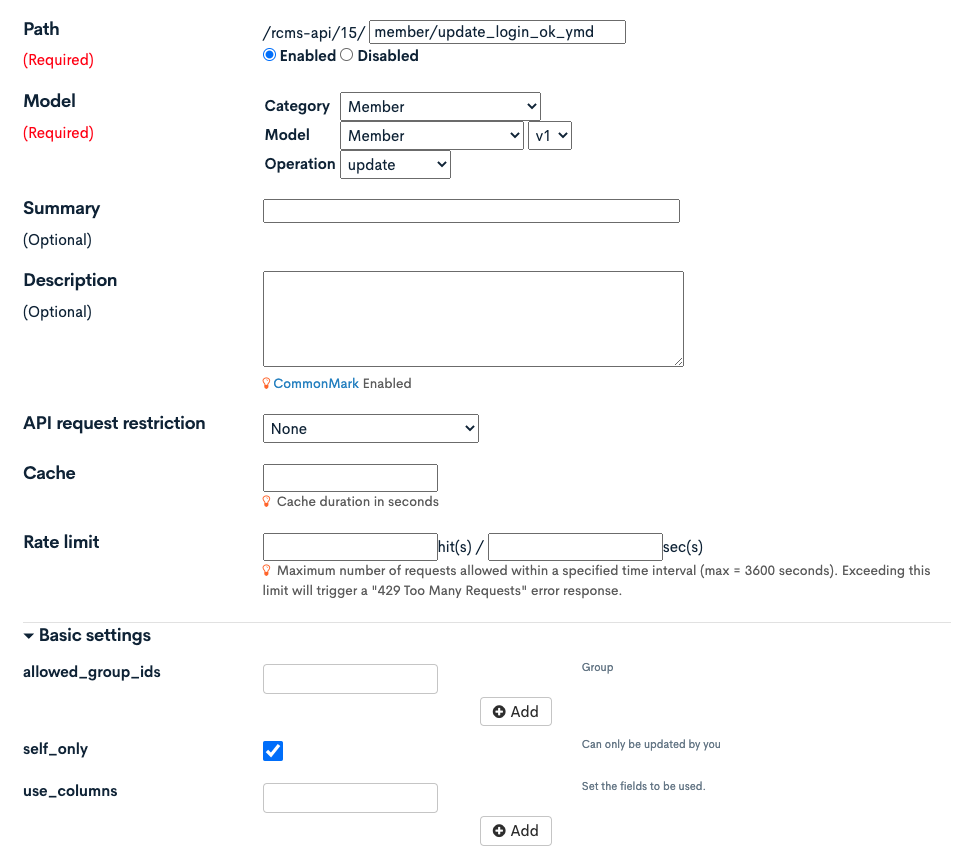
Create the following endpoint:
| Item | settings |
|---|---|
| Path | member/update_login_ok_ymd |
| Category | Member |
| Model | Member |
| Operation | update |
| self_only | check |
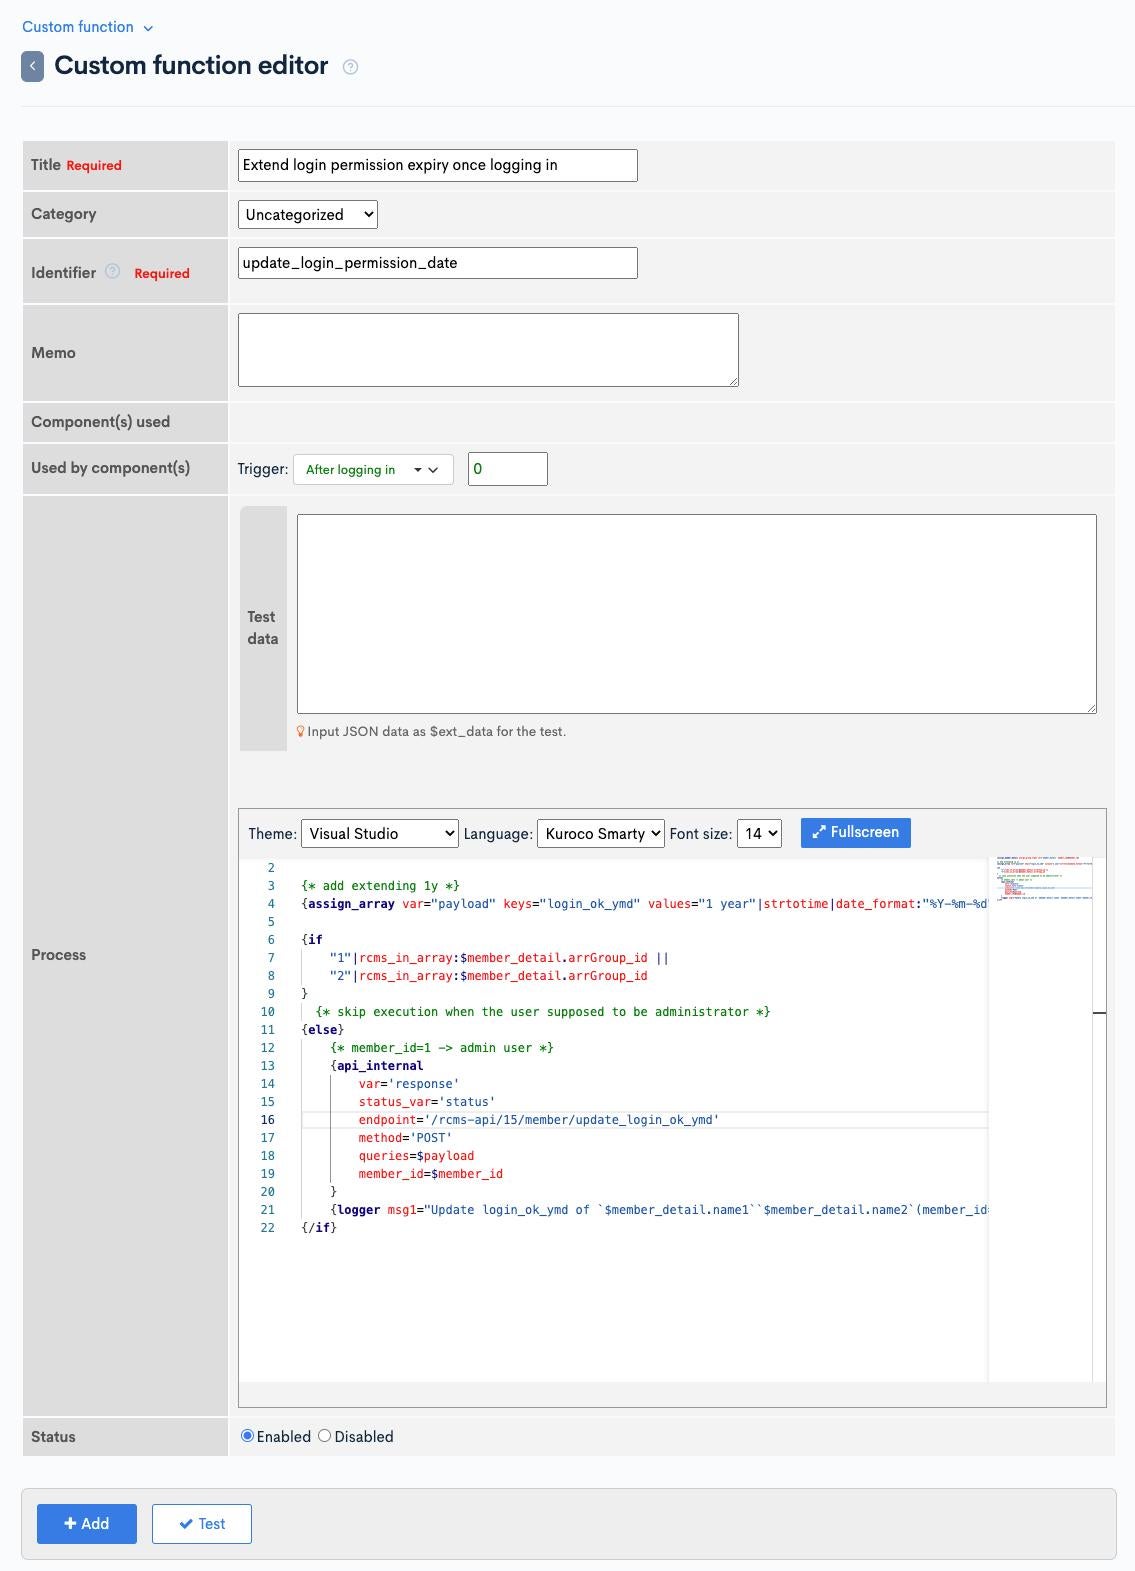
Create custom function
Click [Operation] -> [Custom function].
Click [Add].
Enter as follows:
| Item | Settings |
|---|---|
| Title | Extend login permission expiry once logging in |
| Identifier | update_login_permission_date |
| Used by component(s) | Trigger: After logging in Value: 0 |
| Process | Below code |
{assign_member_detail assign_group_flg=1 var='member_detail' member_id=$member_id}

{* add extending 1y *}
{assign_array var="payload" keys="login_ok_ymd" values="1 year"|strtotime|date_format:"Y-m-d"}

{if
    "1"|rcms_in_array:$member_detail.arrGroup_id ||
    "2"|rcms_in_array:$member_detail.arrGroup_id
}
  {* skip execution when the user supposed to be administrator *}
{else}
    {* member_id=1 -> admin user *}
    {api_internal
        var='response'
        status_var='status'
        endpoint='/rcms-api/4/member/update_login_ok_ymd'
        method='POST'
        queries=$payload
        member_id=$member_id
    }
    {logger msg1="Update login_ok_ymd of `$member_detail.name1``$member_detail.name2`(member_id=`$member_id`)" msg2=$response}
{/if}
Replace /rcms-api/4/member/update_login_ok_ymd with your own endpoint.
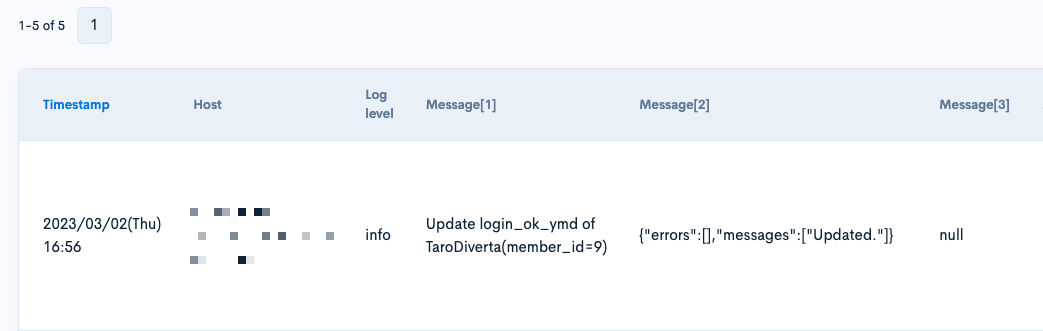
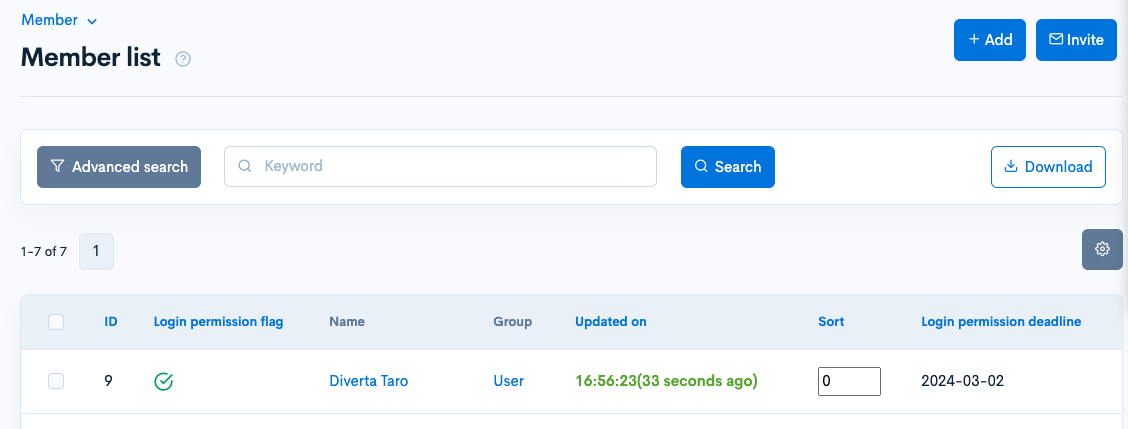
Operation check
Finally, login with the target member's account to check the operation.
If the setting is correct, the log will remain in the custom log as follows and the login permission expiry is updated.
With the above, we have implemented a reminding and automatic withdrawal function to members without login for a certain period of time.
Related documents
Support
If you have any other questions, please contact us or check out Our Slack Community.