Embedding Google Maps on Your Website
This page explains how to embed Google Maps on your own website and update the location information from the frontend.
Overview
Kuroco provides an extension format for storing location information on Google Maps. If you want to input location information through the Kuroco management screen, you can simply click on the location on the map displayed in the content editing screen of the Kuroco management screen to specify the location. However, when displaying a map on the front end or providing an interface to save specified location information, implementation using an API is necessary. This tutorial explains how to display the Google Maps interface on the frontend and update the location information.
Prerequisites
This page assumes that you have already set up a project in Kuroco.
If you haven't set up a project yet, please refer to the following tutorial.
Kuroco Beginner's Guide
This tutorial is written with the following versions:
Nuxt2: v2.15.8
Nuxt3: v3.8.0
Setting up Google Maps
Creating a New Project in GCP
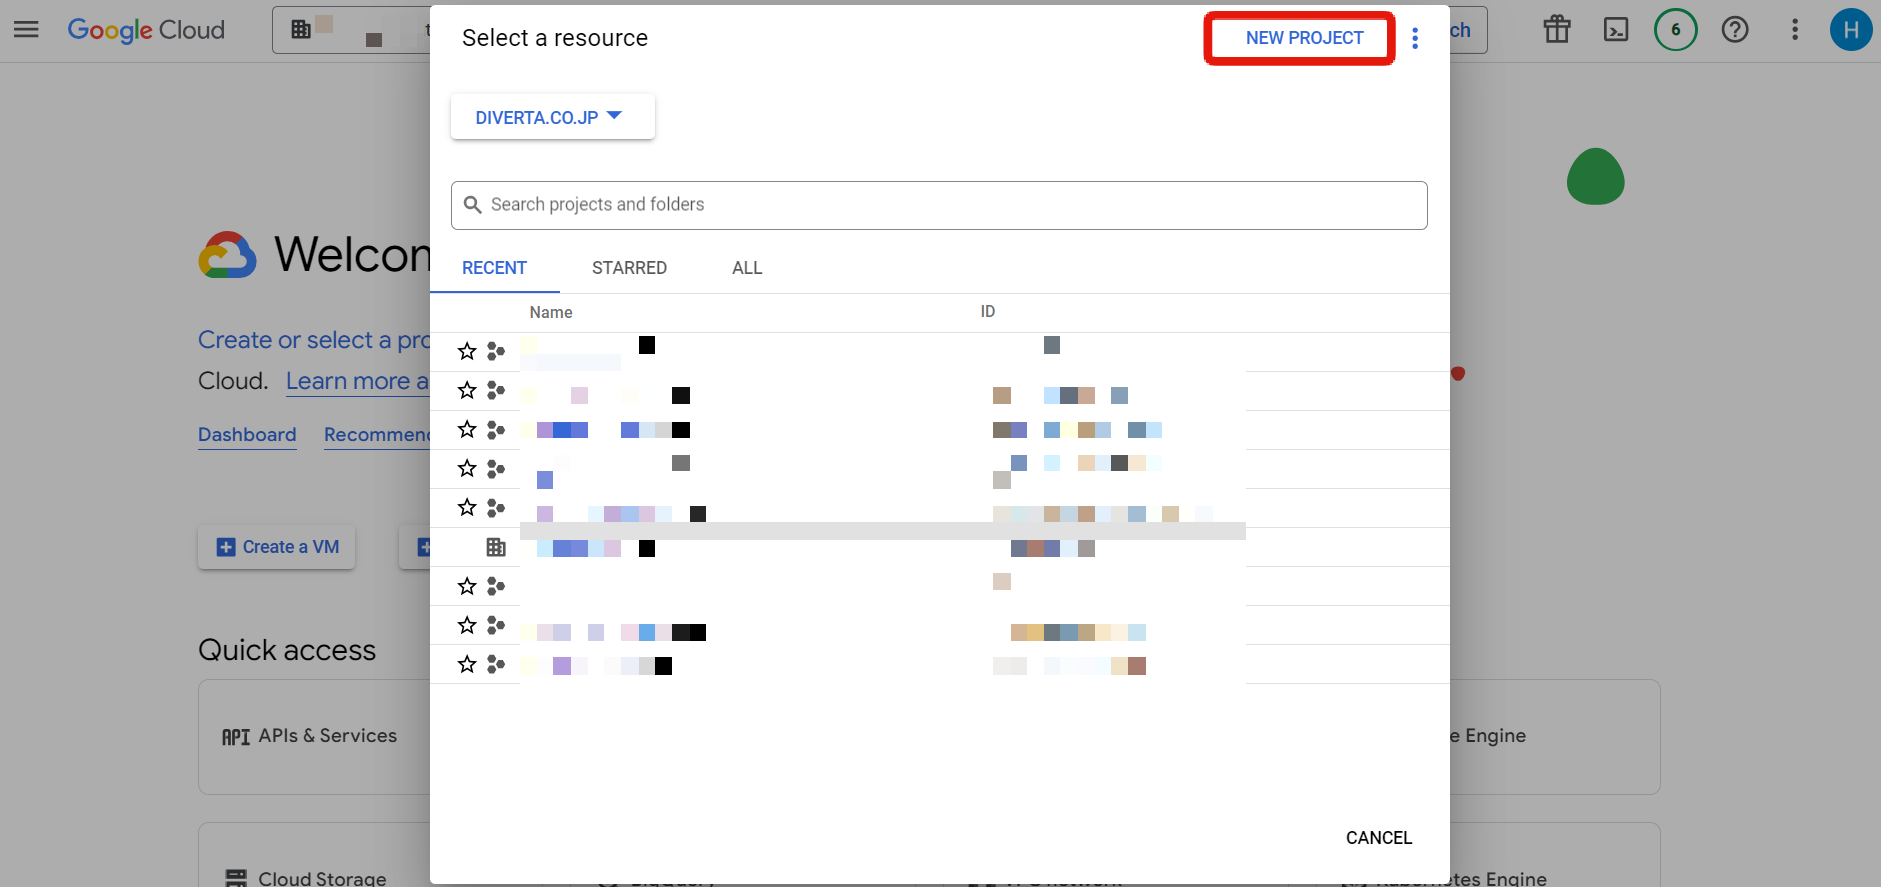
First, create a new project in the Google Cloud Platform (GCP).
Log in to the Google Cloud Platform and click on the project dropdown in the header.
Click on "NEW PROJECT" in the popup that appears.
On the new project settings page, enter a project name of your choice and click "Create".
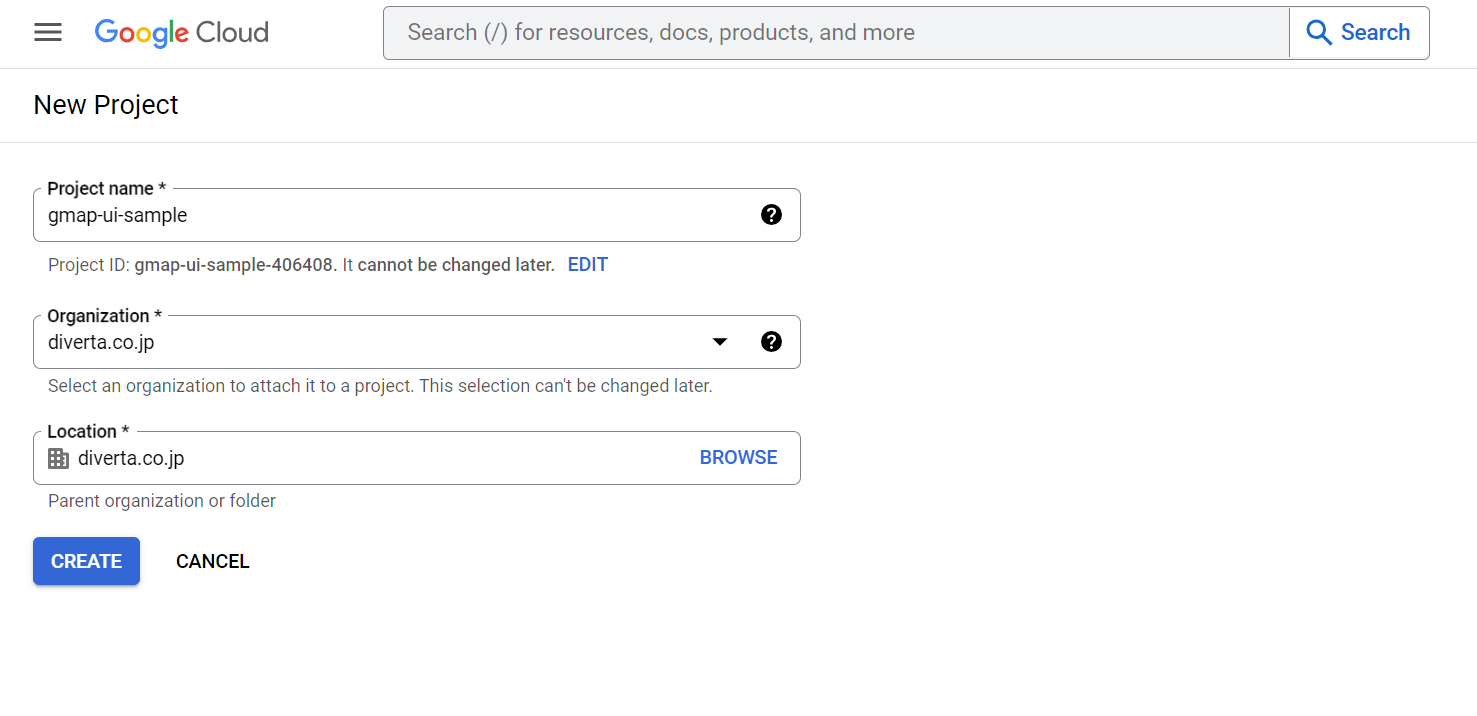
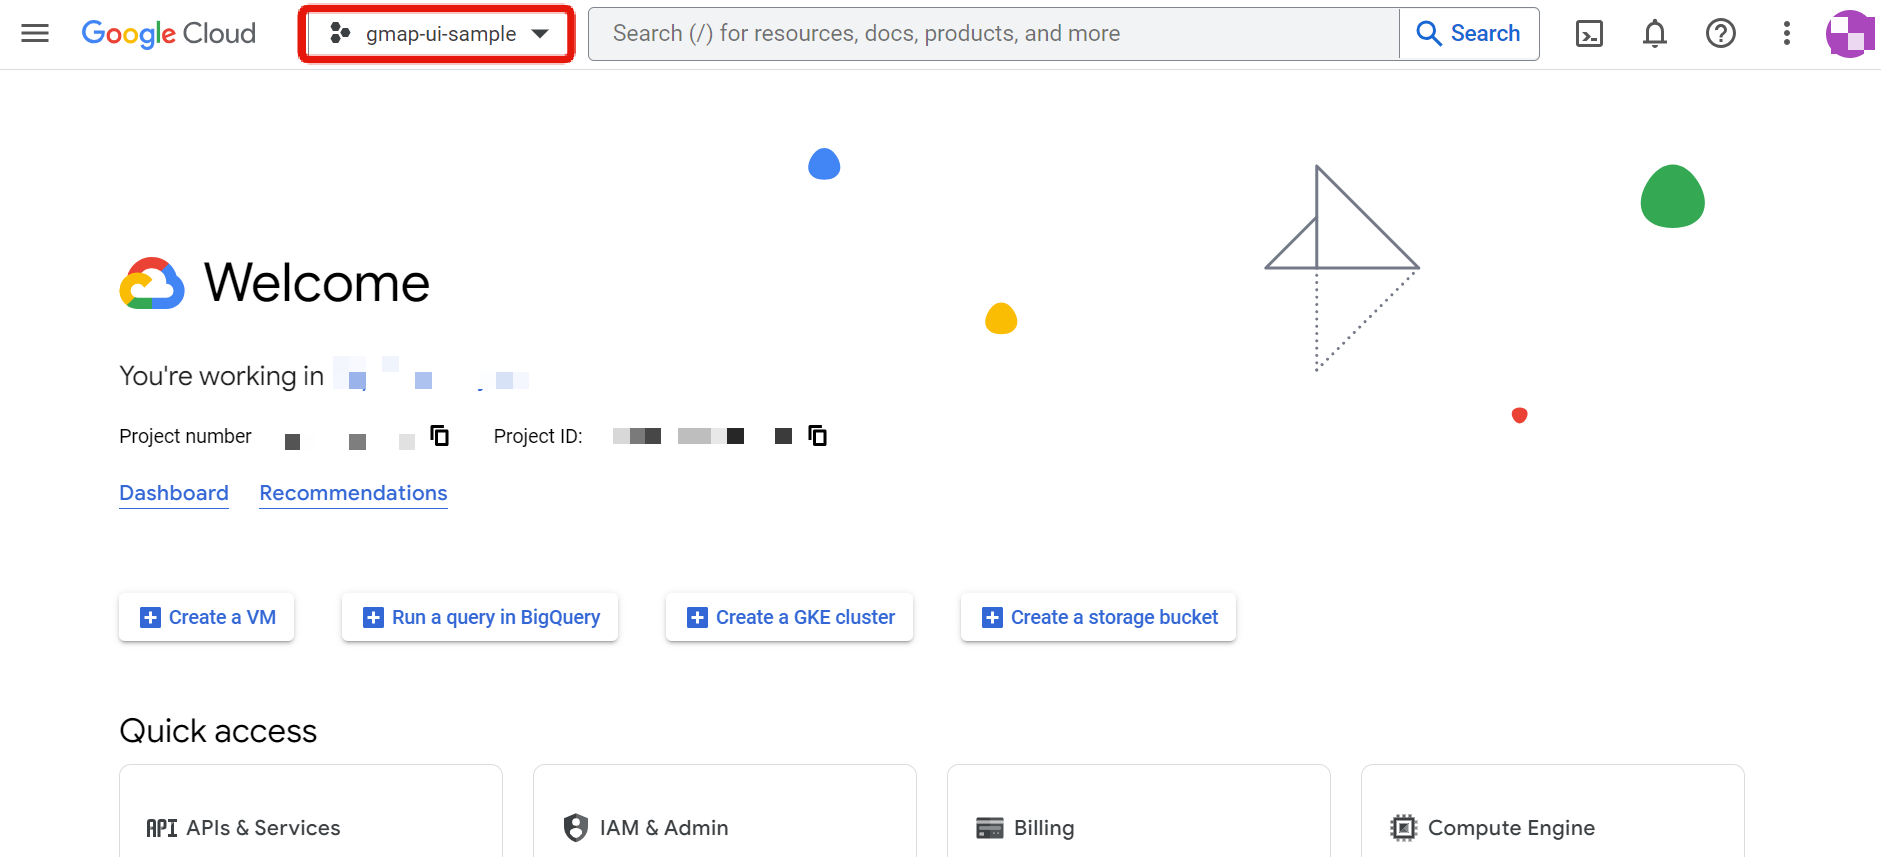
A new project has been created.
Enabling APIs
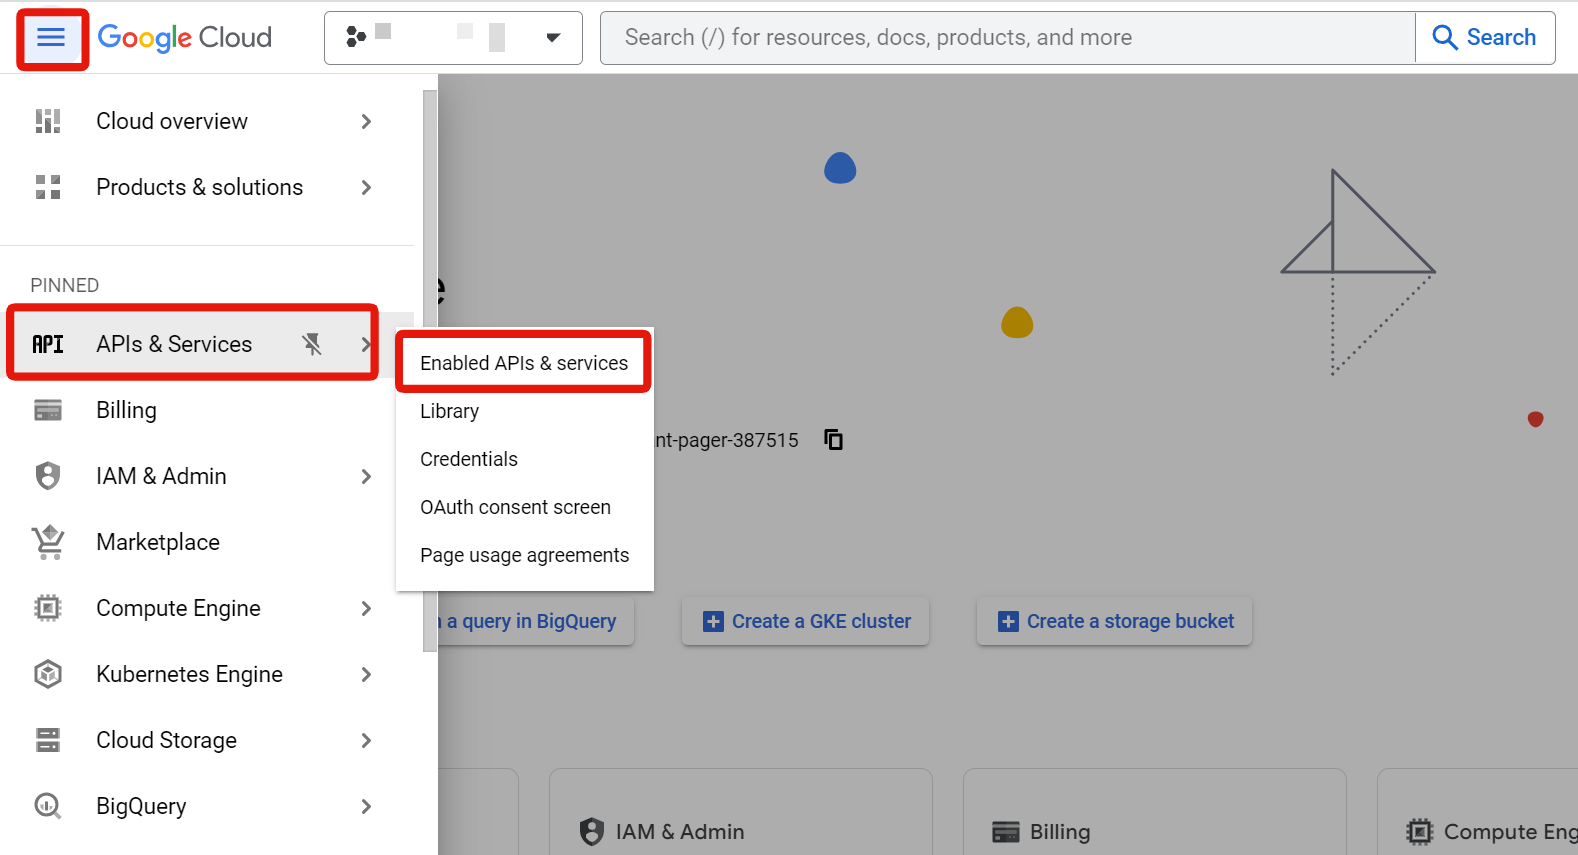
Next, enable the necessary APIs in the GCP console.
First, select the project you created from the project dropdown in the header of the GCP console.
Then, select "APIs & Services" - "Enabled APIs $ services" from the sidebar.
When you select "Library" from the sidebar, the API library page will be displayed.
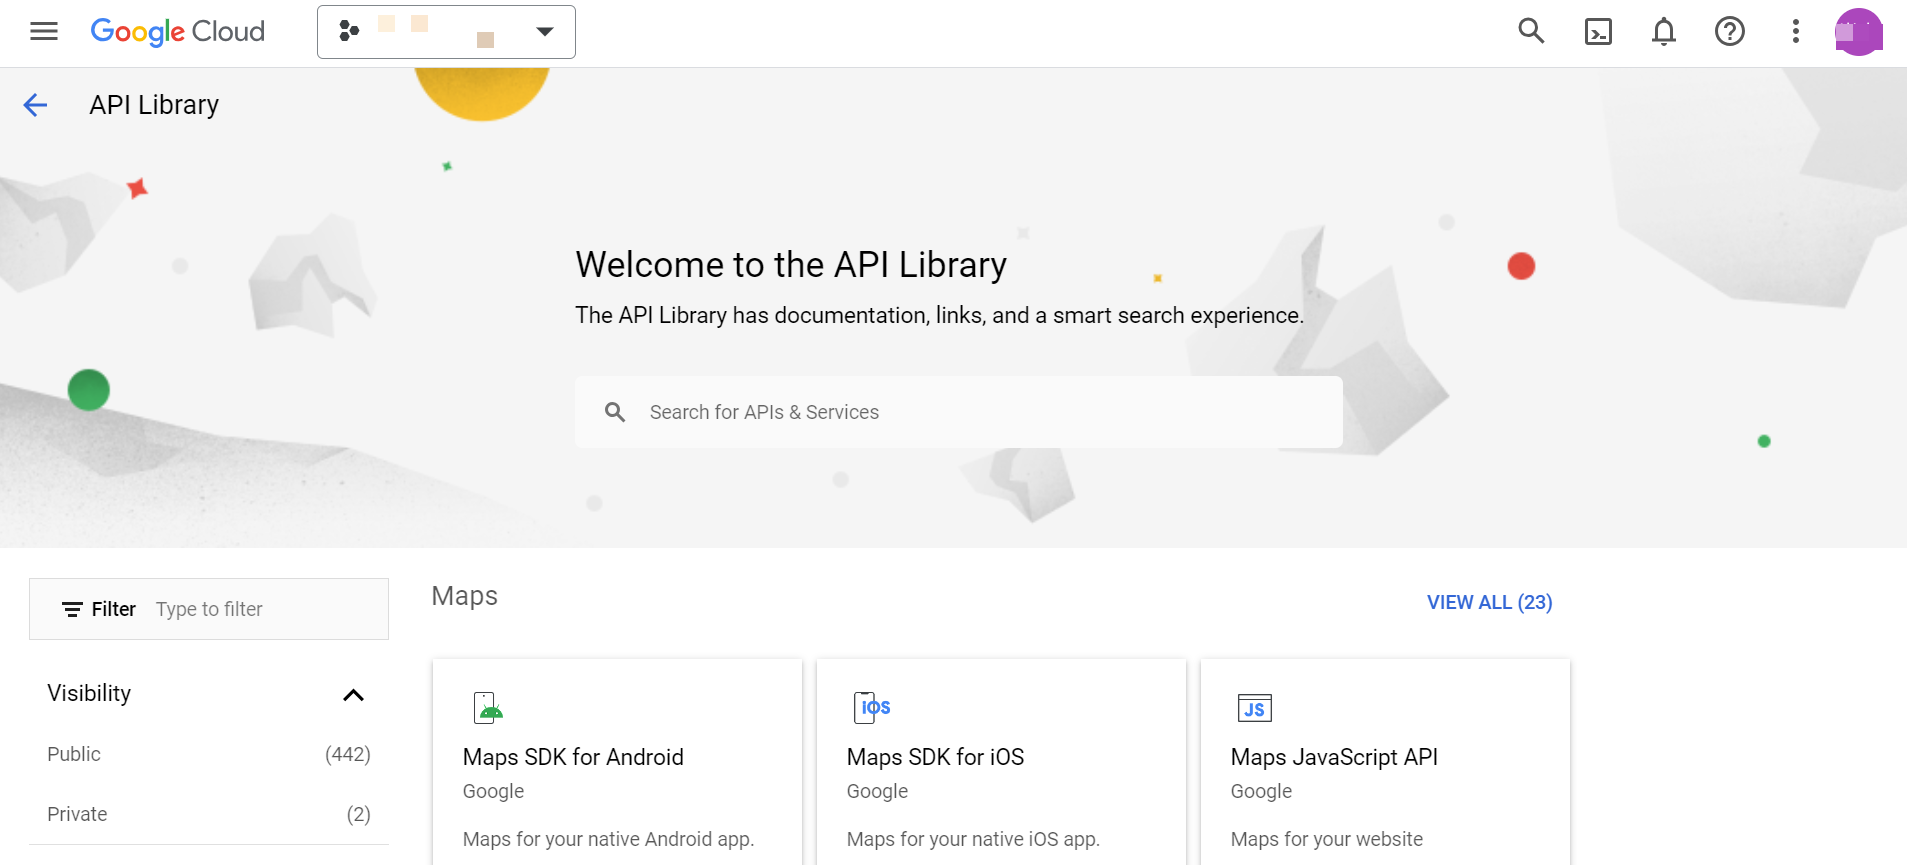
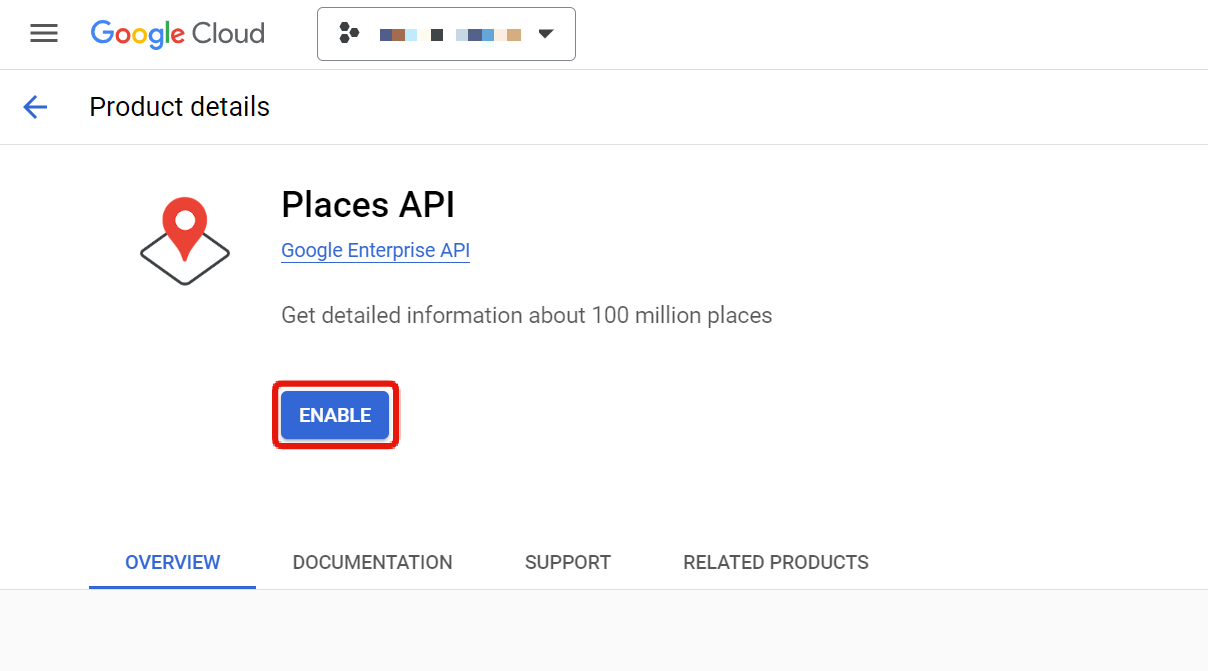
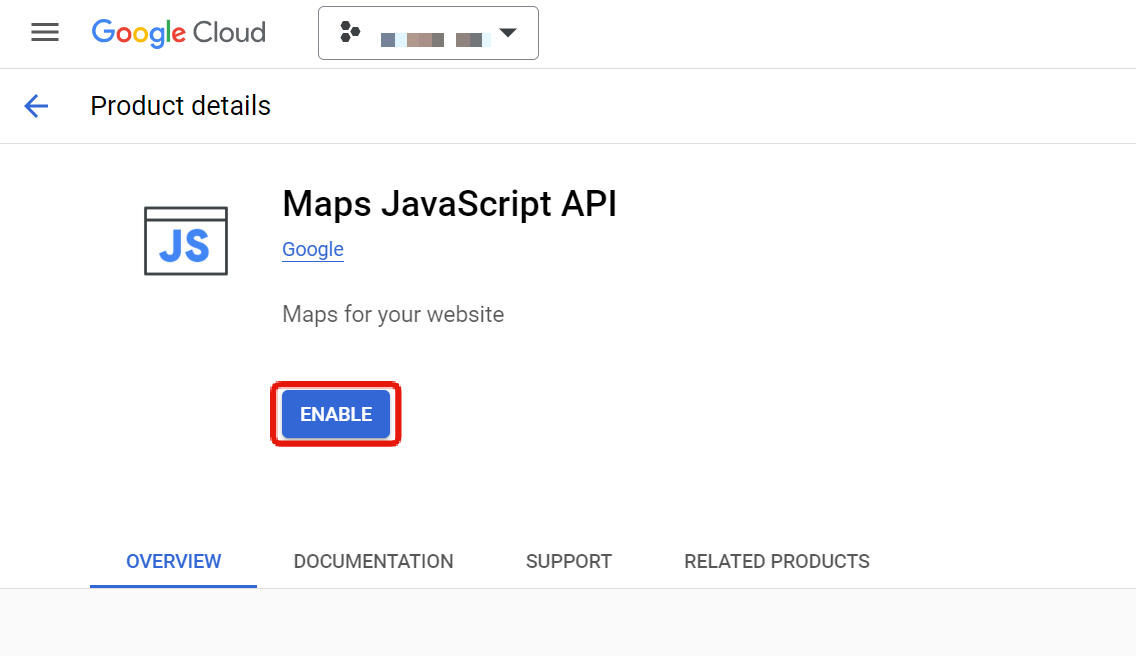
Here, search for "Places API" and "Maps JavaScript API" and enable each API.
Next, generate an API key. Select "Credentials" from the sidebar, and click on "+ Create Credentials".
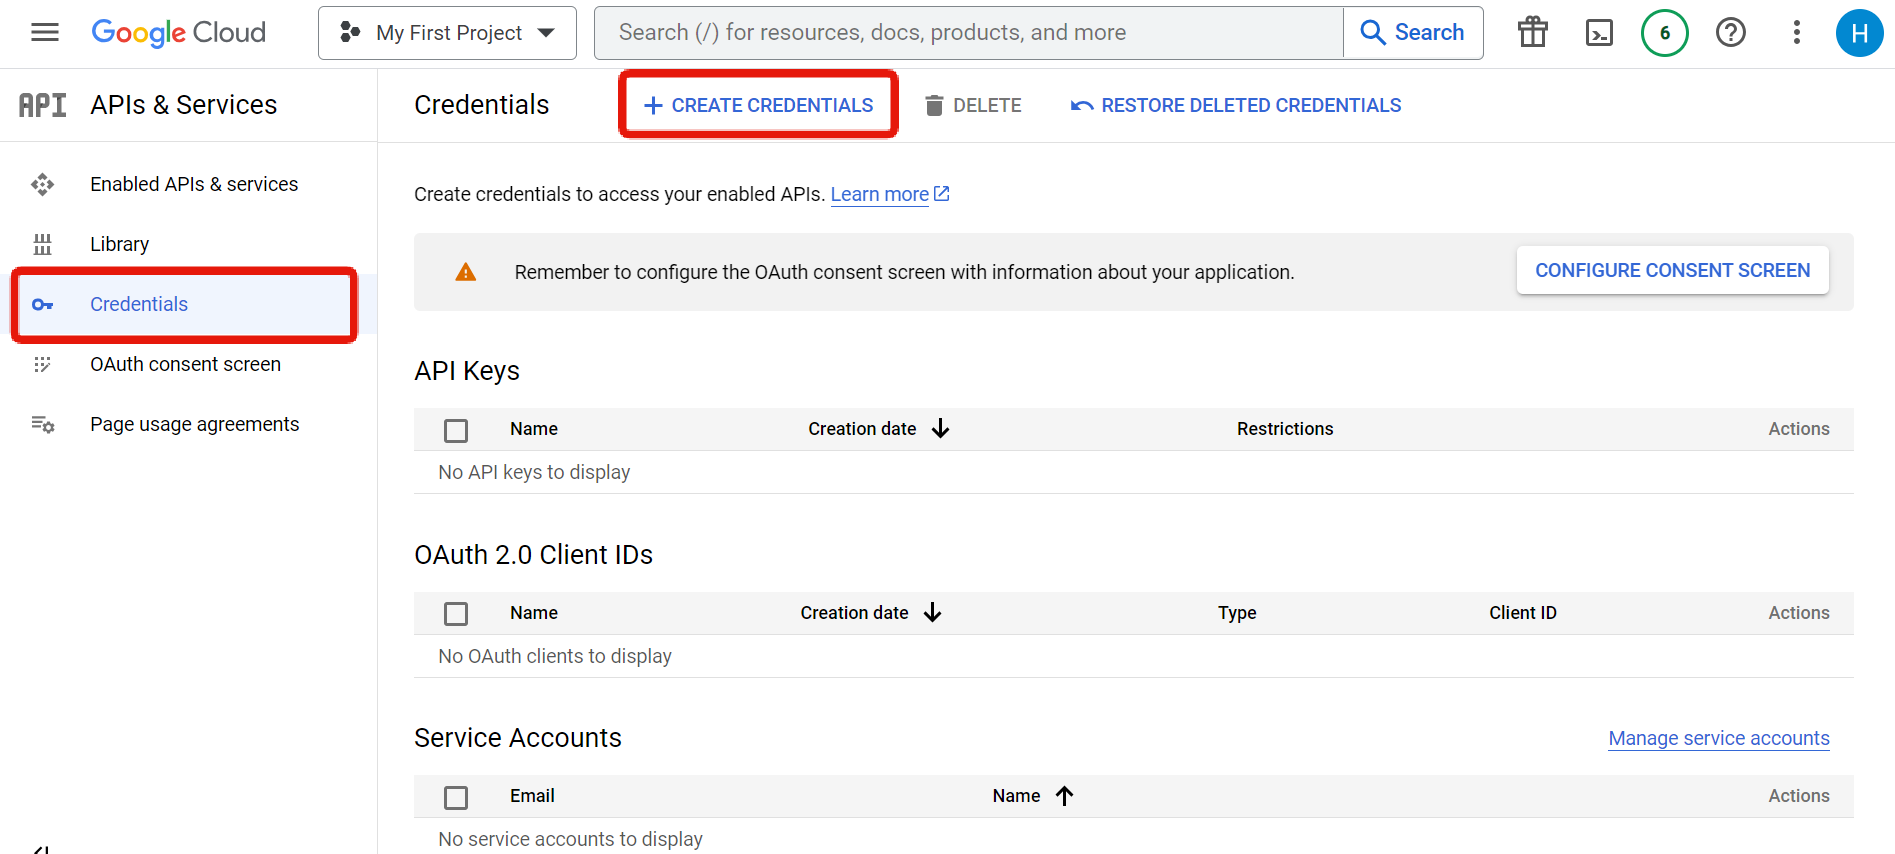
Select API key.
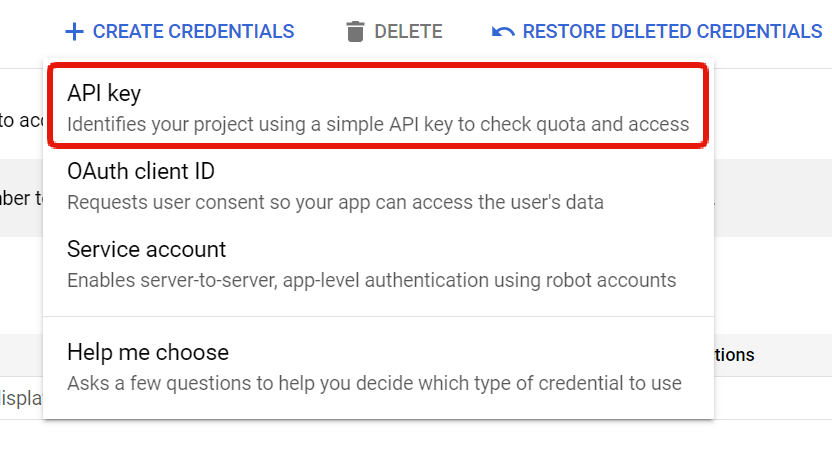
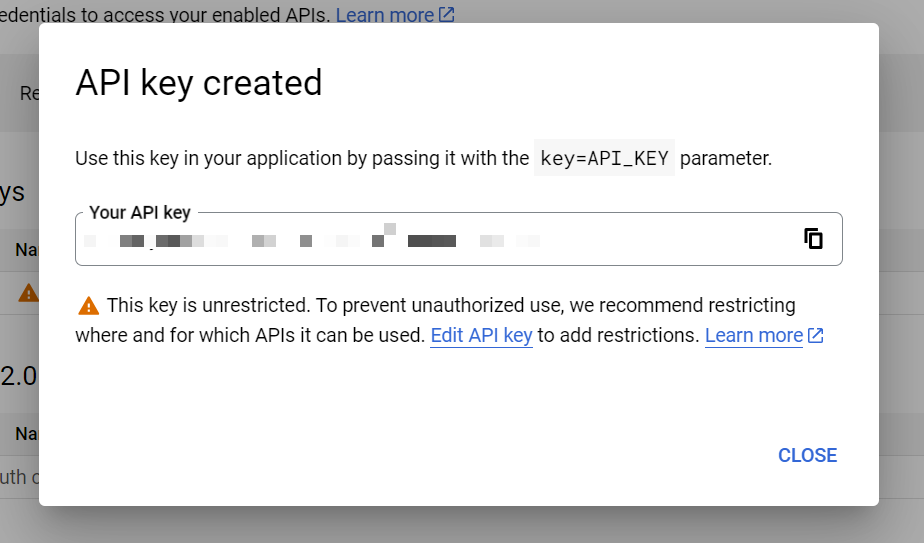
An API key will be generated. Please keep it as you will need it later.
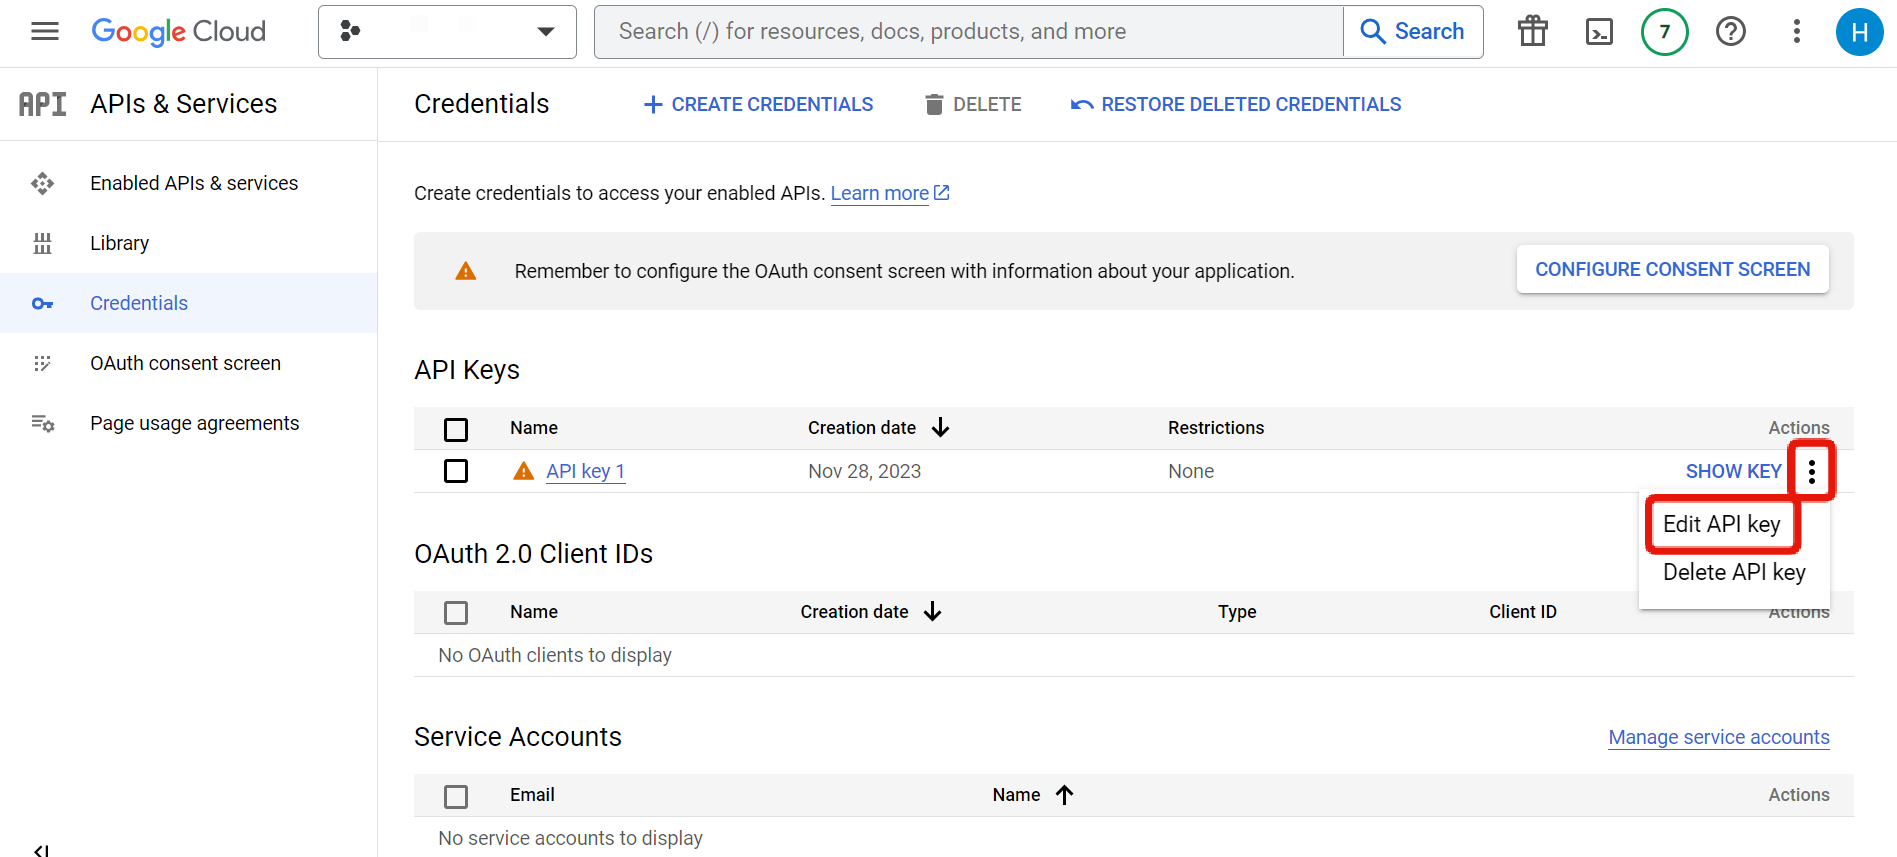
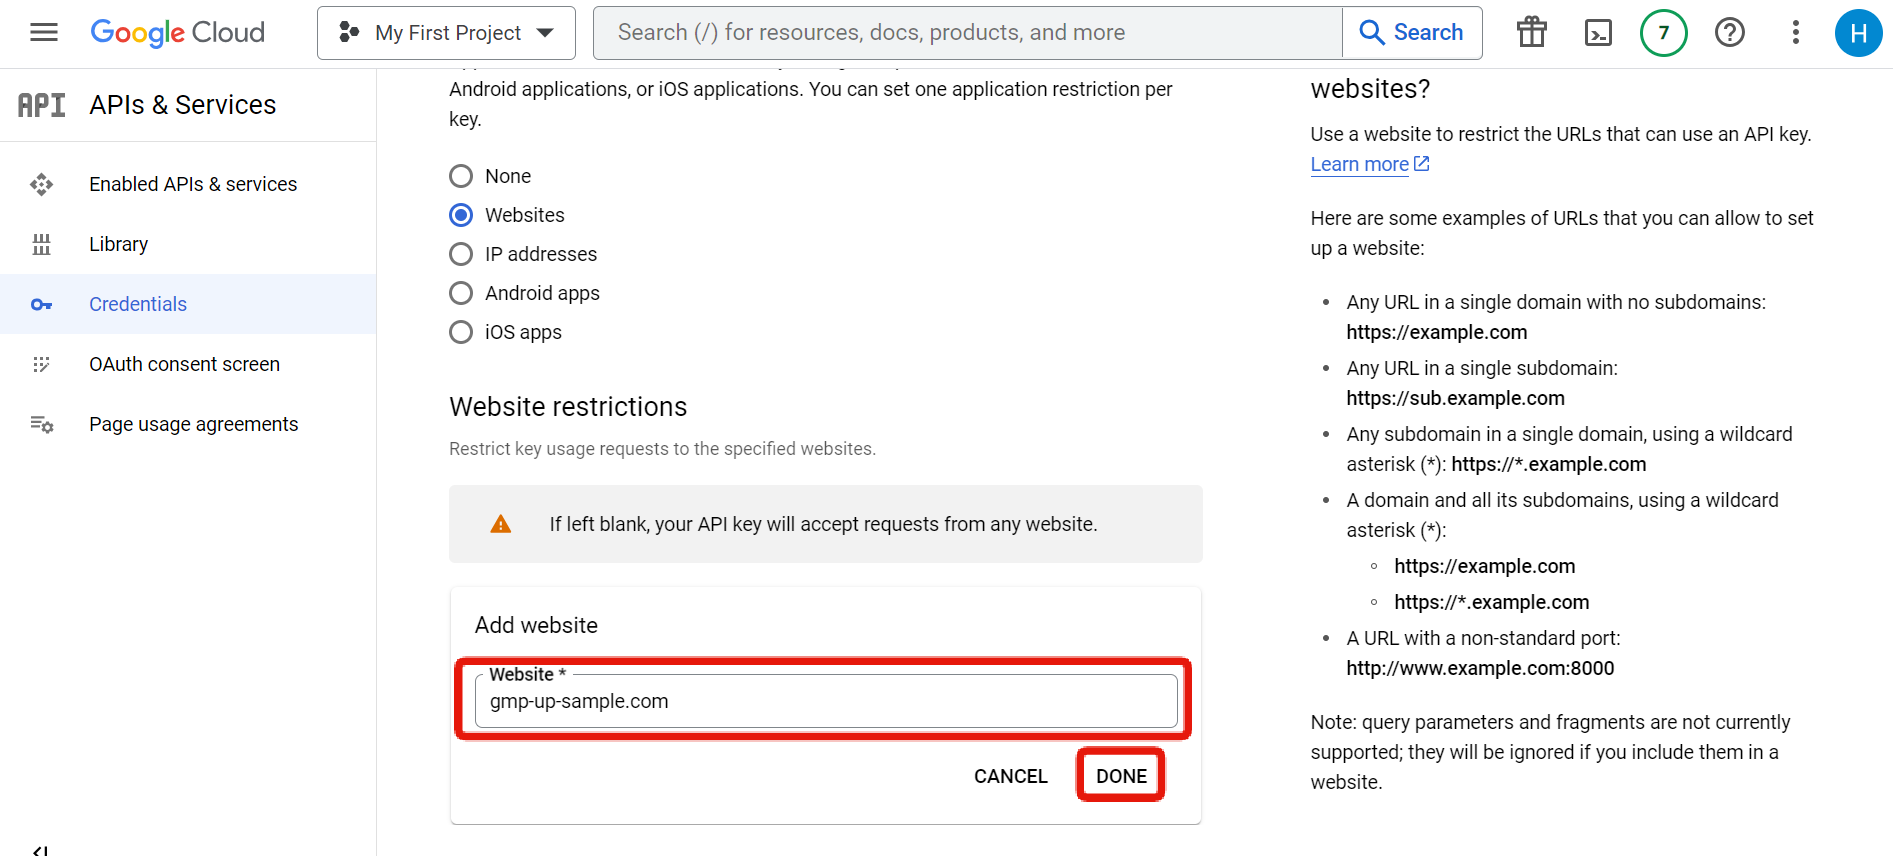
Setting up Allowed Domains
By registering the domain of your website with the API key, you can control the usage of the API and prevent unauthorized access from other websites.
On the credentials page, select "Edit API key" from the button on the right of the API key you created earlier.
Enter a name for the API key and select "Website" from the application restrictions settings.
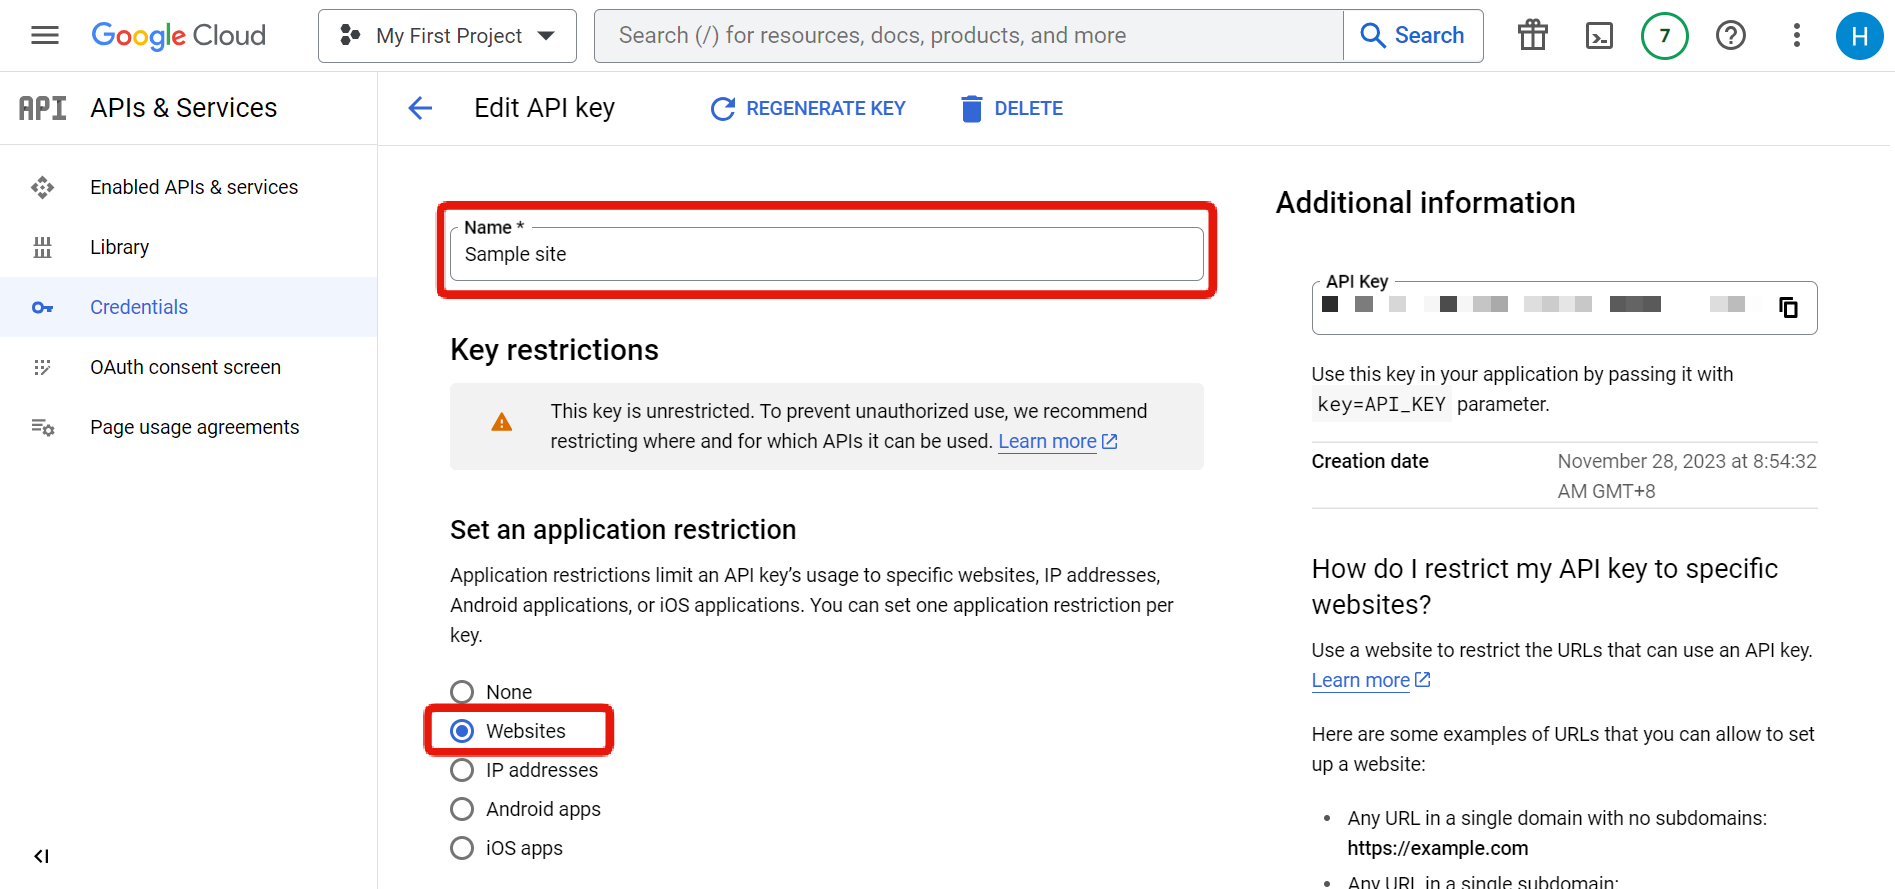
Click the "ADD" button, enter the domain of the site you plan to use, and click "DONE".
Kuroco Settings
Content Definition Settings
In the Kuroco content definition, set the following items in any optional section of the extended item.
| Item Name | Input Value |
|---|---|
| Item Name | Map (Google Maps) |
| Identifier | gmap |
| Item Setting | Map |

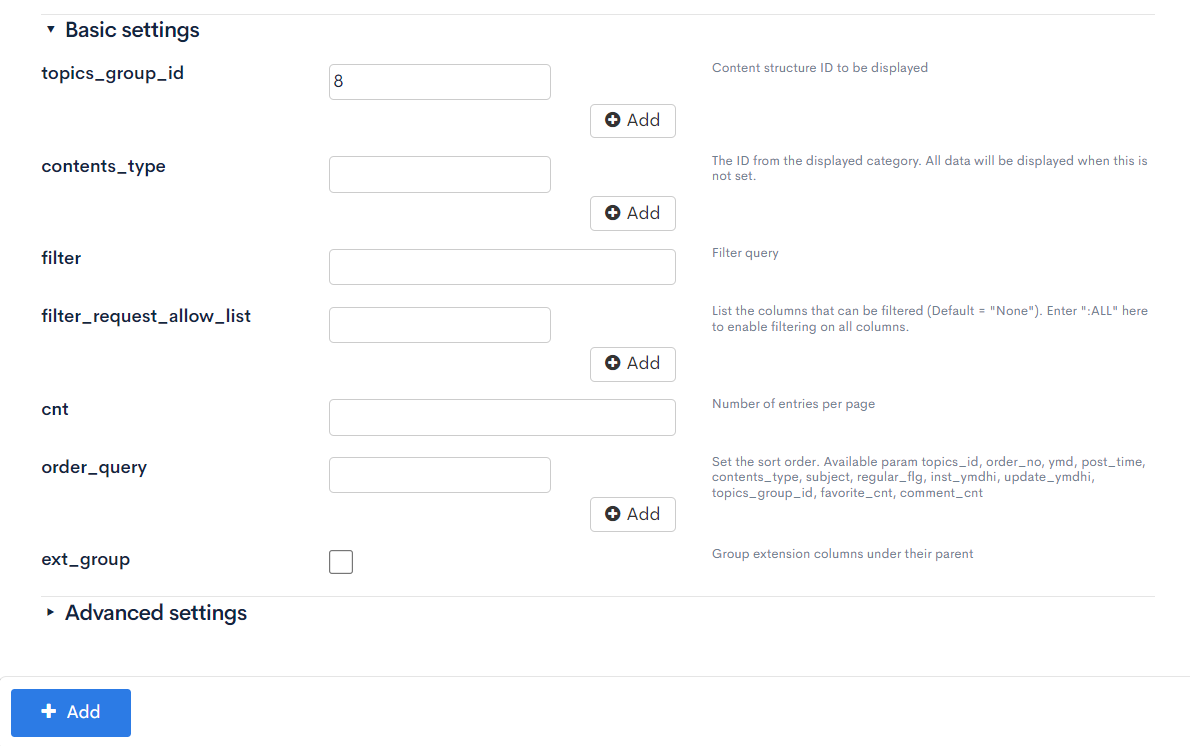
Creating Endpoints
Create an endpoint for retrieve map location information from Kuroco's content.
Please enter as follows:
| Item Name | Input Value |
|---|---|
| Path | /rmcs-api/(API ID)/map/details/{topics_id} |
| Model | Content - Topics - details |
| API Request Restriction | (Select the group or member filter that allows viewing) |
| Cache | 86400 |
| topics_group_id | (Content structrue ID of the content to be displayed) |

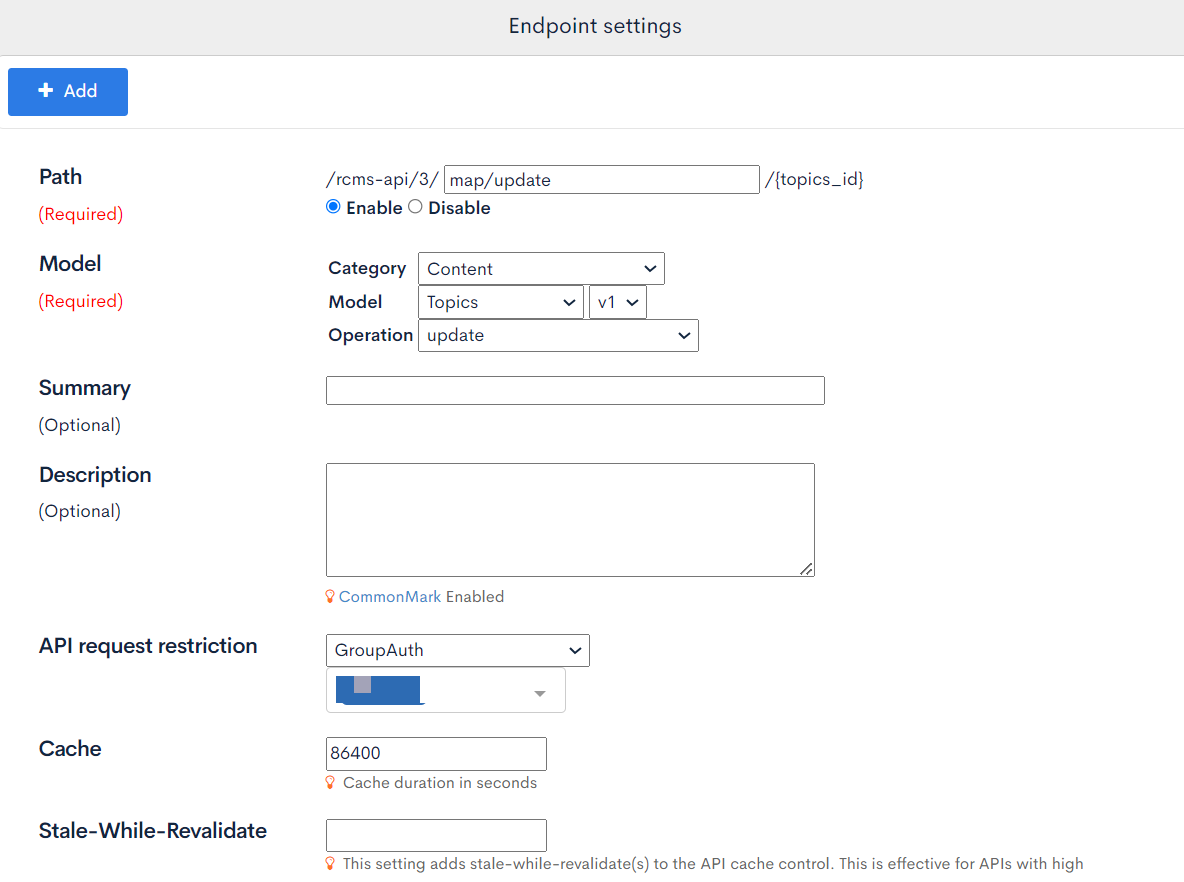
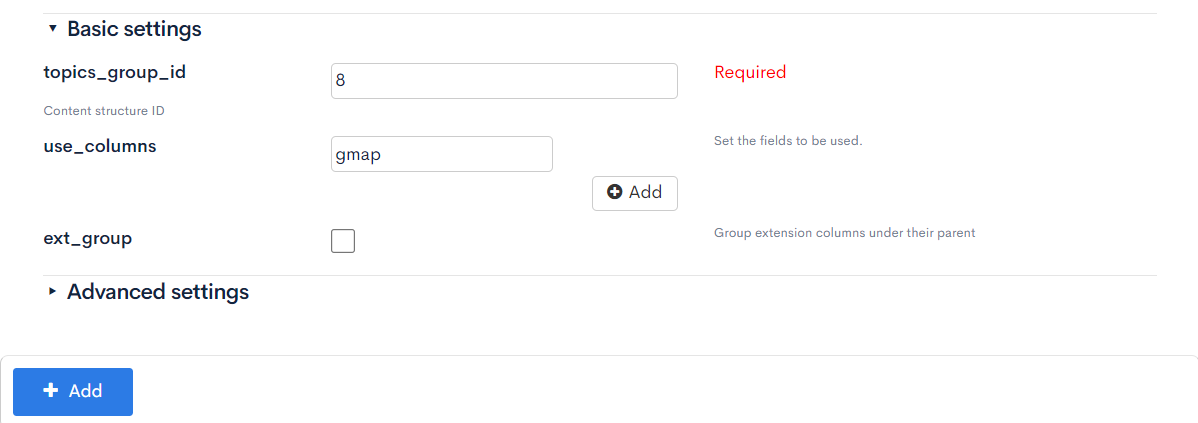
Create an endpoint for changing the location information of the map.
Please enter as follows:
| Item Name | Input Value |
|---|---|
| Path | /rmcs-api/(API ID)/map/update/{topics_id} |
| Model | Content - Topics - update |
| API Request Restriction | (Select the group or member filter that allows changes) |
| topics_group_id | (Content structrue ID of the content you want to update) |
| use_columns | gmap |
Frontend Implementation
Install npm module
Install the npm module which provides Vue.js components for Google Maps.
- Nuxt2
- Nuxt3
npm install vue2-google-maps
npm install vue3-google-map
Add GCP KEY to config
Add the generated API key to the website's configuration file (usually the config file). This allows the website to use the API. If you are implementing it with Nuxt.js, please add it as follows to .env or similar.
BASE_URL=https://sample-service-site.g.kuroco.app
GCP_KEY=**************************************
When using the contents of the .env file during deployment, you can either remove .env from .gitignore and manage the .env file on GitHub, or register the contents in GitHub Secrets and have GitHub Actions read and use them.
To read this constant, write following code.
- Nuxt2
- Nuxt3
export default {
  env: {
    GCP_KEY: process.env.GCP_KEY
  },
  // (omitted)

  plugins: [
    // (omitted)
    '@/plugins/vue2-google-maps.client'
  ],
export default defineNuxtConfig({
    runtimeConfig: {
        // Public keys that are exposed to the client
        public: {
            gcpKey: process.env.GCP_KEY,
            apiBase: 'https://*********.g.kuroco.app'
        }
    },
(Nuxt2 only)
Add a file named vue2-google-maps.client.js to the plugins/ directory and write the following:
- Nuxt2
import Vue from 'vue';
import * as VueGoogleMaps from 'vue2-google-maps';

Vue.use(VueGoogleMaps, {
    load: {
        key: process.env.GCP_KEY,
        libraries: 'places'
    }
});
Implementation of a page displaying Google Maps
Let's display a Google Map on the website. Use the installed components and implement as follows:
- Nuxt2
- Nuxt3
<template>
  <div class="container">
    <h3>Map (Google Maps)</h3>
    <form id="topics_edit" @submit.prevent="update">
      <div>
        <GmapMap
          ref="gmap"
          :center="mapCenter"
          :zoom="gmap_zoom"
          :map-type-id="gmap_type"
          style="width: 500px; height: 300px"
        >
          <GmapMarker
            v-if="markPlace"
            :position="markPlace"
          />
        </GmapMap>
      </div>
    </form>
  </div>
</template>

<script>
export default {
  async asyncData({ $axios, route }) {
    const id = route.params.id;
    const url = `/rcms-api/1/test/${id}`;

    const contents = await $axios
      .$get(url)
      .then((response) => {
        if (response.details) {
          return response.details;
        }
        return {};
      })
      .catch((error) => {
        console.log(error);
        return {};
      });
    // Googleマップの初期状態をセット
    let mapCenter = { lat: 35.66107078220203, lng: 139.7584319114685 };
    let markPlace = null;
    if (contents.gmap?.gmap_x && contents.gmap?.gmap_y) {
      const lat = Number(contents.gmap.gmap_y);
      const lng = Number(contents.gmap.gmap_x);
      mapCenter = { lat, lng };
      markPlace = { lat, lng };
    }

    return {
      mapCenter,
      markPlace,
      id,
      contents,
      errors: []
    };
  },
  computed: {
    gmap_zoom() {
      return Number(this.contents.gmap?.gmap_zoom) || 15;
    },
    gmap_type() {
      return this.contents.gmap?.gmap_type || 'roadmap';
    }
  }
};
</script>
<template>
  <div v-if="data" class="container">
    <h3>Map (Google Maps)</h3>
    <form id="topics_edit" @submit.prevent="update">
      <div>
        <GoogleMap
          :mapId="MAP_ID"
          ref="gmap"
          :center="mapCenter"
          :zoom="gmap_zoom"
          :map-type-id="gmap_type"
          style="width: 500px; height: 300px"
          @click="mark($event)"
          @zoom_changed="setZoom"
          @maptypeid_changed="gmap_type = $event"
          :api-key="key"
        >
          <AdvancedMarker
            v-if="markPlace"
            :options="markerOptions"
            @click="mapClicked"
          />
        </GoogleMap>
      </div>
      <input type="submit" value="Save" />
    </form>
  </div>
</template>

<script setup>
import { AdvancedMarker, GoogleMap } from "vue3-google-map";
const route = useRoute();
const config = useRuntimeConfig();
const key = config.public.gcpKey;
const gmap = ref(null);
const mapCenter = ref({ lat: 35.66107078220203, lng: 139.7584319114685 });
const markPlace = ref(null);
const markerOptions = computed(() => ({
  position: markPlace.value || mapCenter.value,
  draggable: true,
}));
const id = ref(route.params.id);
const contents = ref({});
const MAP_ID = "DEMO_MAP_ID";
console.log("googleMap", gmap.value);
const { data } = await useAsyncData("mapDetails", async () => {
  const url = `/rcms-api/1/newsdetail/${id.value}`;
  try {
    const response = await $fetch(url, {
      method: "GET",
      baseURL: config.public.apiBase,
      credentials: "include",
    });
    if (response.details) {
      return response.details;
    }
    return {};
  } catch (error) {
    return {};
  }
});
onMounted(() => {
  contents.value = data.value;
  if (contents.value.gmap?.gmap_x && contents.value.gmap?.gmap_y) {
    const lat = Number(contents.value.gmap.gmap_y)
      ? Number(contents.value.gmap.gmap_y)
      : 35.66107078220203;
    const lng = Number(contents.value.gmap.gmap_x)
      ? Number(contents.value.gmap.gmap_x)
      : 139.7584319114685;
    mapCenter.value = { lat, lng };
    markPlace.value = { lat, lng };
  }
});
const gmap_zoom = computed({
  get: () => Number(contents.value.gmap?.gmap_zoom) || 15,
  set: (val) => {
    if (!contents.value.gmap) contents.value.gmap = {};
    contents.value.gmap.gmap_zoom = String(val);
  },
});
const gmap_type = computed({
  get: () => contents.value.gmap?.gmap_type || "roadmap",
  set: (val) => {
    if (!contents.value.gmap) contents.value.gmap = {};
    contents.value.gmap.gmap_type = val;
  },
});
function mapClicked(event) {
  // console.log("mapCLicked", { event });
}
function setZoom() {
  contents.value.gmap.gmap_zoom = gmap.value.zoom;
}
</script>
Please adjust the URL of the endpoint you are using to your own.
The result of the execution is as follows.
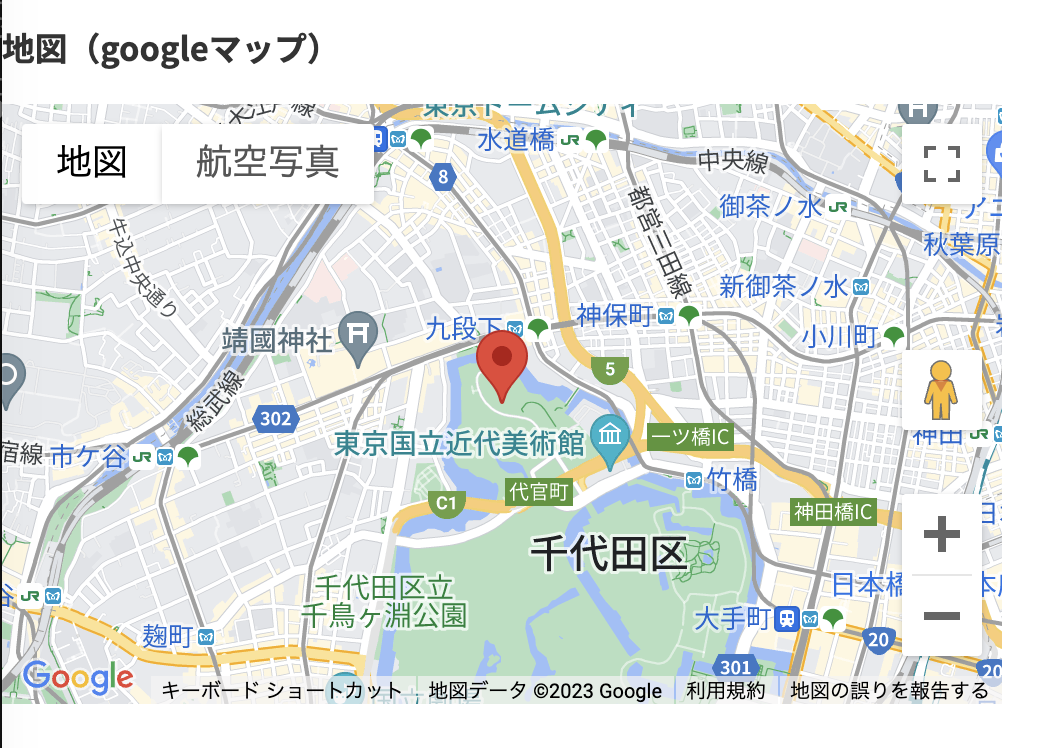
Implementation of a page updating Google Maps contents
Next, let's make it possible to update the location information from the frontend.
- Nuxt2
- Nuxt3
<template>
  <div class="container">
    <h3>Map (Google Maps)</h3>
    <div>
      The position that is set changes when you click on the map. You can also set the zoom and other states.
    </div>
    <form id="topics_edit" @submit.prevent="update">
      <div>
        <form onsubmit="return false;">
          <GmapAutocomplete
            :options="{fields: ['geometry']}"
            :select-first-on-enter="true"
            @place_changed="setPlace"
          />
          <GmapMap
            ref="gmap"
            :center="mapCenter"
            :zoom="gmap_zoom"
            :map-type-id="gmap_type"
            style="width: 500px; height: 300px"
            @click="mark($event)"
            @zoom_changed="gmap_zoom = $event"
            @maptypeid_changed="gmap_type = $event"
          >
            <GmapMarker
              v-if="markPlace"
              :position="markPlace"
            />
          </GmapMap>
        </form>
      </div>
      <input
        type="submit"
        value="Save"
      >
    </form>
  </div>
</template>

<script>
export default {
  async asyncData({ $axios, route }) {
    const id = route.params.id;
    const url = `/rcms-api/1/test/${id}`;

    const contents = await $axios
      .$get(url)
      .then((response) => {
        if (response.details) {
          return response.details;
        }
        return {};
      })
      .catch((error) => {
        console.log(error);
        return {};
      });
    // Googleマップの初期状態をセット
    let mapCenter = { lat: 35.66107078220203, lng: 139.7584319114685 };
    let markPlace = null;
    if (contents.gmap?.gmap_x && contents.gmap?.gmap_y) {
      const lat = Number(contents.gmap.gmap_y);
      const lng = Number(contents.gmap.gmap_x);
      mapCenter = { lat, lng };
      markPlace = { lat, lng };
    }

    return {
      mapCenter,
      markPlace,
      id,
      contents,
      errors: []
    };
  },
  computed: {
    gmap_zoom: {
      get() { return Number(this.contents.gmap?.gmap_zoom) || 15; },
      set(val) { this.contents.gmap.gmap_zoom = String(val); }
    },
    gmap_type: {
      get() { return this.contents.gmap?.gmap_type || 'roadmap'; },
      set(val) { this.contents.gmap.gmap_type = val; }
    }
  },
  methods: {
    setPlace(place) {
      if (place.geometry) {
        this.markPlace = {
          lat: place.geometry.location.lat(),
          lng: place.geometry.location.lng()
        };
        if (place.geometry.viewport) {
          this.$refs.gmap.fitBounds(place.geometry.viewport);
        } else {
          this.$refs.gmap.panTo(place.geometry.location);
        }
      }
    },
    mark(event) {
      this.markPlace = {
        lat: event.latLng.lat(),
        lng: event.latLng.lng()
      };
    },
    async update() {
      const params = {
        gmap: {
          gmap_x: '',
          gmap_y: '',
          gmap_zoom: (this.contents?.gmap?.gmap_zoom || 15),
          gmap_type: (this.contents?.gmap?.gmap_type || 'roadmap')
        }
      };
      if (this.markPlace) {
        params.gmap.gmap_x = String(this.markPlace.lng);
        params.gmap.gmap_y = String(this.markPlace.lat);
      }
      await this.$axios.post(
        '/rcms-api/1/update_news/' + this.$route.params.id,
        params
      ).then((response) => {
        if (response.data.errors?.length) {
          console.log(response.data.errors);
        }
        this.errors = [];
      }).catch((error) => {
        console.log(error);
      });
    }
  }
};
</script>
<template>
  <div v-if="data" class="container">
    <h3>Map (Google Maps)</h3>
    <div>
      The position that is set changes when you click on the map. You can also set the zoom and other states.
    </div>
    <form id="topics_edit" @submit.prevent="update">
      <div>
        <GoogleMap
          :mapId="MAP_ID"
          ref="gmap"
          :center="mapCenter"
          :zoom="gmap_zoom"
          :map-type-id="gmap_type"
          style="width: 500px; height: 300px"
          @click="mark($event)"
          @zoom_changed="setZoom"
          @maptypeid_changed="gmap_type = $event"
          :api-key="key"
        >
          <AdvancedMarker
            v-if="markPlace"
            :options="markerOptions"
            @click="mapClicked"
          />
        </GoogleMap>
      </div>
      <input type="submit" value="Save" />
    </form>
  </div>
</template>

<script setup>
import { AdvancedMarker, GoogleMap } from "vue3-google-map";
const route = useRoute();
const config = useRuntimeConfig();
const key = config.public.gcpKey;
const gmap = ref(null);
const mapCenter = ref({ lat: 35.66107078220203, lng: 139.7584319114685 });
const markPlace = ref(null);
const markerOptions = computed(() => ({
  position: markPlace.value || mapCenter.value,
  draggable: true,
}));
const id = ref(route.params.id);
const contents = ref({});
const errors = ref([]);
const MAP_ID = "DEMO_MAP_ID";
console.log("googleMap", gmap.value);
const { data } = await useAsyncData("mapDetails", async () => {
  const url = `/rcms-api/1/newsdetail/${id.value}`;
  try {
    const response = await $fetch(url, {
      method: "GET",
      baseURL: config.public.apiBase,
      credentials: "include",
    });
    if (response.details) {
      return response.details;
    }
    return {};
  } catch (error) {
    return {};
  }
});

onMounted(() => {
  contents.value = data.value;
  if (contents.value.gmap?.gmap_x && contents.value.gmap?.gmap_y) {
    const lat = Number(contents.value.gmap.gmap_y)
      ? Number(contents.value.gmap.gmap_y)
      : 35.66107078220203;
    const lng = Number(contents.value.gmap.gmap_x)
      ? Number(contents.value.gmap.gmap_x)
      : 139.7584319114685;
    mapCenter.value = { lat, lng };
    markPlace.value = { lat, lng };
  }
});

const gmap_zoom = computed({
  get: () => Number(contents.value.gmap?.gmap_zoom) || 15,
  set: (val) => {
    if (!contents.value.gmap) contents.value.gmap = {};
    contents.value.gmap.gmap_zoom = String(val);
  },
});
const gmap_type = computed({
  get: () => contents.value.gmap?.gmap_type || "roadmap",
  set: (val) => {
    if (!contents.value.gmap) contents.value.gmap = {};
    contents.value.gmap.gmap_type = val;
  },
});

function mark(event) {
  markPlace.value = {
    lat: event.latLng.lat(),
    lng: event.latLng.lng(),
  };
  update();
}

function setZoom() {
  contents.value.gmap.gmap_zoom = gmap.value.map.zoom;
}

async function update() {
  const params = {
    gmap: {
      gmap_x: "",
      gmap_y: "",
      gmap_zoom: String(contents.value?.gmap?.gmap_zoom) || "15",
      gmap_type: contents.value?.gmap?.gmap_type || "roadmap",
    },
  };
  if (markPlace.value) {
    params.gmap.gmap_x = String(markPlace.value.lng);
    params.gmap.gmap_y = String(markPlace.value.lat);
  }
  try {
    const response = await $fetch(
      "/rcms-api/1/update_news/" + route.params.id,
      {
        method: "POST",
        credentials: "include",
        baseURL: config.public.apiBase,
        body: params,
      }
    );
    // console.log(response);
    if (response.data.errors?.length) {
      console.log(response.data.errors);
    }
    errors.value = [];
  } catch (error) {}
}
</script>
Please adjust the URL of the endpoint you are using to your own.
The result of execution is as follows.
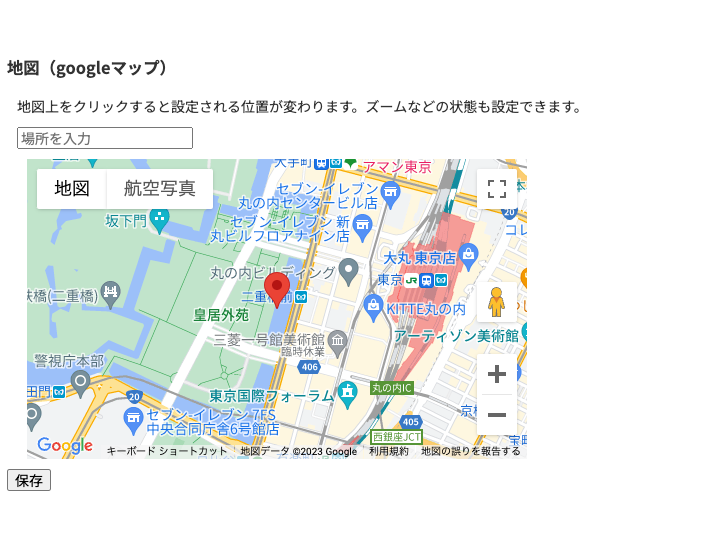
When you click the save button, the position of the pin and the zoom state will be written to Kuroco's DB.
In the above sample code, for simplicity, the page is displayed even in a non-logged-in state, but normally you would log in before making updates. Please refer to the following for information on logging in. Building a login page using Kuroco and Nuxt.js
With the above steps, you have embedded Google Maps on your website and enabled the ability to change the location information on your website just like in the Kuroco admin panel. By following these procedures, you can provide your website users with a great map experience.
Related documents
Support
If you have any other questions, please contact us or check out Our Slack Community.