How to check the API security using Swagger UI
In Kuroco, Swagger UI can be used to check the operation and specifications of each created API.
This tutorial explains how to check the topic data on Swagger UI with the 5 patterns of security settings below.
- Display topic data with Security: None
- Display topic data with Security: Cookie
- Display topic data with Security: Static access token
- Display topic data with Security: Dynamic access token
- Display topic data with Security: Privileged static token
Ref: Refer to API Security regarding the API security.
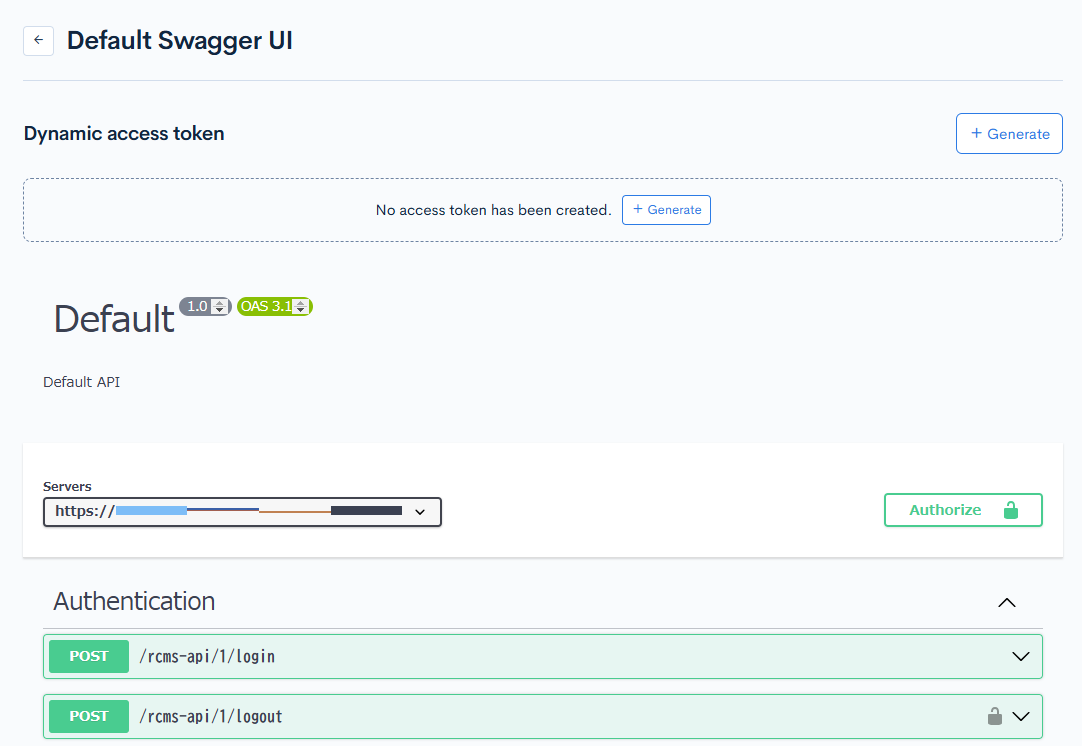
About Swagger UI
Swagger UI is an open-source playground that visualizes OpenAPI, which is the standard specification of API, on the WEB.
This tutorial doesn't explain the Detailed usage of Swagger UI. Please check Swagger official website for details.
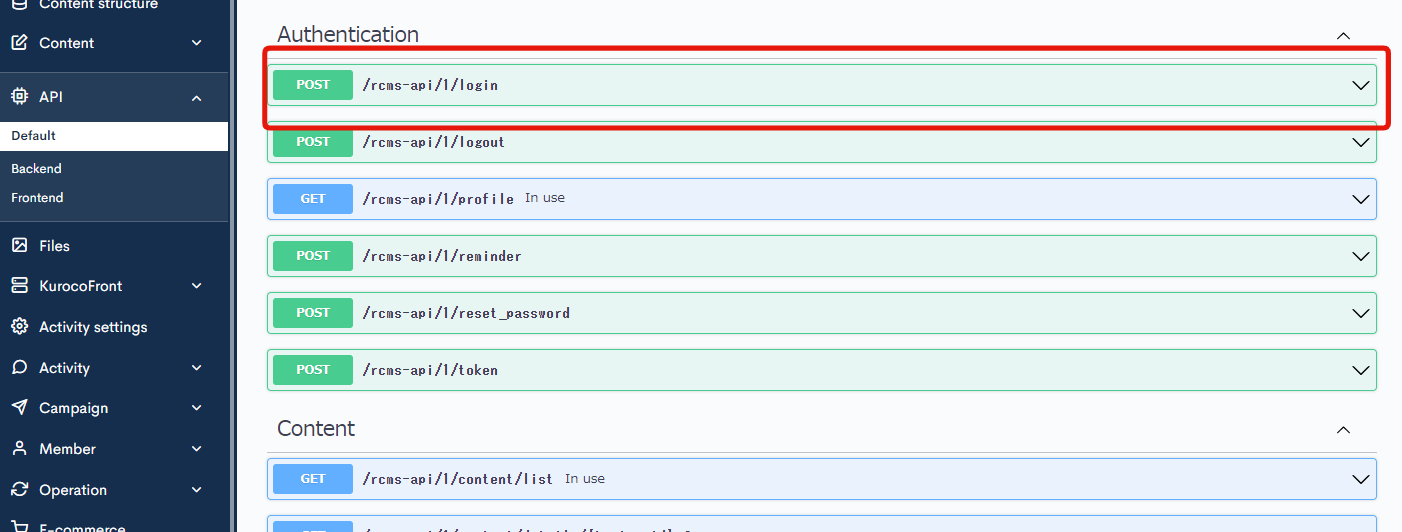
How to display the Swagger UI page
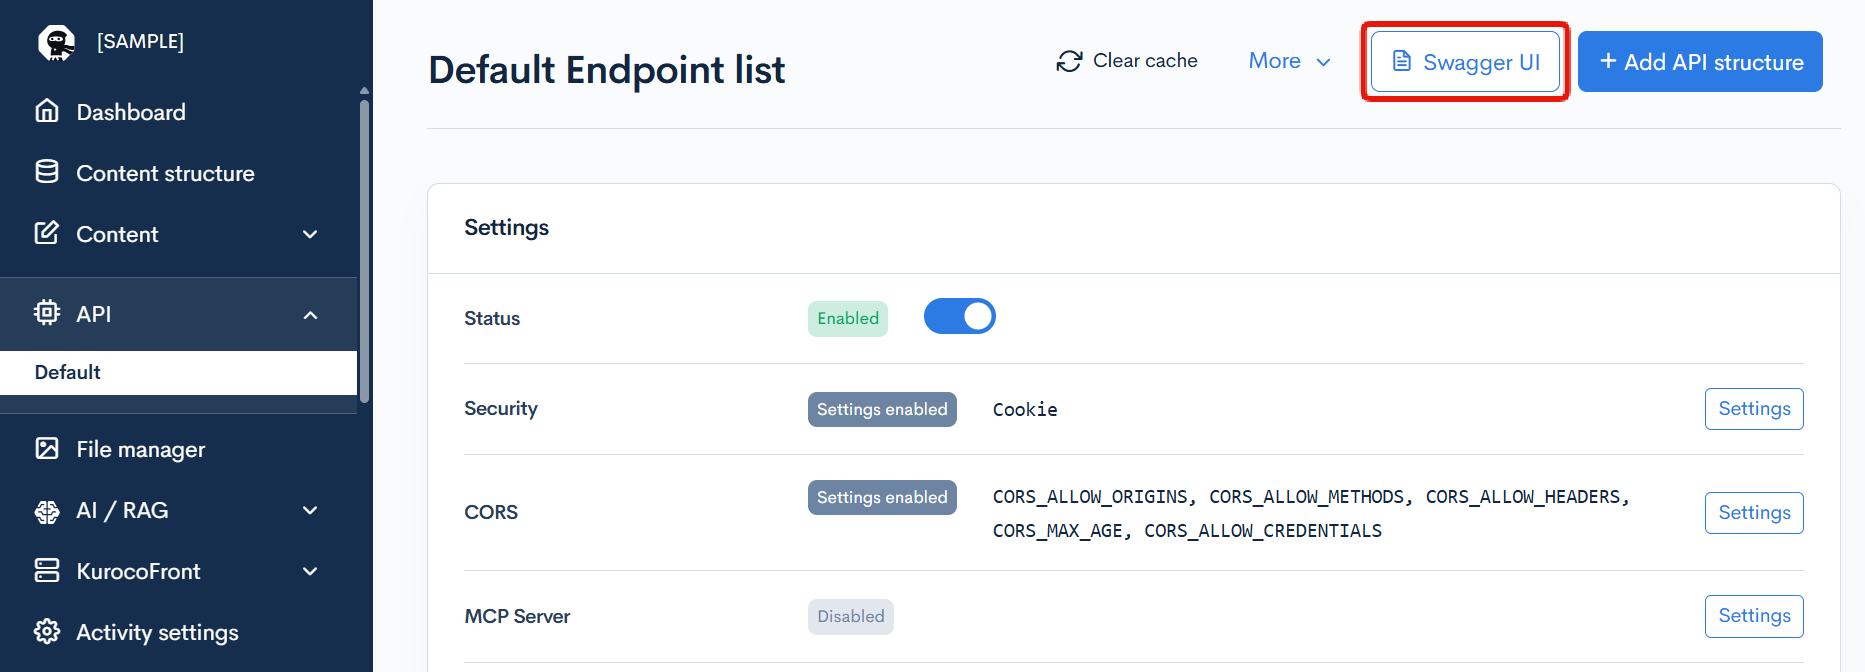
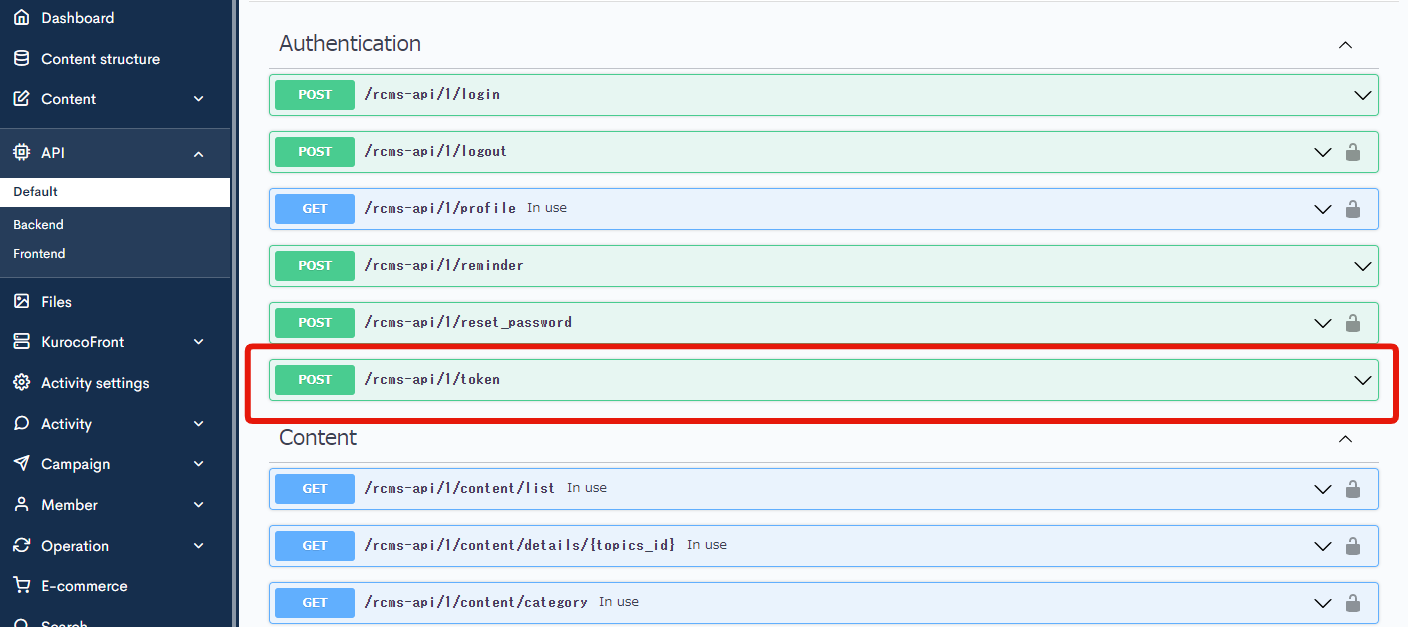
Select desired API from [API] on the side menu, and click [Swagger UI] on the API page.
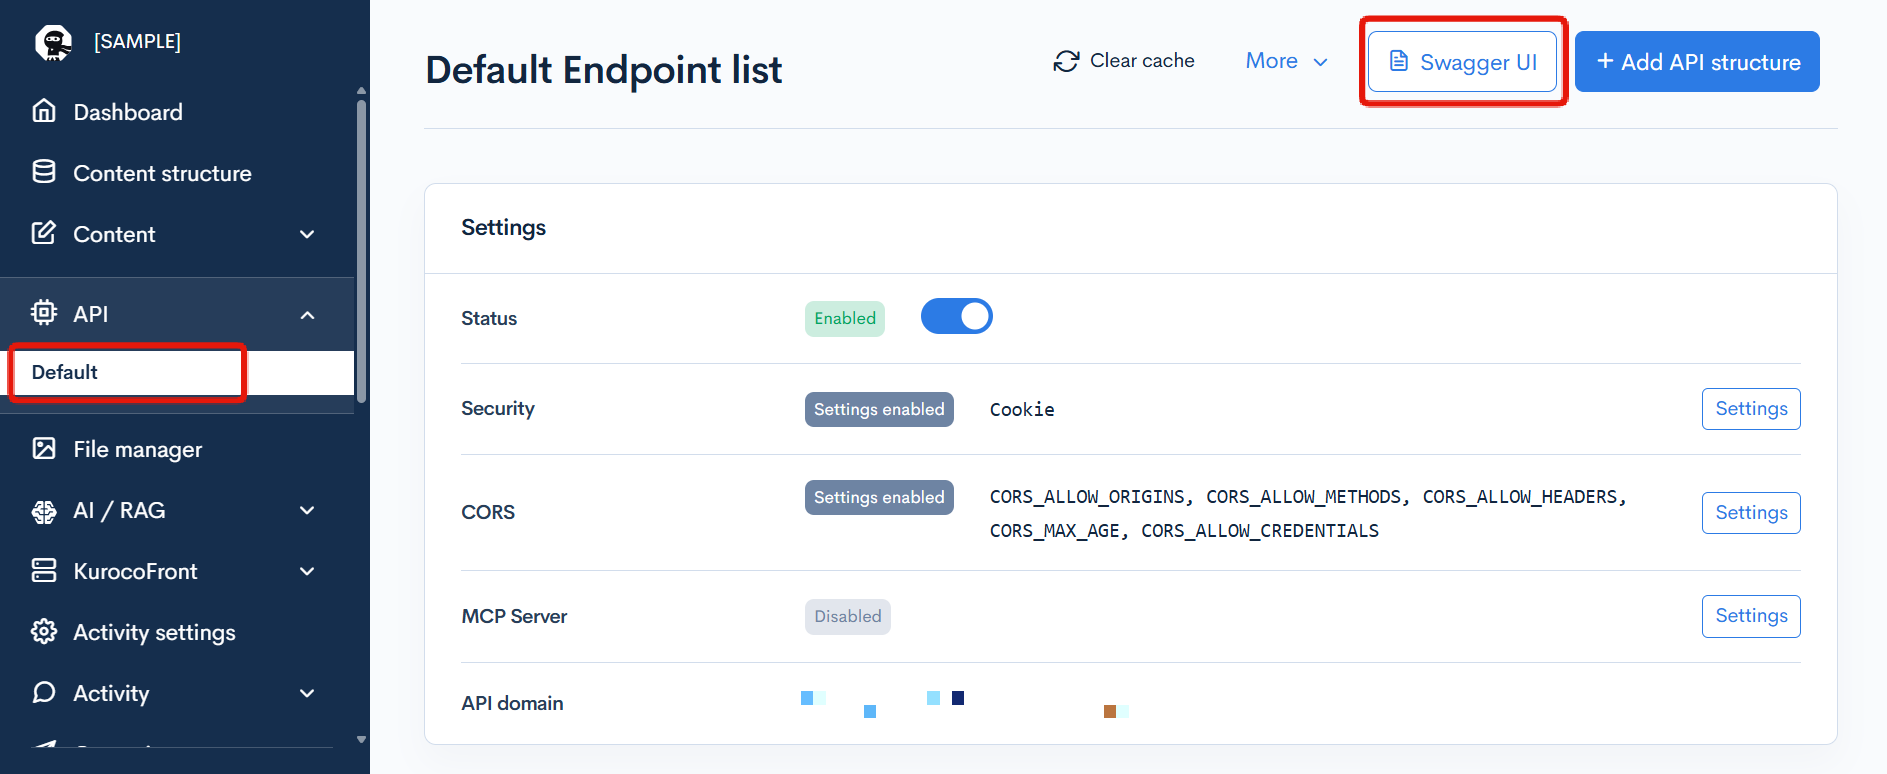
Swagger UI page will be displayed.
Prerequisites
This tutorial supposes that the basic API is already created.
If not done yet, please create an API configuration referring to How to create a content list page using Kuroco and Nuxt.js.
Next is how to check the topic data on Swagger UI.
Display topic data with Security: None
Check the following 2 points on Swagger UI with security settings: none.
- When the endpoint's API Request Restriction is
Unrestricted, the request or response is sent properly. - When the endpoint's API Request Restriction is NOT
Unrestricted, the request gets rejected.
When the endpoint's API Request Restriction is Unrestricted, the request or response is sent properly.
First, let's check that the response is sent properly when the endpoint's API Request Restriction is Unrestricted.
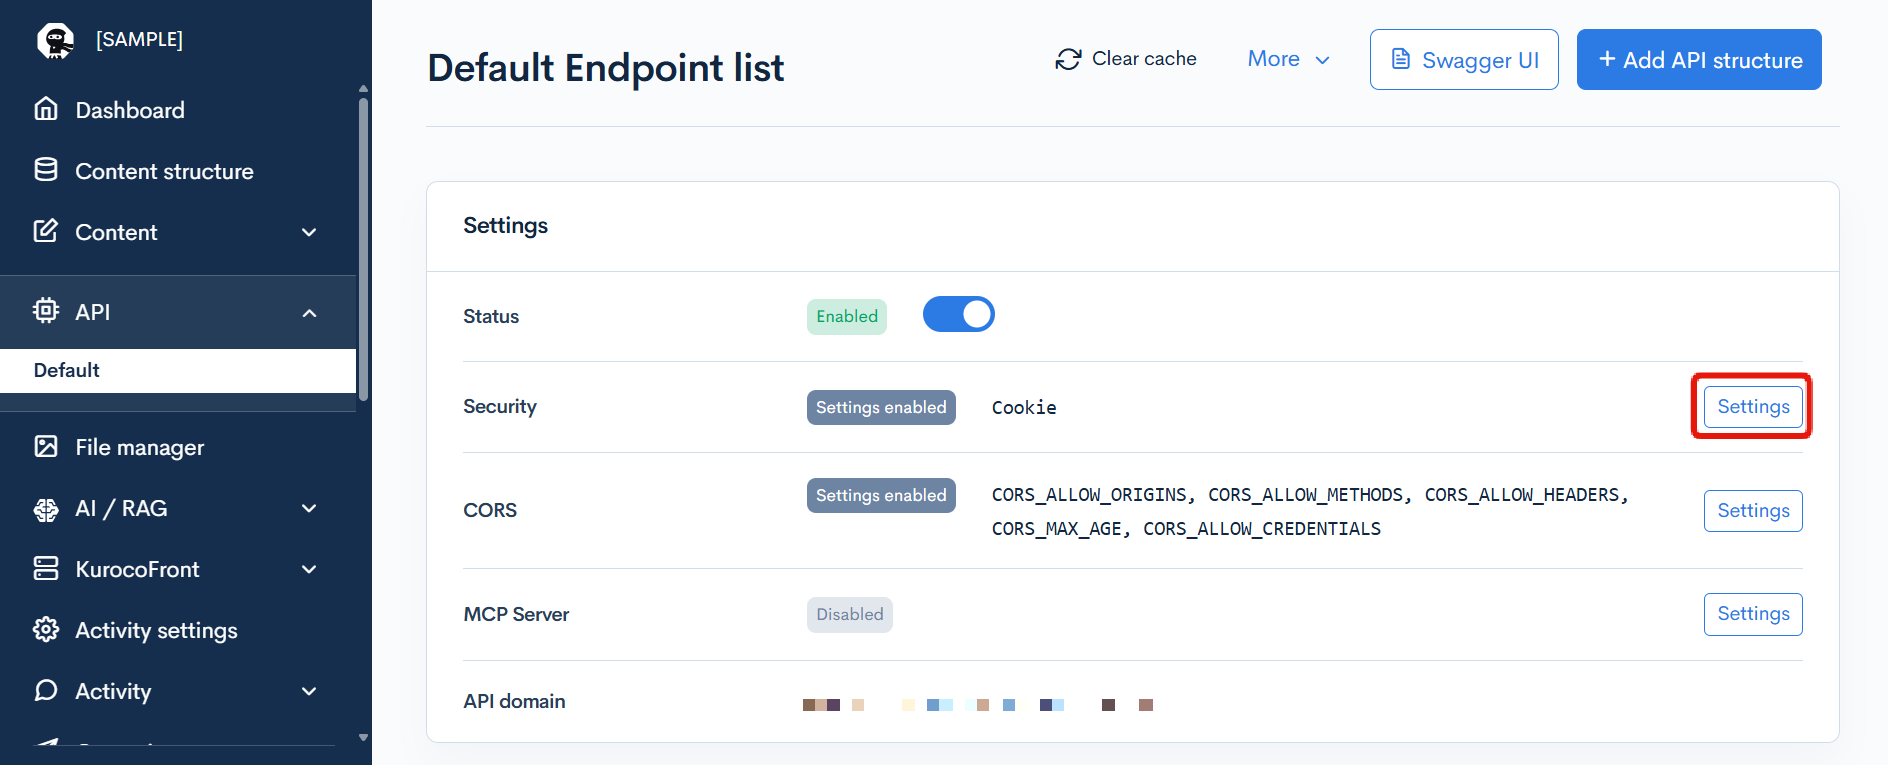
1. Change the security setting.
First, change the security setting.
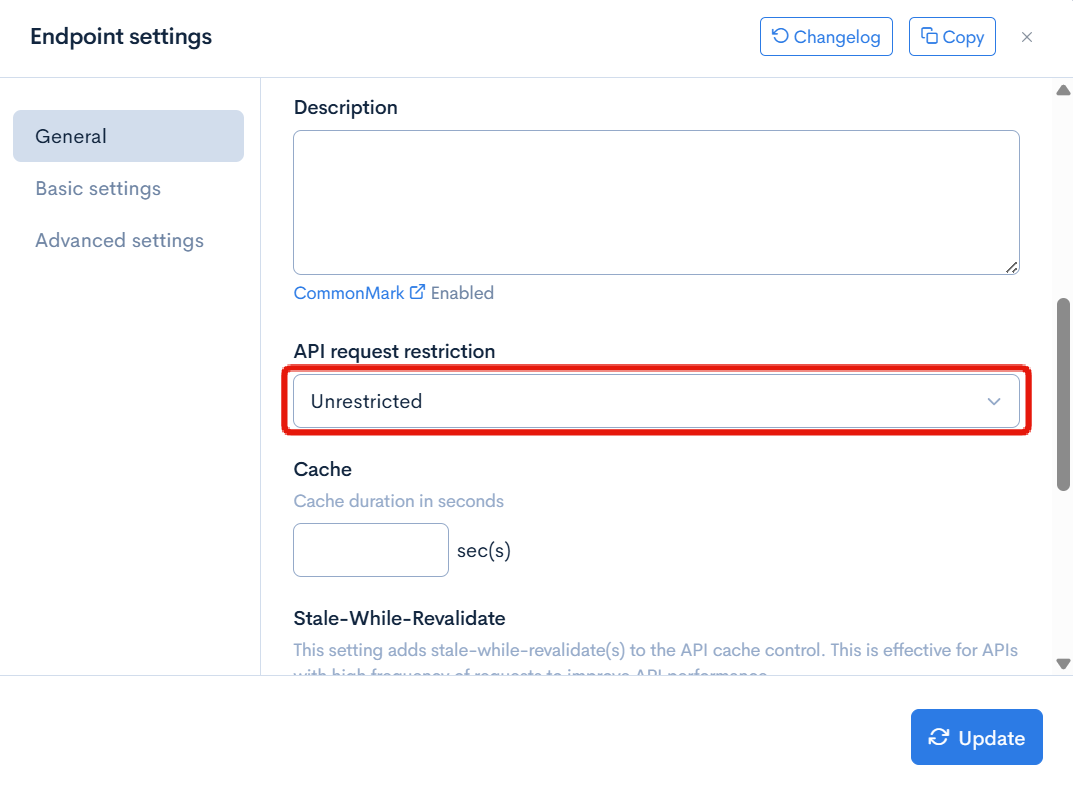
On the API page, click the Security [Settings].
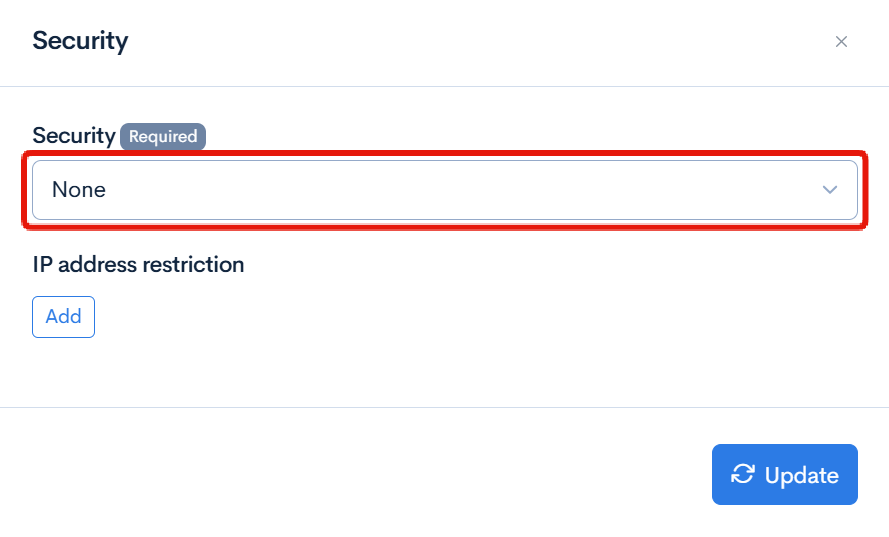
Change the "Security" to [Unrestricted] and click [Update].
If you have set API request limits on the endpoint, please remove them before changing the security settings.
2. Check on the Swagger UI page.
Click [Swagger UI] and access the Swagger UI page.
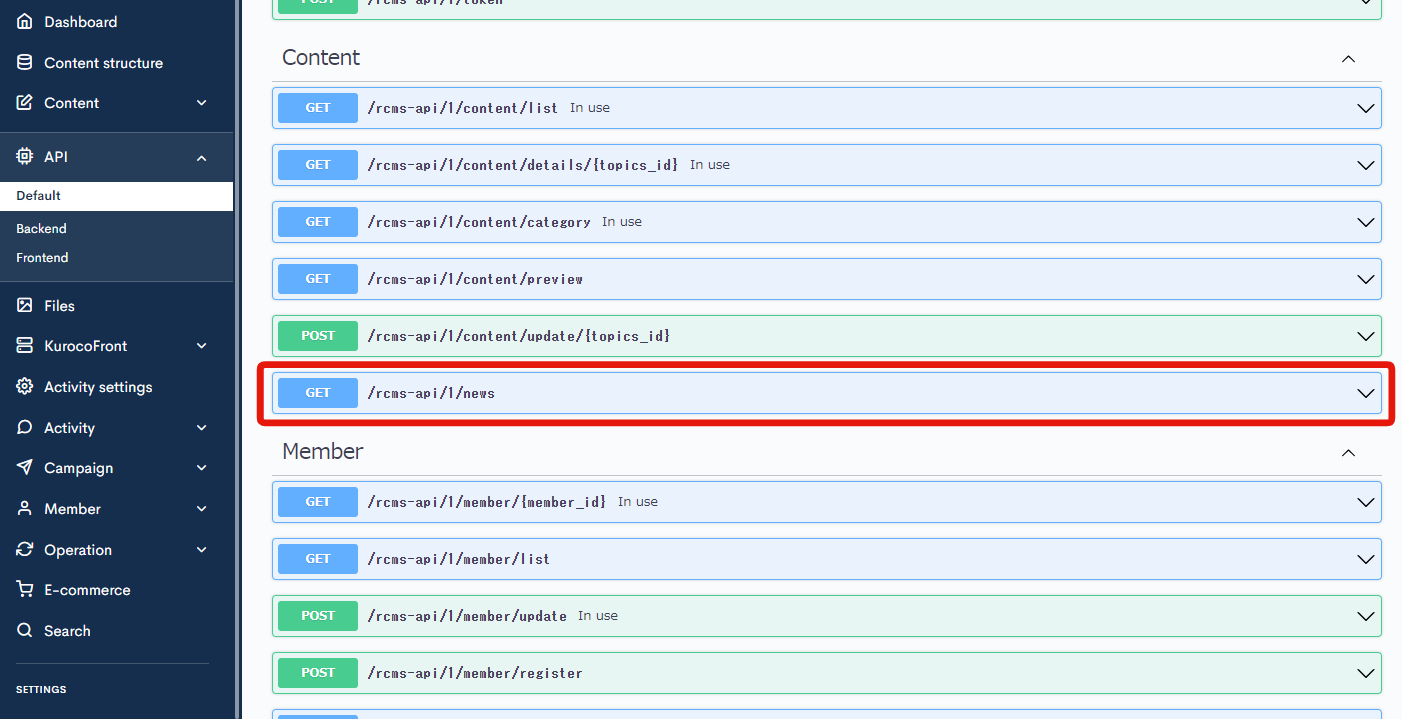
Select news endpoint.
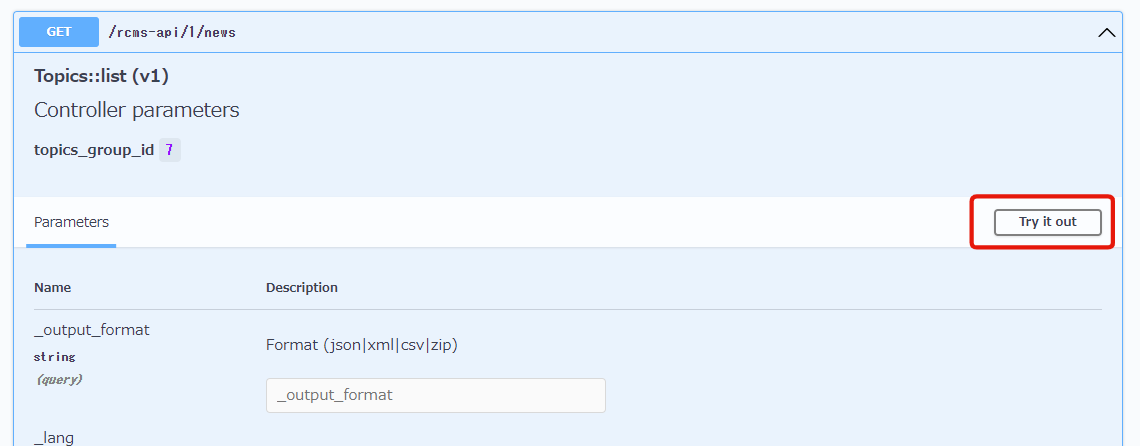
Click [Try It Out].
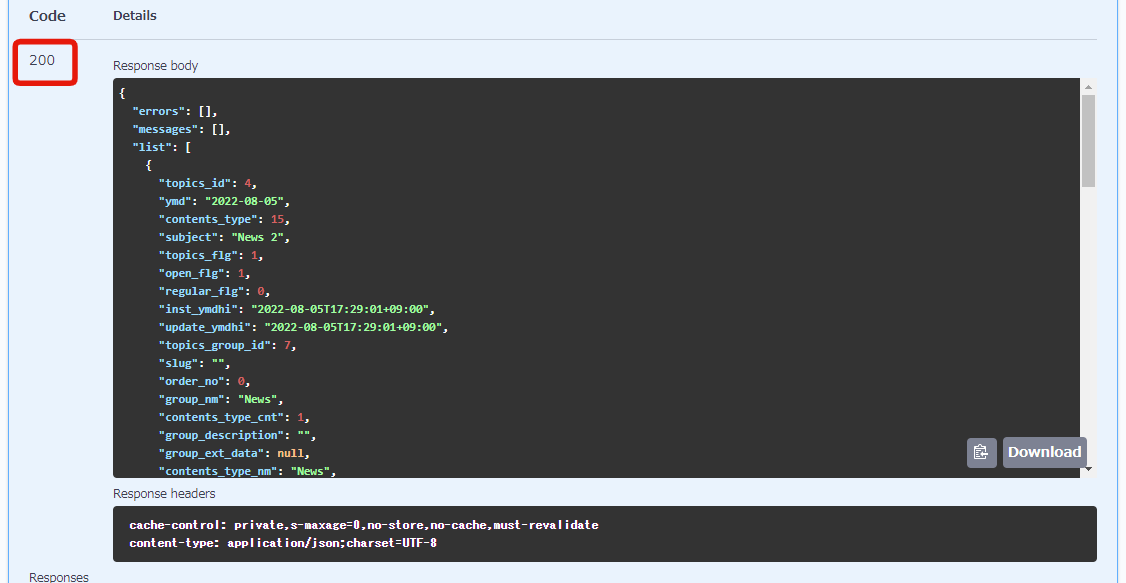
Scroll to the bottom and click [Execute].

You can see that there is a response with response code: 200.
When API request restrictions are enabled, requests will be rejected.
Next, let's check that the access gets rejected when news configuration requires an API Request Restriction.
1. Change the API request restrictions for the content structure.
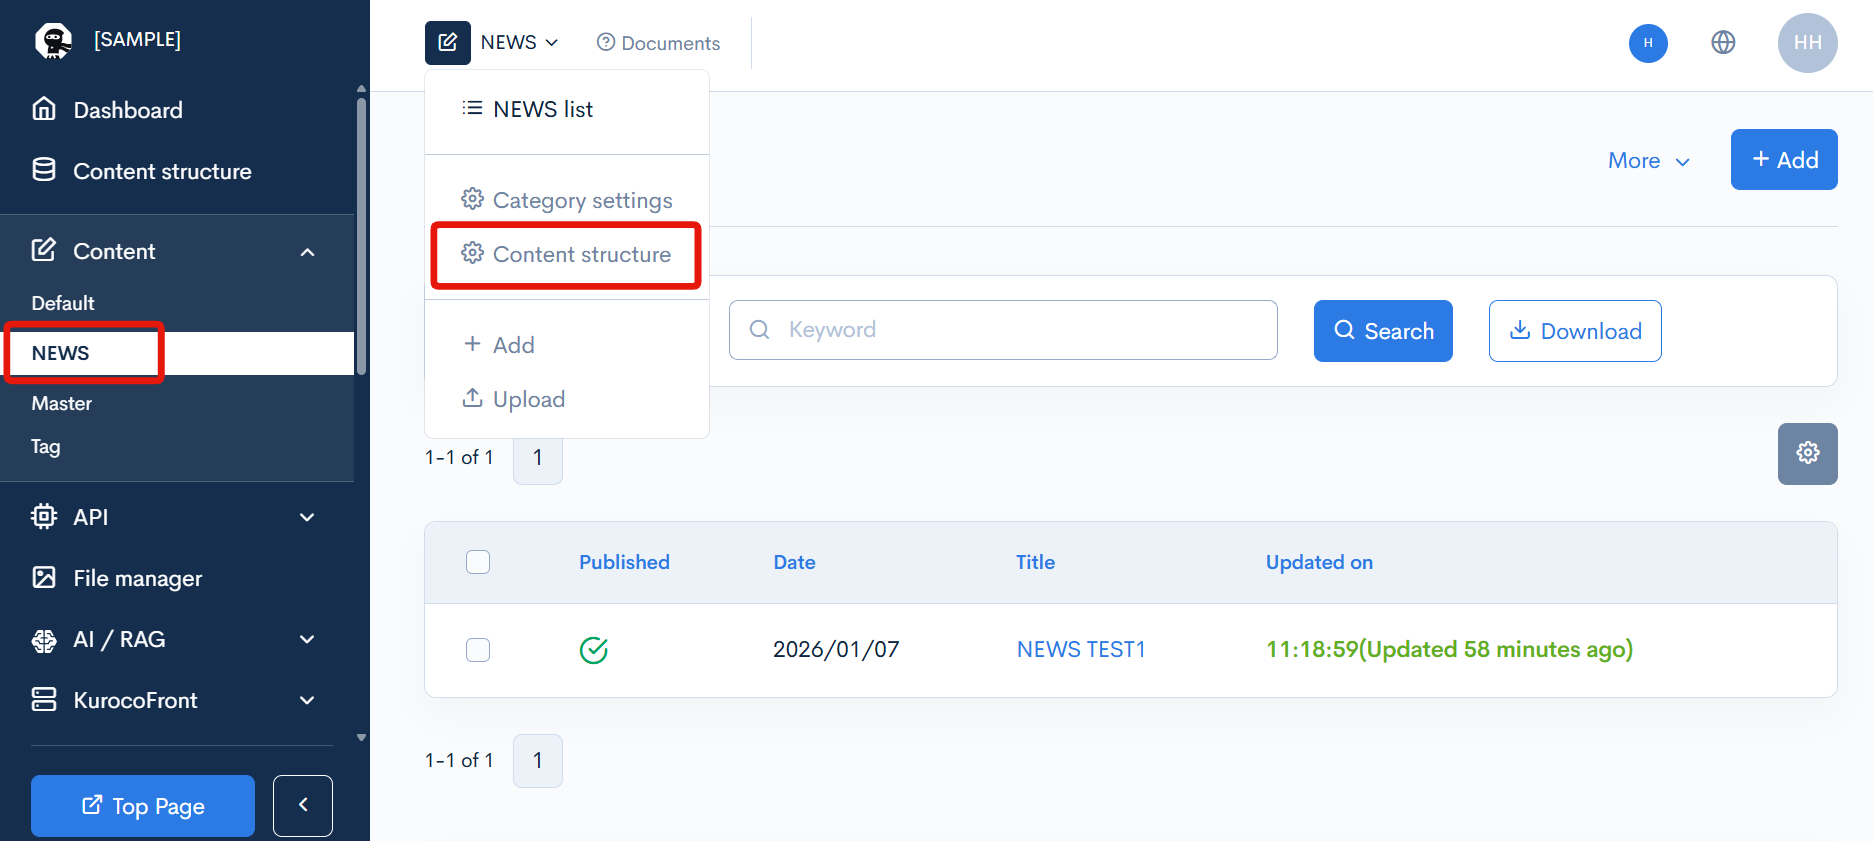
Change the settings of the content structure referenced by the endpoint.
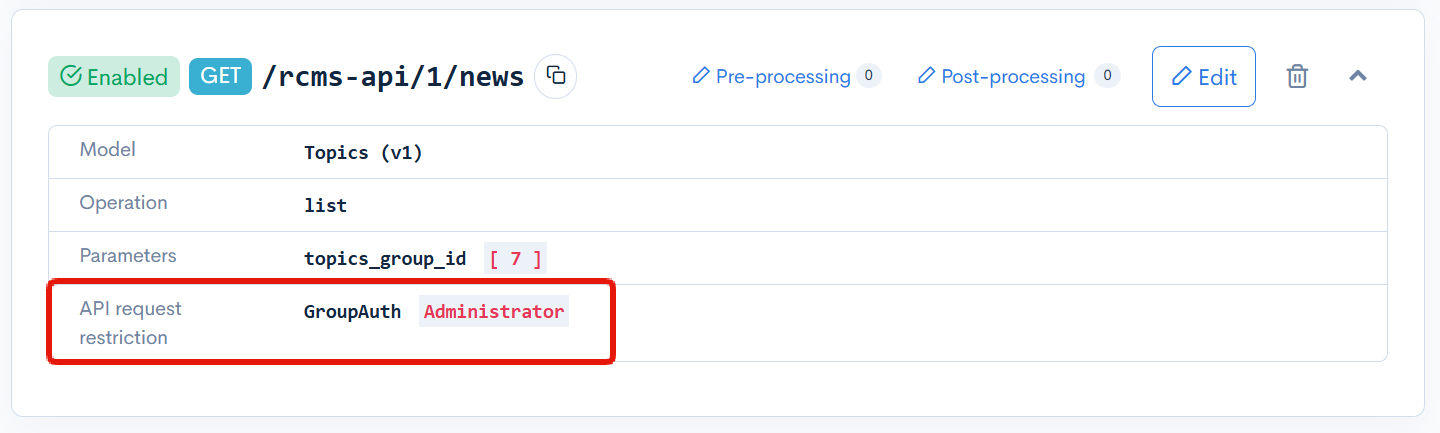
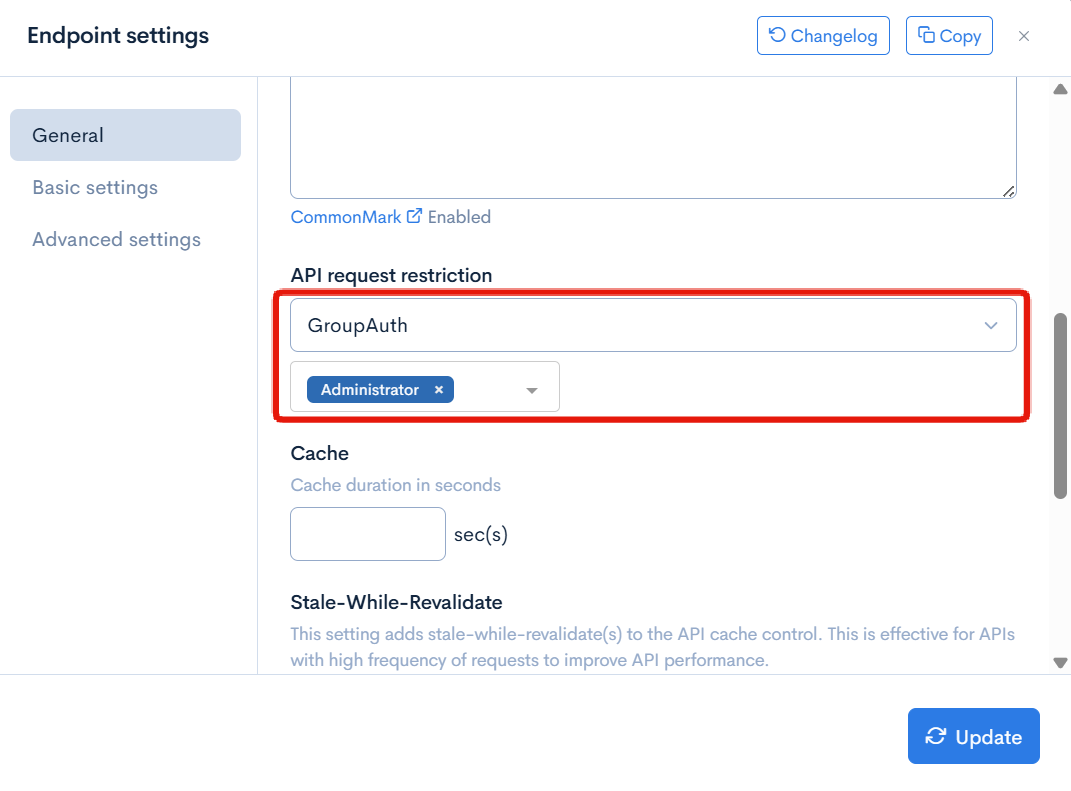
From the target content list screen, click [Content structure].
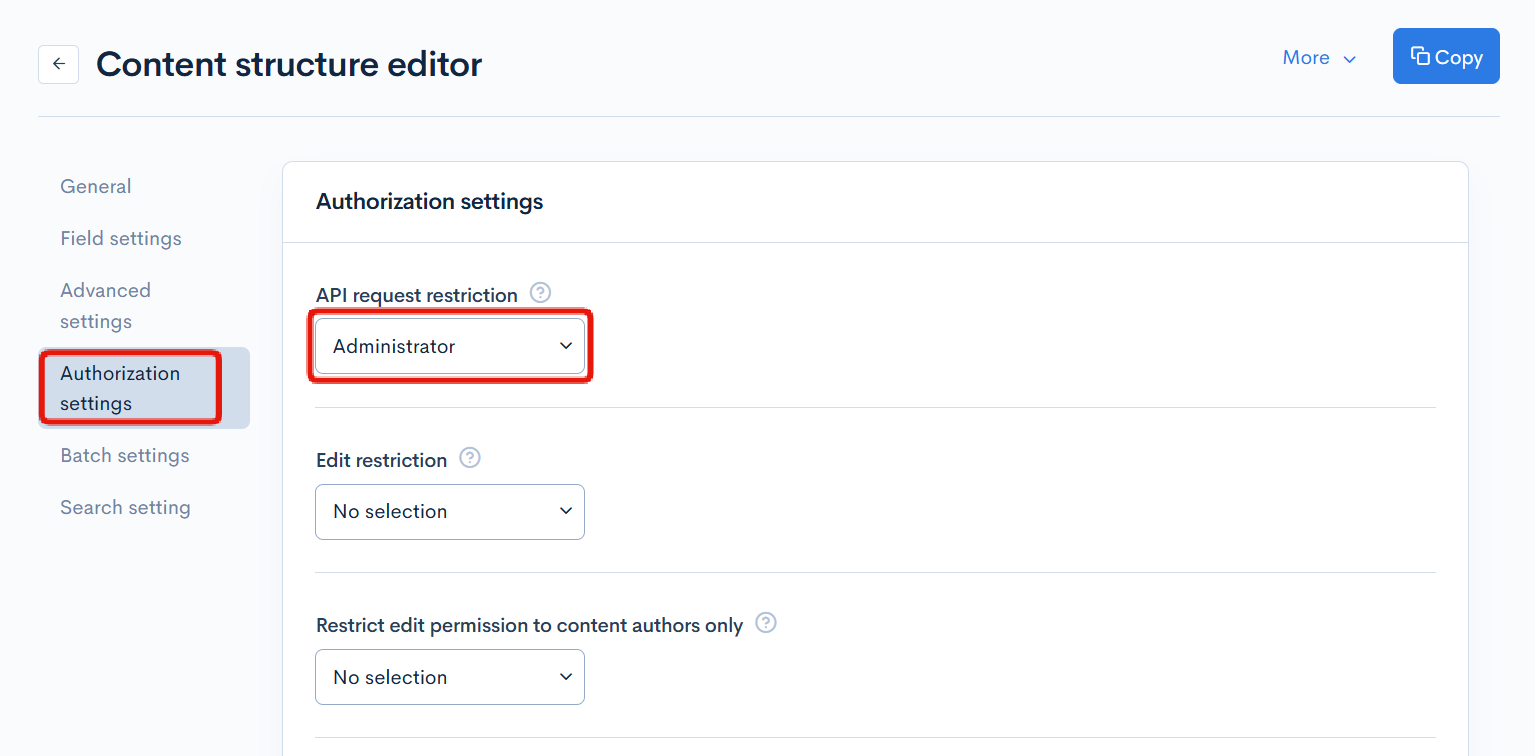
On the "Authorization settings" tab, select any option except Unrestricted on "API Request Restriction" and click [Update]. In this tutorial, GroupAuth:Administrator is selected as an example.
2. Check on the Swagger UI page
Click [Swagger UI] and access the Swagger UI page.
Select news endpoint.
Click [Try It Out].
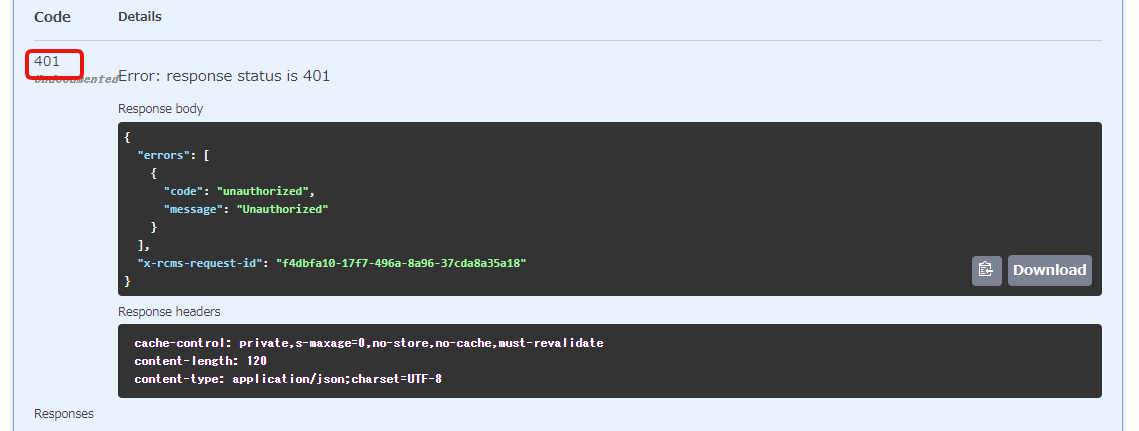
Scroll to the bottom and click [Execute].
You can see that there is no response with response code: 401.
The check using the "security setting: none" is now complete.
Display topic data with Security: Cookie
Next, let's check the topic data on Swagger UI with security setting: Cookie.
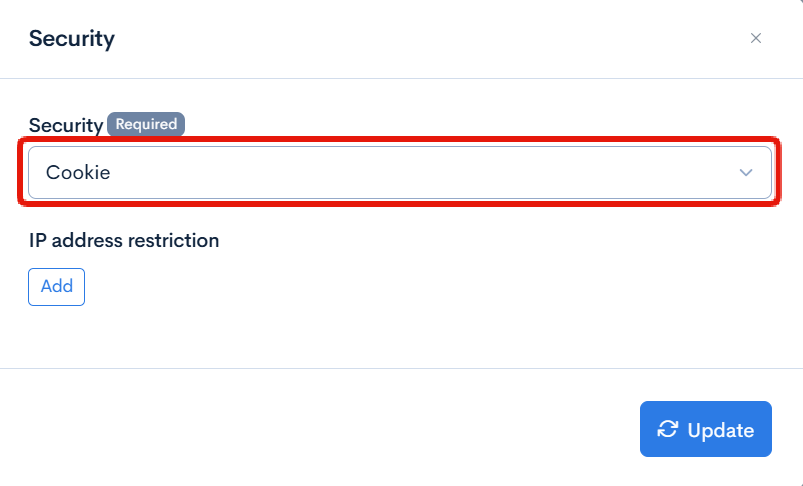
1. Change the security setting.
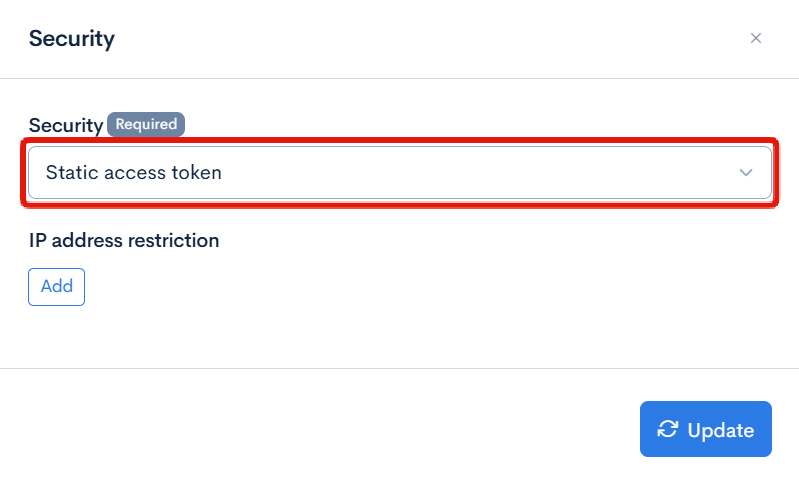
Change the security setting to [Cookie].
On the API page, click the Security [Settings].
Change the "security" to [Cookie] and click [Update].
2. Change the API Request Restriction of the endpoint.
Click [Edit] button of the desired endpoint on the API list page. In this tutorial, news is used as an example.
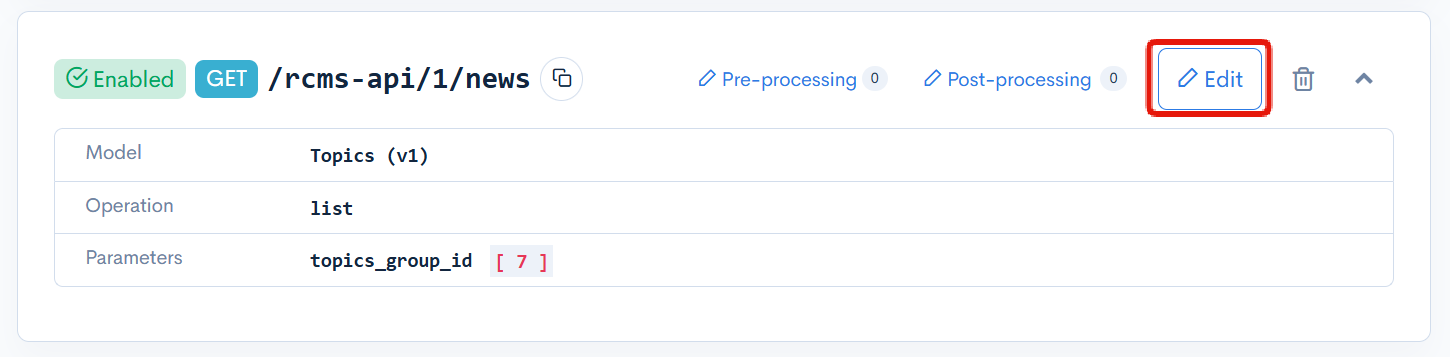
Select any option except Unrestricted on "API Request Restriction" and click [Update]. In this tutorial, GroupAuth:Administrator is selected as an example.
3. Check the contents on Swagger UI page.
Click [Swagger UI] and access the Swagger UI page.
Select news endpoint.
Click [Try It Out].
Scroll to the bottom and click [Execute].
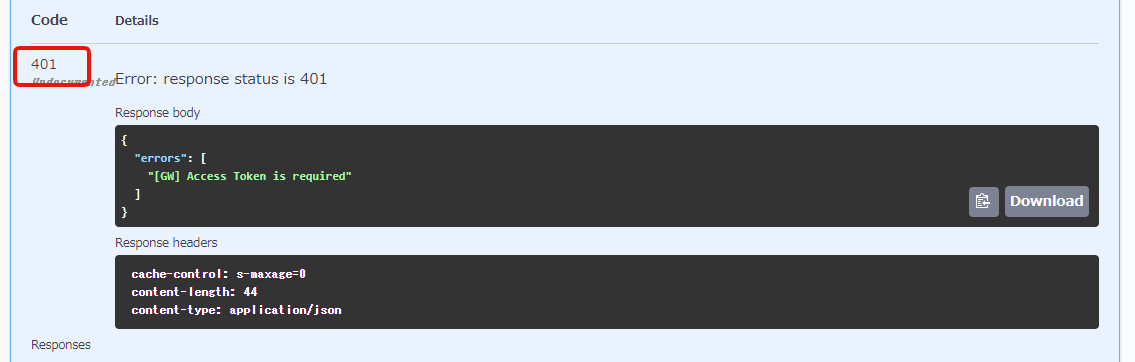
You can see that there is no response with response code: 401.
This is because the access to news was rejected for a user without GroupAuth:Administrator API Request Restriction.
Consequently, it's necessary to start by creating an additional endpoint for login, then communicate to Kuroco server that this user has the GroupAuth:Administrator API Request Restriction.
The authentication method is the same as previously set up, and the session is maintained using cookie authentication.
Moving forward, the next step will be to create an additional endpoint for login, then log in and try [Execute] again to finally confirm that the response is sent properly.
4. Confirm that you belong to the Administrator permission group
Make sure that your account has Administrator privileges.
From the menu, click [Members] and select your account.
Next, check that "Administrator" is set in the "Group" field.
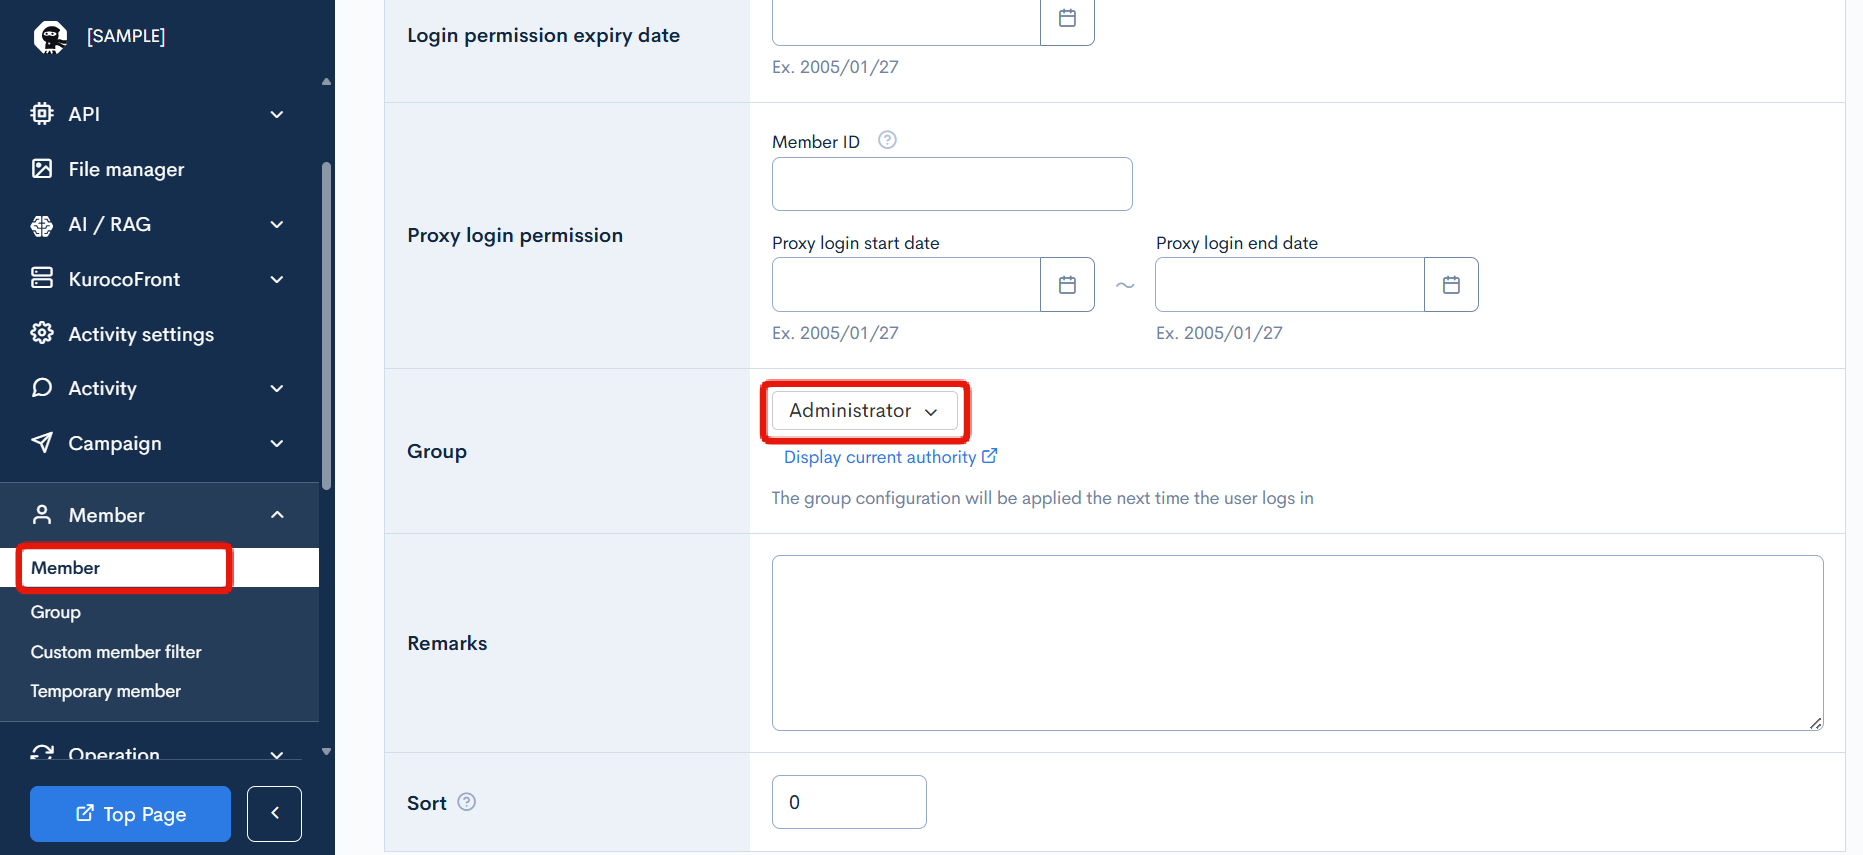
Ref: Please refer to the tutorial How to make new group.
5. Check the login on Swagger UI page
Let's check the login on Swagger UI page.
Click [Swagger UI] and access the Swagger UI page.
Click login endpoint.
Click [Try it out].
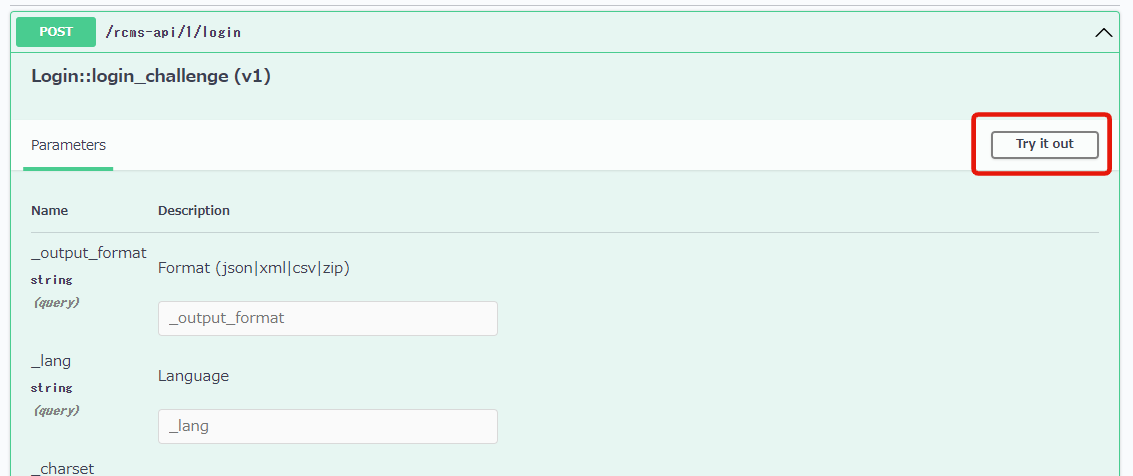
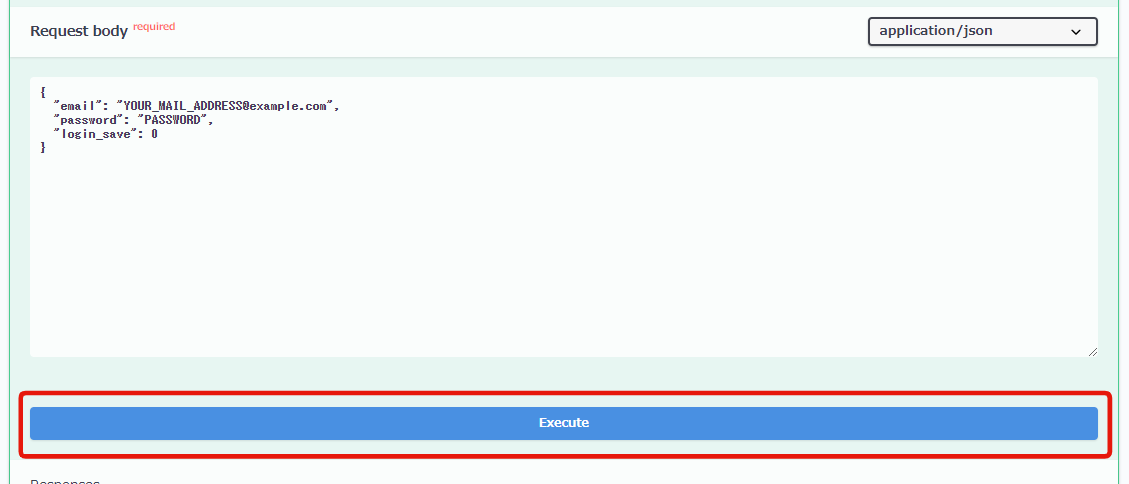
You can write a code in the Request body field.

Input the following login information in it.
{
  "email": "YOUR_MAIL_ADDRESS@example.com",
  "password": "PASSWORD",
  "login_save": 0
}
Input your email address and password in YOUR_MAIL_ADDRESS@example.com and PASSWORD.
Click [Execute] after entering the code on the Request body field.
You can see that there is a response with response code: 200.
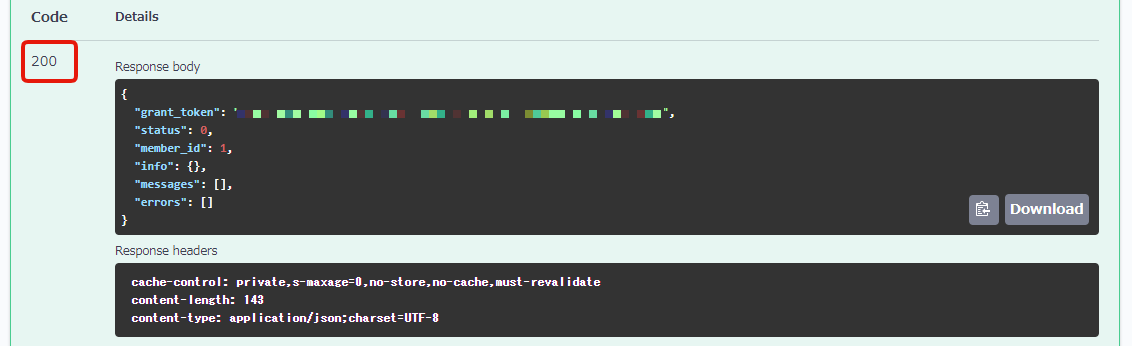
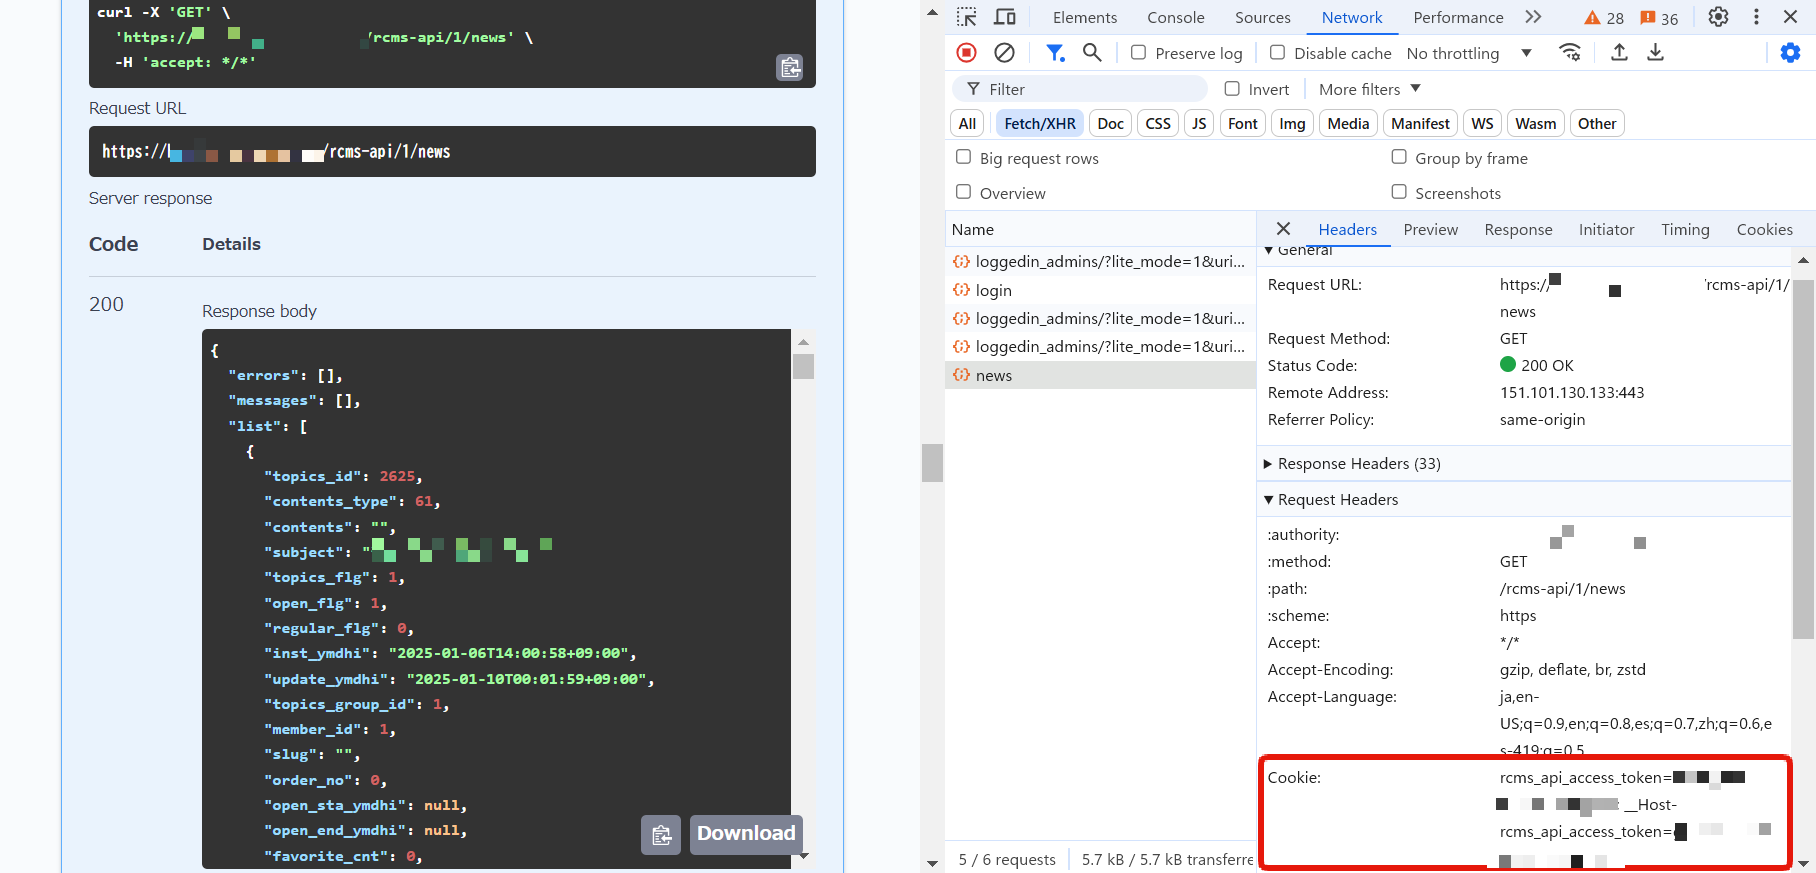
When opening the Developer Tools to check the target request, you can see that the rcms_api_access_token is returned in the Set-Cookie response header.
As a result, the token is stored in the browser's cookies.

6. Recheck the contents on Swagger UI page.
Let's recheck the news endpoint again on the Swagger UI page.
Select news endpoint.
Click [Try It Out].
Scroll to the bottom and click [Execute].
You can see a response now with the code: 200, while the response code was 401 earlier.
When you open the Developer Tools and check the target request, you can see that the rcms_api_access_token is included in the request headers.
Note about the case of security setting: Cookie
In the case of security setting: Cookie, the domains of front and Kuroco need to be the same to avoid third-party cookie restrictions.
(Have to match both domains and make it a first-party Cookie.)
Therefore, for example, even if you access login-> news from the local front-end (Nuxt.js), the request gets rejected because the domain (URL) is from http: // localhost: 3000.
Display topic data with Security: Static access token
Next, let's check the topic data on Swagger UI with security setting: Static access token.
1. Change the API Request Restriction of the endpoint.
Click [Edit] button of the news endpoint.
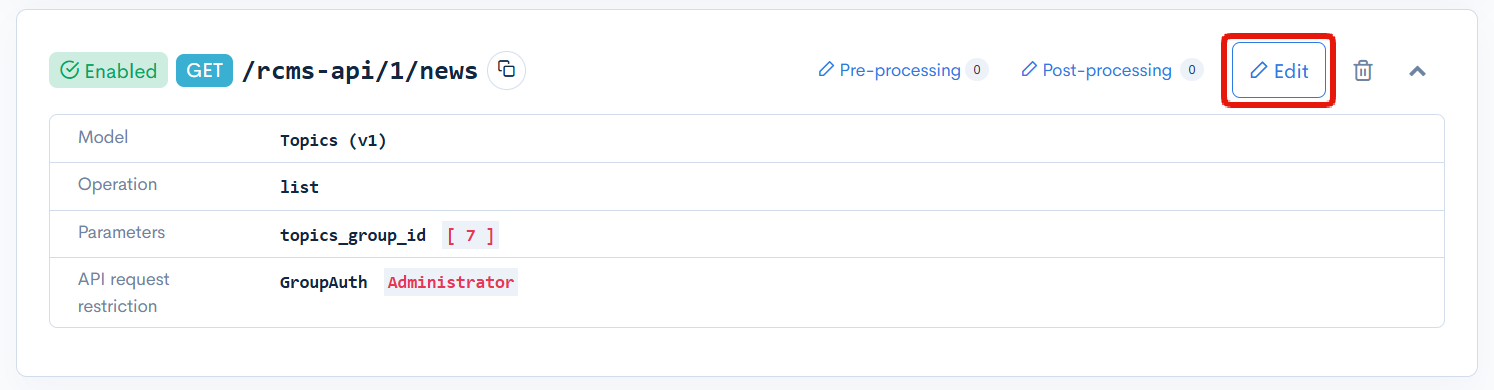
Change the "Security" to [Unrestricted] and click [Update].
2. Change the security setting.
On the API page, click the Security [Settings].
Change the security setting to [Static access token] and click [Update].
3. Check the Swagger UI page.
Click [Swagger UI] and access the Swagger UI page.
Select news endpoint.
Click [Try It Out].
Scroll to the bottom and click [Execute].
You can see that there is no response with response code: 401.
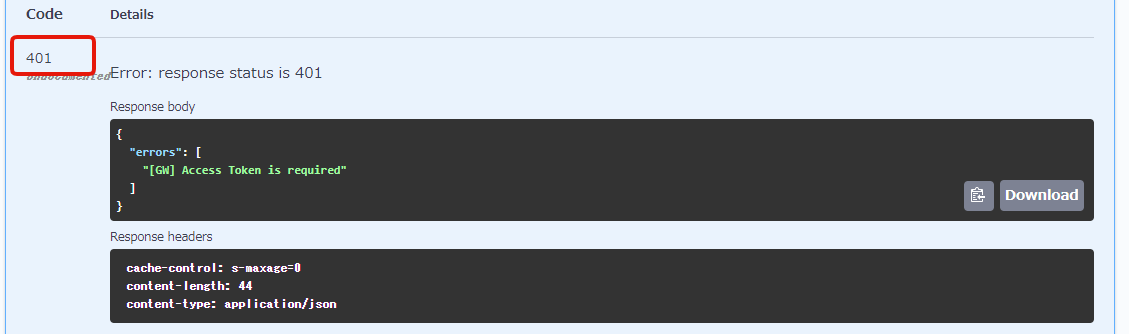
That's because access requests without a token are rejected.
In the case of static access token, a token is used for user authentication.
When a user sends a request, custom request header (x-rcms-api-access-token) is added to the request header and the user is authenticated by matching the value.
Kuroco allows you to customize Swagger UI to dynamically generate this token and keep it on the Kuroco server.
In addition, you can set up the automatic attachment on the custom request header when sending a request.
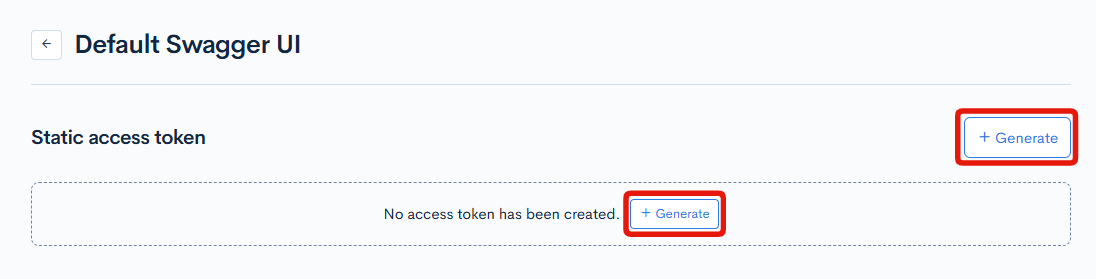
4. Generate static access token
Next, let's generate the static access token.
Click [Generate] of [Static access token].
Specify the expiration date and click [Generate].
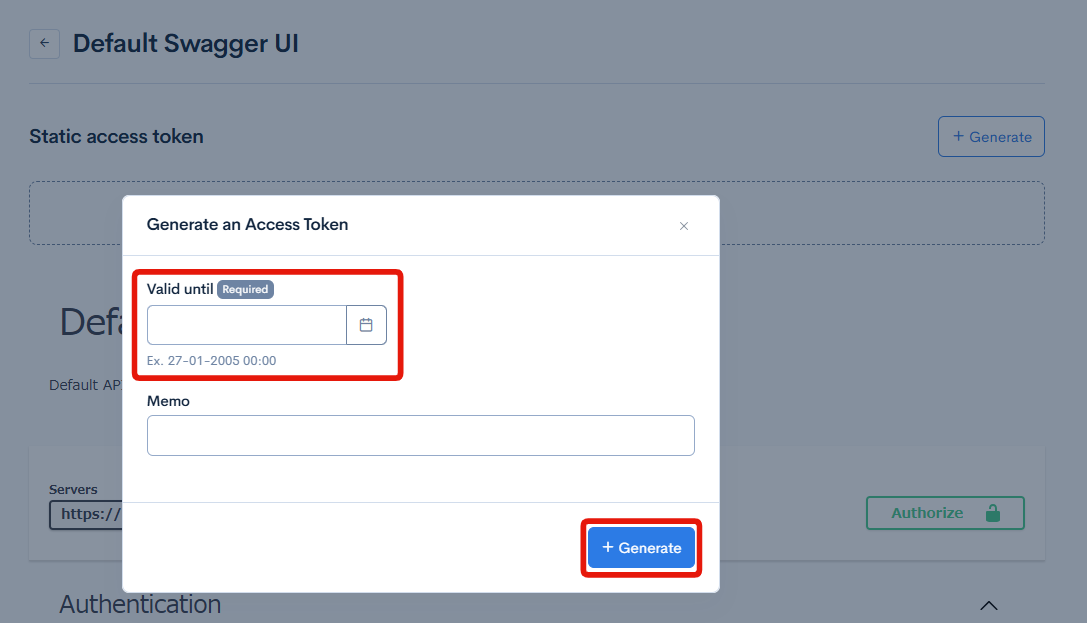
Copy the generated token.

5. Configure the generated static access token
Next, configure the generated static access token to be automatically added to the request header.
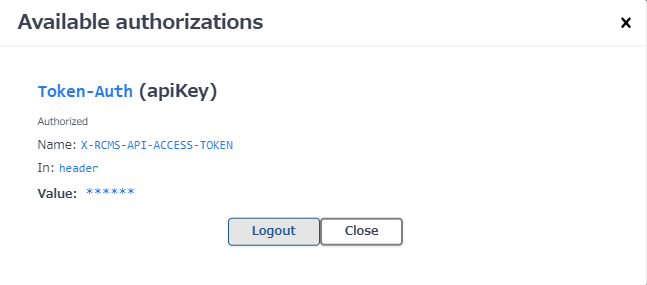
Click [Authorize] on the Swagger UI page.
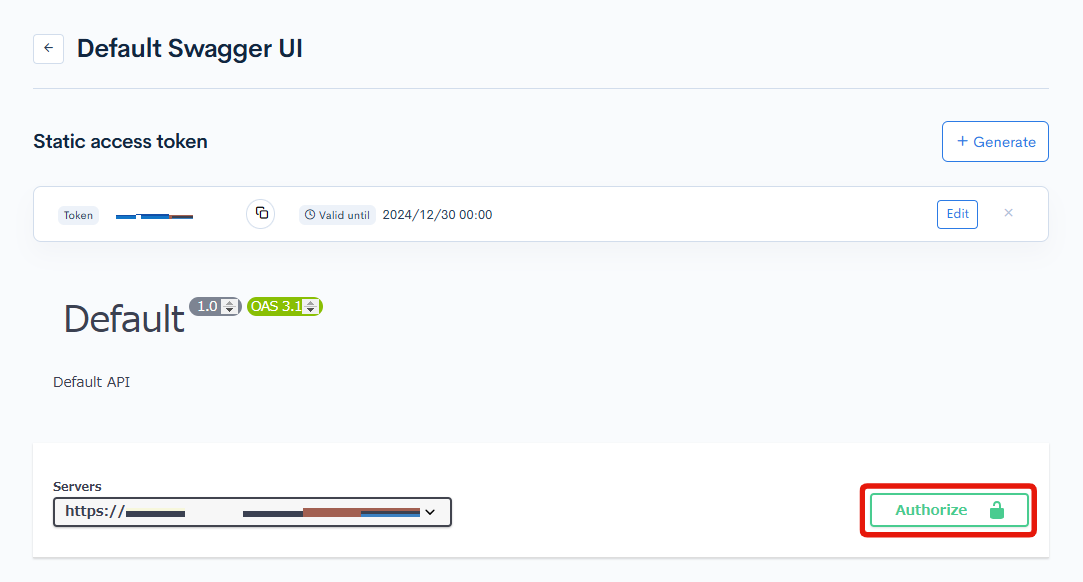
Paste the token you have copied to the "Value" and click [Authorize].
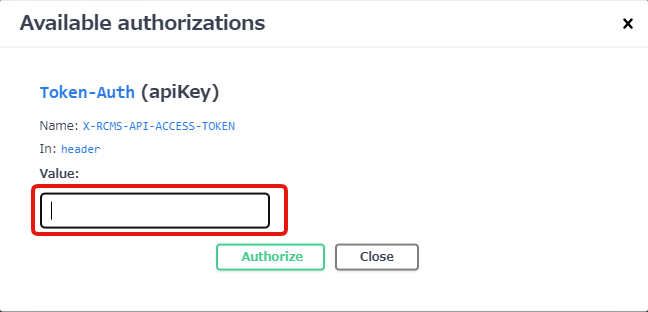
"Available API Request Restrictions" will be displayed. Close it from [Close] button.
6. Recheck the contents on the Swagger UI page.
Let's recheck the news endpoint again on the Swagger UI page.
Select news endpoint.
Click [Try It Out].
Scroll to the bottom and click [Execute].
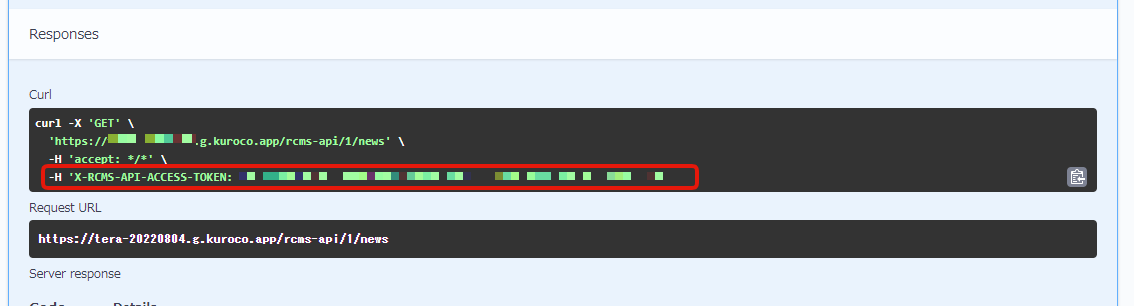
You can see a response now with the code: 200, while the response code was 401 earlier.
You can see from the "Curl" that the static access token generated by X-RCMS-API-ACCESS-TOKEN is attached to this request.
Note: in case of security setting: Static access token
There is no need to match the domains in a request by static access token, unlike the case of Cookie.
Therefore, if the token is properly set in the header, you can access it from your local environment.
If you execute the sample request (Curl) displayed on Swagger UI locally, you can confirm that it responds normally as shown below.
curl -X 'GET' \
  'https://sample-support-kuroco.a.kuroco.app/rcms-api/1/news' \
  -H 'accept: */*' \
  -H 'X-RCMS-API-ACCESS-TOKEN: value of Static Access Token'

# Response is displayed.
# {"errors":[],"messages":[],"list":[{"topics_id": ...
In addition, you can also access from the front-end (Nuxt).
Modify the code in pages/news/index.vue to send the Static Access Token in the request header as below.
 export default {
   async asyncData({ $axios }) {
     return {
-      response: await $axios.$get('/rcms-api/4/news'),
+      response: await $axios.$get('/rcms-api/4/news', {
+        headers: { 'x-rcms-api-access-token': 'value of Static Access Token' }
+        }
+      )
     };
   },
 };
Replace the endpoint with your own.
Display topic data with Security: Dynamic access token
Next, let's check the topic data on Swagger UI with security setting: Dynamic access token.
1. Change the security setting.
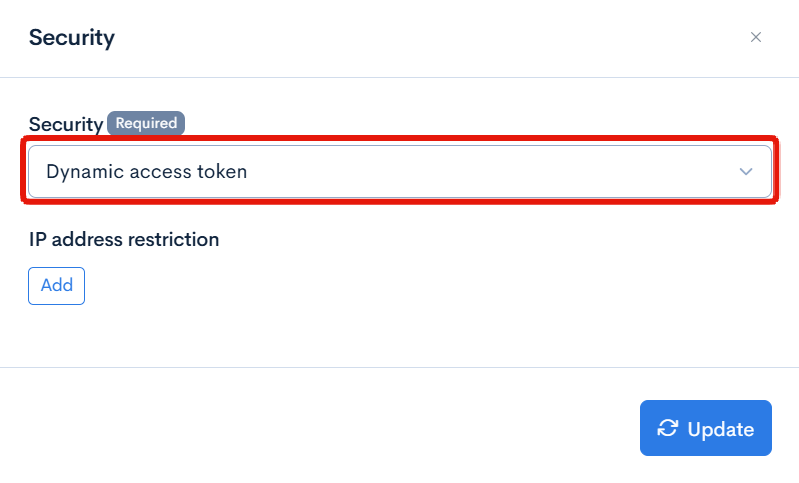
On the API page, click the Security [Settings].
Change the security setting to [Dynamic access token] and click [Update].
2. Change the API Request Restriction of the endpoint.
Click [Edit] button of the news endpoint.
Select any option except Unrestricted on "API Request Restriction" and click [Update]. In this tutorial, GroupAuth:Administrator is selected as an example.
3. Check Swagger UI page.
Click [Swagger UI] and access the Swagger UI page.
Select news endpoint.
Click [Try It Out].
Scroll to the bottom and click [Execute].
You can see that there is no response with response code: 401.
This is because the token is not included in the request, and even if it is included, access will be denied if it is not the value of the token generated by a user with GroupAuth:Administrator API Request Restriction.
In the case of dynamic access token, tokens are used for the user authentication.
When a user makes a request, a custom request header (x-rcms-api-access-token) is added to the request header, and authentication is performed by matching the value.
Unlike static access tokens, dynamic access tokens cannot generate/set fixed tokens.
Therefore, create an additional endpoint for login and an endpoint for token generation, and dynamically generate tokens by login-> token generation.
To access a secure endpoint, add a custom request header (x-rcms-api-access-token) to the request header and send the value of the dynamically generated token, similar to the static access token.
Kuroco server verifies this value for authentication.
Additionally, It's also possible to set up the automatic addition of custom request headers to requests on the page.
4. Confirm that you belong to the Administrator permission group
Make sure that your account has Administrator privileges.
From the menu, click [Members] and select your account.
Next, check that "Administrator" is set in the "Group" field.
Ref: Please refer to the tutorial How to make new group.
5. Let's check the login on Swagger UI page.
Click [Swagger UI] and access the Swagger UI page.
Click login endpoint.
Click [Try it out].
You can write a code in the Request body field.
Input the following login information in it.
{
  "email": "YOUR_MAIL_ADDRESS@example.com",
  "password": "PASSWORD",
  "login_save": 0
}
Input your email address and password in YOUR_MAIL_ADDRESS@example.com and PASSWORD.
Click [Execute] after entering the code on the Request body field.
If the request is successfully sent, you will get a response containing grant_token, you should copy this value.
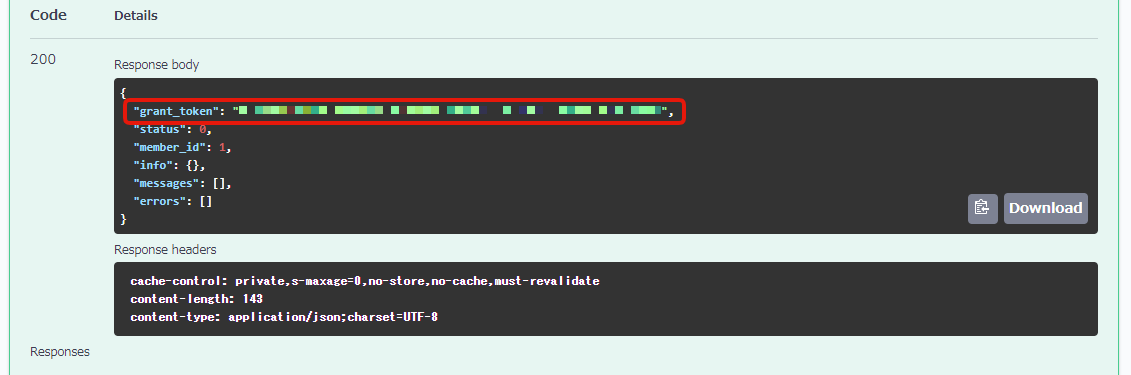
grant_token is a one-time token to get the token you actually need ( access_token).
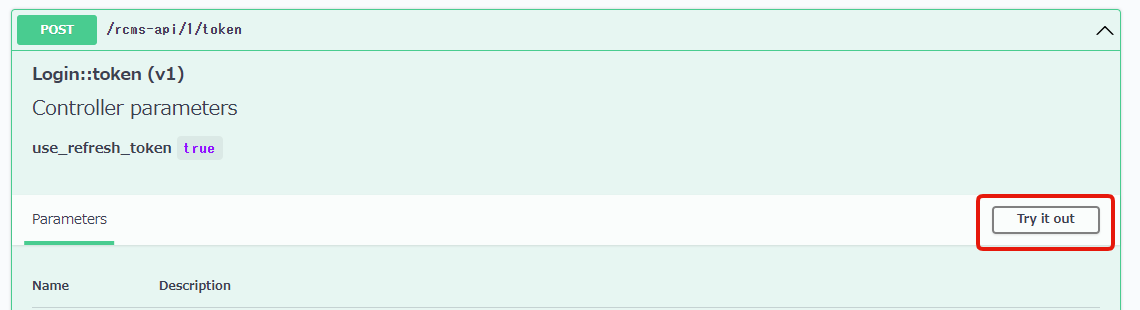
Next, click the token on the Swagger UI page.
Click [Try it out].
Entering code into the Request body field will become enabled now.
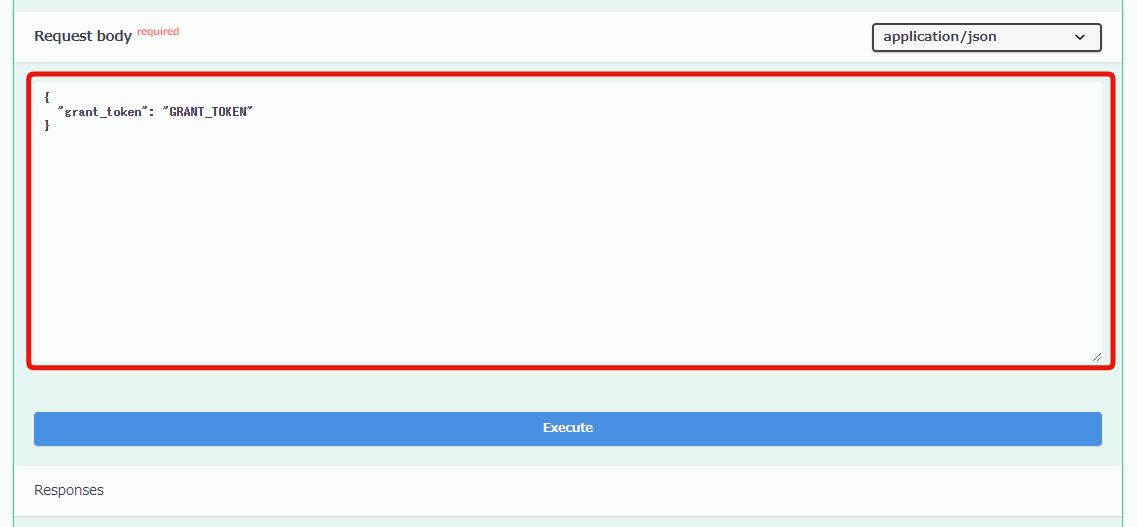
Input the following in the Request body field.
{
  "grant_token": "GRANT_TOKEN"
}
Input the value you just copied in GRANT_TOKEN.
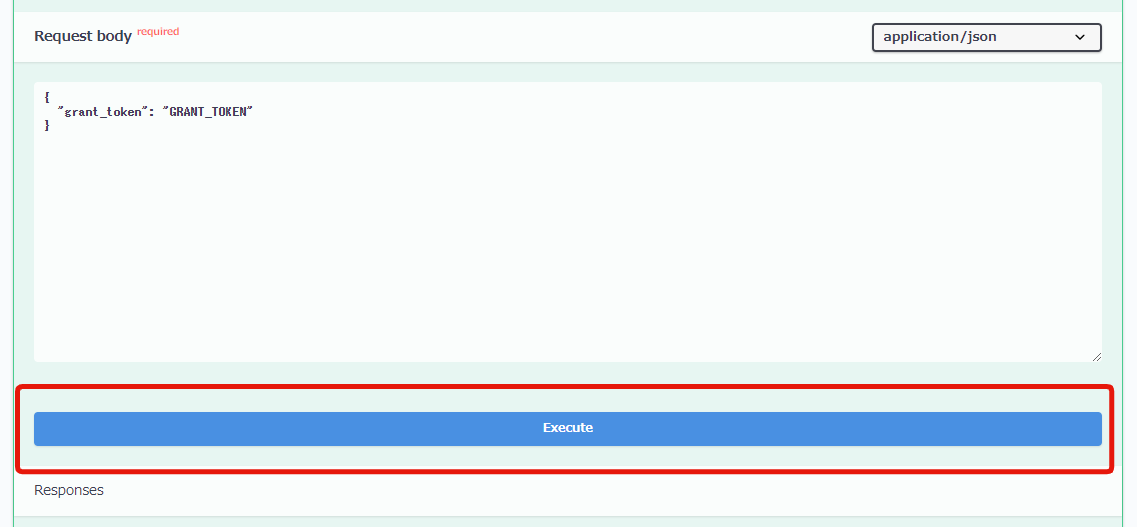
Scroll to the bottom and click [Execute].
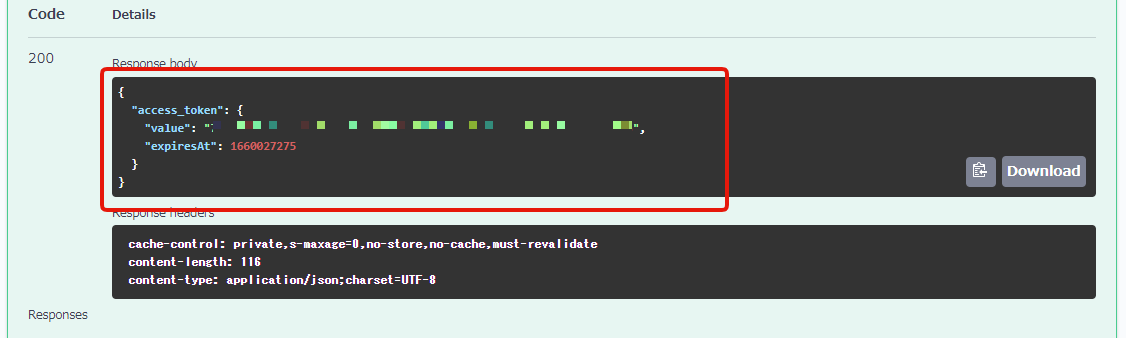
If the request is successful, an access_token response will be displayed, copy the value shown there.
6. Set up the generated dynamic access token.
Next, let's set up so that the generated dynamic access token is added to the requested header automatically.
Click [Authorize] on the Swagger UI page.

Paste the token you have copied to the "Value" and click [Authorize].
"Available API Request Restrictions" will be displayed. Close it from "Close" button.
7. Recheck the contents on Swagger UI page.
Let's recheck the news endpoint again on the Swagger UI page.
Select news endpoint.
Click [Try It Out].
Scroll to the bottom and click [Execute].
You can see a response now with the code: 200, while the response code was 401 earlier.
Also, if you check Curl, you can see that this request was made with the dynamic access token generated by x-rcms-api-access-token.
Note: in case of security setting: Dynamic access token
Unlike Cookie, in the request by dynamic access token, there is no need to match the domain.
Therefore, if the token is properly set in the header, you can access it from your local environment.
As with the Static Access Token, it is also possible to execute the sample request (Curl) displayed on the Swagger UI locally and display the response.
In this case, as mentioned above, you need to execute in the order of login-> token-> news.
You can also access it from the front-end (Nuxt).
As shown below, change the code of pages/news/index.vue, execute it in order of login->token->news, and adjust it so that the generated token is added to the request header automatically.
 <script>
 export default {
   async asyncData({ $axios }) {
+    const loginResponse = await $axios.$post('/rcms-api/9/login',  {
+      'email': 'YOUR_MAIL_ADDRESS@example.com',
+      'password': 'PASSWORD',
+      'login_save': 0
+    });
+    const grantToken = loginResponse.grant_token;
+
+    const tokenResponse = await $axios.$post('/rcms-api/9/token',  {
+      'grant_token': grantToken,
+    });
+    const accessToken = tokenResponse.access_token.value;
     return {
-      response: await $axios.$get('/rcms-api/4/news'),
+      response: await $axios.$get('/rcms-api/4/news', {
+        headers: { 'x-rcms-api-access-token': accessToken }
+        }
+      )
     };
   },
 };
Replace the endpoint with your own.
Input your email address and password in YOUR_MAIL_ADDRESS@example.com and PASSWORD.
Display topic data with Security: Privileged static token
Next, let's check the topic data on Swagger UI with security setting: Privileged static token.
The privileged static token uses the same token-based authentication as the static access token, but requires specifying a member ID during token generation.
Since requests are executed with the permissions of the specified member, you can access endpoints that have API request restrictions.
The basic operations are the same as the static access token. The following points are different.
1. Change the security setting.
On the API page, click the Security [Settings], change the security to [Privileged static token] and click [Update].

2. Generate the privileged static token.
Click [Generate] of [Privileged static token] on the API information page.
In the displayed dialog, specify the following items:
- Expiration date: Specify the expiration date of the token.
- Memo: You can enter an optional memo.
- Member ID: Specify the ID of the member to associate with the token. API requests will be executed with the permissions of this member.
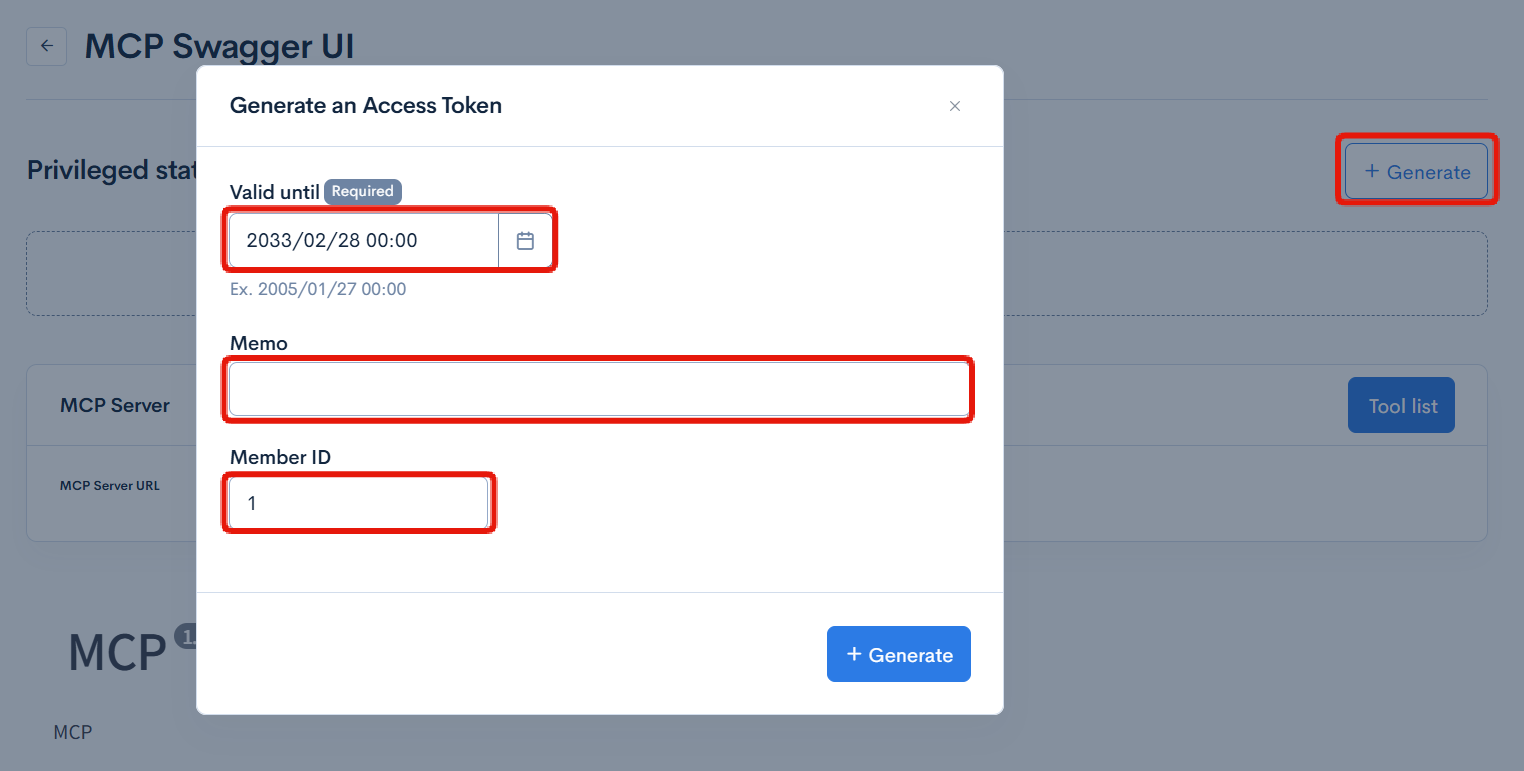
After entering the values, click [Generate]. Copy the generated token value.
3. Configure the generated token.
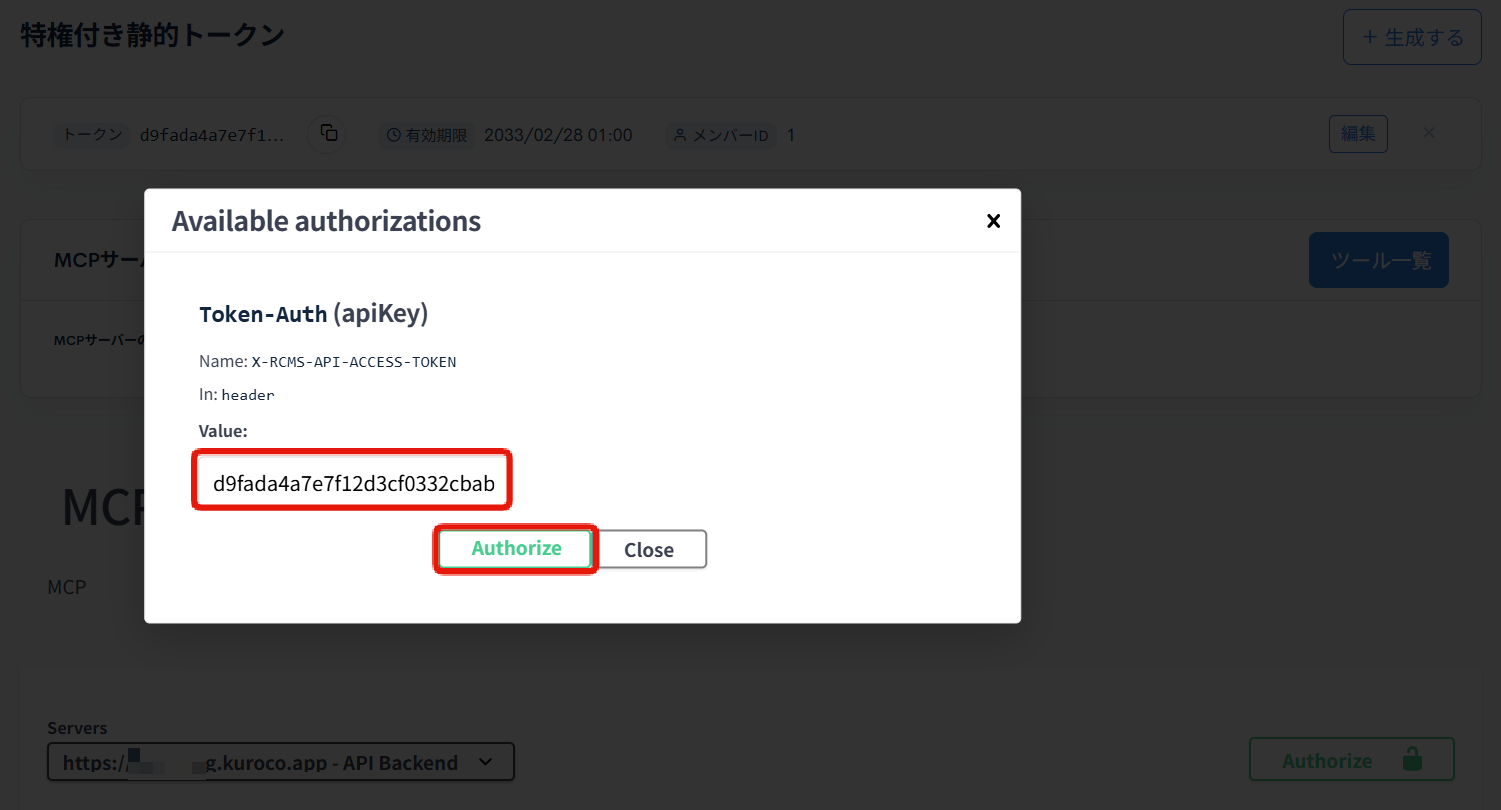
As with the static access token, click [Authorize] on the Swagger UI page, paste the copied token into the "Value" field, and click [Authorize].
4. Check the contents on the Swagger UI page.
Select the endpoint, click [Try It Out] -> [Execute], and you can confirm that data is returned with response code: 200.
Since requests are executed with the permissions of the member specified by the member ID, you can access endpoints that have API request restrictions.
Note: in case of security setting: Privileged static token
Like the static access token, there is no need to match the domains in a request by privileged static token, unlike the case of Cookie.
If the token is properly set in the header, you can access it from your local environment.
Related documents
Support
If you have any other questions, please contact us or check out Our Slack Community.