Creating a custom function endpoint
Kuroco allows you to create endpoints for custom functions.
Advantages of custom functions
With custom functions, you can freely add processes that may be difficult to implement using only the standard API endpoint functions. This in turn enables you to respond flexibly to a variety of use cases like the following:
- Update request/response content
- Hook a function to an API
- Implement your own security measures
This tutorial explains how to link your endpoints to custom functions.
GET endpoint and custom function
First, we will create a sample GET endpoint, and then link it with a custom function named PlainCustomFunction.
Create your GET endpoint
On your endpoint list screen, click [Add new endpoint].
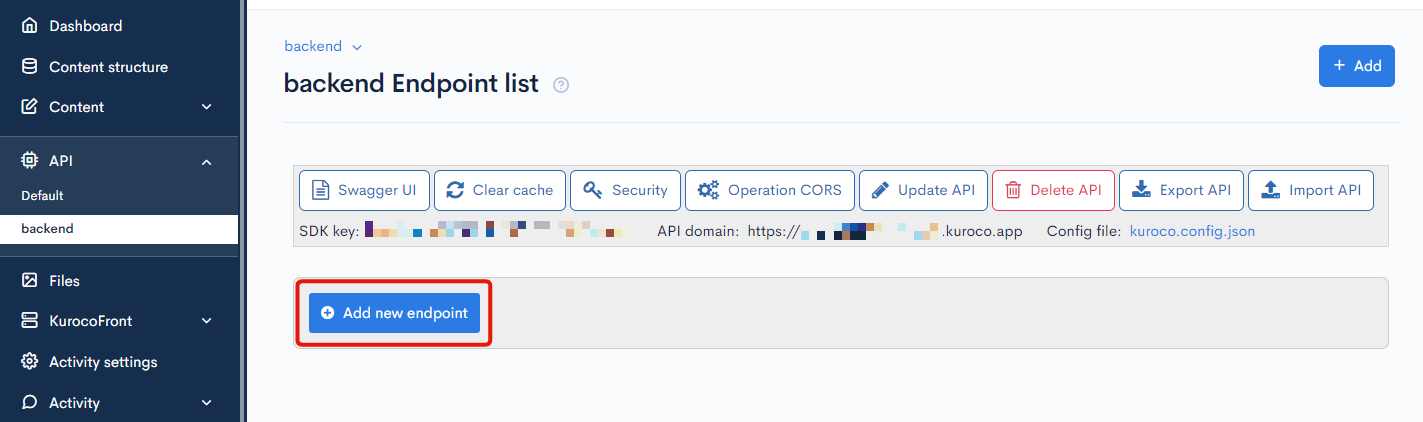
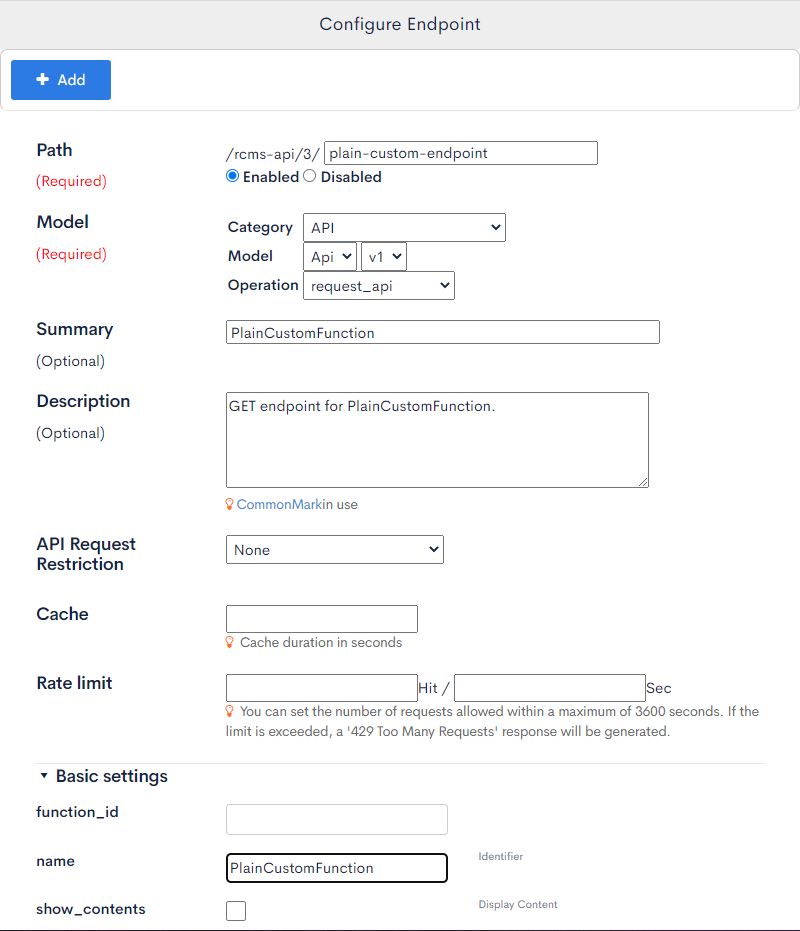
Configure the settings dialog as follows:
| Field(s) | Sub-field | Input |
|---|---|---|
| Path | - | plain-custom-endpoint |
| Enabled/Disabled | Enabled | |
| Model | Category | API |
| Model | API | |
| Operation | request_api | |
| Summary (optional) | - | PlainCustomFunctionNote: Enter a clear name for your endpoint here. We recommend using the name of your custom function. |
| Description (optional) | - | GET endpoint for PlainCustomFunction.Note: Enter a clear description for your endpoint here. We recommend briefly explaining the purpose of your function. |
| Basic settings | name | PlainCustomFunctionNote: Enter the slug of your custom function here. |
When you are done, click [Add] to save the settings.
When the use_path_param parameter is enabled in the API::request_api endpoint, it accepts path parameters like /rcms-api/1/external_api/{data_id}.
For detailed usage, please refer to the following documentation:
Create your custom function
Next, navigate to the Custom function list screen, and click [Add] in the upper right corner.
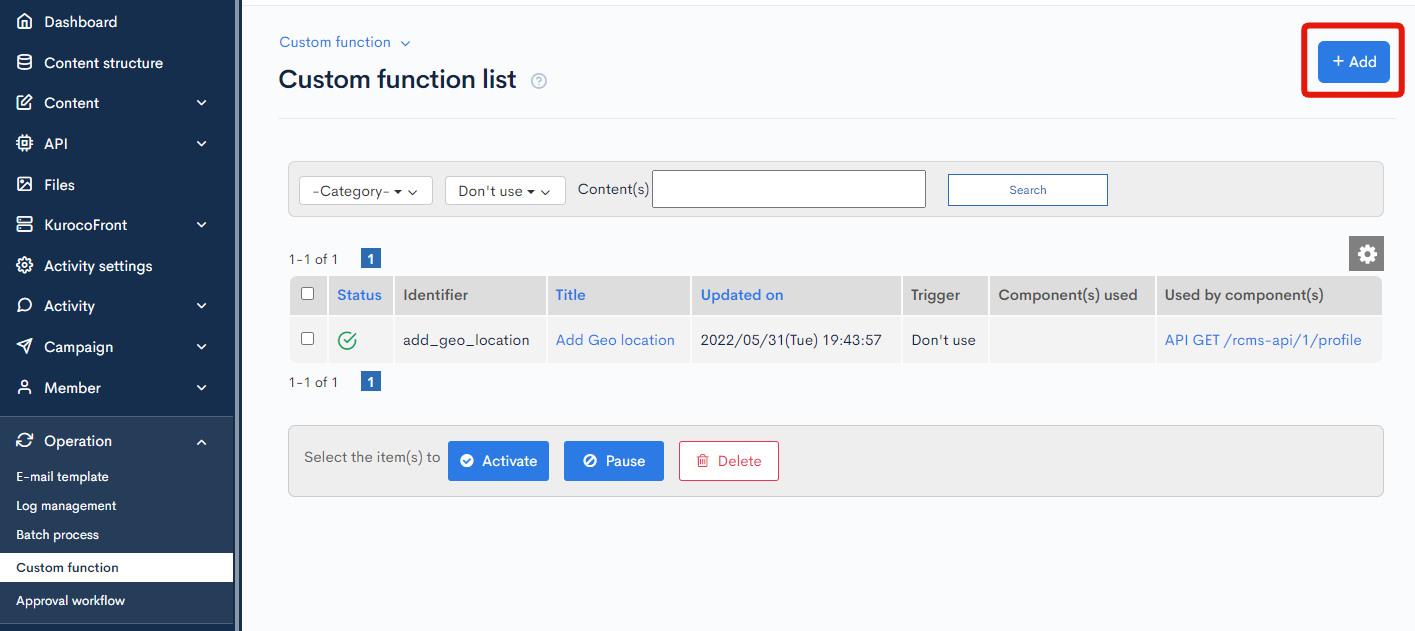
Configure the Custom function editor as follows:
| Field(s) | Input |
|---|---|
| Title | PlainCustomFunction |
| Category | Uncategorized |
| Identifier | PlainCustomFunction |
| Process |
|
| Status | Publish |
{assign var="data" value=”Hello!"}
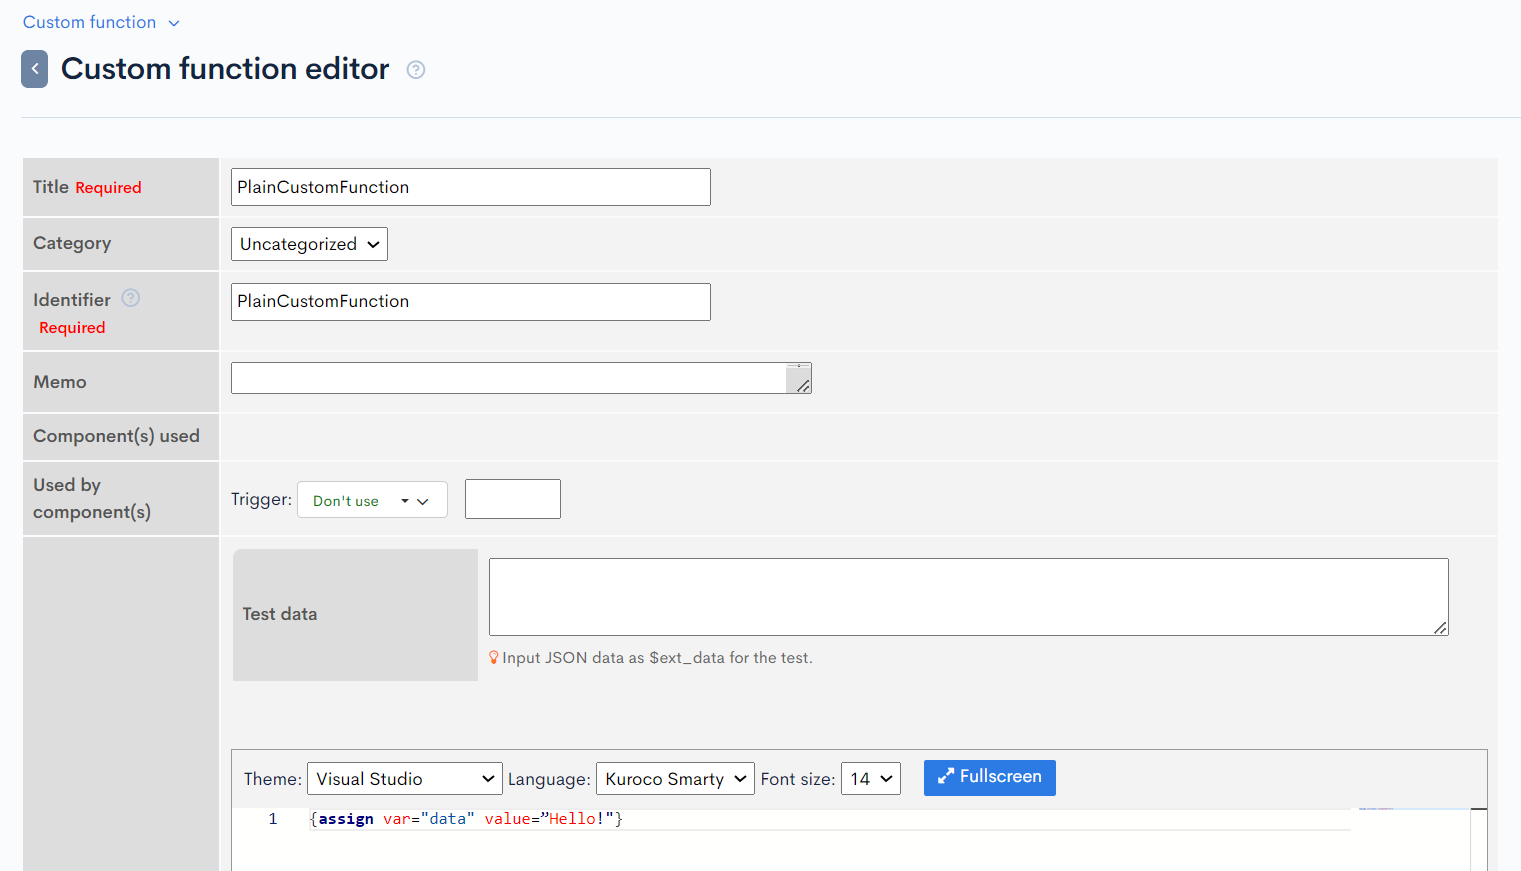
When you are done, click [Add] to save the settings.
Variables Available for request_api
| Variable Name | Type | Description |
|---|---|---|
$data | object | The value assigned to this variable will be returned in the data field of the response. |
$errors | object | If a value is assigned to this variable, the endpoint will return an error. The assigned value will be used as the message field in the response. |
$http_code | int | Assigning a value to this variable will override the original HTTP status code. |
Available HTTP Codes
| Code | Name | Meaning |
|---|---|---|
| 202 | Accepted | The request has been received but processing is not yet complete. |
| 204 | No Content | The request was successful, but there is no response body. |
| 400 | Bad Request | The request from the client is invalid. |
| 401 | Unauthorized | The request failed due to lack of user authentication (not logged in). |
| 403 | Forbidden | The request failed because the user does not have access rights to the content (different from 401, as user authentication is completed). |
| 404 | Not Found | The request failed because the specified endpoint's content does not exist. |
| 405 | Method Not Allowed | The error occurs when the request uses an unsupported HTTP method. |
| 406 | Not Acceptable | The error occurs when the server cannot generate a response matching the request's conditions. |
| 500 | Internal Server Error | Error that occurs when the request from the client is correct, but an error occurs on the server side. |
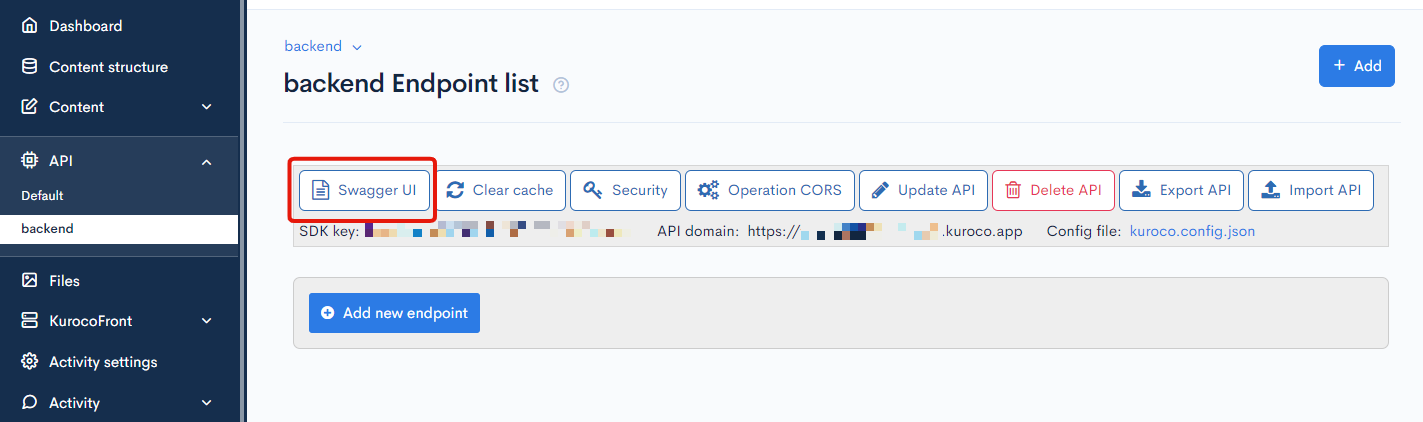
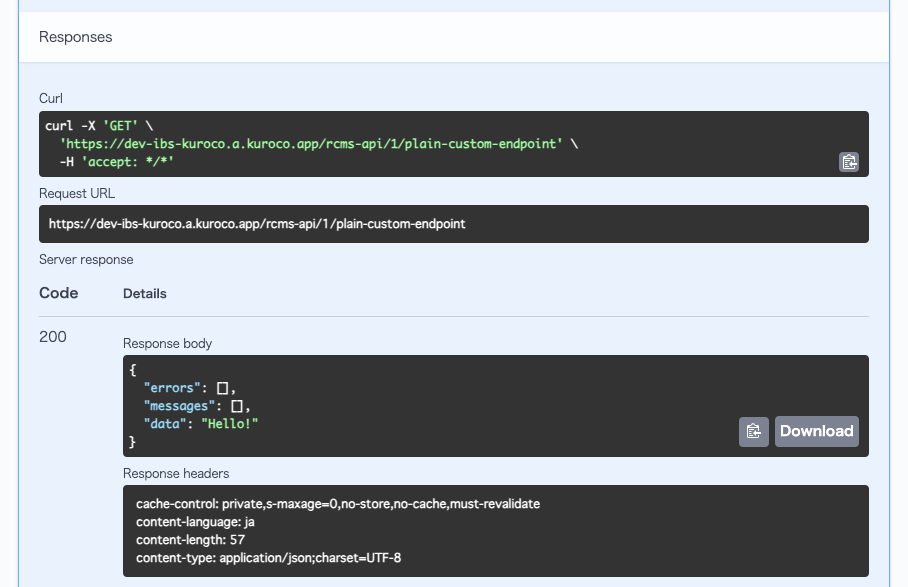
Verify the GET endpoint activity
Now, verify the behavior of your GET endpoint from the Swagger UI screen.
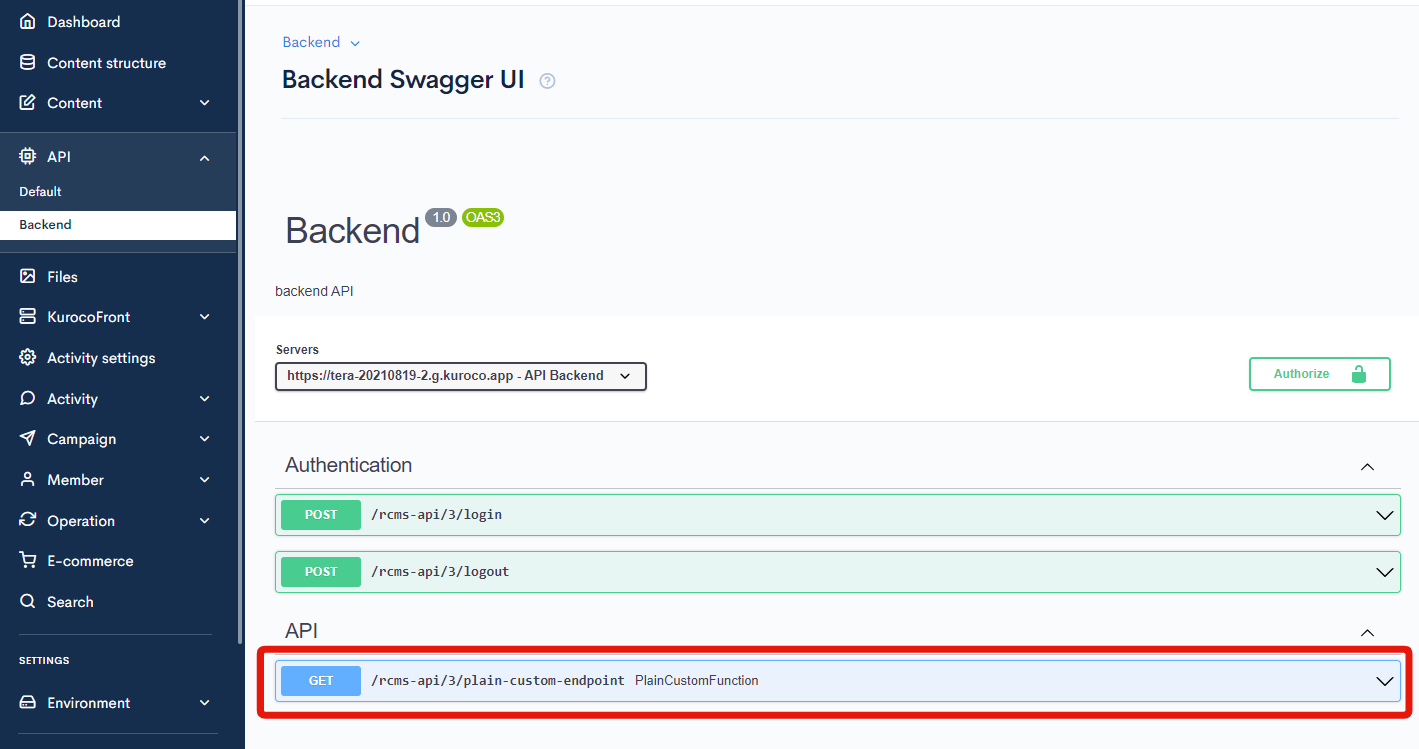
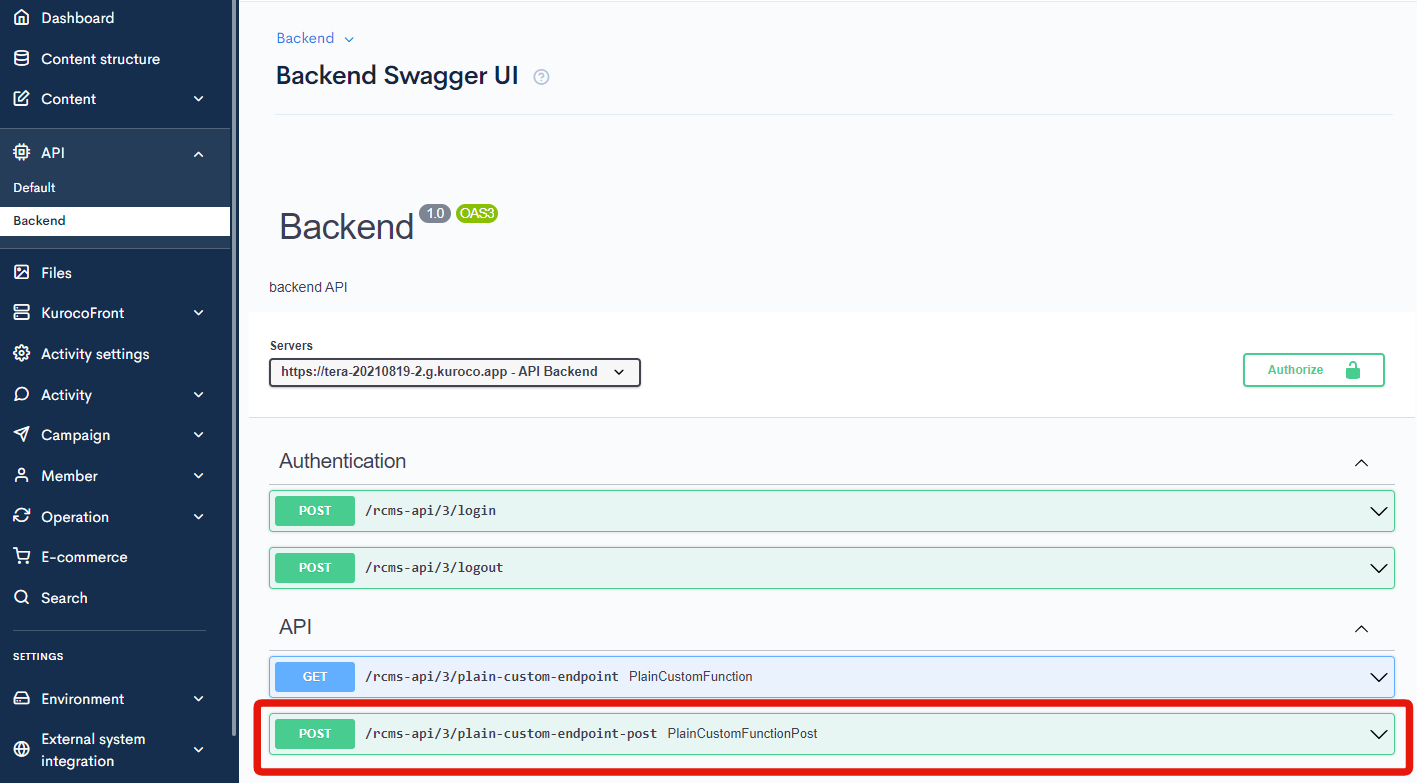
On the endpoint list screen, click [Swagger UI].
Select plain-custom-endpoint, which you created earlier.
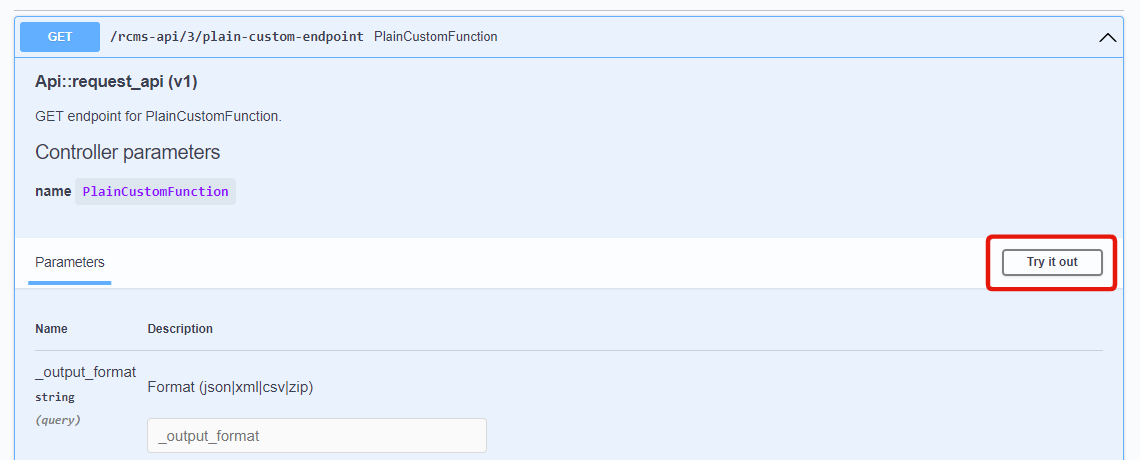
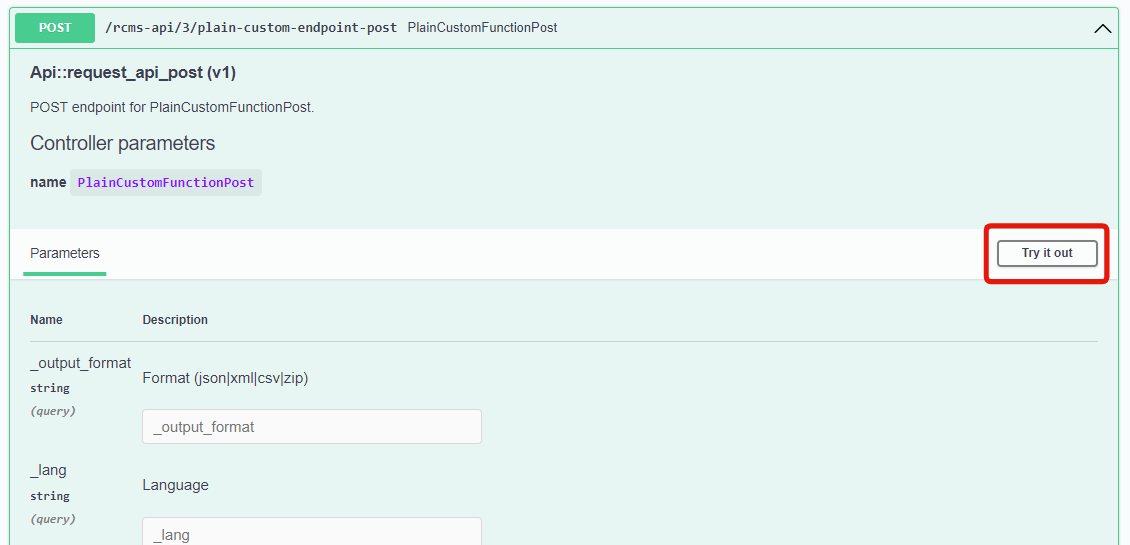
Click [Try it out].
Then, click [Execute].
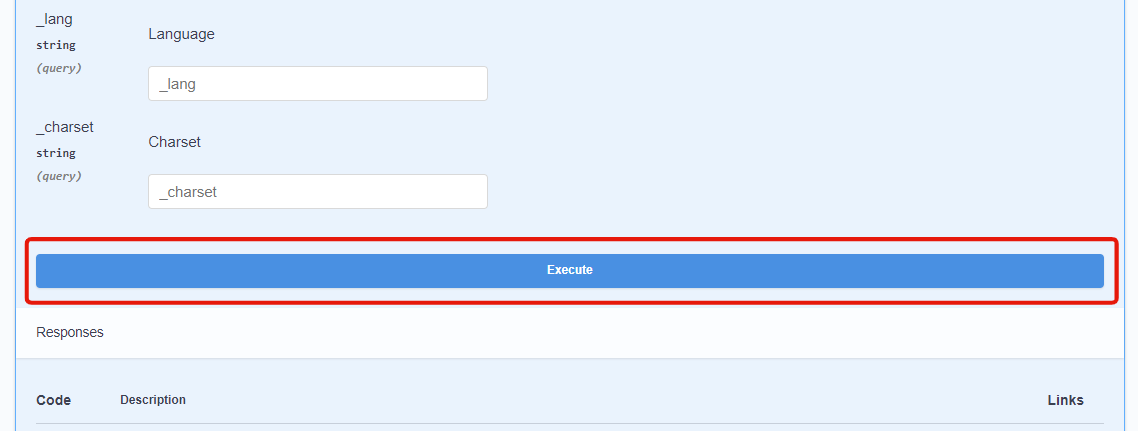
You should see the contents of the function displayed under "Response body".
POST endpoint and custom function
Now we will create a sample POST endpoint and link it with the custom function PlainCustomFunctionPost.
Create your POST endpoint
Create your POST endpoint
On your endpoint list screen, click [Add new endpoint].
Configure the settings dialog as follows:
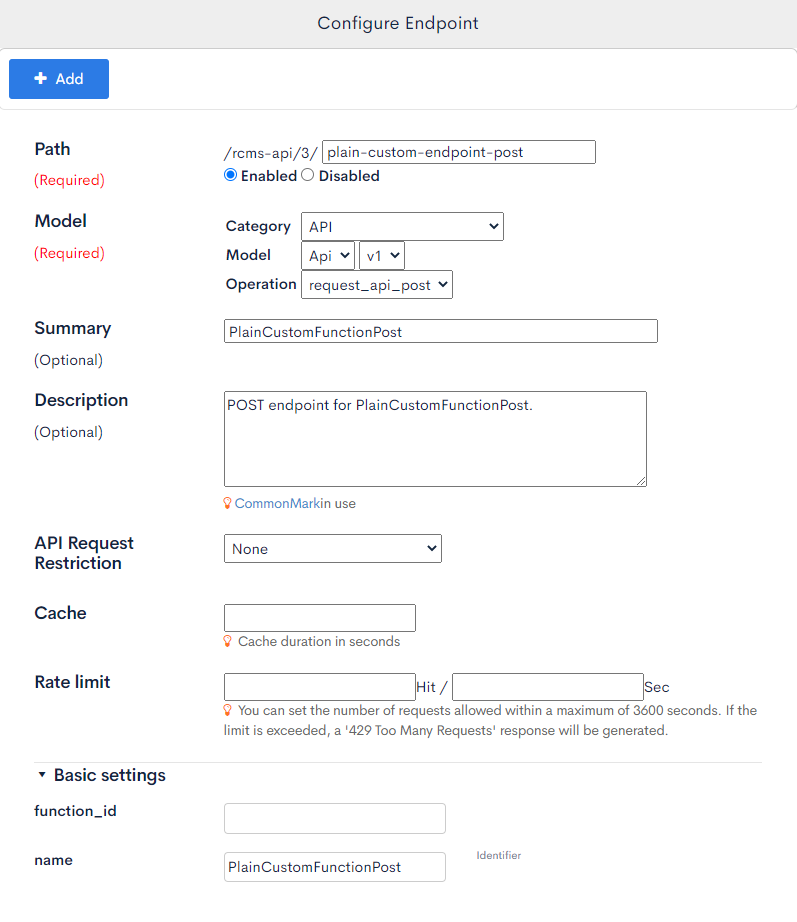
| Field(s) | Sub-field | Input |
|---|---|---|
| Path | - | plain-custom-endpoint-post |
| Enabled/Disabled | Enabled | |
| Model | Category | API |
| Model | API | |
| Operation | request_api_post | |
| Summary (optional) | - | PlainCustomFunctionPostNote: Enter a clear name for your endpoint here. We recommend using the name of your custom function. |
| Description (optional) | - | POST endpoint for PlainCustomFunctionPost.Note: Enter a clear description for your endpoint here. We recommend briefly explaining the purpose of your function. |
| Basic settings | name | PlainCustomFunctionPostNote: Enter the slug of your custom function here. |
When you are done, click [Add] to save the settings.
Create your custom function
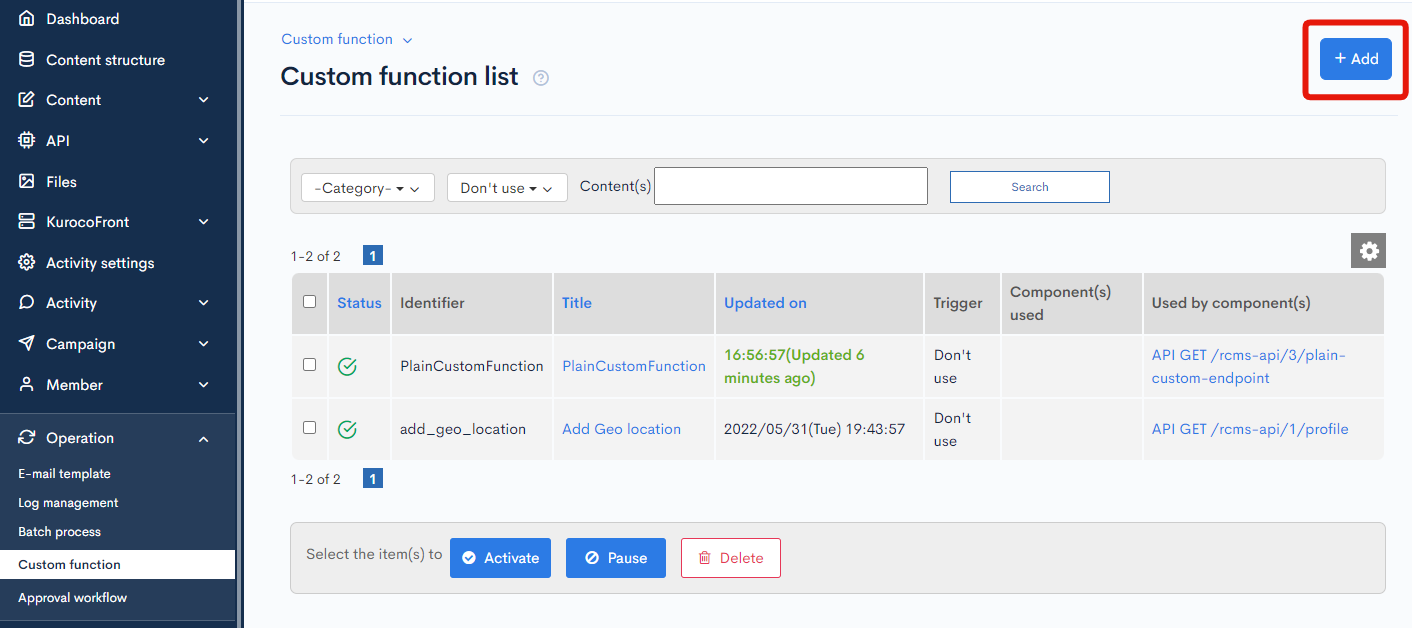
Next, navigate to the function list screen and click [Add] in the upper right corner.
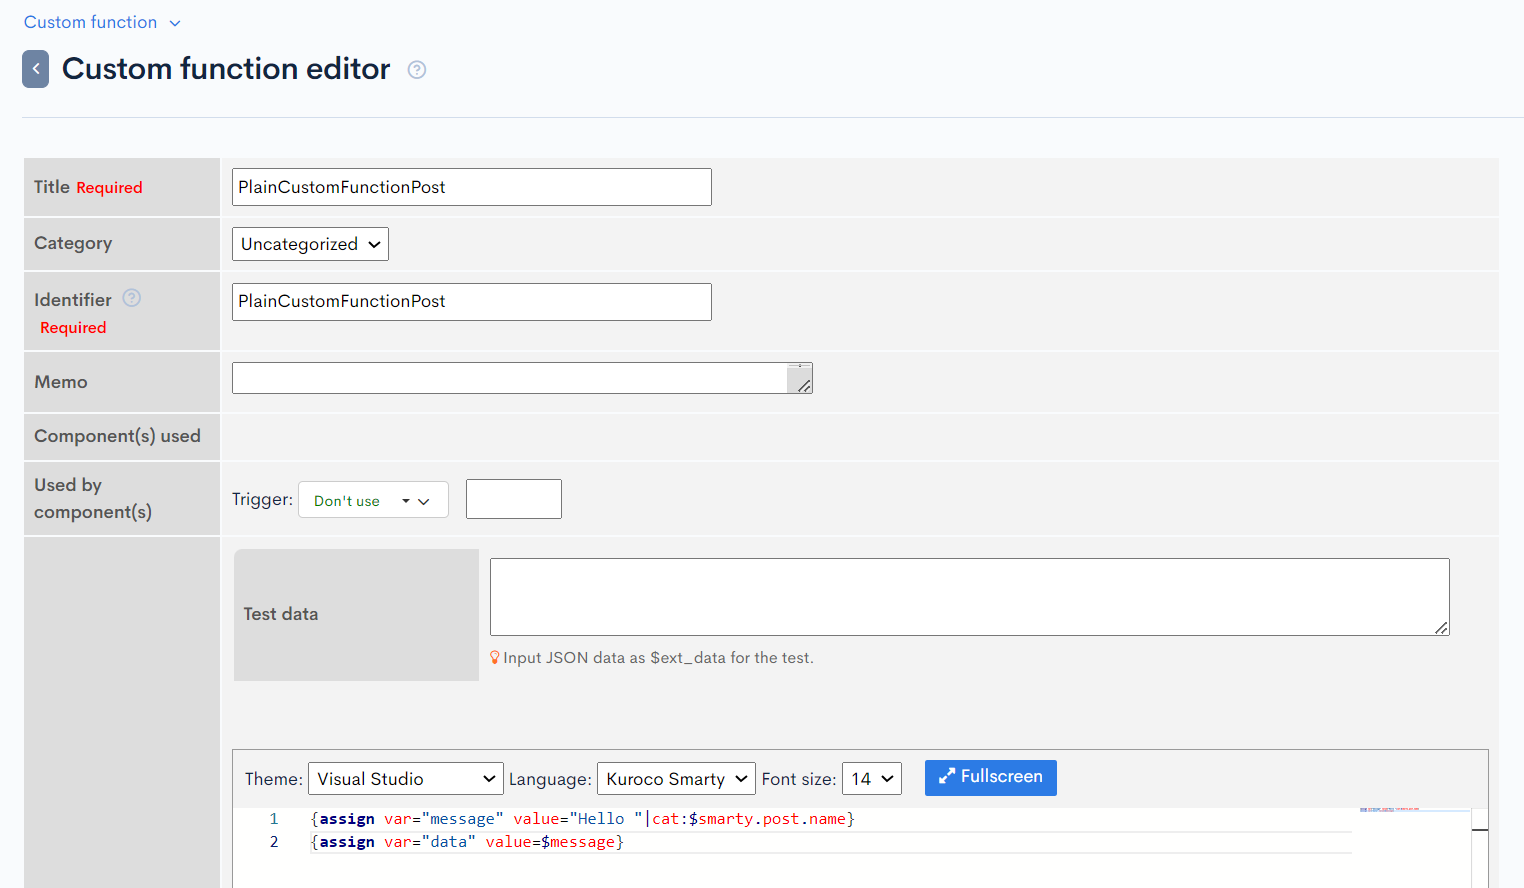
Configure the function editor as follows:
| Field(s) | Input |
|---|---|
| Title | PlainCustomFunctionPost |
| Category | Uncategorized |
| Slug | PlainCustomFunctionPost |
| Process |
|
| Status | Publish |
{assign var="message" value="Hello "|cat:$smarty.post.name}
{assign var="data" value=$message}
Variables Available for request_api_post
| Variable Name | Type | Description |
|---|---|---|
$data | object | The value assigned to this variable will be returned in the data field of the response. |
$errors | object | If a value is assigned to this variable, the endpoint will return an error. The assigned value will be used as the message field in the response. |
$http_code | int | Assigning a value to this variable will override the original HTTP status code. |
Available HTTP Codes
| Code | Name | Meaning |
|---|---|---|
| 202 | Accepted | The request has been received but processing is not yet complete. |
| 204 | No Content | The request was successful, but there is no response body. |
| 400 | Bad Request | The request from the client is invalid. |
| 401 | Unauthorized | The request failed due to lack of user authentication (not logged in). |
| 403 | Forbidden | The request failed because the user does not have access rights to the content (different from 401, as user authentication is completed). |
| 404 | Not Found | The request failed because the specified endpoint's content does not exist. |
| 405 | Method Not Allowed | The error occurs when the request uses an unsupported HTTP method. |
| 406 | Not Acceptable | The error occurs when the server cannot generate a response matching the request's conditions. |
| 500 | Internal Server Error | Error that occurs when the request from the client is correct, but an error occurs on the server side. |
Verify the POST endpoint activity
Now, verify the behavior of your POST endpoint from the Swagger UI screen.
On the endpoint list screen, click [Swagger UI].
Select plain-custom-endpoint-post, which you created earlier.
Click [Try it out].
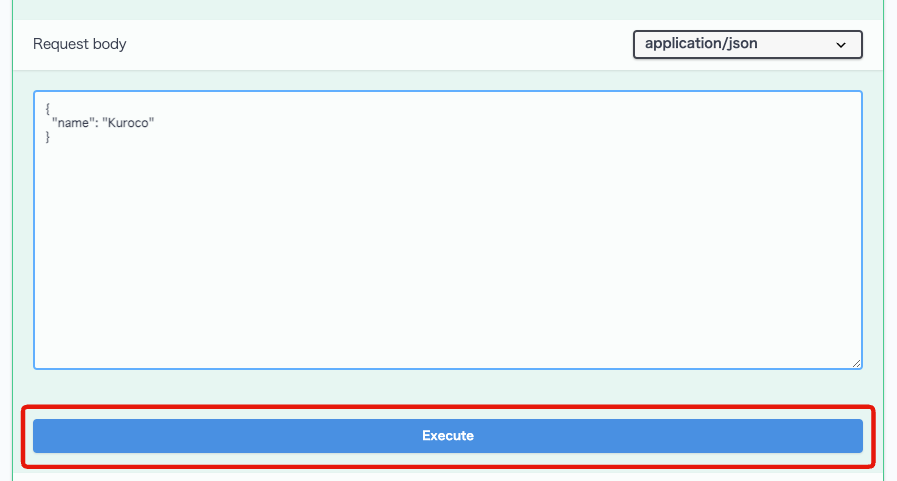
Set Response body as bellow.
{
  "name": "Kuroco"
}
Then, click [Execute].
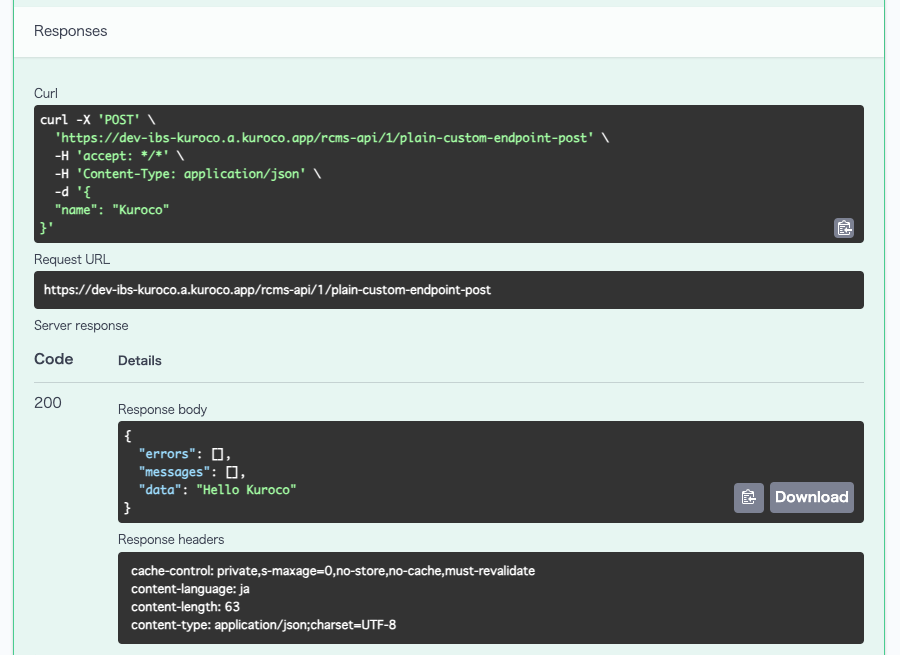
You should see the contents of the function displayed under "Response body".
Adding Custom Request Variables
The created endpoint, as mentioned above, can accept any custom request variables.
To handle request variables within custom processing, use the following syntax:
- GET variable:
$smarty.get.hoge - POST variable:
$smarty.post.foo - Cookie variable:
$smarty.cookie.bar
Furthermore, you can use a combined request variable that includes all three mentioned above:
- Request variable:
$smarty.request.piyo
{assign var="message" value="Hello "|cat:$smarty.request.name}
{assign var="data" value=$message}
Returning Success and Error Messages
If you want to send error messages (errors) or success messages (messages) in the response, you can use the following syntax within your custom processing:
{assign var="message" value="Hello "|cat:$smarty.post.name}
{assign var="data" value=$message}
{if $smarty.post.name|strlen > 10}
    {append var="errors" value="name should be less than 10 characters."}
{else}
    {append var="messages" value="name is valid."}
{/if}
In this example, if the POST variable name contains a string with more than 10 characters, an error message is appended to the errors variable. Otherwise, a success message is appended to the messages variable in the response.
In the Swagger UI interface, provide the following Request body and click [Execute] to test it:
{
  "name": "Kuroco"
}
Execution result (success message):
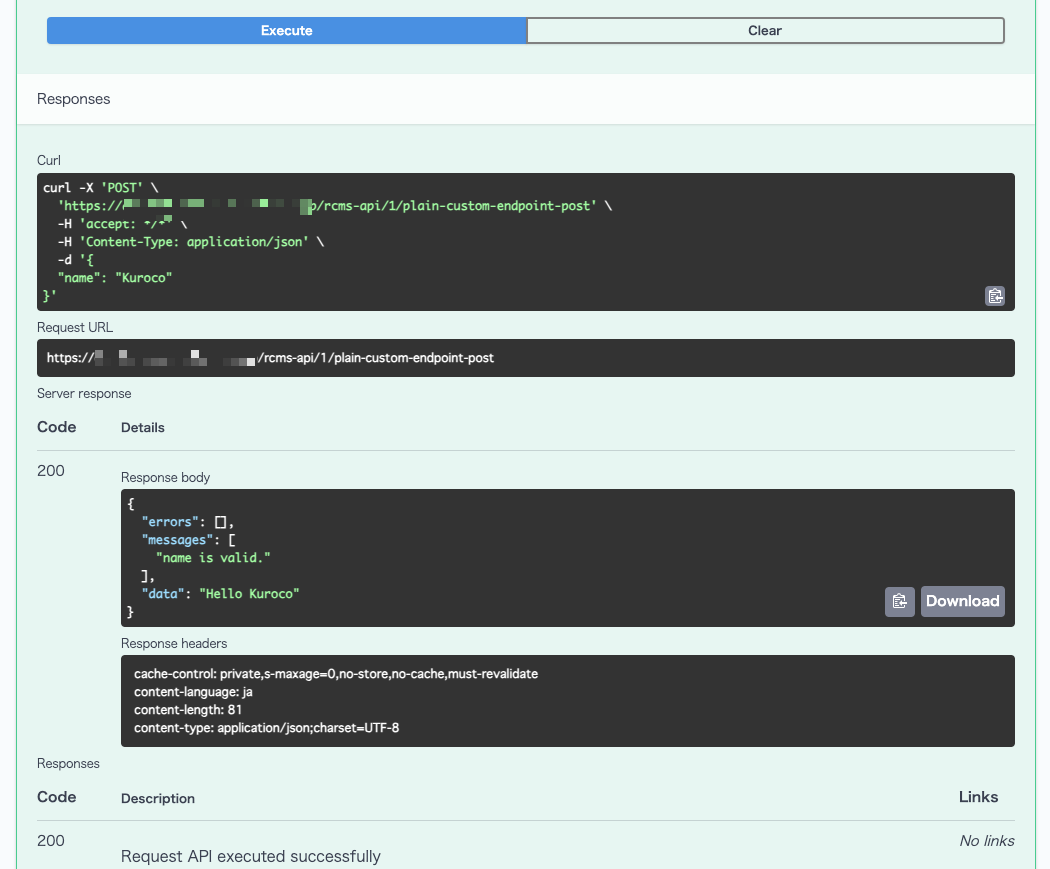
You can confirm that a success message is returned in the response.
Next, provide the following Request body in the Swagger UI interface and click [Execute] to test it:
{
  "name": "KurocoDiverta"
}
Execution result (error):
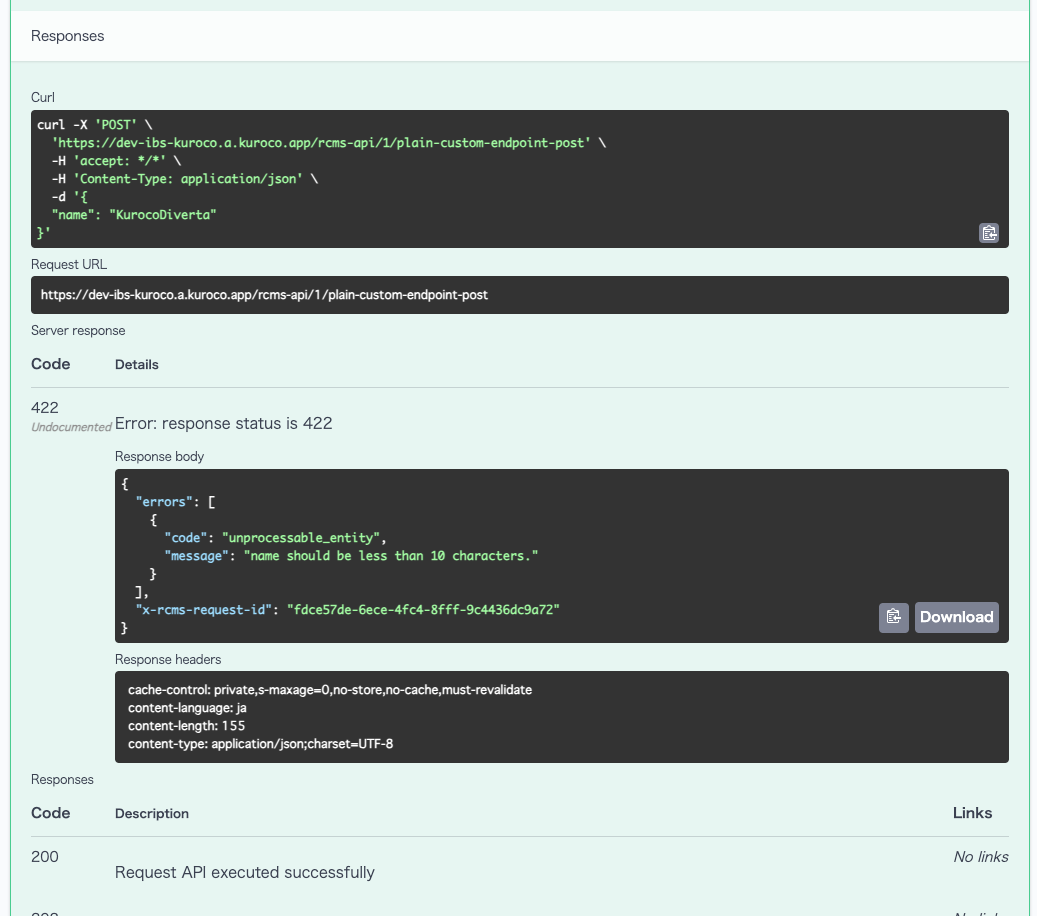
You can confirm that an error message is returned in the response.
Implementation of custom functions
This concludes the procedures for linking custom functions to API endpoints. For more information about the implementation such functions, refer to the tutorials below:
- How to implement original validation in API by using function
- Setting up stubs on API endpoints using custom functions
- rewrite request values passed to the API main process by using the original process
Related documents
Support
If you have any other questions, please contact us or check out Our Slack Community.