Integrating Kuroco MCP Server with Amazon Bedrock AgentCore Gateway
This tutorial explains how to connect a Kuroco MCP server to Amazon Bedrock AgentCore Gateway using OAuth 2.0 client_credentials authentication.
The integration has three main parts:
- Configure the Kuroco OAuth Authorization Server and register a
client_credentialsclient. - Register that client in Amazon Bedrock AgentCore as an outbound OAuth client provider.
- Create an AgentCore Gateway and add the Kuroco MCP server as an MCP target.
The resulting flow is:
Client or agent
    → Amazon Bedrock AgentCore Gateway
    → Kuroco OAuth Authorization Server using client_credentials
    → Kuroco MCP Server
1. Configure the Kuroco OAuth Authorization Server
This integration relies on Kuroco's built-in OAuth Authorization Server, which issues the access tokens that Amazon Bedrock AgentCore uses to call the Kuroco MCP server.
In this section you:
- Create (or reuse) an OAuth Authorization Server whose target domain is
API. - Register a confidential OAuth client that supports the
client_credentialsgrant. - Collect the values you will later enter into Amazon Bedrock AgentCore.
1.1 Prerequisites
-
A Kuroco API endpoint that has the MCP server enabled, and whose API security is set to any value except
none.The
client_credentialsgrant issues bearer tokens that the Kuroco MCP server validates through OAuth.
Get the MCP endpoint URL of that API from the MCP settings, which has the following form:
https://{your-site}.g.kuroco.app/rcms-api/{api_id}/mcp
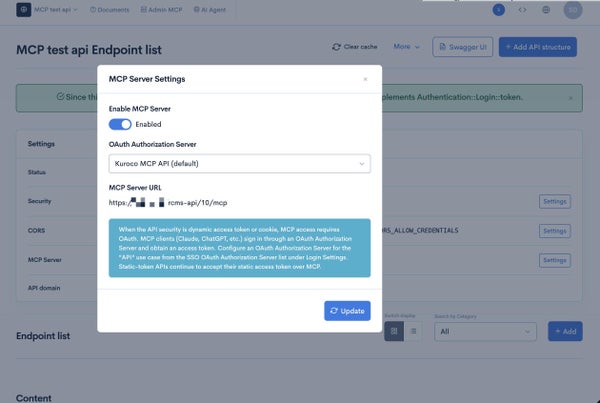
If the MCP server is not yet enabled on an endpoint, configure it first (endpoint MCP settings: tool name, input schema, status).
This tutorial uses the Client API MCP server (/rcms-api/{api_id}/mcp), backed by an API-domain OAuth Authorization Server. If you need to expose admin operations instead, you can follow the same flow with the Admin MCP server (/direct/rcms_api/admin_mcp/), backed by an AdminMCP-domain OAuth Authorization Server. The setup is analogous, but the target domain, scopes, and audience differ.
1.2 Create the OAuth Authorization Server
You can reuse an existing API-domain authorization server (Kuroco may have created a default one named Kuroco MCP API (default)) instead of creating a new one. If you reuse it, make sure its Supported grant types include client_credentials and its Allowed scopes include api:read (and api:write if needed). Grant types are selected per client, so enabling client_credentials on a shared server does not affect existing clients that use other grants.
In the Kuroco admin panel, open External System Integration → OAuth Authorization Server, then click Add and configure it as follows.
| Setting | Value |
|---|---|
| Name | Any label, for example Bedrock AgentCore. |
| Target Domain | API (protects a content API exposed via /rcms-api/{api_id}/mcp). This value cannot be changed after creation. |
| Supported grant types | Enable client_credentials. (authorization_code / refresh_token are not required for this integration.) |
| Allowed scopes | Enable api:read (and api:write if the client must perform write operations). |
| Access token lifetime | 3600 (seconds; default). |
| Refresh token lifetime | 2592000 (seconds; default). |
| Authorization code lifetime | 60 (seconds; default). |
| Login page URL | Leave it empty. This field is optional and is not used by the client_credentials flow. |
| Enabled | ON |
Click Add to save.
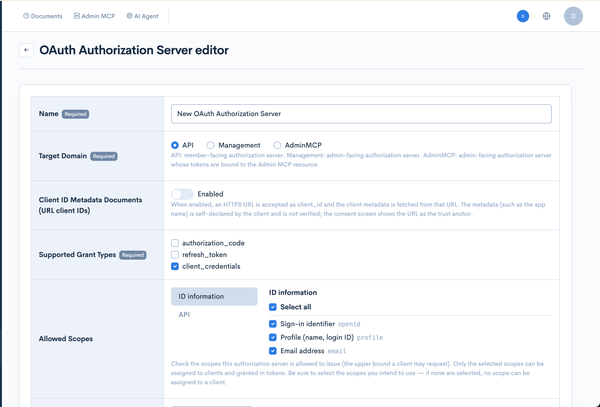
After saving, open the authorization server again. Two read-only values are shown that you will need later:
-
Issuer URL, of the form:
https://{your-site}.g.kuroco.app/direct/login/oauth_idp/{id} -
Metadata URL, of the form:
https://{your-site}.g.kuroco.app/.well-known/oauth-authorization-server/direct/login/oauth_idp/{id}
1.3 Register an OAuth client
On the authorization server list, click Manage clients in the row of the server you created, then click Add and configure the client as follows.
| Setting | Value |
|---|---|
| Client name | Any label, for example Bedrock AgentCore. |
| Token Endpoint Auth Method | client_secret_basic. This tutorial uses client_secret_basic, but client_secret_post is also supported — choose the same method here and in Amazon Bedrock AgentCore. It must not be none; client_credentials requires a confidential client. |
| Supported grant types | Enable client_credentials. |
| Service member | Select the member the issued token acts as. All Gateway MCP calls run with this member's permissions, so choose a member with the least privilege required. The member must be allowed to generate a token. This field is required when client_credentials is selected. |
| Default API | Select the MCP-enabled API this token targets. This sets the token audience (RFC 8707 resource). Required for this integration — Amazon Bedrock AgentCore does not send a resource parameter, so without a Default API the token endpoint rejects the request with invalid_target. |
| Allowed Scopes | Select api:read (and api:write for write operations). At least one functional scope is required. |
| Redirect URI | Leave empty. A redirect URI is only required for the authorization_code grant, which this integration does not use. |
| Enabled | ON |
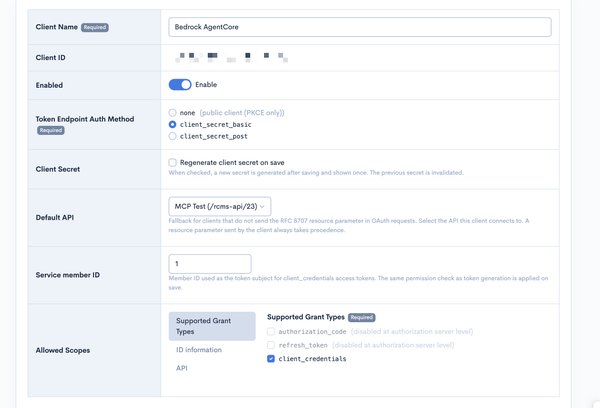
When you click Add:
- A Client ID is generated automatically.
- Because the auth method is not
none, a Client Secret is generated and displayed only once. Copy it immediately — it cannot be shown again (you can regenerate it later from the client edit screen if lost).
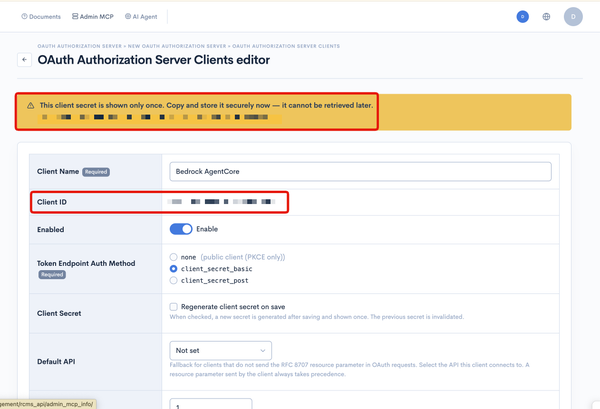
1.4 Collect the values for Amazon Bedrock AgentCore
You now have everything needed to configure AgentCore. Collect:
- Client ID and Client secret (from the client you just registered).
- Issuer, Authorization endpoint, and Token endpoint.
To obtain the endpoints, open the Metadata URL from Section 1.2. It returns an OAuth 2.0 Authorization Server Metadata document (RFC 8414). Retrieve these values from the JSON:
| Metadata field | Example value |
|---|---|
issuer | https://{your-site}.g.kuroco.app/direct/login/oauth_idp/{id} |
authorization_endpoint | https://{your-site}.g.kuroco.app/direct/login/oauth_idp/{id}/authorize |
token_endpoint | https://{your-site}.g.kuroco.app/direct/login/oauth_idp/{id}/token |
client_credentials does not use the authorization endpoint, but Amazon Bedrock AgentCore requires the field, so record it anyway.
2. Configure the Kuroco OAuth client in Amazon Bedrock AgentCore
Before creating the Gateway, register the Kuroco OAuth Authorization Server in AgentCore Identity as an outbound OAuth client provider, using the values you collected in Section 1.4.
Kuroco publishes an OAuth 2.0 Authorization Server Metadata document (RFC 8414) at the Metadata URL, but AgentCore's automatic discovery expects an OpenID Connect discovery document, which Kuroco does not publish for this endpoint. Use Manual config and enter the endpoints by hand.
2.1 Add the OAuth client to AgentCore Identity
In the AWS Console:
- Open Amazon Bedrock AgentCore.
- Open Identity.
- Go to the outbound authentication section.
- Add a new OAuth client.
- Select a custom OAuth provider.
- Select Manual config.
Configure the provider as follows:
| Setting | Value |
|---|---|
| Client authentication method | Client secret basic (must match the Token Endpoint Auth Method set on the Kuroco client; Client secret post is also supported) |
| Issuer | The issuer value from the Kuroco Metadata URL |
| Authorization endpoint | The authorization_endpoint value from the Kuroco Metadata URL |
| Token endpoint | The token_endpoint value from the Kuroco Metadata URL |
| Client ID | The Client ID generated when registering the client in Kuroco |
| Client secret | The Client secret generated when registering the client in Kuroco |
Client secret basic means that AgentCore authenticates to the Kuroco token endpoint using HTTP Basic authentication:
Authorization: Basic base64(client_id:client_secret)
The token request uses the client_credentials grant and is sent to the Kuroco token endpoint (the token_endpoint value from the Metadata URL, of the form https://{your-site}.g.kuroco.app/direct/login/oauth_idp/{id}/token):
POST /direct/login/oauth_idp/{id}/token
Content-Type: application/x-www-form-urlencoded
Authorization: Basic base64(client_id:client_secret)

grant_type=client_credentials
You do not need to configure any scopes in AgentCore. The token's scopes come from the Allowed Scopes you set on the Kuroco client (api:read / api:write): when the token request omits the scope parameter, Kuroco grants the client's configured scopes.
Likewise, you do not configure the token audience in AgentCore. It comes from the Default API you set on the Kuroco client, which Kuroco uses as the RFC 8707 resource when the request does not send a resource parameter.
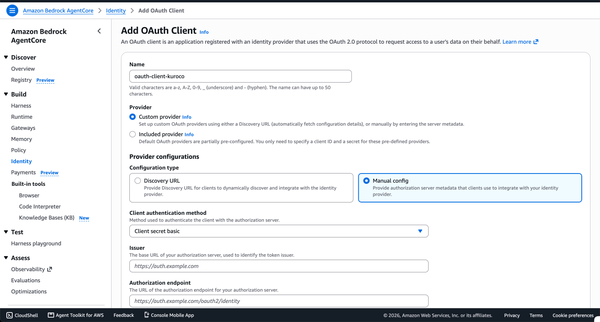
At this point, the OAuth configuration is complete. The Kuroco OAuth Authorization Server is connected to Amazon Bedrock AgentCore using client_credentials.
This OAuth client configuration can be reused by any AgentCore Gateway that needs to connect to the corresponding Kuroco MCP server.
3. Create an Amazon Bedrock AgentCore Gateway
In the AWS Console:
- Open Amazon Bedrock AgentCore.
- Open Gateways.
- Select Create Gateway.
The creation wizard contains four steps.
Step 1 — Define gateway details
You can leave the default values unchanged.
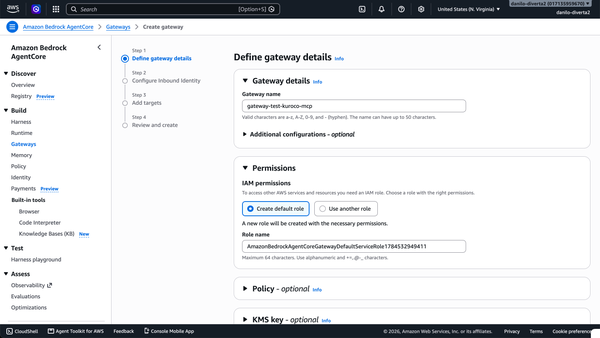
Review the generated gateway name and other default settings, then click Next.
Step 2 — Configure Inbound Identity
Inbound authentication controls how clients authenticate when calling the AgentCore Gateway.
Choose the authentication method depending on your needs. Available options are:
- IAM authentication
- JWT-based authentication
- No authorization, for a temporary isolated test only
Inbound authentication is separate from the outbound OAuth authentication used between AgentCore Gateway and Kuroco.
Client → AgentCore Gateway
    Inbound authentication

AgentCore Gateway → Kuroco MCP Server
    OAuth client_credentials
For production environments, use an authenticated inbound configuration. Avoid leaving a publicly reachable Gateway without inbound authentication.
After configuring inbound identity, click Next.
Step 3 — Add targets
Add the Kuroco MCP server as the Gateway target.
Configure the target as follows:
| Setting | Value |
|---|---|
| Target Protocol | MCP Target |
| Target type | MCP Server |
| MCP endpoint | The endpoint of the Kuroco MCP server you want to add |
| Outbound Auth | OAuth client |
| OAuth client | Select the OAuth client created in Section 2 |
All remaining settings can be left at their default values.
The MCP endpoint should be the complete public HTTPS endpoint of the Kuroco MCP server. It has the following form:
https://{your-site}.g.kuroco.app/rcms-api/{api_id}/mcp
Use the MCP endpoint of the same API you selected as the Default API on the Kuroco client, so that the token audience matches the resource being called.
After configuring the target, click Next.
Step 4 — Review and create
Review the Gateway and target configuration, then click Create Gateway.
AgentCore will create the Gateway and connect the target to the Kuroco MCP server using the OAuth client configured earlier.
4. Test the Gateway
Copy the Gateway URL from the Gateway details page. It should end with /mcp.
For a Gateway created without inbound authorization, you can test it with curl:
curl -i -X POST 'YOUR_GATEWAY_URL' \
  -H 'Content-Type: application/json' \
  -H 'Accept: application/json, text/event-stream' \
  -d '{
    "jsonrpc": "2.0",
    "id": 1,
    "method": "tools/list",
    "params": {}
  }'
A successful response should include the tools exposed by the Kuroco MCP server.
To call a tool, use the exact tool name and input schema returned by tools/list:
curl -i -X POST 'YOUR_GATEWAY_URL' \
  -H 'Content-Type: application/json' \
  -H 'Accept: application/json, text/event-stream' \
  -d '{
    "jsonrpc": "2.0",
    "id": 2,
    "method": "tools/call",
    "params": {
      "name": "YOUR_TOOL_NAME",
      "arguments": {}
    }
  }'
For Gateways using IAM or JWT inbound authentication, include the corresponding authentication when calling the Gateway.
The Gateway can now be connected to any MCP client and will use the Kuroco MCP server.
Related documents
- Model Context Protocol (MCP) Integration with Kuroco — How to enable the MCP server on a Kuroco API endpoint, a prerequisite for this tutorial
- MCP Server Reference — Endpoints, authentication methods, and tool structure for the Client API MCP server and Admin MCP server
- MCP Client Configuration — OAuth Authorization Server setup (CIMD and manual client registration) for other MCP clients
- How to Register an MCP Connector in Claude.ai — Another walkthrough of registering a Kuroco OAuth Authorization Server and client, using the
authorization_codegrant instead ofclient_credentials - API security — Details on the API security settings referenced in this tutorial's prerequisites
Support
If you have any other questions, please contact us or check out Our Slack Community.