Operating the Kuroco admin panel with Admin MCP
This page explains how to connect Claude Code to Kuroco's Admin MCP and operate the Kuroco admin panel from an AI agent.
The setup starts from the Admin MCP screen in the admin panel. That screen shows the endpoint URL to connect to and the setup instructions for each MCP client.
Prerequisites
- An administrator account that can log in to the Kuroco admin panel
- Administrator permissions for the operations you want to perform (through Admin MCP you can only do what that administrator can do in the admin panel)
- An environment with Claude Code installed (the
claudecommand available) - If the Admin MCP access restriction (IP address) is enabled, the source IP address must be allowed
Prerequisites for connecting to Admin MCP
Kuroco provides two kinds of MCP servers, and this page covers Admin MCP, the one for administrative operations. For how it differs from the MCP server of an API, see Kuroco AI features guide.
MCP clients obtain access tokens from an OAuth Authorization Server whose target domain is AdminMCP. Kuroco auto-creates the Admin MCP authorization server Admin MCP (default) as soon as you open External system integration > ID linkage > OAuth Authorization Server. In most cases you use that authorization server as it is, and do not need to add a new one.
Only one authorization server whose target domain is AdminMCP can be enabled per site. Also, Admin MCP (default) is not re-created automatically once deleted. If you deleted it, click Add on the list screen and create an authorization server with the target domain set to AdminMCP.
Only administrators who can sign in (authorize on the consent screen) through this authorization server can connect to Admin MCP. To narrow down who can connect by group membership, set Groups allowed to sign in Release version: β / RCversion on the authorization server's edit screen. See OAuth Authorization Server for details.
Connect to Admin MCP
This page connects by enabling CIMD (Client ID Metadata Documents), which does not require pre-registering a client.
1. Open the Admin MCP screen
Click Admin MCP at the top right of the admin panel.
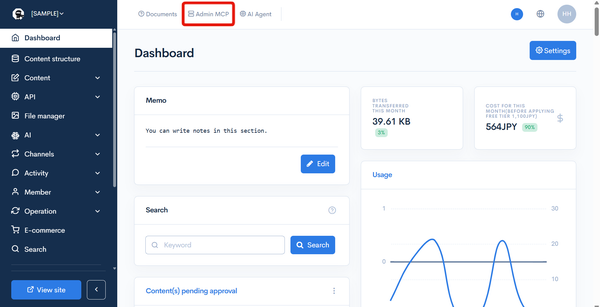
The Admin MCP screen (/management/rcms_api/admin_mcp_info/) is displayed.
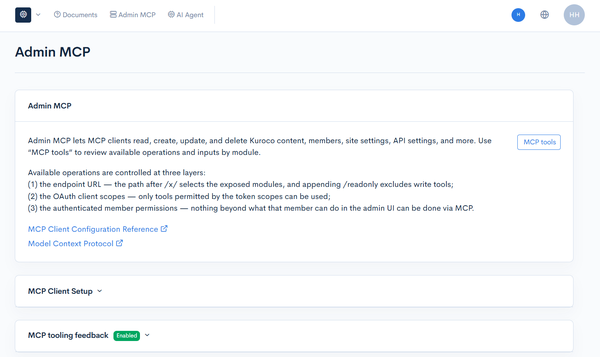
2. Enable CIMD
If MCP client setup shows "Client ID Metadata Documents (CIMD) is disabled.", click Enable CIMD.
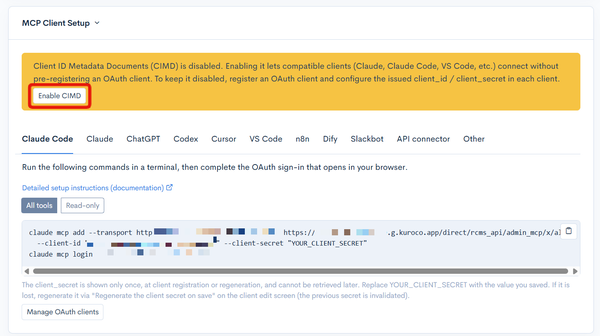
The edit screen of Admin MCP (default) opens: enable Client ID Metadata Documents (CIMD) and click Update.
While CIMD is enabled, any application can request authorization without pre-registration. A token is issued only when Allow is clicked on the consent screen, but the upper bound of the scopes such a token can carry is set by the authorization server's Allowed scopes. Allow only the scopes you need.
To keep CIMD disabled instead, issue a client secret from Manage OAuth clients on the Admin MCP screen and set the client_id / client_secret in the MCP client (see OAuth Authorization Server for details).
3. Check the endpoint URL to connect to
The endpoint URL has the following form.
https://{site_key}.g.kuroco.app/direct/rcms_api/admin_mcp/x/all
MCP client setup shows the setup method for each MCP client as tabs. Select the Claude Code tab. Keep the endpoint set to All tools (selected by default). Check the displayed content.
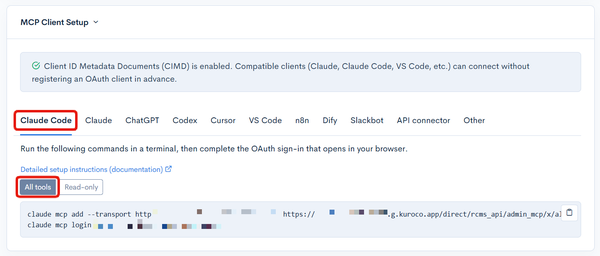
The path after /x/ selects the modules to expose. If you want a read-only connection that excludes write tools (create, update, delete, and so on), select Read-only instead (this appends /readonly to the URL). To narrow the URL to specific modules, adjust it to the format shown in the Endpoint section of the Admin MCP screen.
Each of these URLs is a separate OAuth resource. An access token is bound to the URL specified when it was obtained. Using it against a different URL is rejected with 401, so narrowing the URL actually narrows the authorization scope.
4. Register the server in Claude Code and authenticate
This connection is registered per project (directory) you run the command in. In a terminal, move to the project directory where you want to use Claude Code, then run both of the two commands shown on the Claude Code tab under MCP client setup.
The commands have the following form (the screen shows them with your actual site key and server name already filled in, so you can use them as-is). {server_name} is the identifier used inside Claude Code and can be any value.
claude mcp add --transport http {server_name} https://{site_key}.g.kuroco.app/direct/rcms_api/admin_mcp/x/all
claude mcp login {server_name}
The Kuroco admin login and consent screen open in your browser. Complete the authentication there.
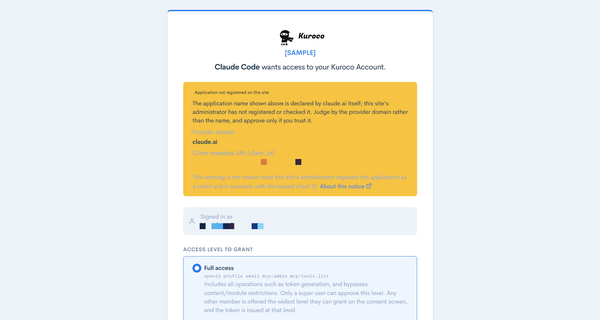
A client connected via CIMD is not registered as a client in Kuroco, so the consent screen shows the warning "Application not registered on this site". This does not indicate that the application is dangerous. See The "Application not registered on this site" notice on the consent screen for details.
The access level you allow here, together with the permissions of the member you log in as, limits what operations Claude Code can actually perform. If you connected with CIMD disabled, the OAuth client's Allowed scopes is an additional ceiling on top of these.
5. Install Kuroco Skills (recommended)
Kuroco Skills is an Agent Skills package for AI agents such as Claude Code. In addition to Kuroco specifications and best practices, it includes how to use Admin MCP (the kuroco-admin-mcp skill), so installing it makes it easier to run instructions that use the Admin MCP tools.
Run the following command in the project directory you used in step 4.
npx skills add diverta/kuroco-skills
After the installation, restart Claude Code to enable the skills. For the /plugin command method and for cloning the repository directly, see How to use Kuroco Skills.
This command is also shown on each client tab of the Admin MCP screen, as 2. Install Kuroco Skills.
6. Verify the connection
Run /mcp in Claude Code and confirm that the registered MCP server is connected and that the Admin MCP tools are listed. If the status stays needs authentication, run claude mcp login {server_name}.
Once the tools are available, try the Example prompts. If you cannot connect, see When the connection fails.
Example prompts
The following prompts are a good way to confirm that Claude Code actually calls the Admin MCP tools.
Investigation and inventory (read-only)
These also work with a read-only URL.
Investigate whether there are any security problems in the endpoint settings.
Check the request-count usage and look for ways to reduce the Kuroco usage fee.
List the NEWS content items that are published but have an empty body.
Bulk updates (write operations)
These require a URL that includes write tools (no /readonly) and a capability level of Read & write or higher.
Update the slug of every NEWS content item to news-{topics_id}.
Unpublish the news items published before 2020. Check the number of target items first, then apply the change.
If a prompt always has to repeat the same premise, write it in Site-specific Admin MCP instructions on the Admin MCP screen so it is passed to connected AI clients as a shared premise.
When the connection fails
| Error | Likely cause | Resolution |
|---|---|---|
invalid_target: resource is not permitted for this client | The client's Target resource and the URL set in the MCP client do not match. | Align them, including the presence of /readonly. |
invalid_scope: scope '...' not allowed for this client | A scope that is not allowed by the authorization server or the client is being requested. | Open the edit screens of the authorization server and the client, select the privilege level under Allowed scopes, and click Update. If the MCP client still holds older metadata, remove the registration and add it again. |
redirect_uri does not match a registered URI | The MCP client's callback URL is not registered in the client's Redirect URI. | Check the redirect_uri parameter of the authorization URL shown in the browser address bar and register that value as the client's Redirect URI. |
Rejected with 401 | You are connecting to a URL other than the one the token was obtained for. | Align the URL set in the MCP client with the endpoint URL you decided when connecting, and authenticate again. |
Rejected with 403 | The source is not allowed by the Admin MCP access restriction (IP address). | Add the source IP address to "Admin MCP access restriction (IP address)" under Environment settings > Admin panel > Admin panel. |
After changing client settings such as Target resource, Allowed scopes, or Redirect URI, re-authenticate from the MCP client.
Notes
- For read-only usage, combine an endpoint URL with
/readonlyand the client capability level Read-only. Write tools are excluded and the token carries no write permission. - The ceiling of what Read & write delegates is listed per module under Permissions delegated by mcp:tools.write on the Admin MCP screen. To delegate more, select All operations (delegated account permissions).
- To pass site-specific operating rules to AI clients, write them in Site-specific Admin MCP instructions on the Admin MCP screen. These instructions never widen the permissions of a token, and clients decide whether to follow them, so they are not a substitute for access control.
- For clients other than Claude Code (Claude, ChatGPT, Codex CLI, Cursor, VS Code, n8n, Dify, Slackbot, and so on), see the corresponding tab on the Admin MCP screen and the MCP client configuration reference.
Related documents
Support
If you have any other questions, please contact us or check out Our Slack Community.