How to use proxy login
Kuroco's proxy login feature allows specific members to log in on behalf of another member's account. This tutorial explains how to configure proxy login and how to use it from the management screen, the API, and Admin MCP.
What is proxy login?
Proxy login is a feature that allows members with specific permissions to log in on behalf of another member. It is useful in the following scenarios:
- Providing support when a member cannot log in
- Verifying a member's screen display and data
- Making content changes or configuration updates on behalf of a member
- Allowing users who belong to multiple groups to switch between accounts per group
Configuring proxy login permissions (granting proxy login access in the member editor) requires editor or super user privileges.
Prerequisites
- Configuring proxy login requires editor or super user privileges.
- Using proxy login is available even for members without management screen access (via the
Login/alias_loginendpoint).
Setup instructions
Step 1: Open the member editor
- Log in to the Kuroco management screen.
- Click [Member management] -> [Member].
- From the member list, click the name of the target member (the member you want to log in as) to open their editor.
Step 2: Configure proxy login permission
Find the "Proxy login permission" field in the ID information section of the member editor.
| Item | Description |
|---|---|
| Proxy login permission | Enter the member IDs allowed to log in on this user's behalf. Only users with permission to log in to the management screen can set proxy logins. |
- In the "Proxy login permission" field, enter the member ID of the administrator (the member who will perform the proxy login).
- If you want to allow multiple members to perform proxy logins, enter each member ID.
- Click [Update] to save the settings.
You can find member IDs in the "ID" column on the member list screen.
Step 3: Execute a proxy login
There are three ways to use a proxy login: from the management screen, via the API, or with Admin MCP (OAuth authentication).
From the management screen
Members with management screen access can execute proxy logins directly from the management screen.
- Log in to the management screen as the authorized member.
- Click the member icon displayed at the top of the screen.
- Open "Login as" and click the name of the member you want to log in as.
- You are now logged in as the target member.
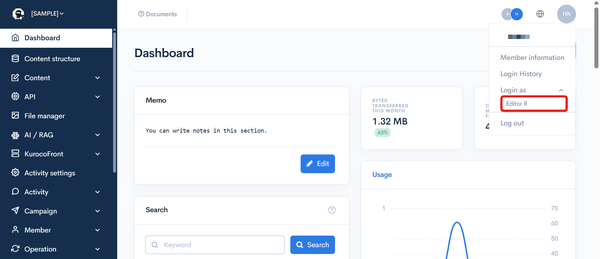
The "Login as" dropdown in the management screen only displays members who have management screen access.
Via the API
Members without management screen access can also execute proxy logins using the Login/alias_login endpoint.
Use this method when implementing proxy login from the frontend.
While logged in as the member performing the proxy login, send a request specifying the target member's ID.
Request parameters
| Parameter | Type | Required | Description |
|---|---|---|---|
aliaslogin_id | integer | Yes | Member ID of the proxy login target |
Response
| Field | Type | Description |
|---|---|---|
grant_token | string | Grant token used for token exchange |
status | integer | 0: OK |
member_id | integer | Logged-in member ID |
info | object | Additional login info (includes validUntil for cookie authentication) |
messages | array | Messages |
errors | array | Errors |
If the proxy login fails, status code 401 is returned.
While in a proxy login session, sending another request with the original member's ID in aliaslogin_id returns you to the original member's login session.
While in a proxy login session, you will access the frontend and APIs with the target member's permissions. The target member's profile information and content viewing permissions will be applied.
You can check which member IDs the currently logged-in member is allowed to impersonate by calling the Login::profile endpoint with aliaslogin_target set in the basic_info parameter.
With Admin MCP
When connecting to the Admin MCP server with OAuth authentication, you can select a proxy login target under "Account the token acts as" on the consent screen. If you select a proxy login target and approve, the issued access token executes MCP tools as that member.
- Connect to the Admin MCP server from your MCP client and start the OAuth authentication.
- Log in as a member who has been granted proxy login permission.
- The consent screen shows the "Account the token acts as" section. Select "Delegate as myself" or a proxy login target.
- Review the details and approve. An access token is issued for the selected member.
The "Account the token acts as" section lists members who meet all of the following conditions:
- The target member's "Proxy login permission" includes the logged-in member's ID.
- Both the target member and the logged-in member have "Authorized to log in" enabled and are within the "Login expiration date".
- If a period is configured for the proxy login permission, the current date is within that period.
- The target member belongs to an enabled group, and that group does not disable management screen access.
When a proxy login target is selected as the delegate, the token behaves as follows:
- The token's effective permission is the selected member's current group permission intersected with the OAuth scope ceiling.
mcp:tools.writeapplies the write-permission ceiling;mcp:adminuses the group permission without an additional ceiling. - Operations are executed as the selected member, and the approving member's ID is recorded as the actor in the audit logs. The approving member is also recorded as the updater of modified data.
- The
sub,profile, andemailclaims identify the selected member, and the approving member is identified as the actor by theactclaim.
- Delegating the
mcp:adminscope requires both the approving member and the delegate member to be super users. - Removing the "Proxy login permission" invalidates already-issued access tokens from the next request.
- OAuth authorization cannot be approved from a proxy login session. Log in directly with your own account before approving.
For details on Admin MCP server authentication and OAuth scopes, see the MCP Server Reference.
Configuration examples
Example 1: Customer support use case
If a customer support agent (Member ID: 1) needs to proxy login as a regular member (Member ID: 100):
- Open the editor for Member ID: 100.
- Enter member ID
1in the "Proxy login permission" field. - Click [Update] to save.
The administrator logged in with Member ID: 1 can now proxy login as Member ID: 100.
Example 2: Allow multiple administrators
To allow multiple support agents (Member IDs: 1, 2, 3) to proxy login:
- Open the target member's editor.
- Enter member IDs
1,2, and3in the "Proxy login permission" field. - Click [Update] to save.
Important notes
- Editor or super user privileges required for configuration: Configuring proxy login permissions (granting access in the member editor) requires editor or super user privileges.
- No management screen access required for usage: Members without management screen access can use proxy login via the API endpoint (
Login/alias_login). - Accountability: Actions performed during a proxy login session are recorded in the operation logs. Use proxy login only when necessary.
- Security considerations: Grant proxy login permissions only to trusted members. Remove unnecessary proxy login permissions promptly.
- Login permission required: The target member must have their "Authorized to log in" setting enabled.
- Effect on Admin MCP tokens: A proxy login delegation applied to an Admin MCP access token becomes invalid from the next request once the "Proxy login permission" is removed.
Related documentation
Support
If you have any other questions, please contact us or check out Our Slack Community.