Sending messages to LINE users
This page explains how to send messages from Kuroco to LINE users by integrating Kuroco with the LINE Messaging API.
Overview
Kuroco provides the feature to send messages to LINE users. Messages are sent to users by sending instructions from Kuroco to LINE using the LINE Messaging API. Sending messages requires writing code in Kuroco's custom function.
When adding friends to a LINE official account, you can register users in Kuroco using the LINE user ID (no log in permission required), and use the trigger function to trigger various events in Kuroco and send LINE messages to any user at any timing.
What you'll learn
You will learn how to send messages from Kuroco to LINE users using the following steps:
- Overview
- Creating a Channel in the LINE Developers Console
- Configure LINE Connection
- Integrating Kuroco with LINE from the Kuroco Admin Panel
- Obtaining the LINE User ID from the Webhook when Adding Friends to the LINE Official Account
- Send a Message to User Using Kuroco's Custom Function
Prerequisites
Obtain the LINE User ID from the Webhook sent when adding friends to the LINE official account.
You can also use the OAuth integration feature to register members in Kuroco using a LINE account.
For more details, please refer to the tip in Obtaining the LINE User ID from the Webhook when Adding Friends to the LINE Official Account.
Creating a Channel in the LINE Developers Console
First, you need to create a channel in the LINE Developers Console. If you don't have a LINE account, please create one.
Log in to the LINE Developers Console (When logging in for the first time, you will be asked whether to register as a developer or not, you will need to register as a developer in this case).
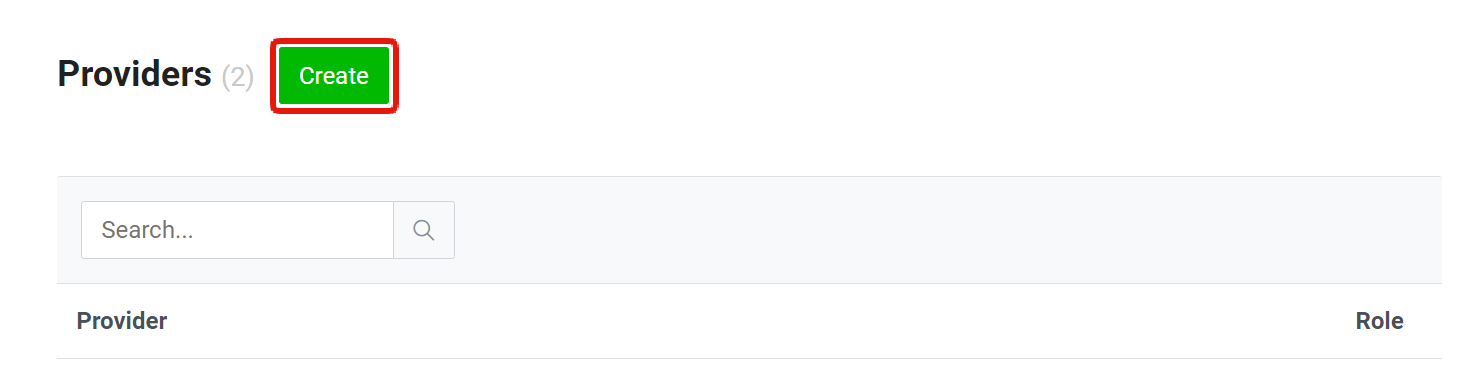
Next, create a new provider by clicking the [Create] button.
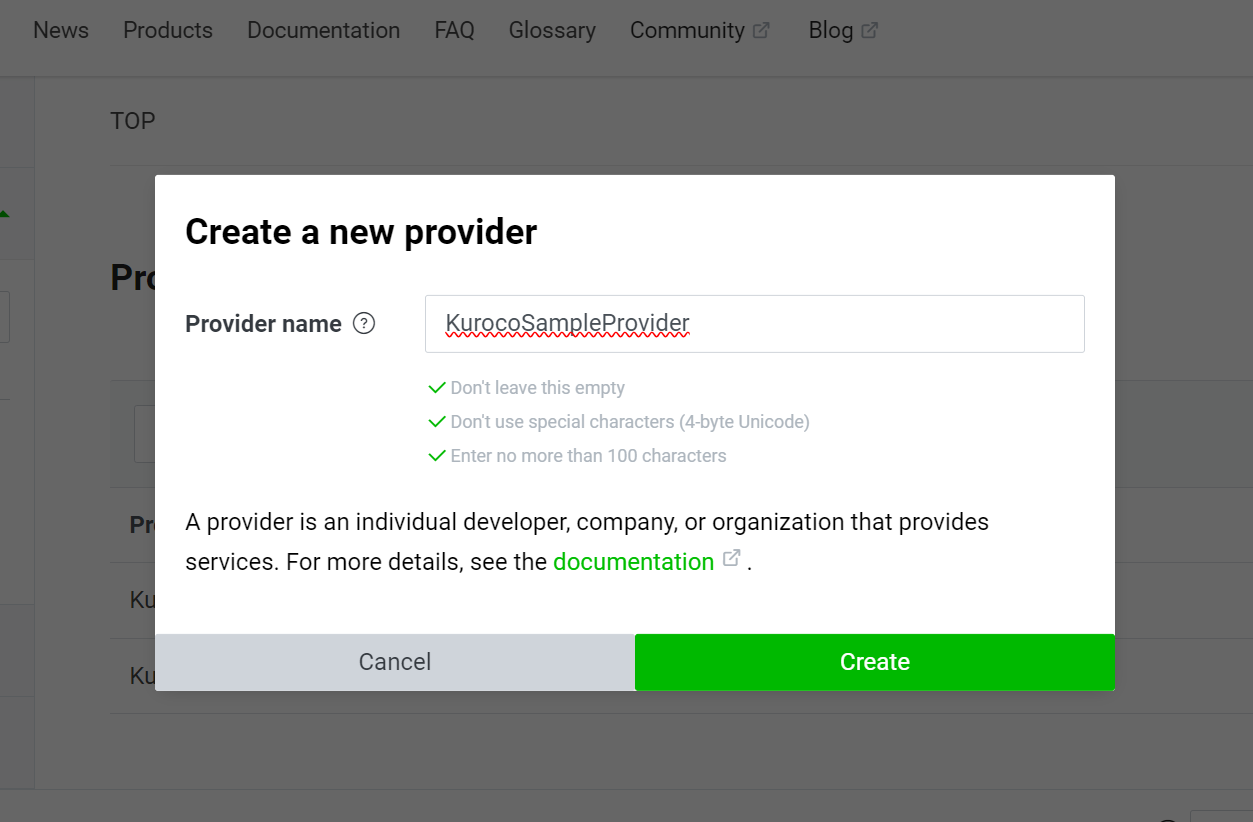
Specify the provider name. Here, we will use "KurocoSampleProvider".
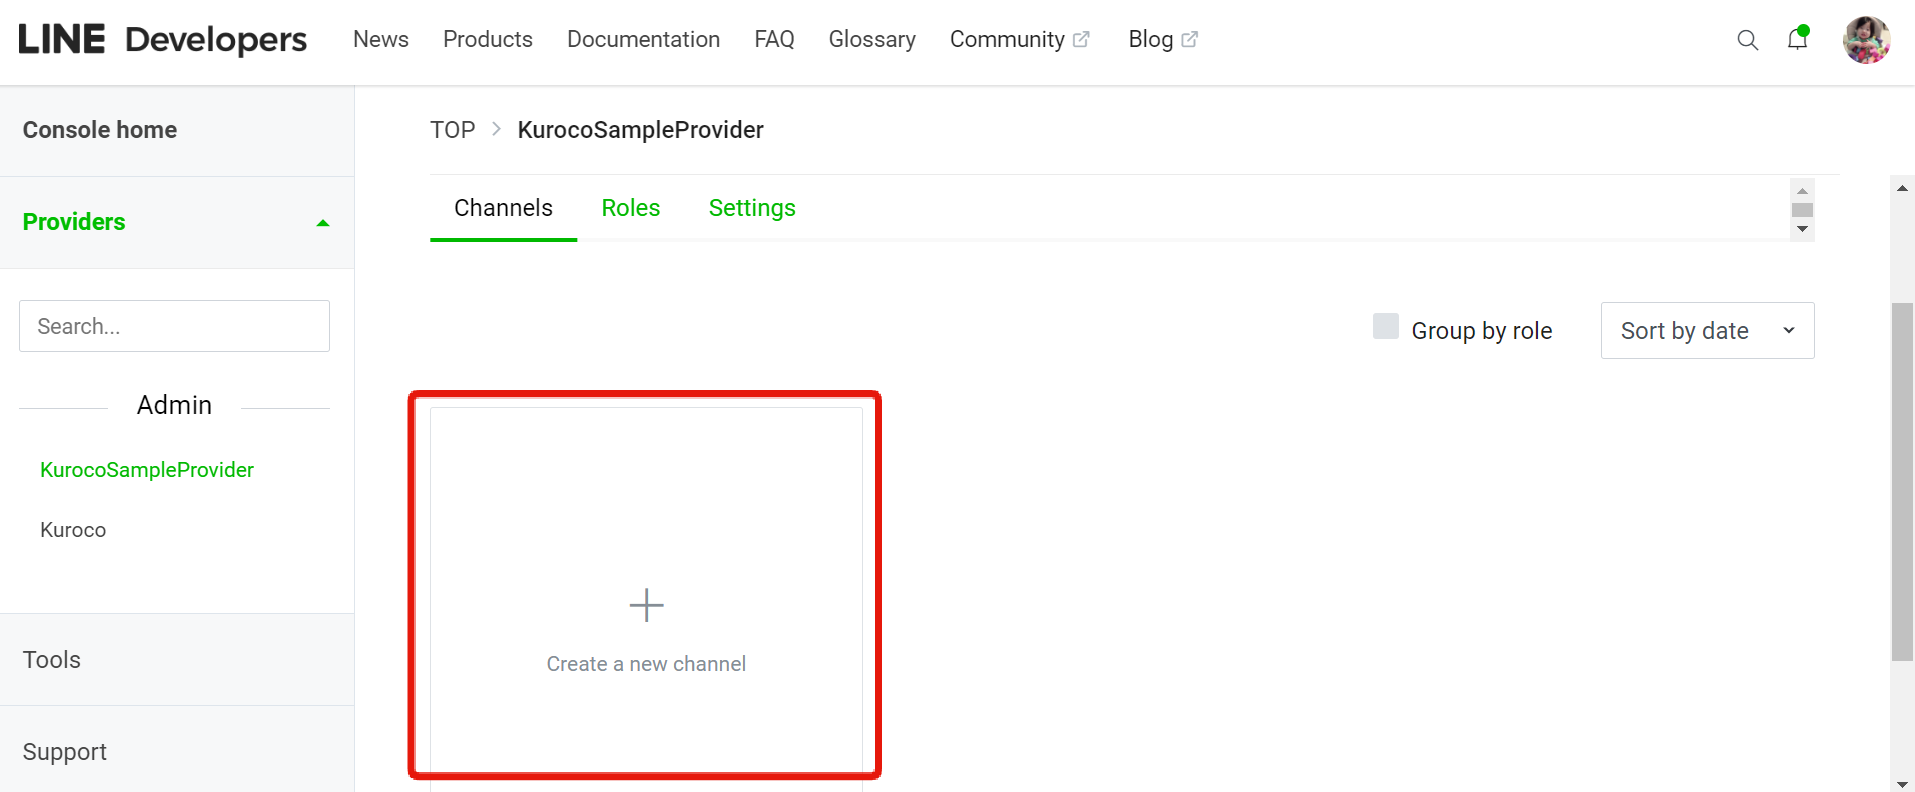
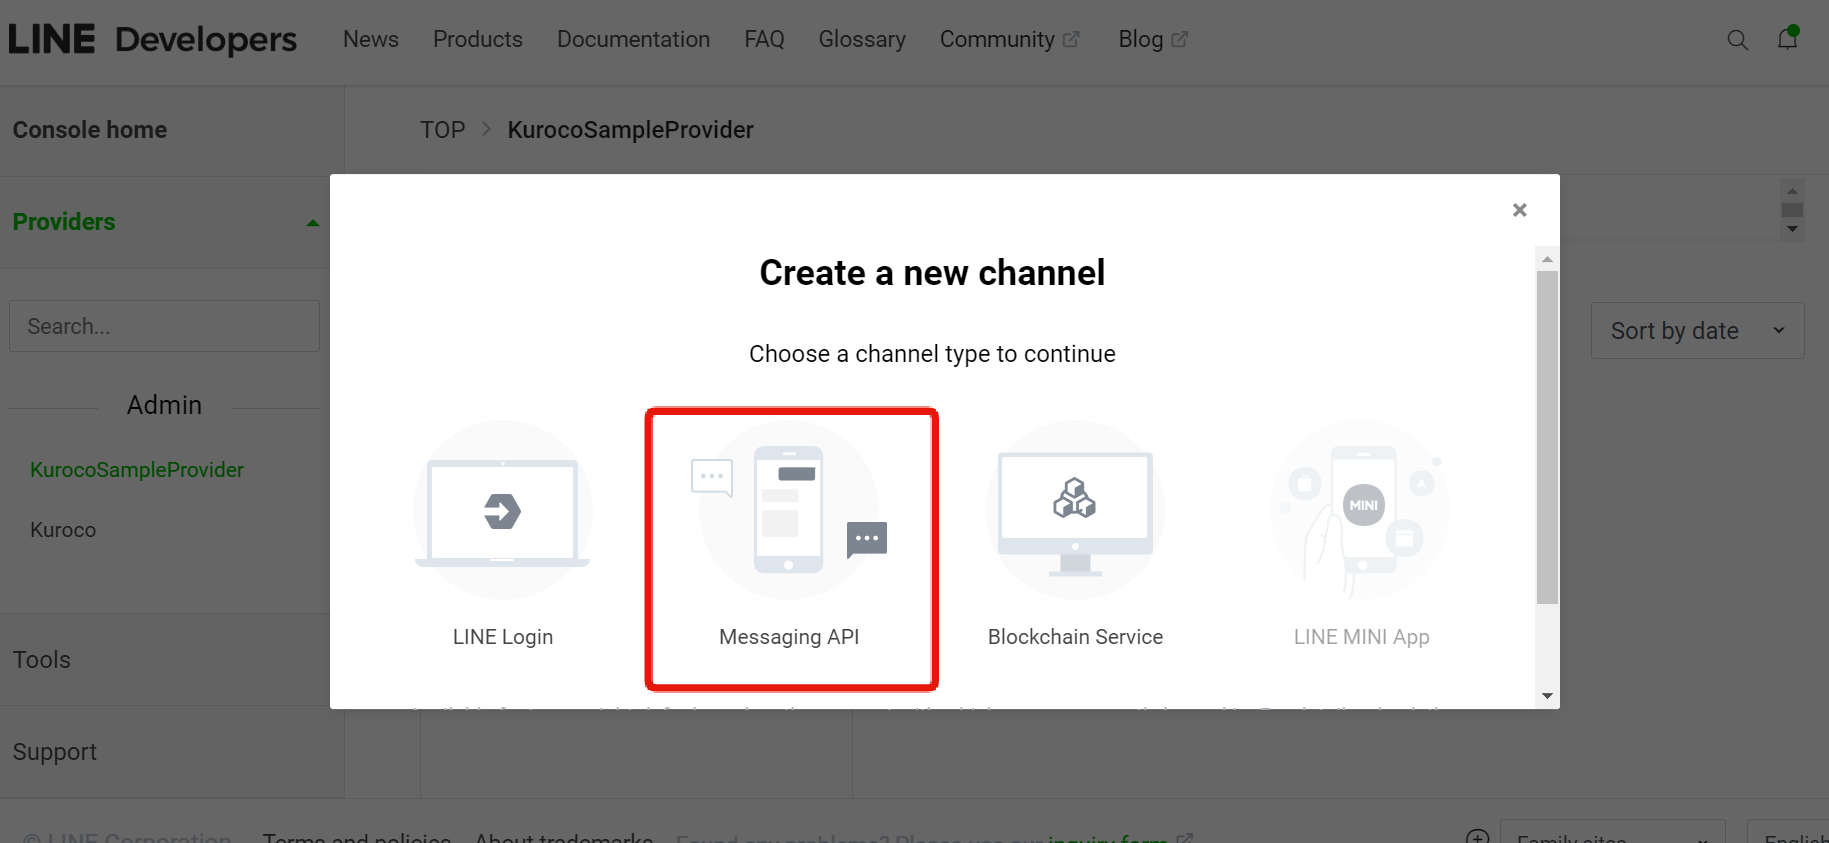
Next, create a channel by clicking [Create New Channel].
Select [Messaging API] as the channel type.
You will be redirected to the new channel creation screen.
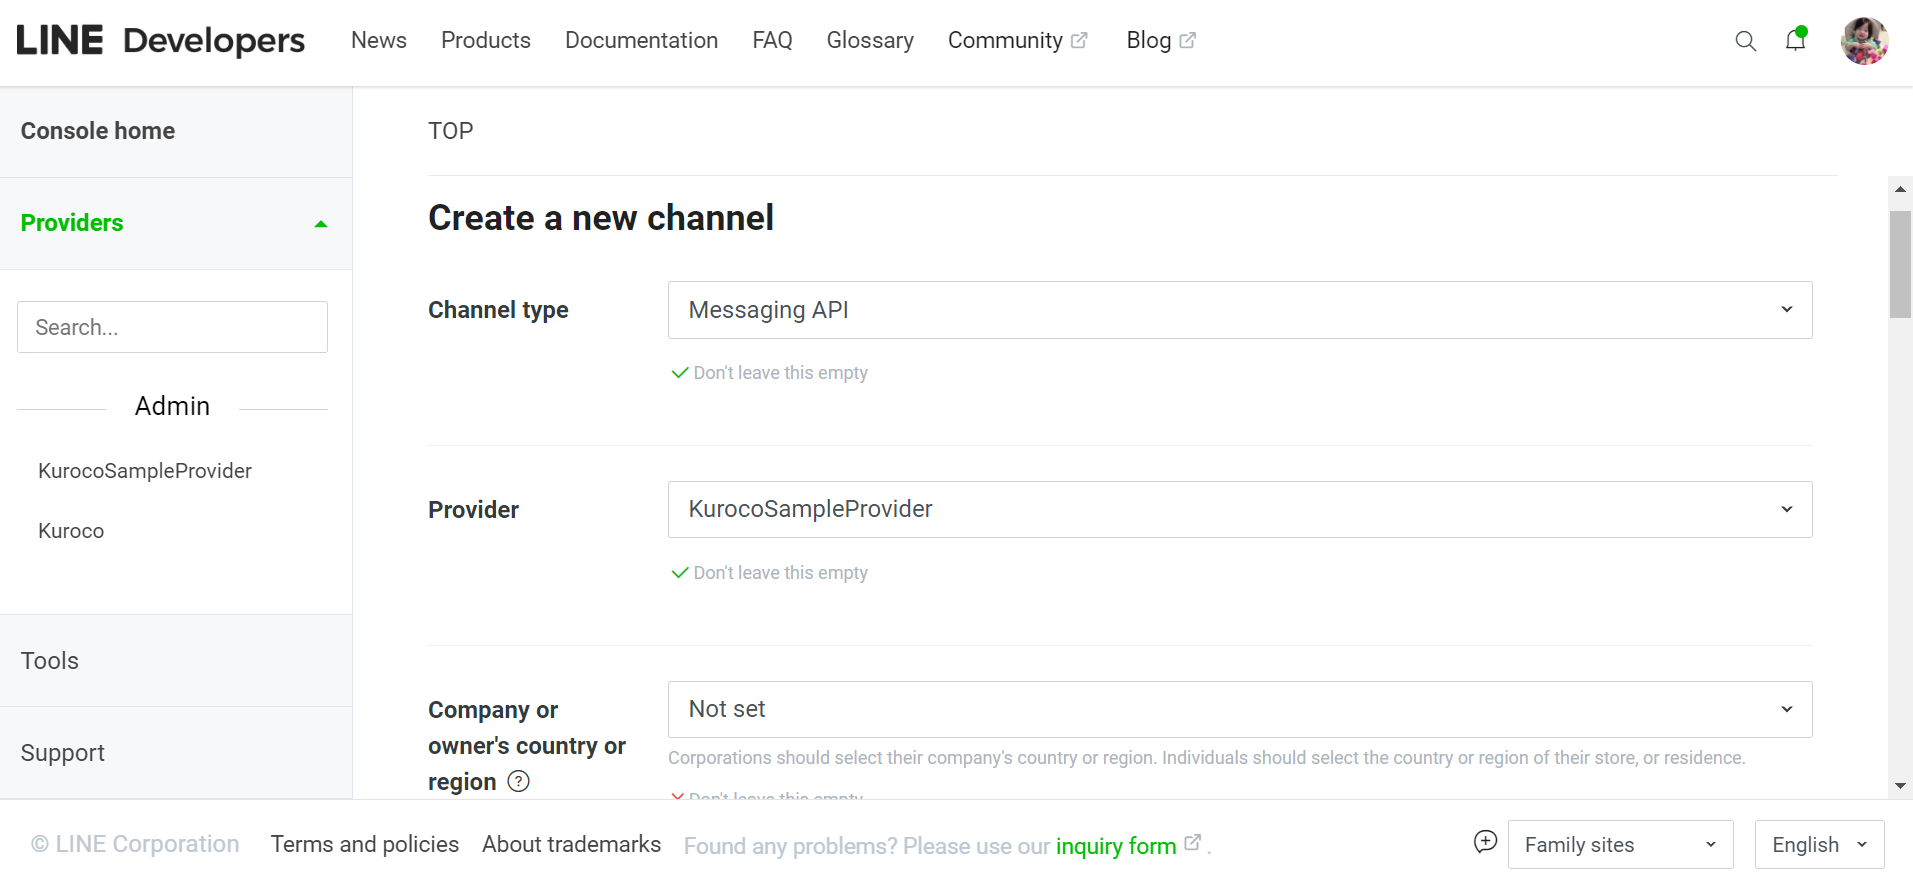
Enter the following items and click the [Create] button.
| Item | Value |
|---|---|
| Channel type | Messaging API |
| Provider | Specify the provider created in the previous steps. |
| Company or owner's country or region | Select the country/region where the company is located for corporations, or select the country/region where the store or residence is located for individuals. |
| Channel icon | Upload an image that will be the icon of the channel. |
| Channel name | Specify the channel name. |
| Channel description | Enter the description of the channel. |
| Category | Select the main category. |
| Subcategory | Select the Subcategory. |
| Email address | Enter the email address of the person who will be the administrator of this channel. |
| Privacy policy URL | Check the checkbox after confirming the content. |
| Terms of use URL | Check the checkbox after confirming the content. |
A confirmation dialog will be displayed. If there are no issues, click "OK".

After creating, the channel will be displayed as shown below. Click to check the detailed information.
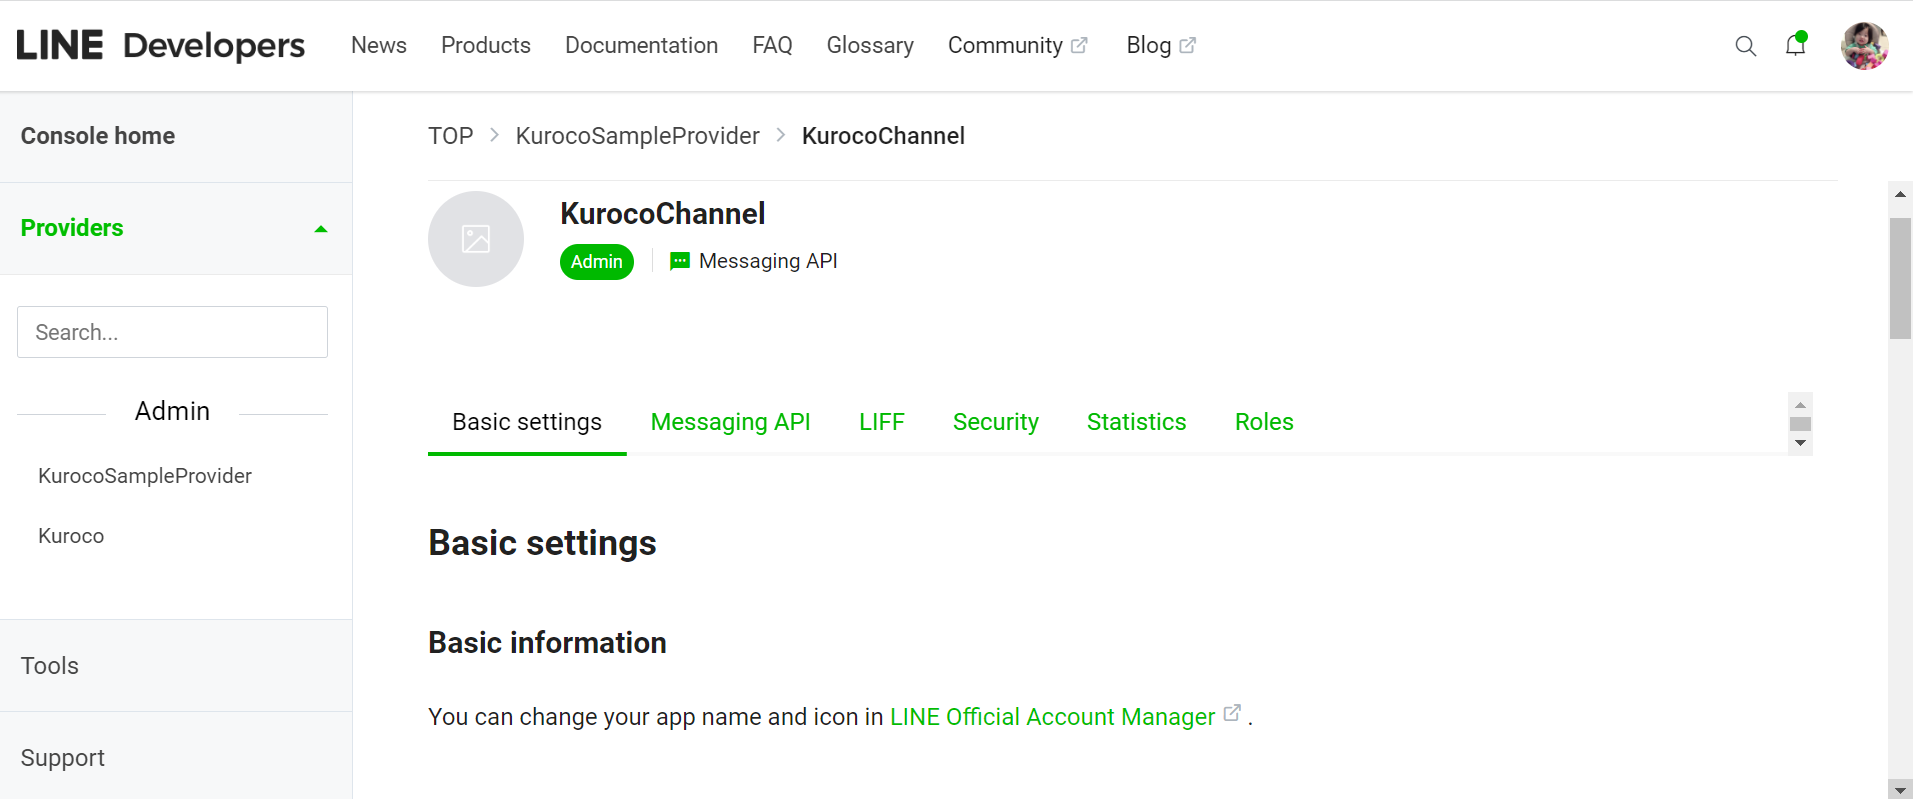
That's it, the channel has been created.
Note down the Channel ID as it will be used later.
Configure LINE Connection
Next, we will configure the connection between Kuroco and LINE.
First, prepare a pair of public and private keys, and register the public key in the settings screen of the channel created earlier.
There are several ways to create a pair of public and private keys, but if your web browser supports Web Crypto API (such as Google Chrome), you can generate the private and public keys using the SubtleCrypto.generateKey() method.
Here, we will explain how to create the public and private keys using Google Chrome as an example.
Launch Google Chrome and open the browser's developer tools.

Enter the following code in the JavaScript console and execute it (press Enter key).
(async () => {
  const pair = await crypto.subtle.generateKey(
    {
      name: "RSASSA-PKCS1-v1_5",
      modulusLength: 2048,
      publicExponent: new Uint8Array([1, 0, 1]),
      hash: "SHA-256",
    },
    true,
    ["sign", "verify"]
  );

  console.log("=== private key ===");
  console.log(
    JSON.stringify(
      await crypto.subtle.exportKey("jwk", pair.privateKey),
      null,
      "  "
    )
  );

console.log("=== public key ===");
console.log(
  JSON.stringify(
    await crypto.subtle.exportKey("jwk", pair.publicKey),
    null,
    "  "
  )
);
})();
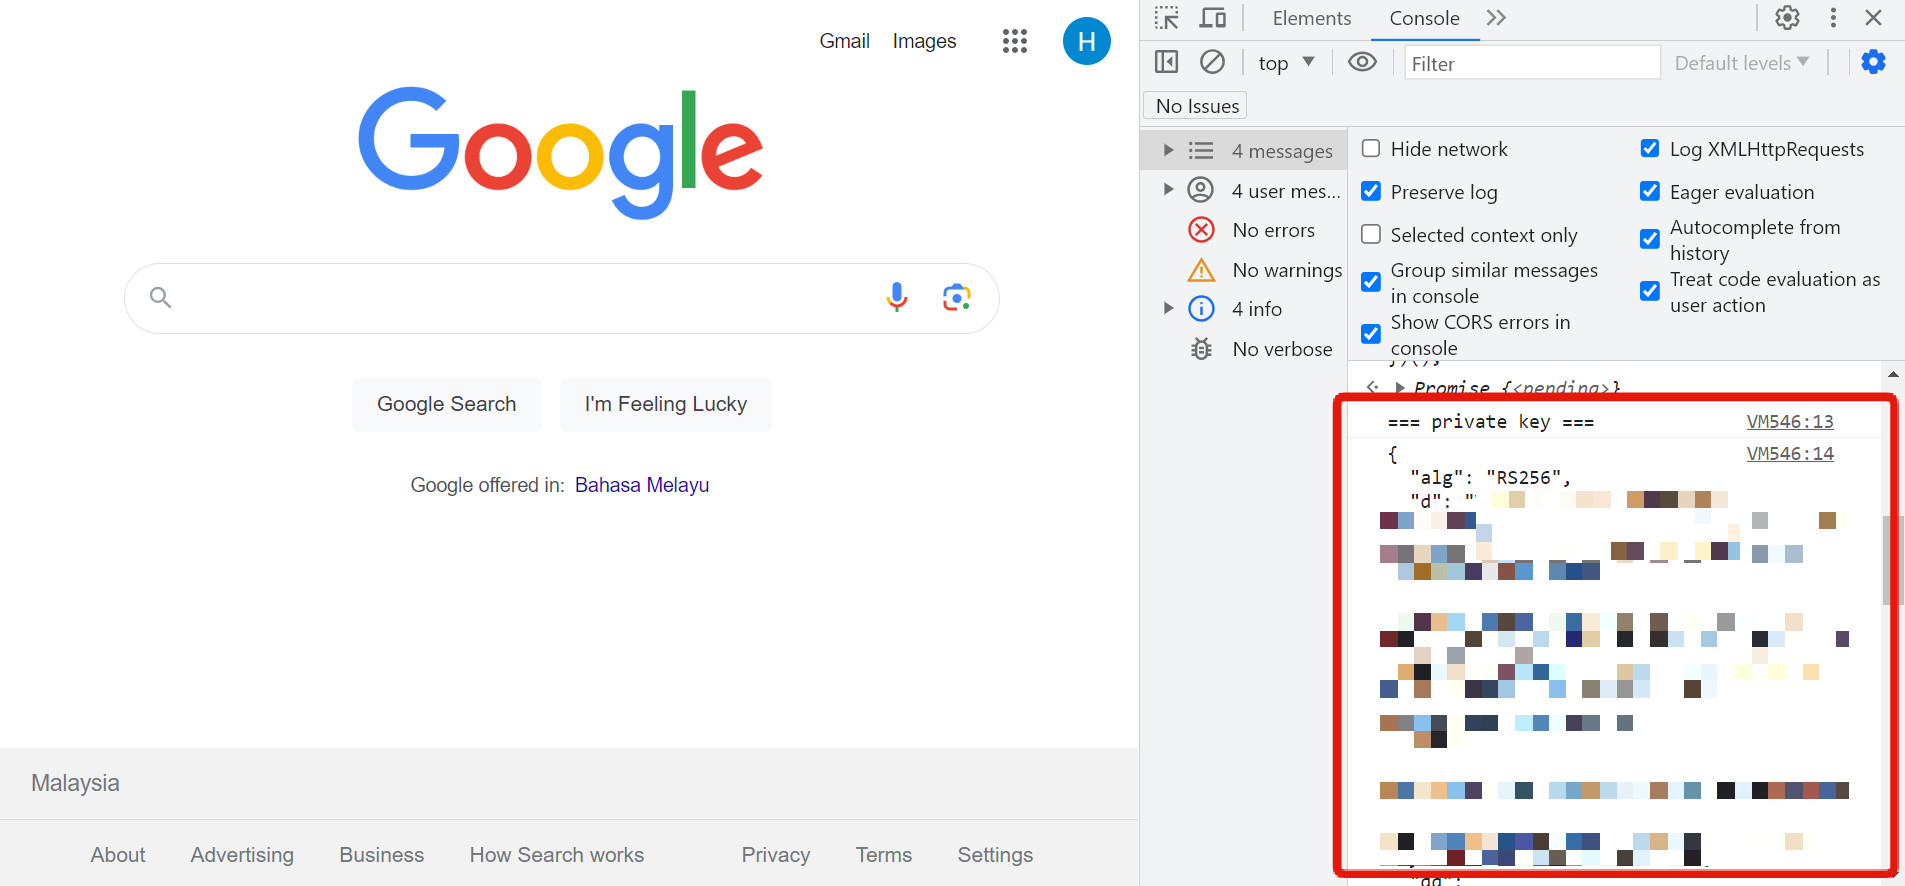
When successful, the following secret key and public key will be generated.
Example of secret key
{
  "alg": "RS256",
  "d": "B6A6he..........",
  "dp": "ogd_VFa..........",
  "dq": "qt9TJZV..........",
  "e": "AQAB",
  "ext": true,
  "key_ops": [
    "sign"
  ],
  "kty": "RSA",
  "n": "wQoAaMQmz..........",
  "p": "92ODEIUZY..........",
  "q": "x8ItprfI7..........",
  "qi": "kfmYirMr.........."
}
Example of public key
{
  "alg": "RS256",
  "e": "AQ..........",
  "ext": true,
  "key_ops": [
    "verify"
  ],
  "kty": "RSA",
  "n": "wQoAaMQm.........."
}
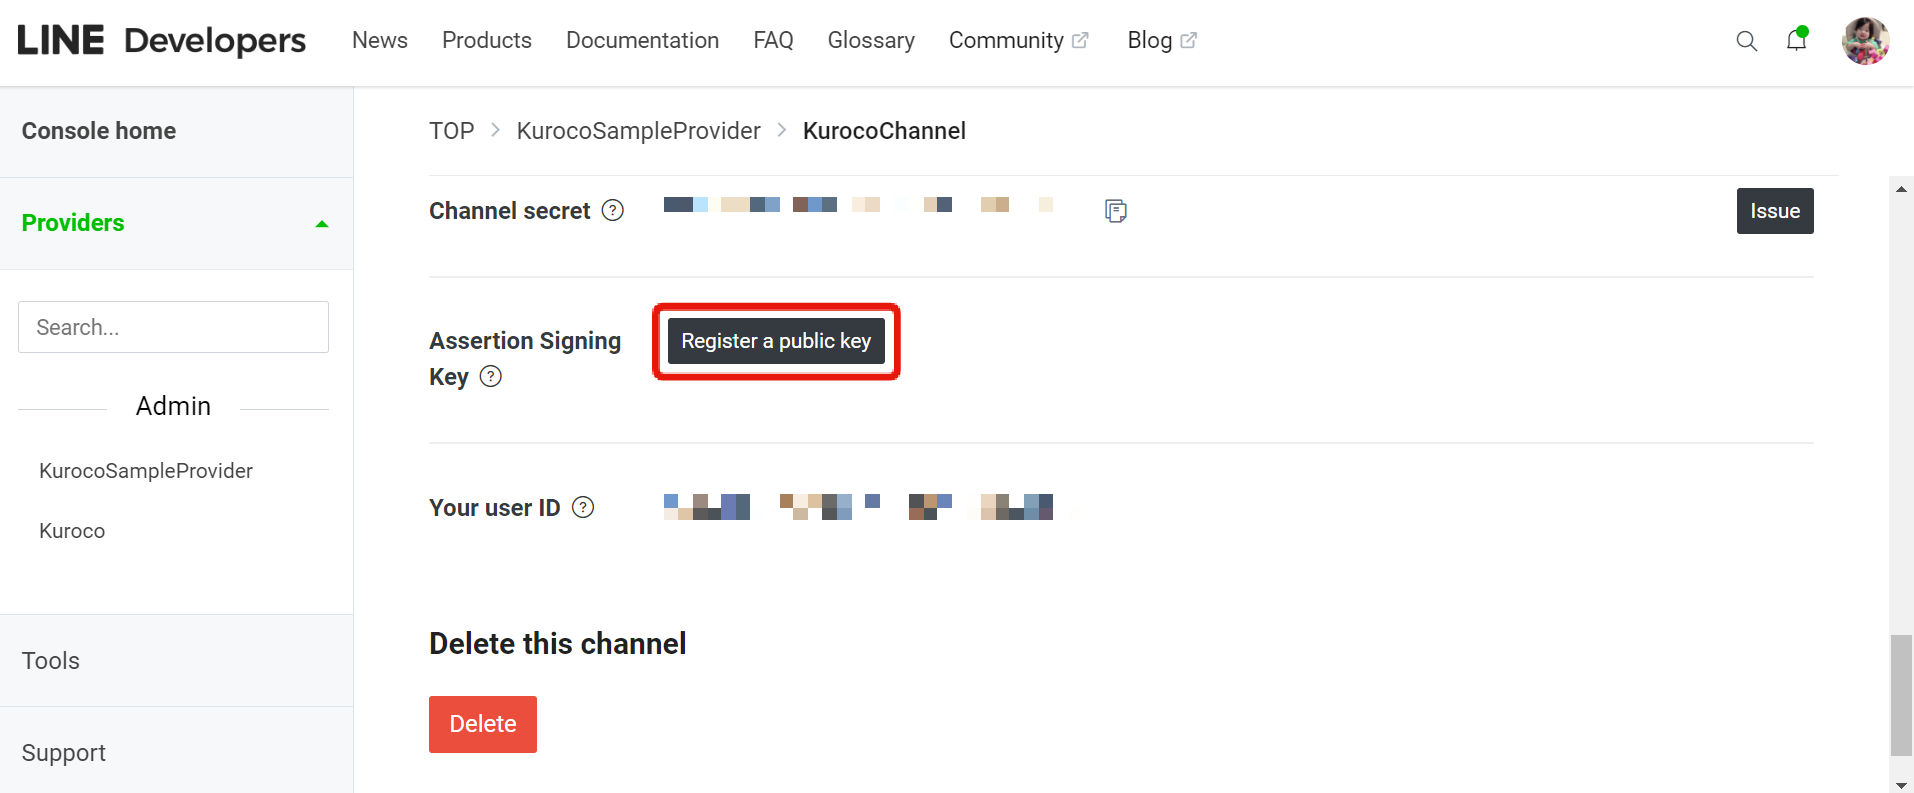
Click the [Register a public key] button next to the "Assertion Signing Key" in the channel settings screen you created earlier.
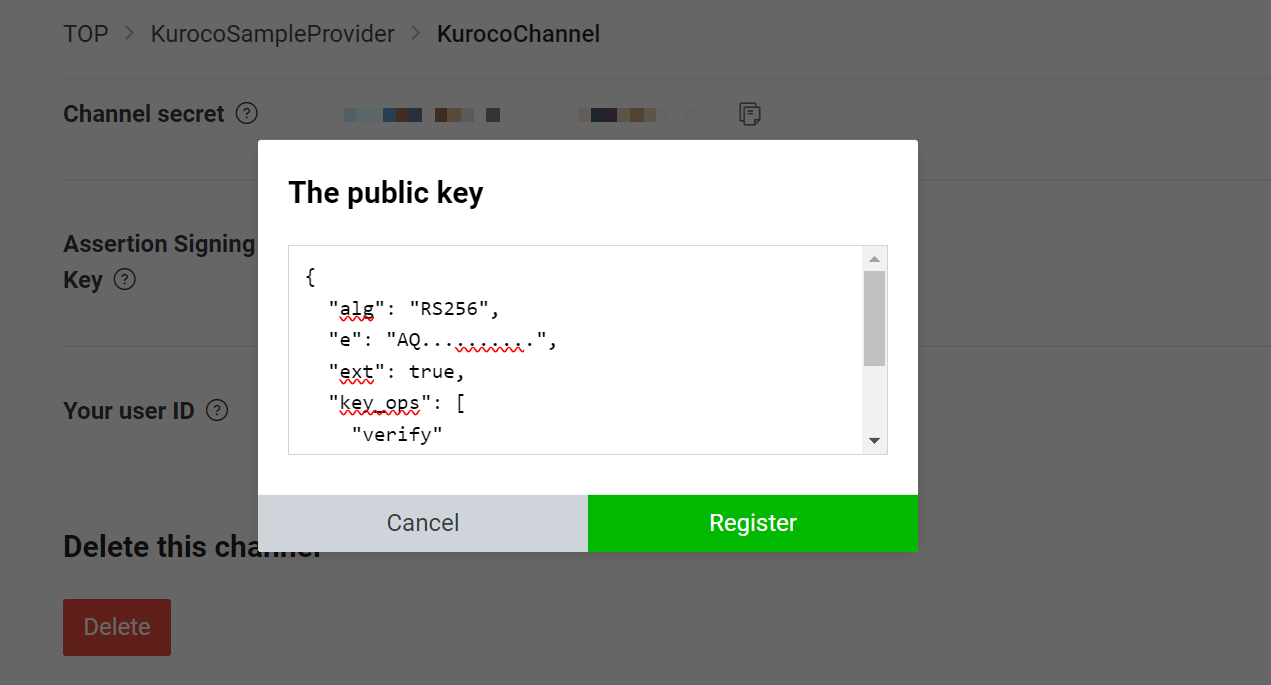
Enter the created public key. Click the [Register] button.
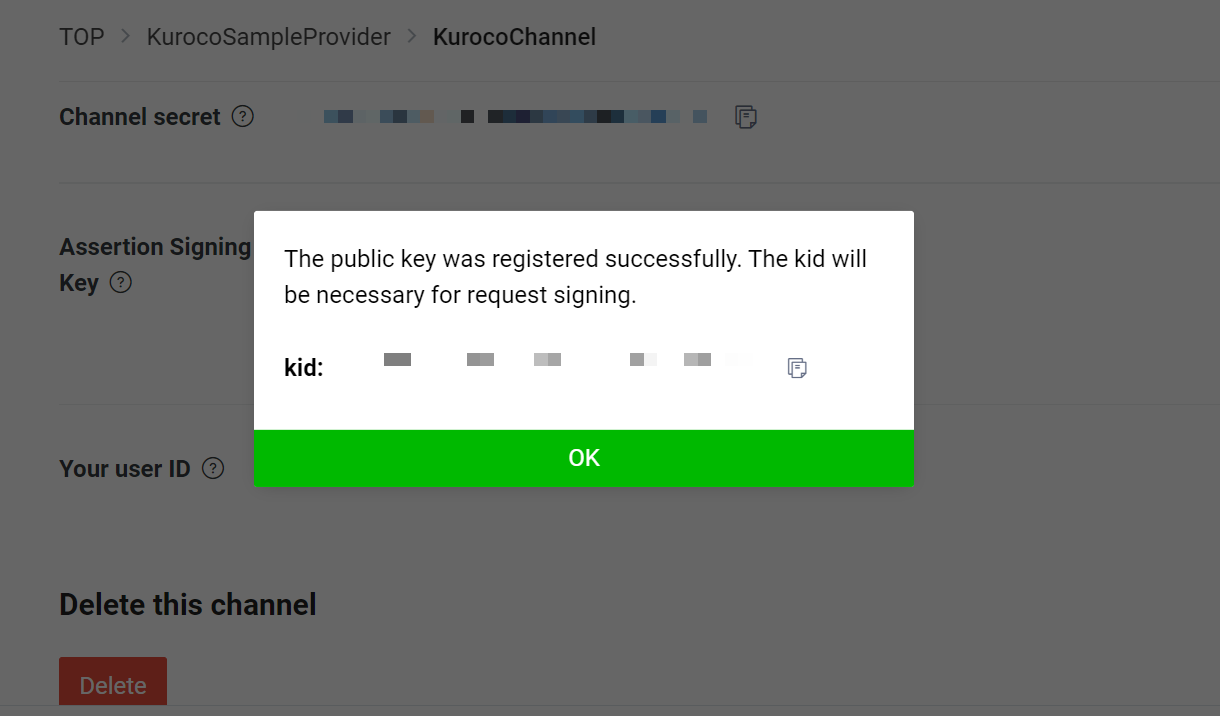
When the registration of the public key is successful, the kid will be displayed, copy it for later use.
Integrating Kuroco with LINE in the Kuroco Admin Panel
Next, go to the Kuroco admin panel and click [Channels] -> [Messaging] -> [LINE].
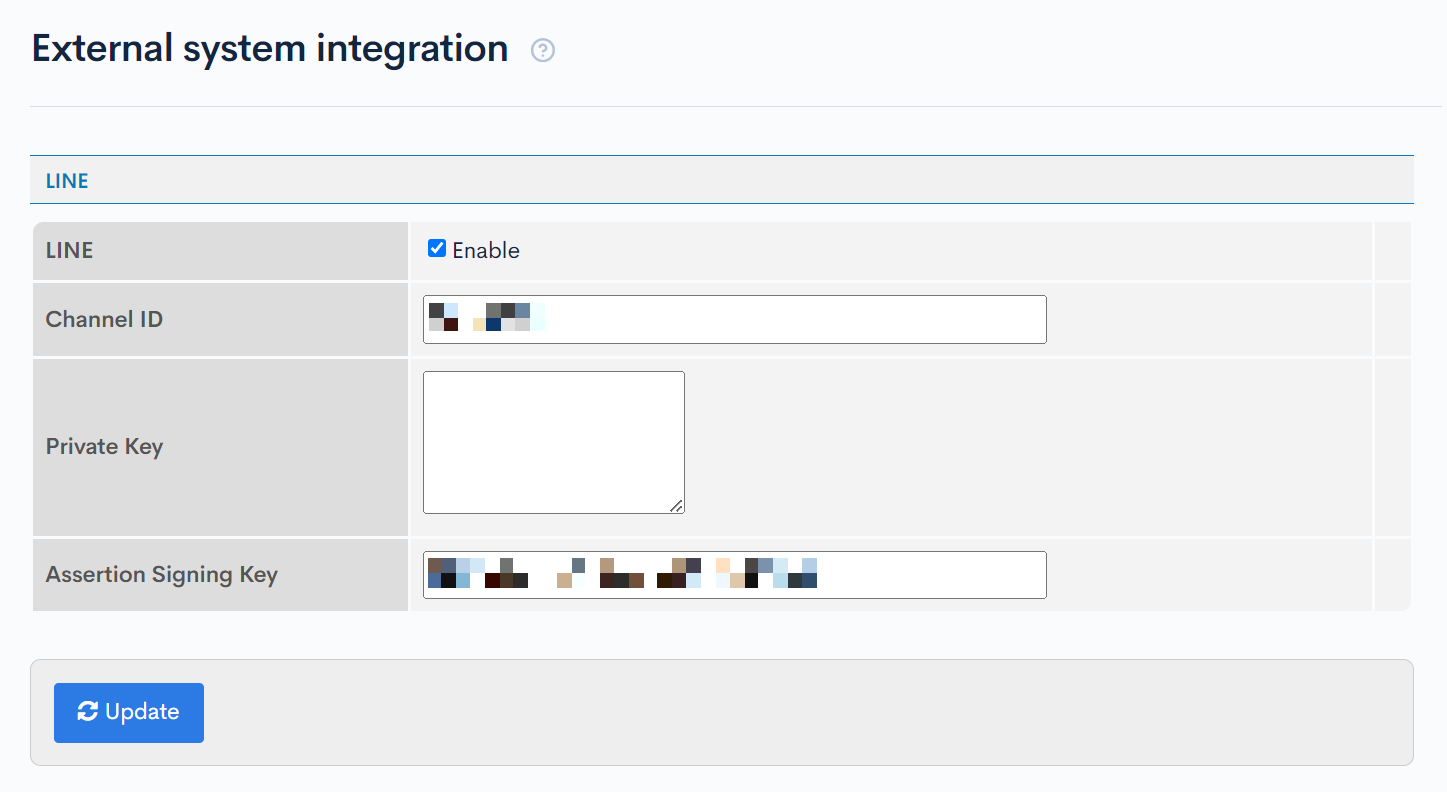
Check the "Enable" checkbox in the [LINE] section, enter the channel ID, secret key, and assertion signing key (kid) that you copied earlier, and click [Update].
The Kuroco settings are now complete.
Obtaining the LINE User ID from the Webhook when adding friends to the LINE Official Account
Next, set it up so that when a LINE user adds the official account as a friend, the user is automatically registered as a member of Kuroco.
It is also possible to use the OAuth integration function to register members in Kuroco using a LINE account.
- To save the LINE User ID by logging in to LINE with OAuth integration, refer to Implementing SSO using OAuth authentication with external accounts.
- Set the LINE Login channel and the Messaging API channel in the same provider.
- Link the Messaging API channel in [Channel Basic Settings] -> [Linked Bot] of LINE Login.
Preparing a group
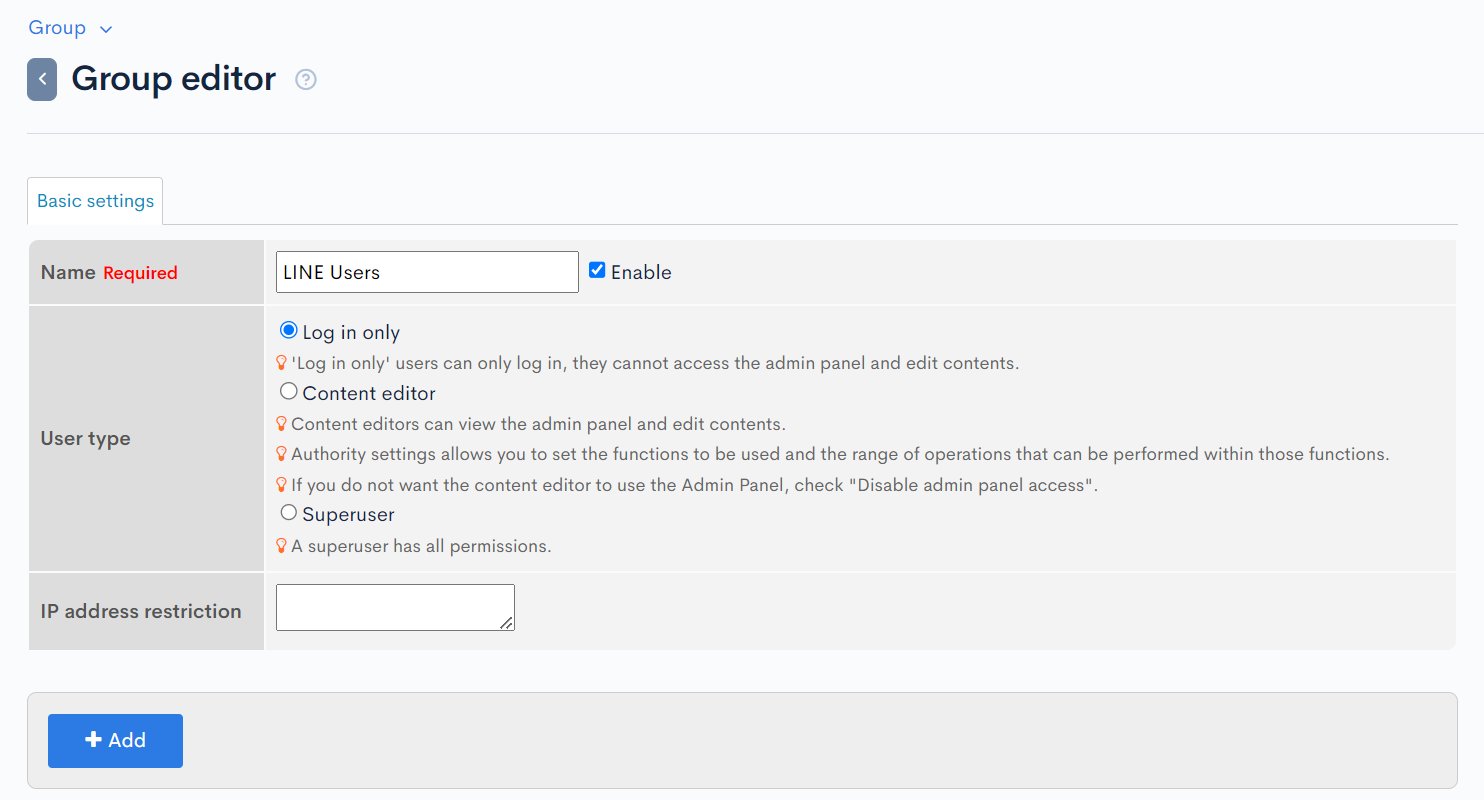
Create a group called "LINE Users". Take note the ID of the created group.
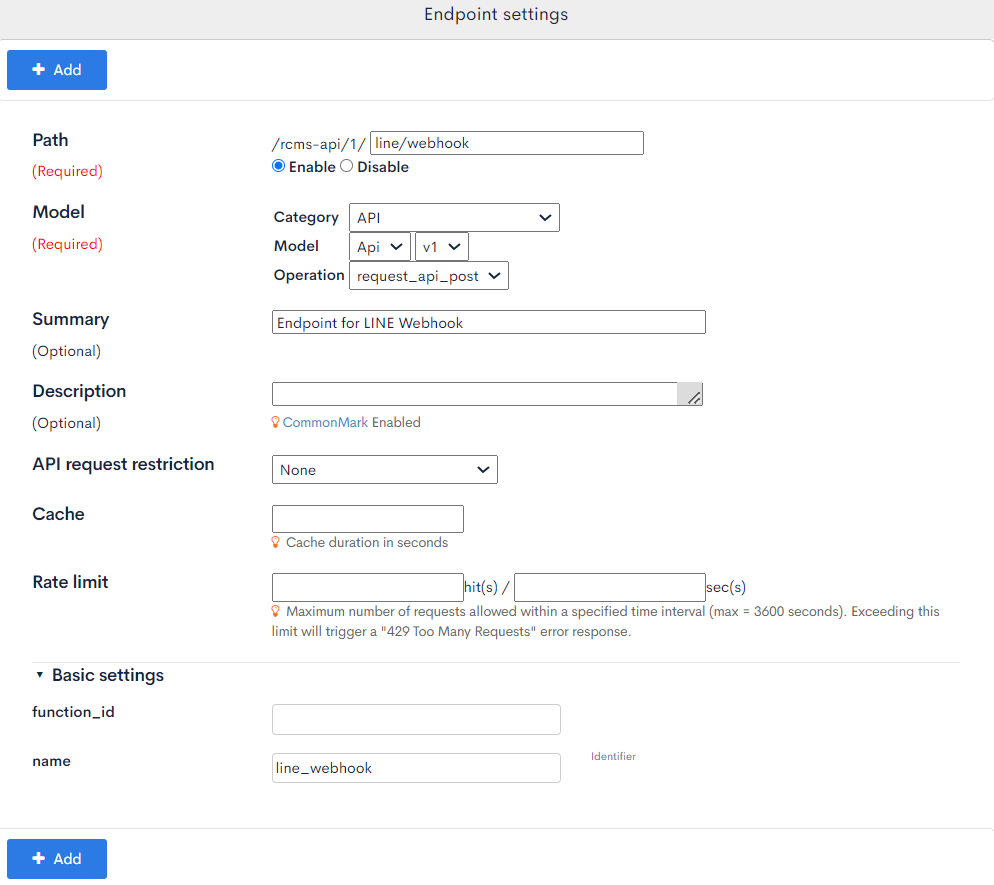
Creating an endpoint to receive webhooks
We need a webhook endpoint on the Kuroco side to receive LINE events.
Create an endpoint with the following settings for the API that uses Cookie as security.
| Item | Value |
|---|---|
| Path | line/webhook |
| Model | Api / Api / v1 / request_api_post |
| Summary | Endpoint for LINE Webhook |
| API Request Limit | None |
| name | line_webhook |
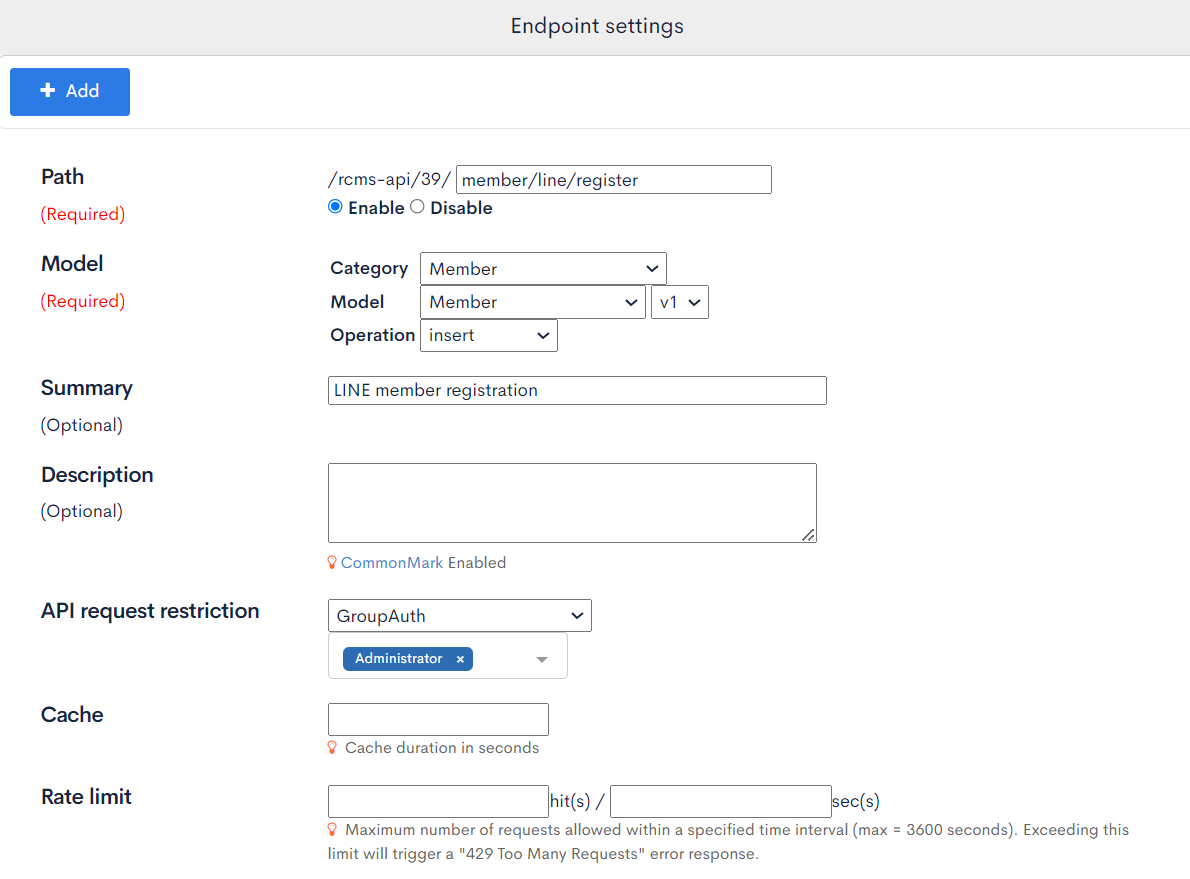
Also, create another endpoint for member registration.
Create an endpoint with the following settings for the API that uses Dynamic Token as security.
| Item Name | Input Value |
|---|---|
| Path | member/line/register |
| Model | Member / Member / v1 / insert |
| Summary | LINE member registration |
| API Request Limit | Group Auth / Administrator |
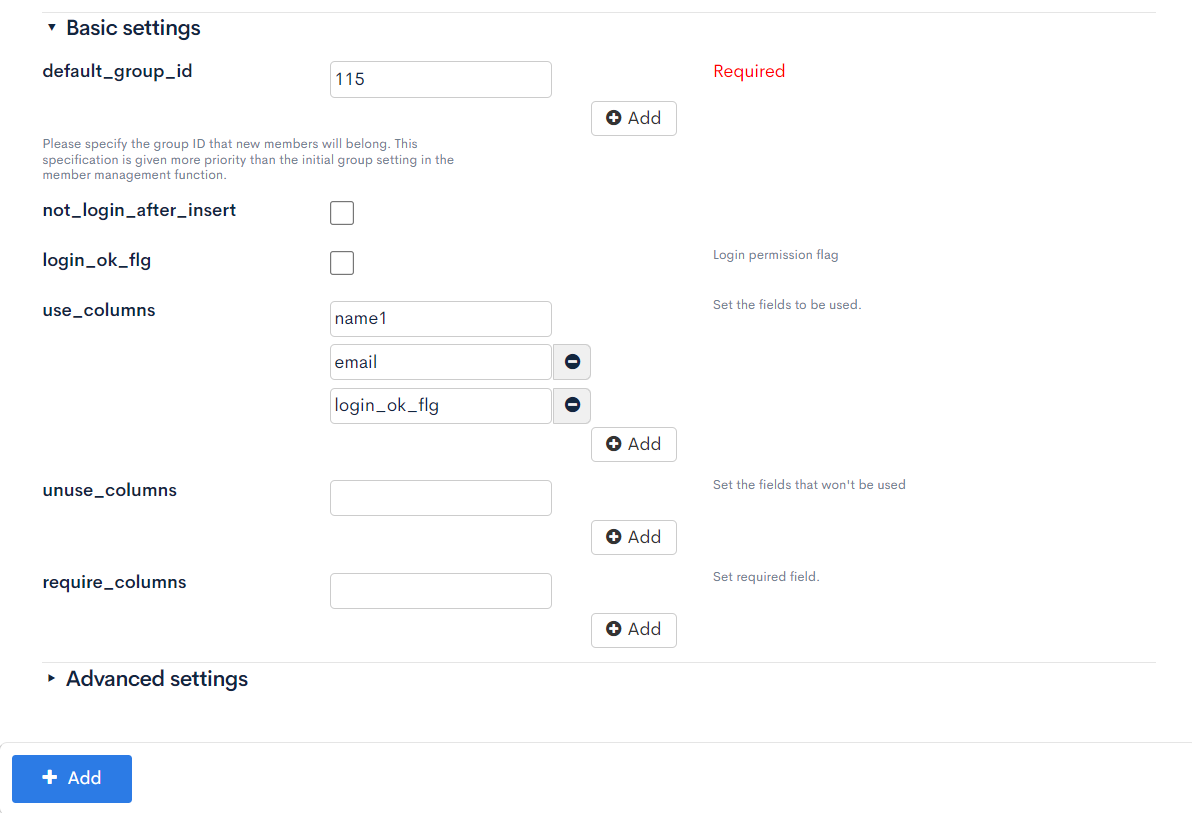
| default_group_id | ID of the created group above |
| not_login_after_insert | Unchecked |
| login_ok_flg | Unchecked |
| use_columns | name1, email, login_ok_flg |
Creating Custom function for User Registration
Create a custom function with the following details:
- Title: LINE Webhook
- Category: Uncategorized
- Identifier: line_webhook
- Process: (see below)
loading...
Setting the Webhook URL in LINE Channel Settings
In the LINE Developers Console, open the [Messaging API] tab in the Messaging API Channel Settings page.
Register the created endpoint in the [Webhook URL] field.

Adding LINE Official Account as a Friend for Testing
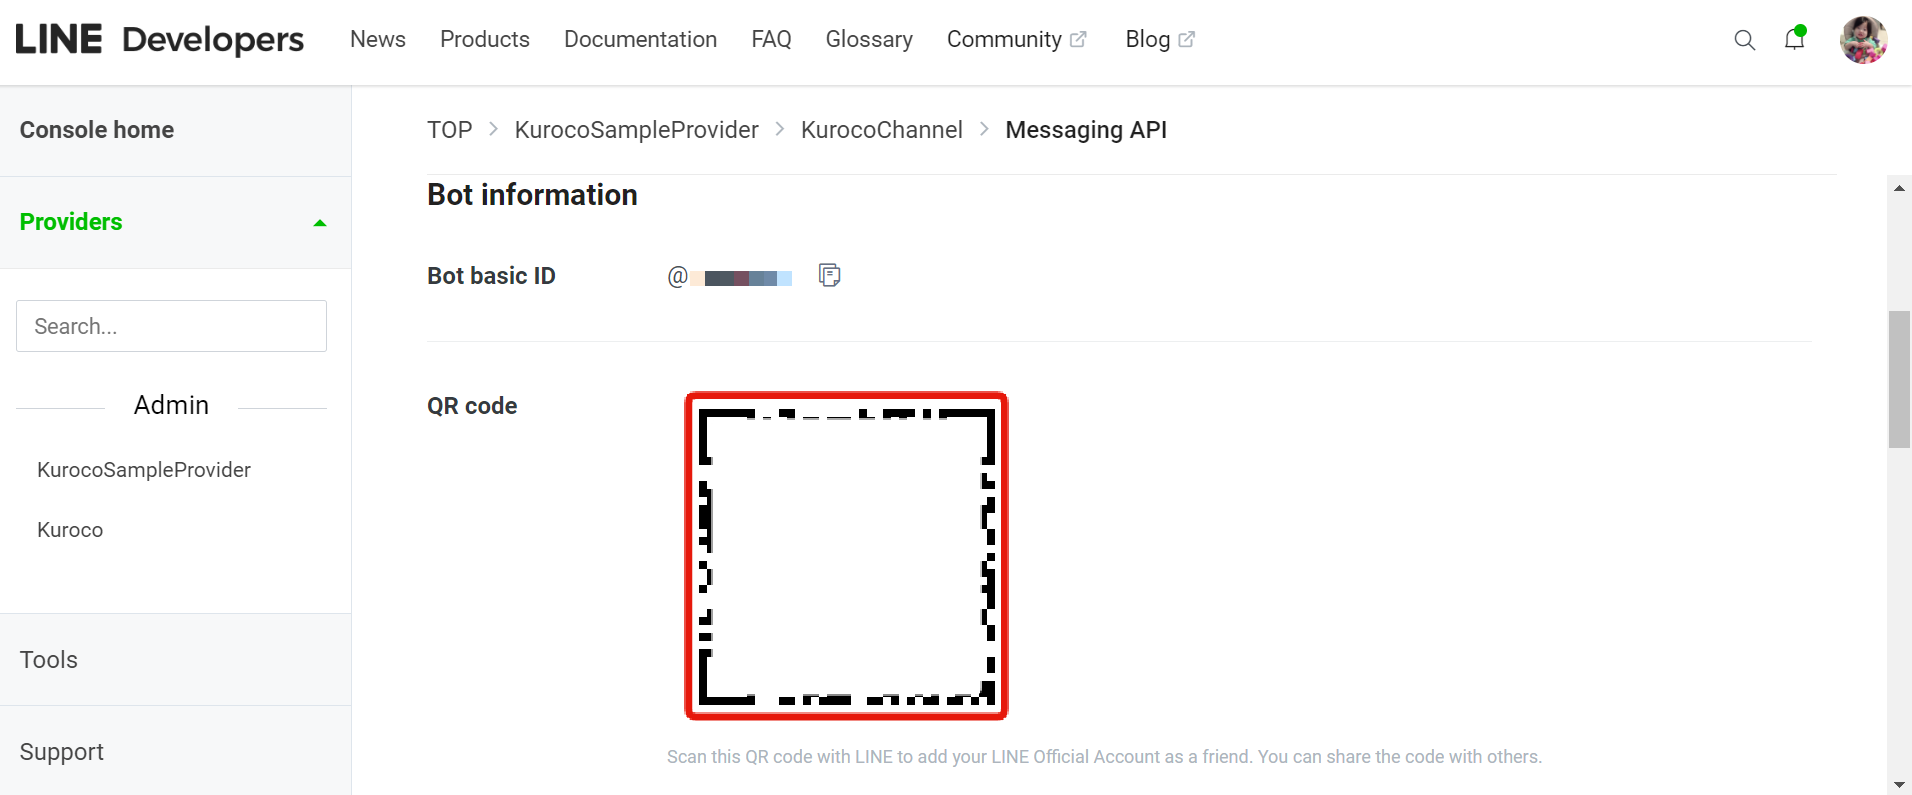
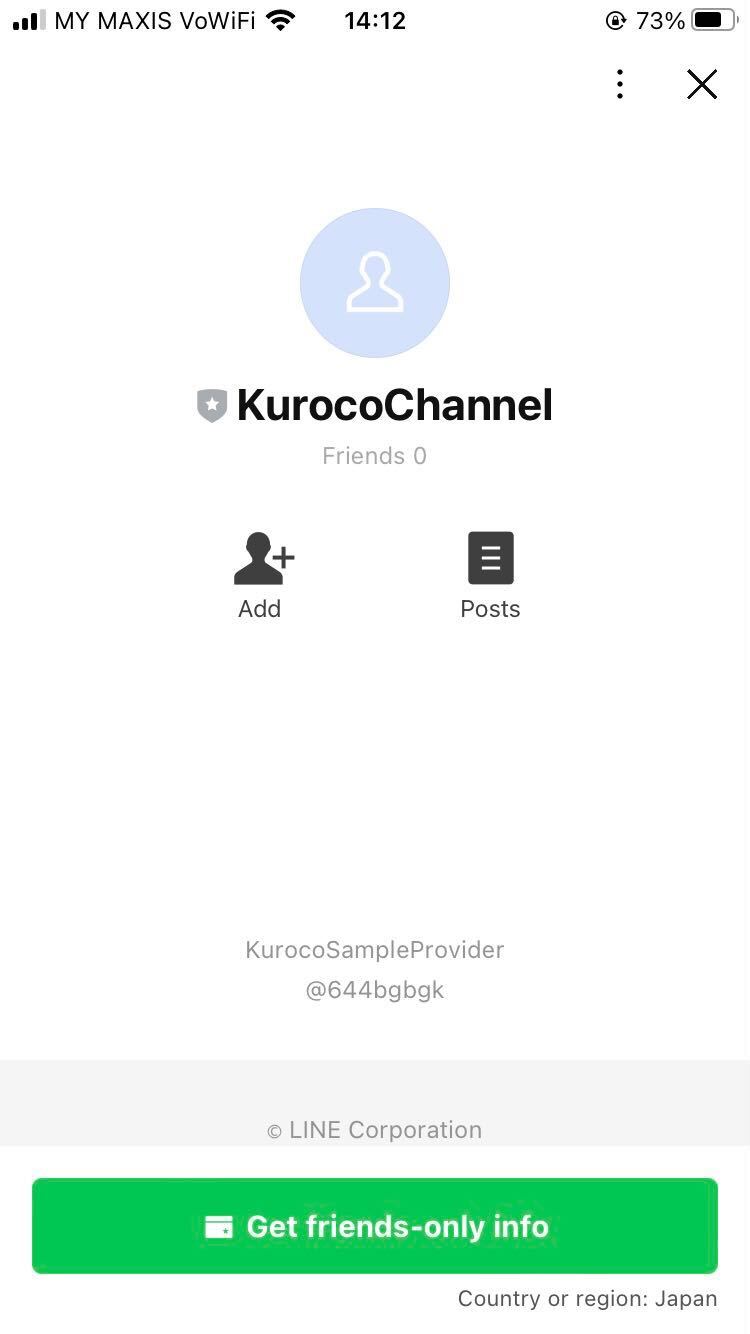
Scan the [QR code] displayed on the Messaging API Channel Settings page with your device and add the LINE Official Account as a friend.
Check the displayed official channel name and tap [Get friends-only info].
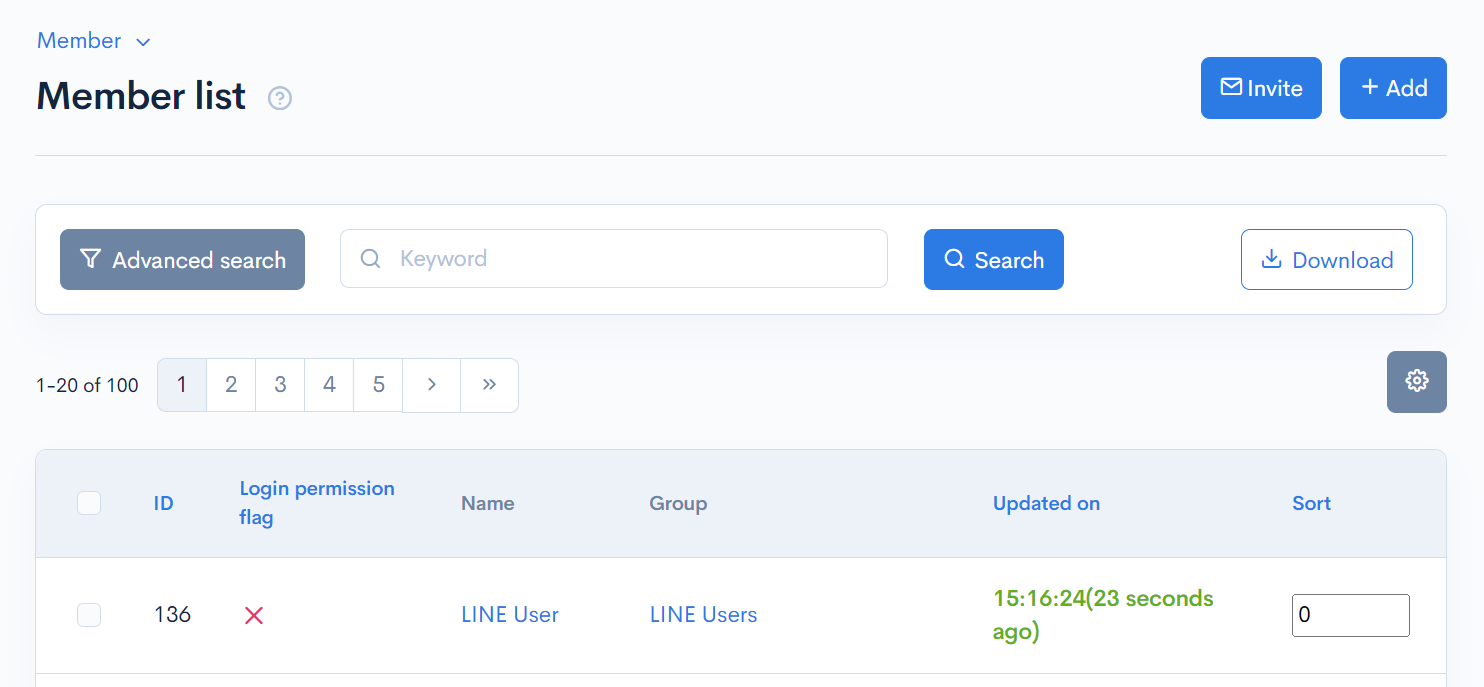
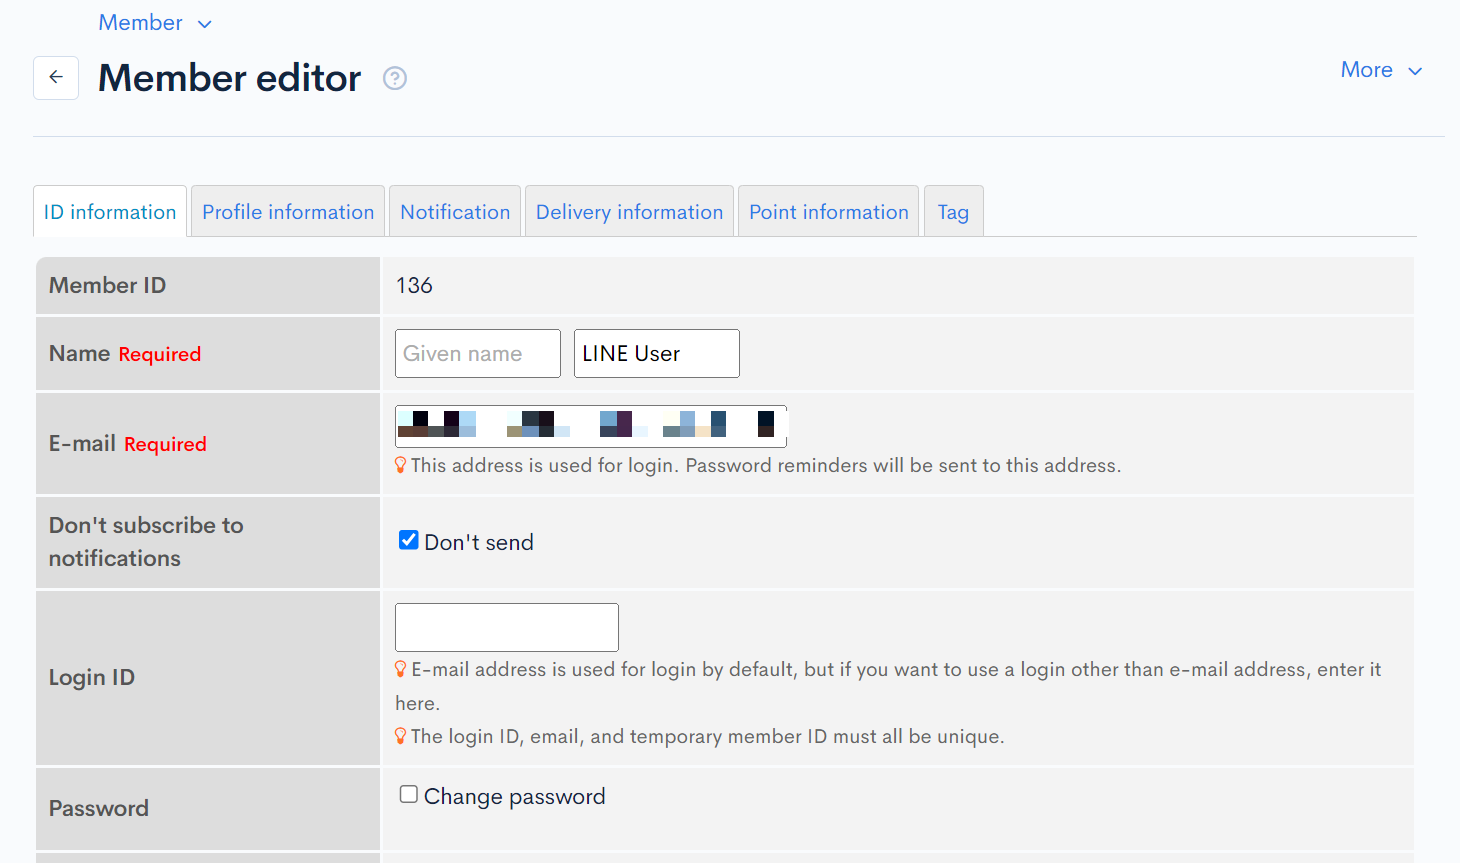
Confirm that the member is added to the member list in the Kuroco management screen.
Send a Message to User Using Kuroco's Custom Function
For testing purposes, create a custom function and write the following:
- Title: LINE test
- Category: Uncategorized
- Identifier: line_test
- Process: (see below)
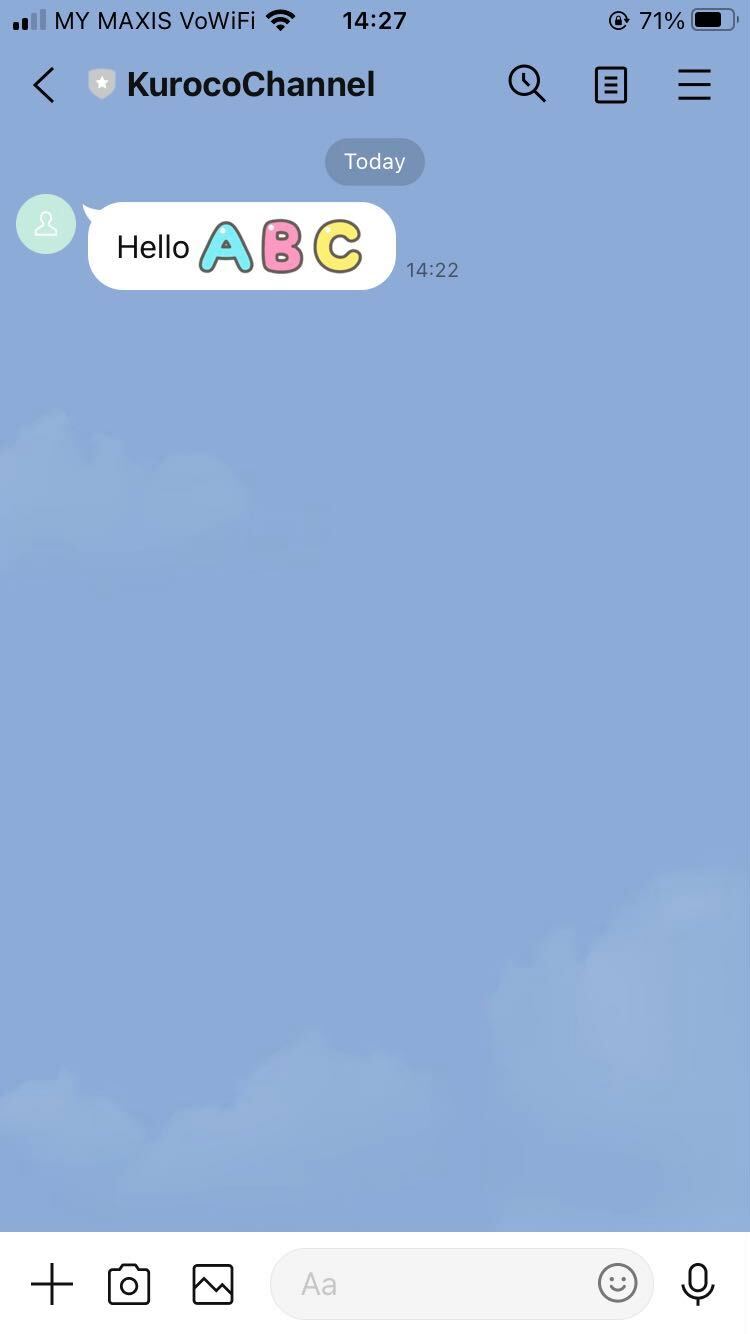
{sendmail
    var=result
    subject='LINE message test'
    contents="Hello [emoji:5ac21a8c040ab15980c9b43f:001][emoji:5ac21a8c040ab15980c9b43f:002][emoji:5ac21a8c040ab15980c9b43f:003] "
    to="Uxxxxxxxxxxxxxxxxxxxxxxxxxxxxxxxx@text.line.r-cms.jp"
}
Enter (LINE User ID)@text.line.r-cms.jp in the to field.
You can include emojis in the contents field as shown above. To insert an emoji, use the following format:
[emoji:(Product ID):(Emoji ID)]
For available emojis, refer to the LINE Emoji Definitions.
Result of the Message
Related documents
Support
If you have any other questions, please contact us or check out Our Slack Community.