Use IDaaS to Implement Microsoft Entra External ID (formerly Azure AD B2C) SSO
This tutorial explains how to implement IDaaS SSO with Microsoft Entra External ID (formerly Azure AD B2C). This is an SSO using OAuth authentication, with Microsoft Entra ID as the IdP and Kuroco as the SP.
This is for implementation of Active Direcctory users which gives more User Login Flow control and uses ID as a Service feature.
For OAuth SP Login with Microsoft functionality, please refer to Implement SSO with OAuth authentication using Microsoft
Prerequisites
It is required that you have a Microsoft Entra ID tenant account.
Add IDaaS settings on Kuruco management page.
First of all, add IDaaS settings on Kuroco's management page.
1. Access the IDaaS SP setting page
Refer to IDaaS SP edit to access the IDaaS SP edit page.
2. Add SP setting
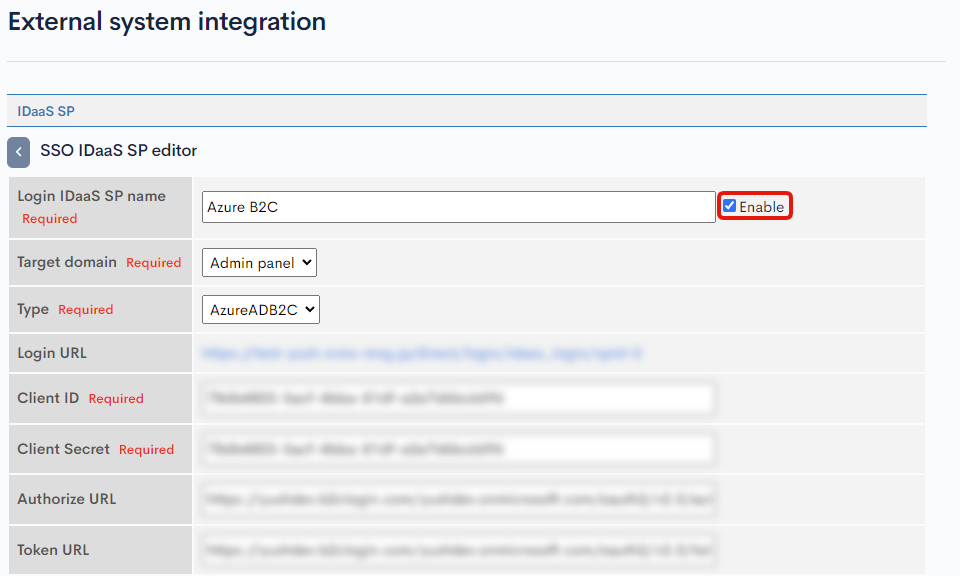
Input the followings in IDaaS SP edit page and click [Add] button. Leave the enabled checkbox as unchecked for now.
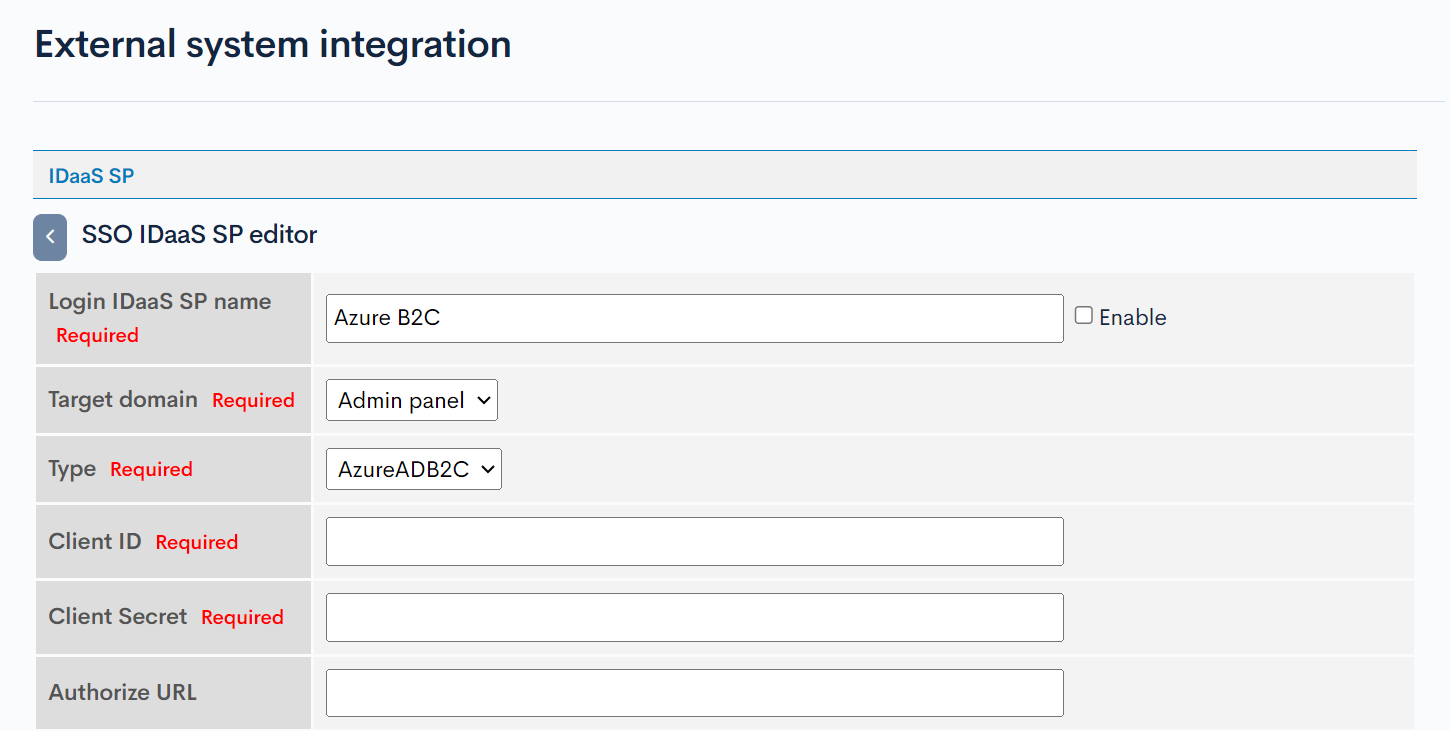
| Field | Description |
|---|---|
| Login IDaaS SP name | Your preferred name for reference. |
| Target domain | Target domain of the IDaaS SP. In this tutorial, we will proceed by set Admin panel |
| Type | AzureADB2C |
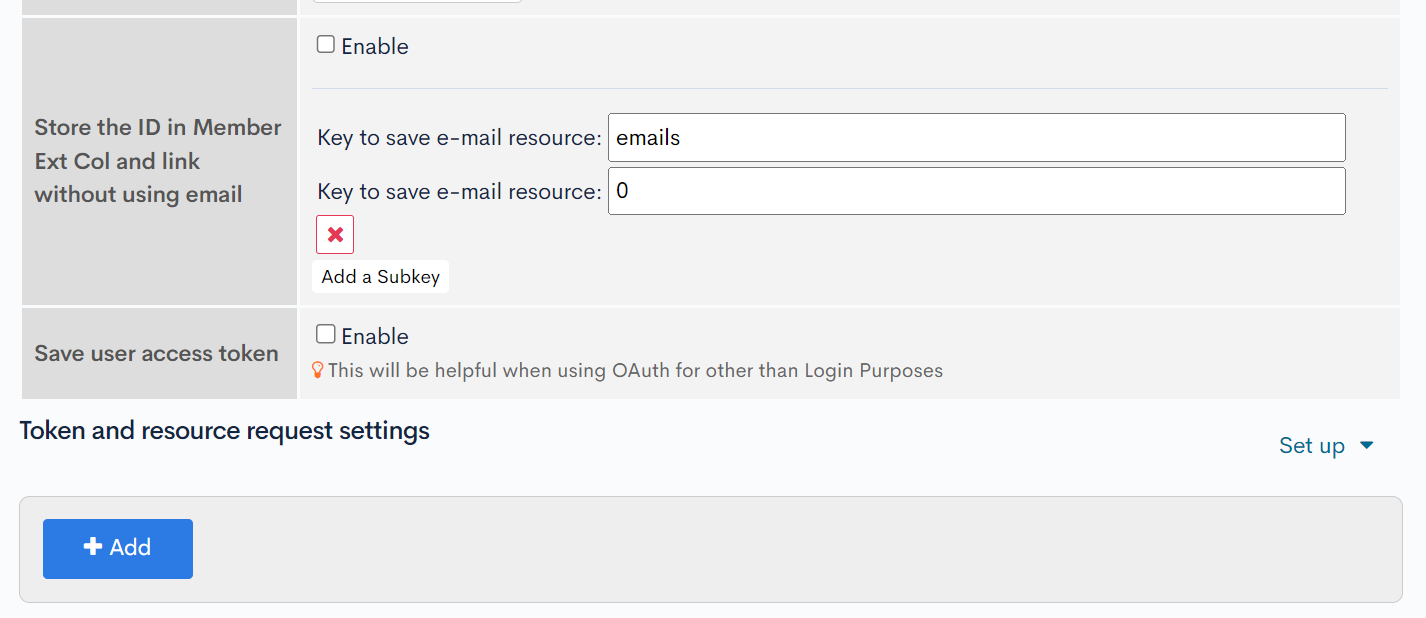
| Store the ID in Member Ext Col and link without using email | Uncheck Enableemails0 |
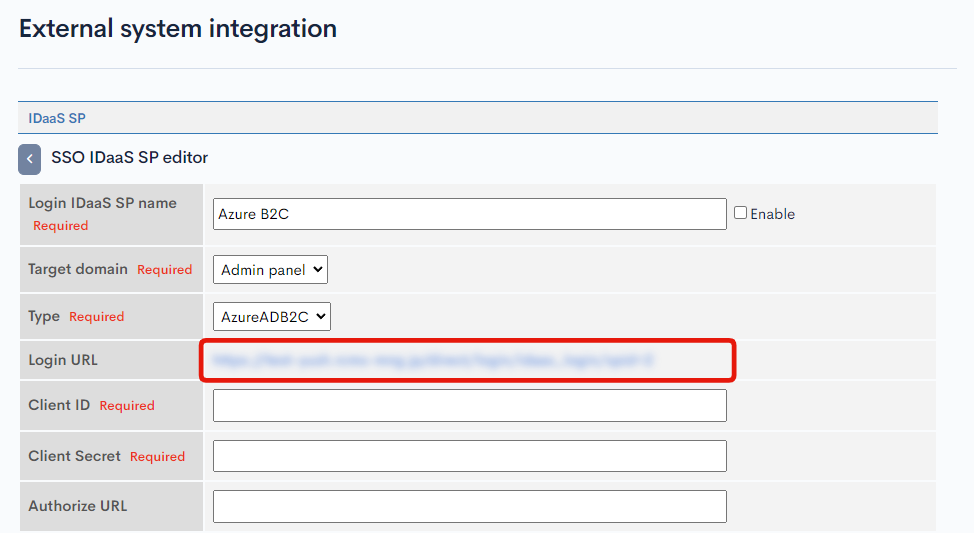
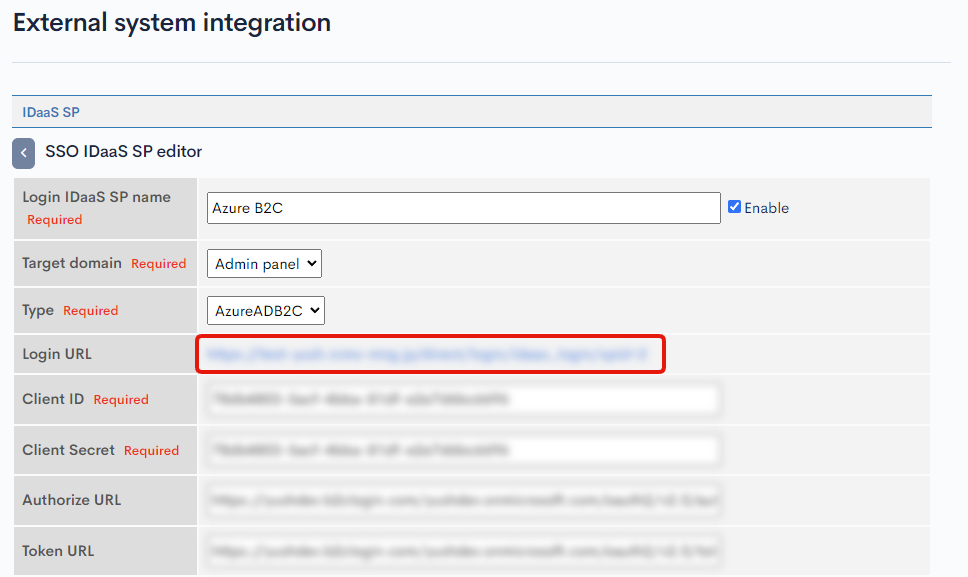
Copy [Login URL] because it will be required to configure in Microsoft Azure Portal.
(The format of this URL will be https://<Site Admin URL>/direct/login/idaas_login/spid=<SP ID>)
Microsoft Entra External ID Configuration
Next is to configure Microsoft Entra External ID App on Microsoft Azure Portal.
The screen may change depending on Mircosoft specification.
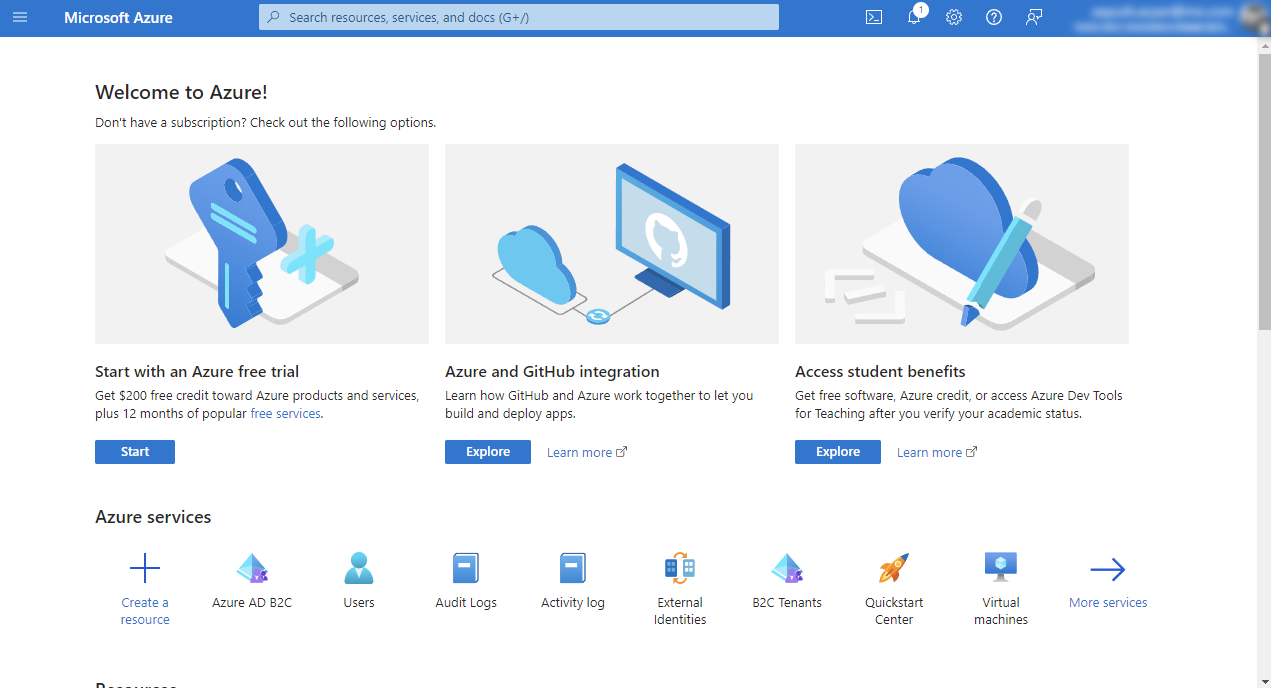
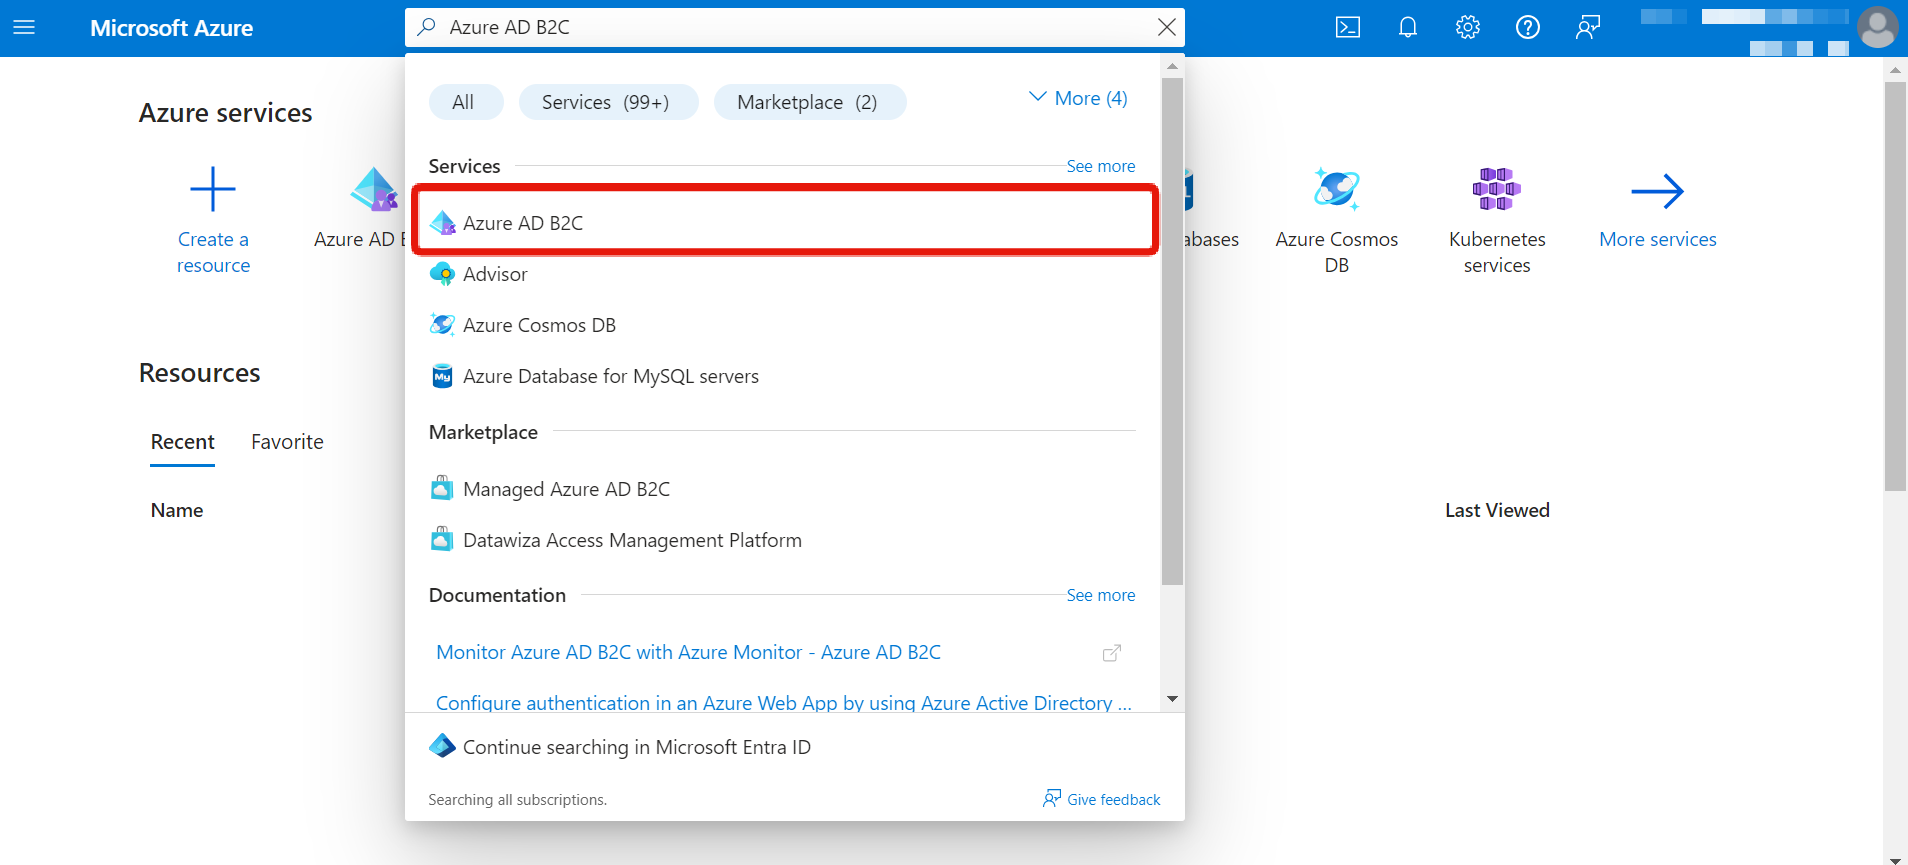
1. Access Microsoft Entra External ID Dashboard Access the Microsoft Entra External ID Configuration from Azure Portal Dashboard. If you see quick access, you can select from there.
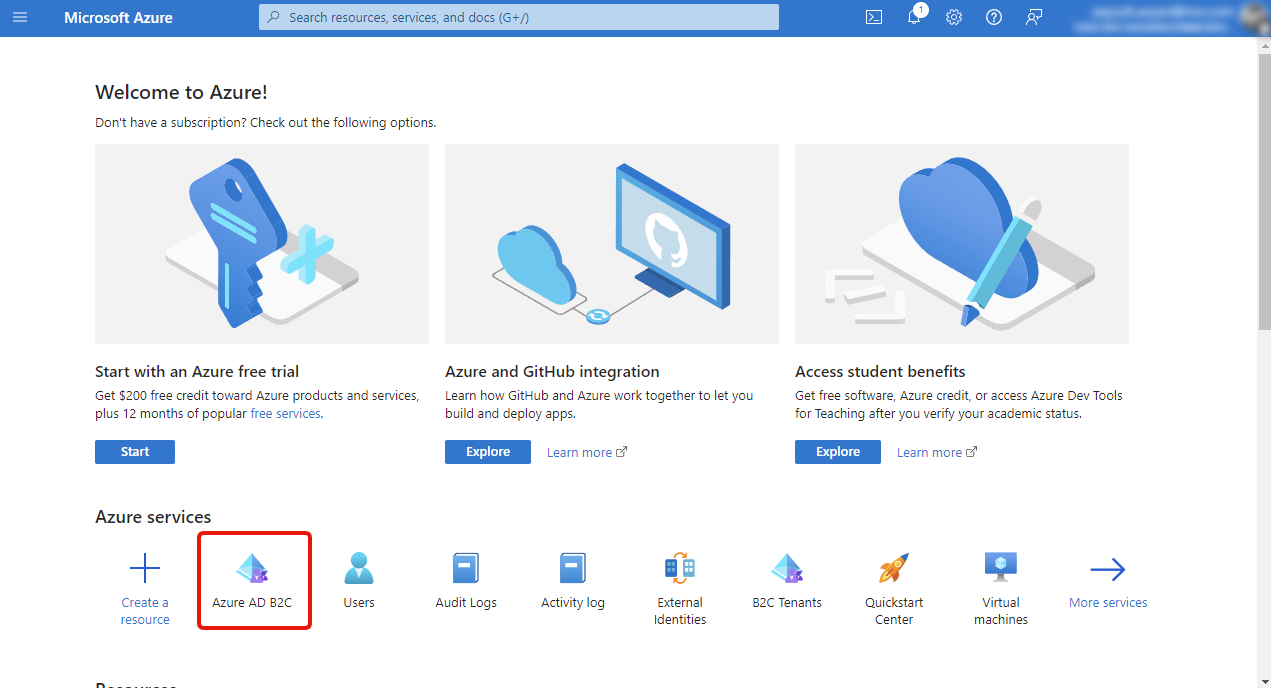
Otherwise you can also use search to search for [Azure AD B2C] (displayed as the legacy name in the portal) and open that.
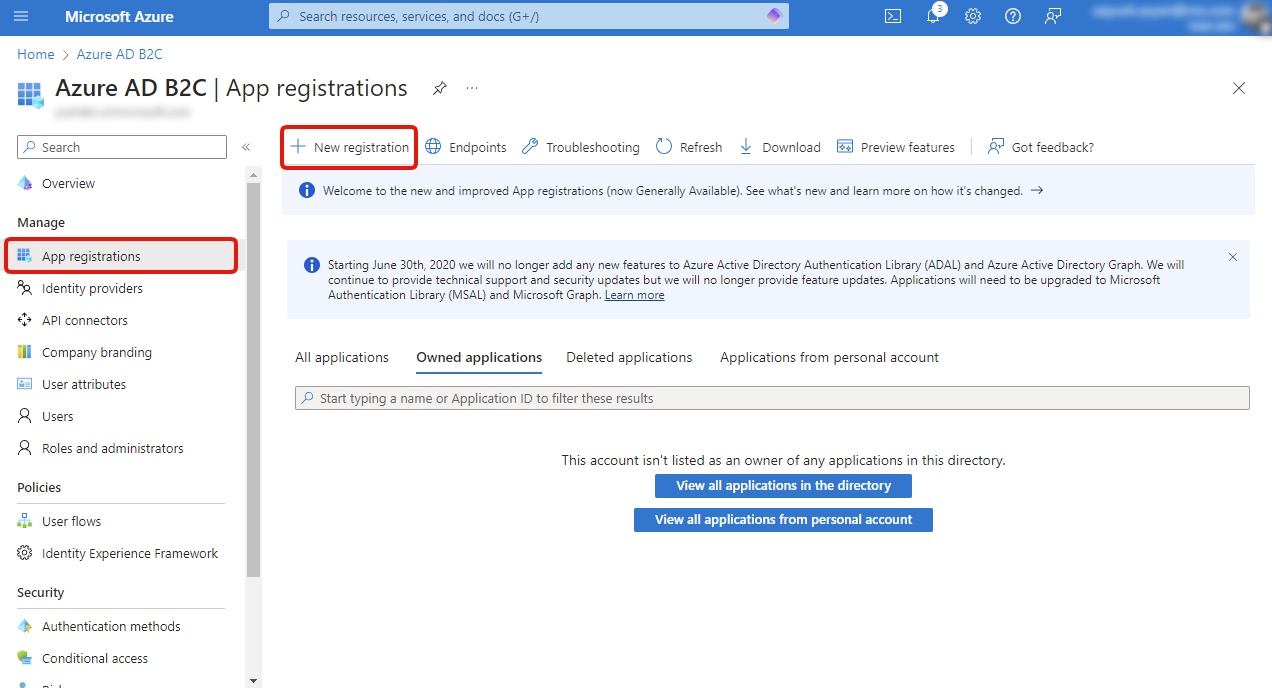
2. Create New App Registration
Click on [App Registrations] and click on [New Registration]. This will take to App Creation screen. This will be the IdP app on Microsoft Azure side.
On the Register an Application screen, enter the following details accordingly as mentioned in the table below.
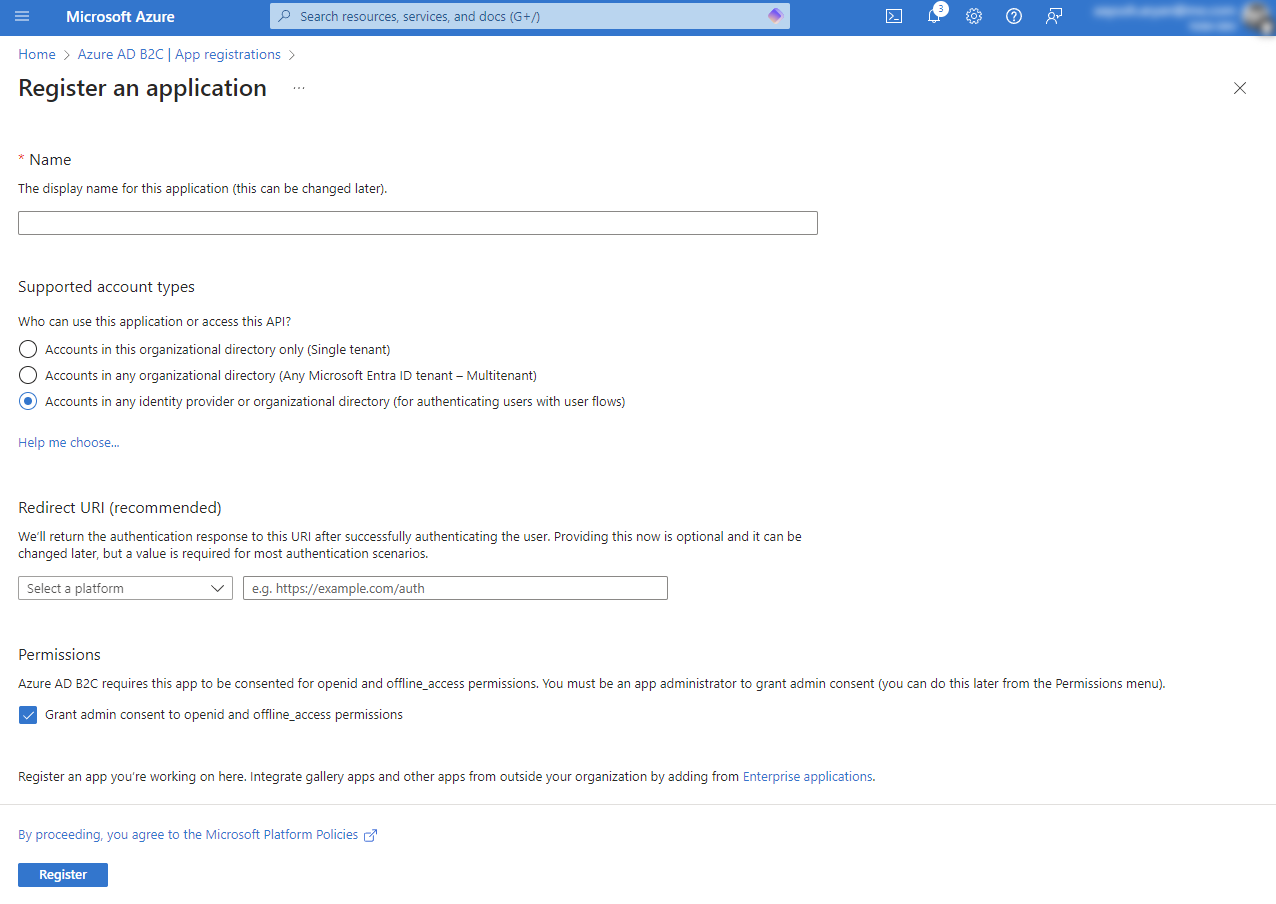
| Field | Description |
|---|---|
| Name | Your preferred name for reference. This does not have to be same as Kuroco. This is name for the IdP app on Microsoft. |
| Supported Account Types | The accounts types to be enabled for this Application, depending on Business Logic, if user flow needs to be configured then any IdP or Directory needs to be selected. |
| Redirect URL - Platform | Select [Web] from the dropdown. |
| Redirect URL - URL | This is the [Login URL] that was copied in the previous step when configuring Kuroco Admin side. |
| Permissions | Check the checkbox for auto grant of permissions for the application to access openId details. |
Click [Proceed] to save move to the next step.
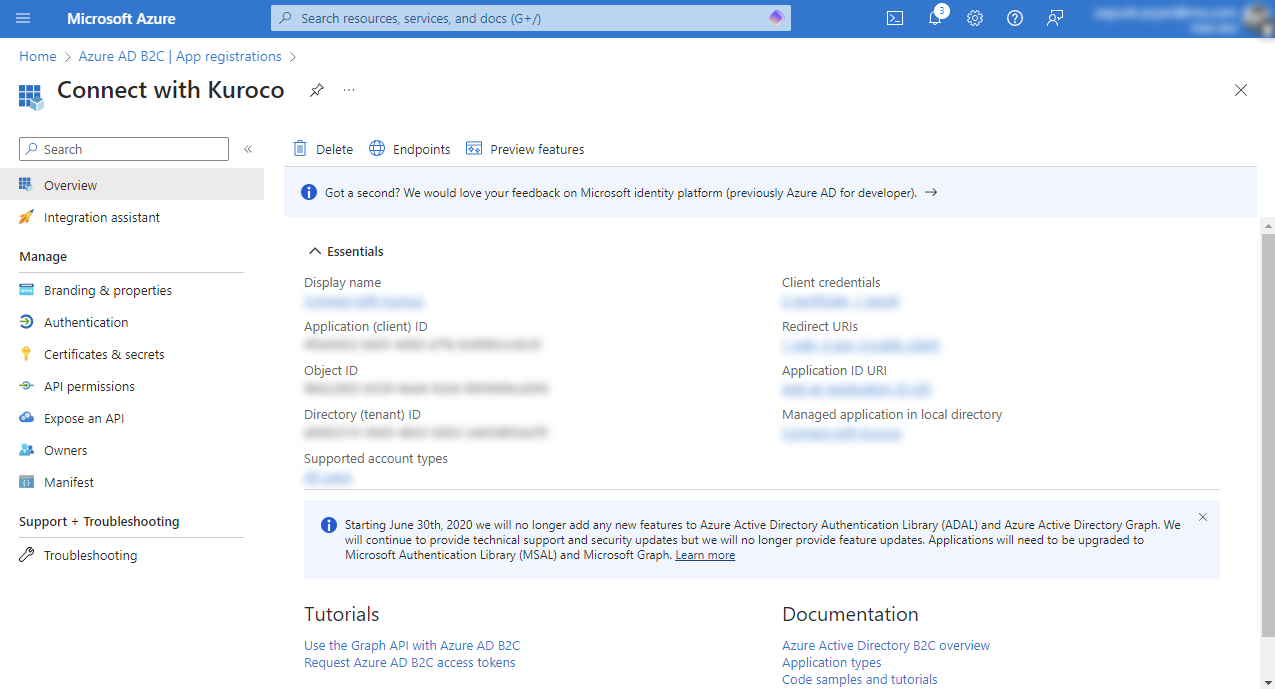
After the Application is created, the Application dashboard will look like below.
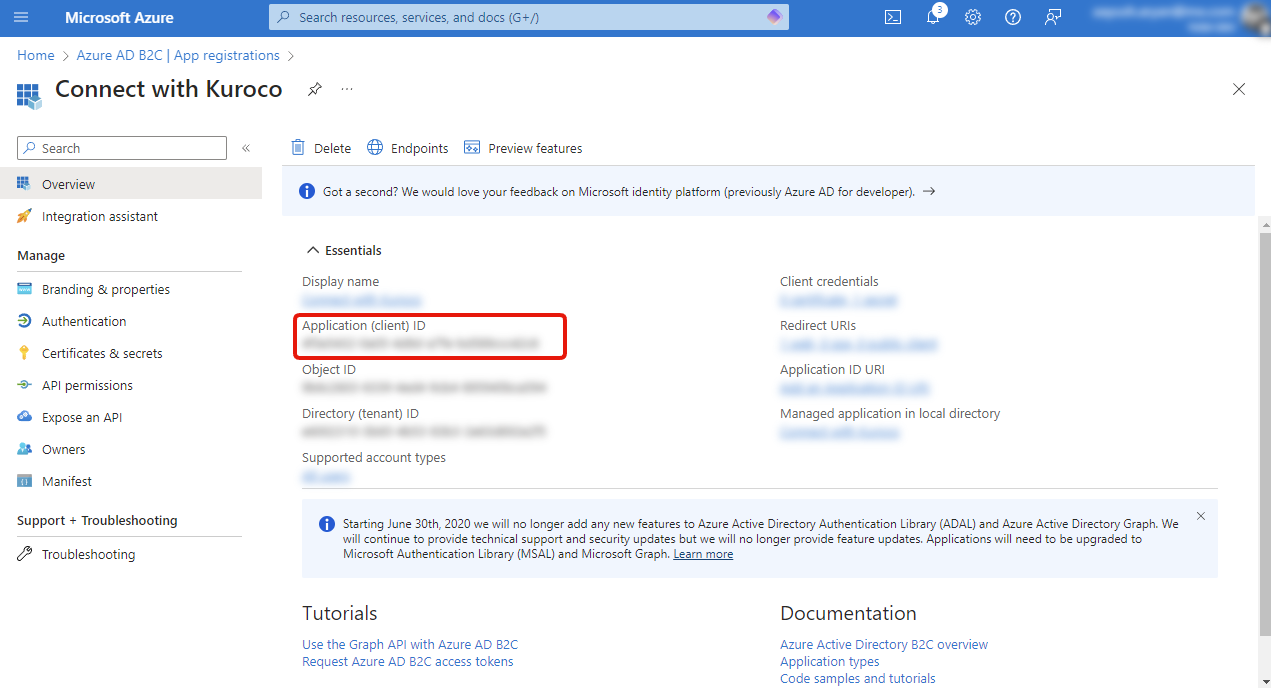
3. Copy Application (client) ID
Copy [Application (client) ID]. This is going to be used to configure on Kuroco IDaaS SP Edit Admin screen.
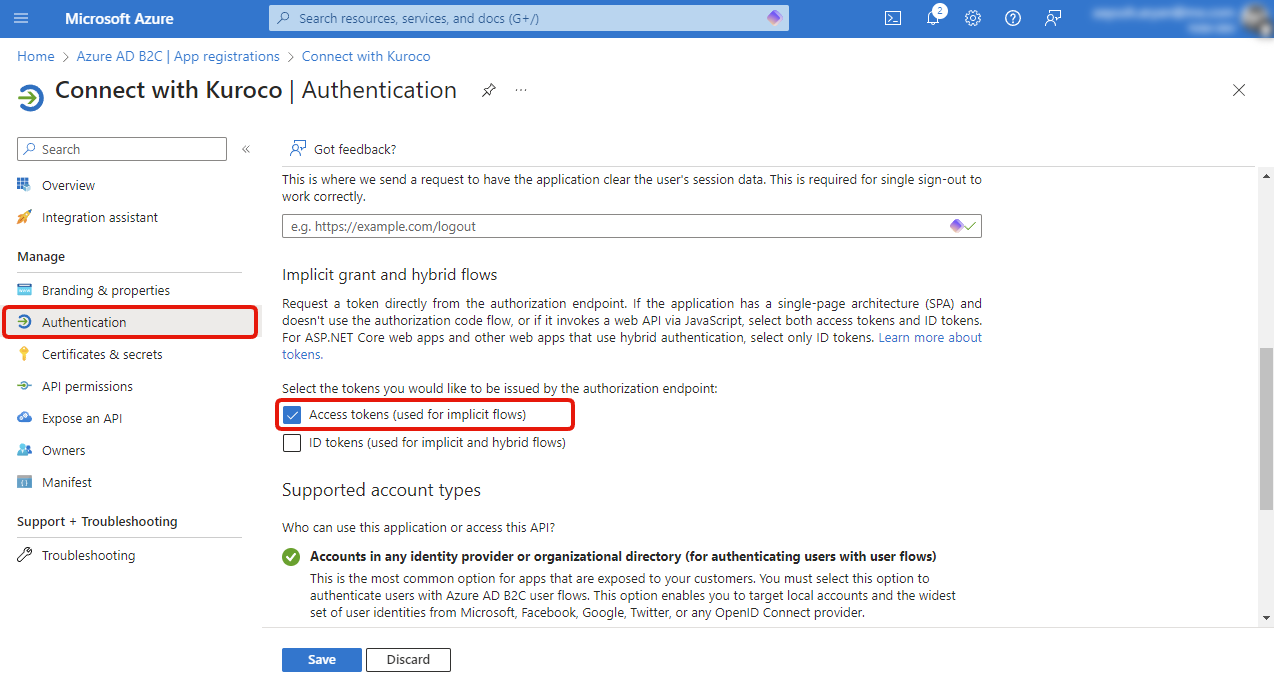
4. Enable Access Token Flow
Click on [Authentication] and check the checkbox for [Access Tokens]. Click [Save]. This enables for the use of Implicit flows.
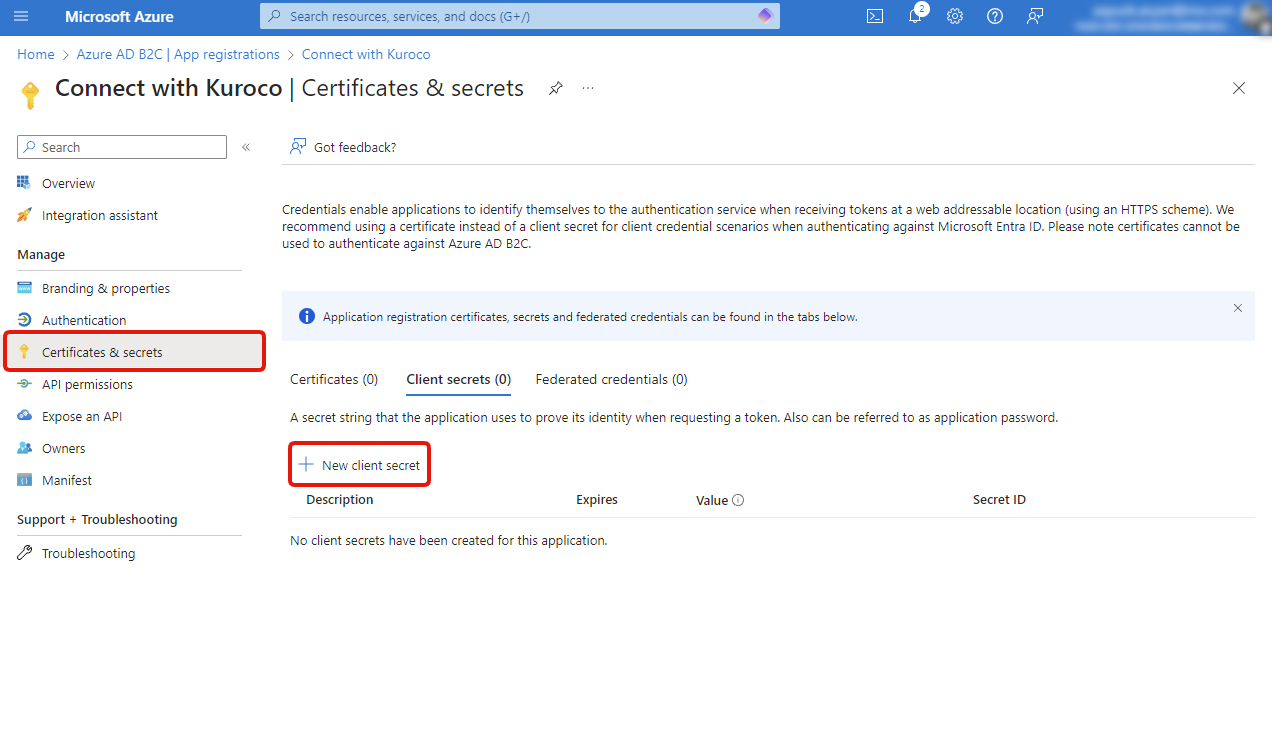
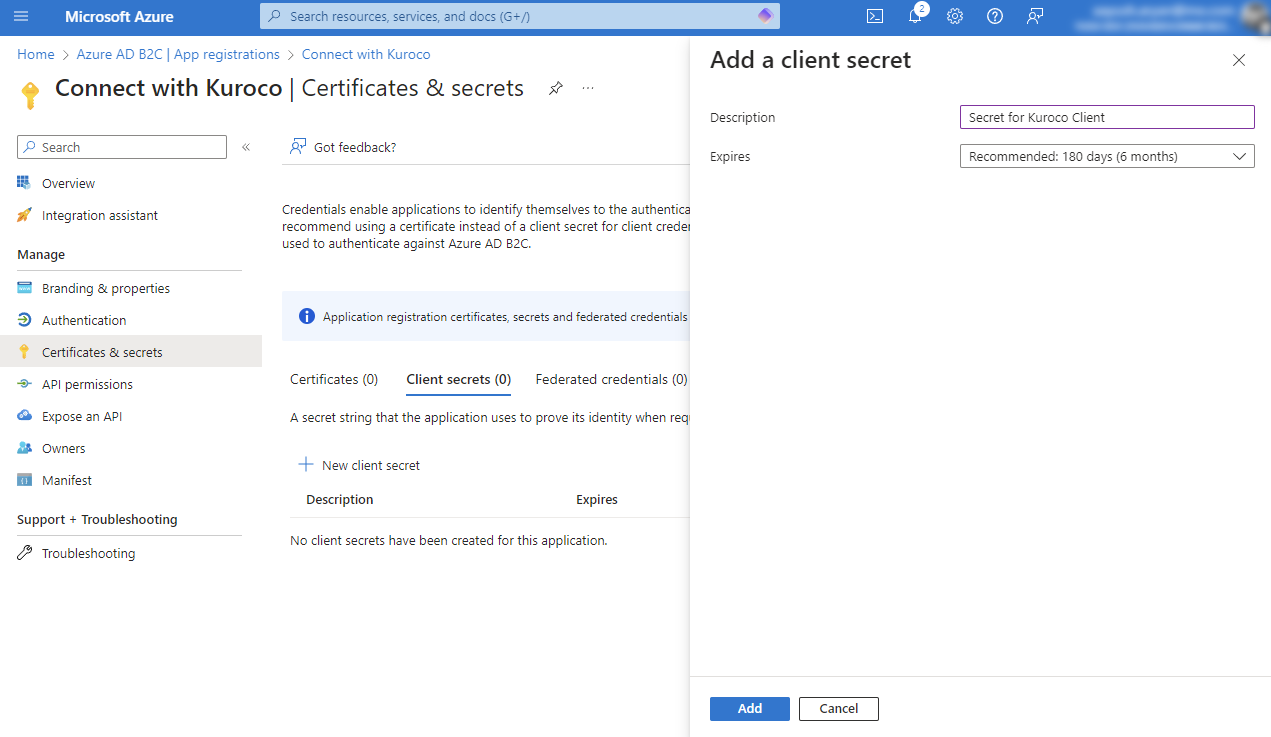
5. Generate a Client Secret
Click on [Certificates & Secrets] and then click on [New Client Secret].
On the side modal, enter the Description as a short description for this secret and set the expiry for the secret and click [Add]
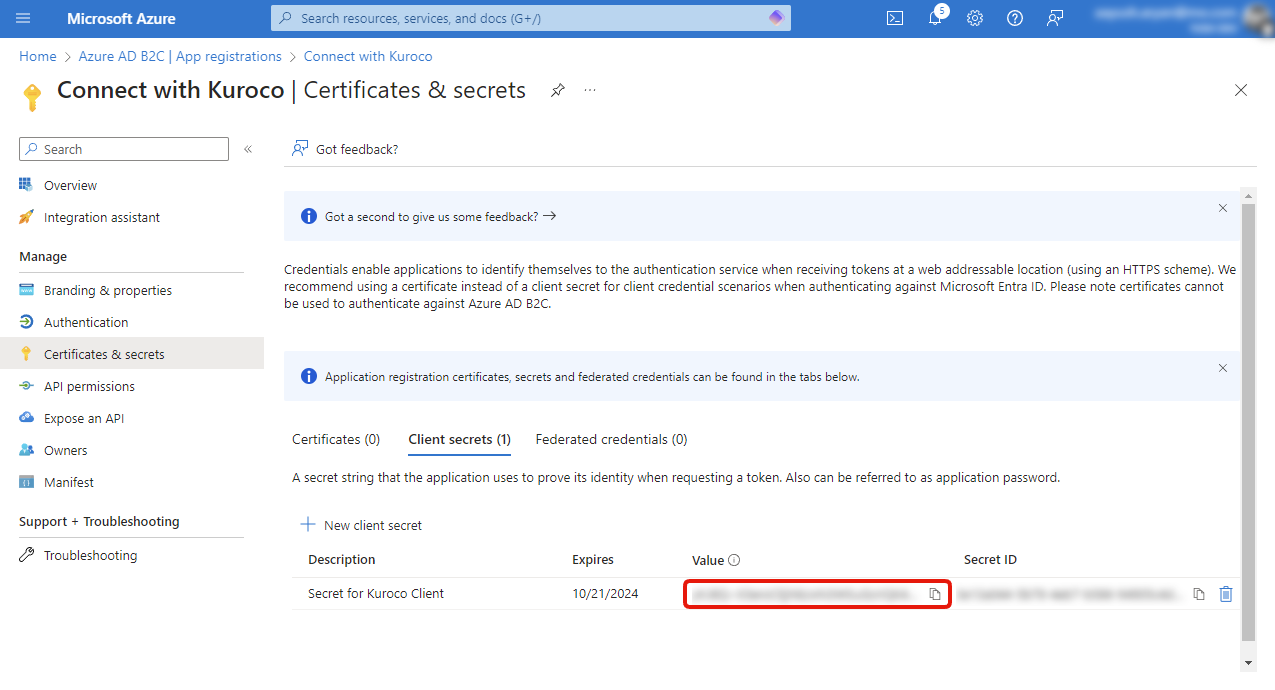
After expiry, a new secret will have to be created in Mircosoft and configured in Kuroco, otherwise SSO Logins will stop working.
Copy the Secret Value. Once navigated away to the next screen, this value will not be visible again. This value needs to be configured in Kuroco IDaaS SP Edit Admin Screen.
6. Create and Configure User Flow
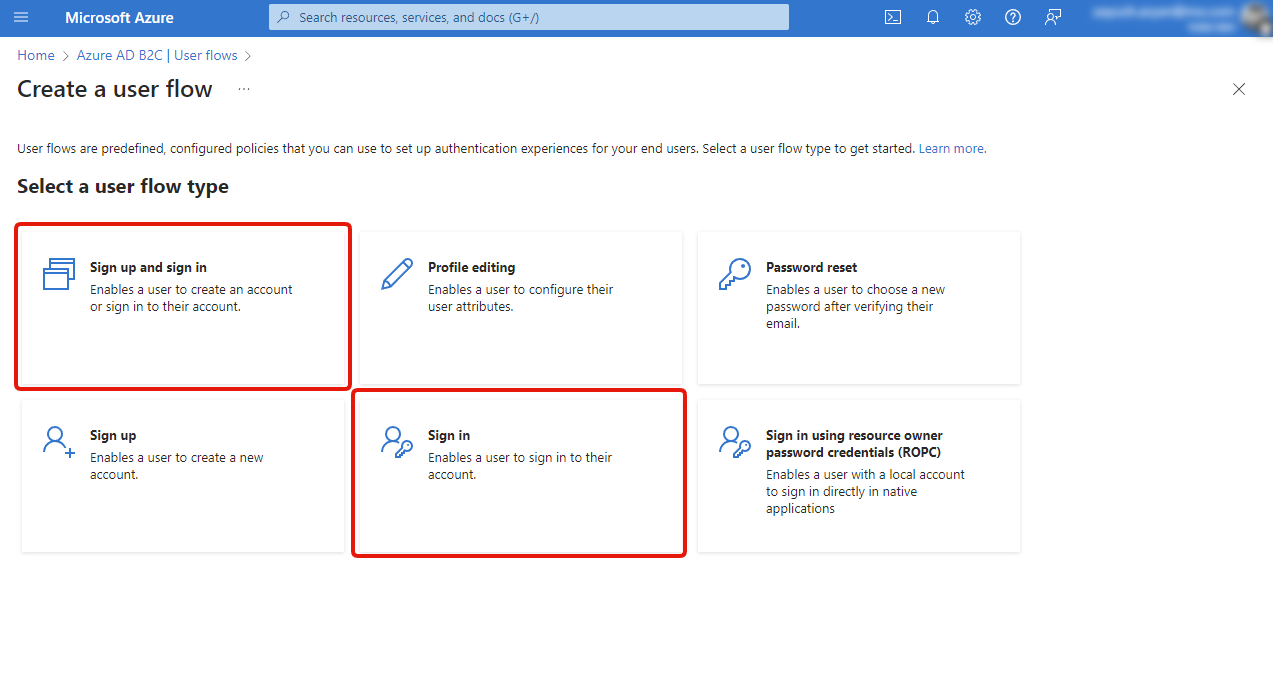
Navigate to the Ad B2C Configuration Dashboard and click on [User Flows] and then [New User Flow].
(User Flows help define how Microsoft Entra External ID will handle login and registration, if the flow is already set, then the User flow configuration steps can be skipped.)

If the user flow does not exist in the side menu, make sure that you are in a Microsoft Entra External ID directory and not a Microsoft Entra ID directory. To use External ID features, create a separate Microsoft Entra External ID tenant from your existing employee-based Microsoft Entra ID tenant.
Select the entry point for the user flow. It can be configured to allow new user registrations or not depending on the selection here. This sign up configuration is different than Kuroco new user registration which is seen on IDaaS SP Edit screen.
In this document, we will proceed by selecting [Sign up and sign in].
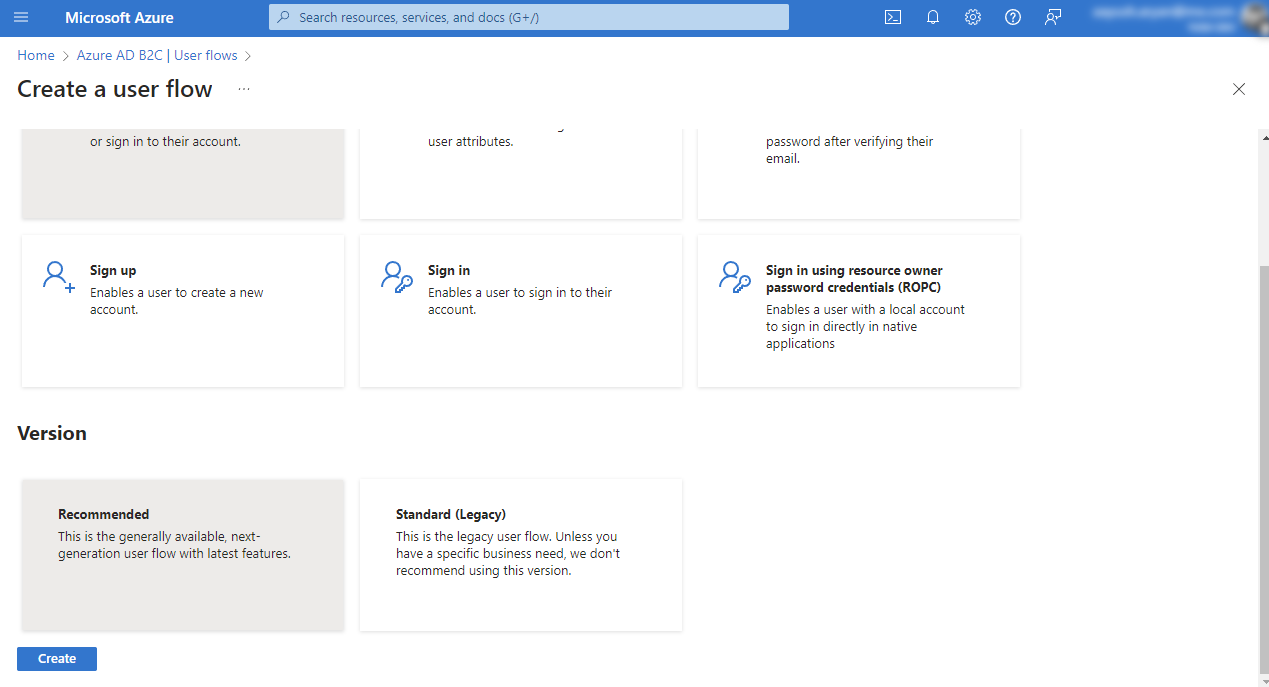
Select the [Recommended] Version and then click on [Create].
On the User Flow Configuration screen. Set the fields according to the following table. After filling the data, click on [Create].
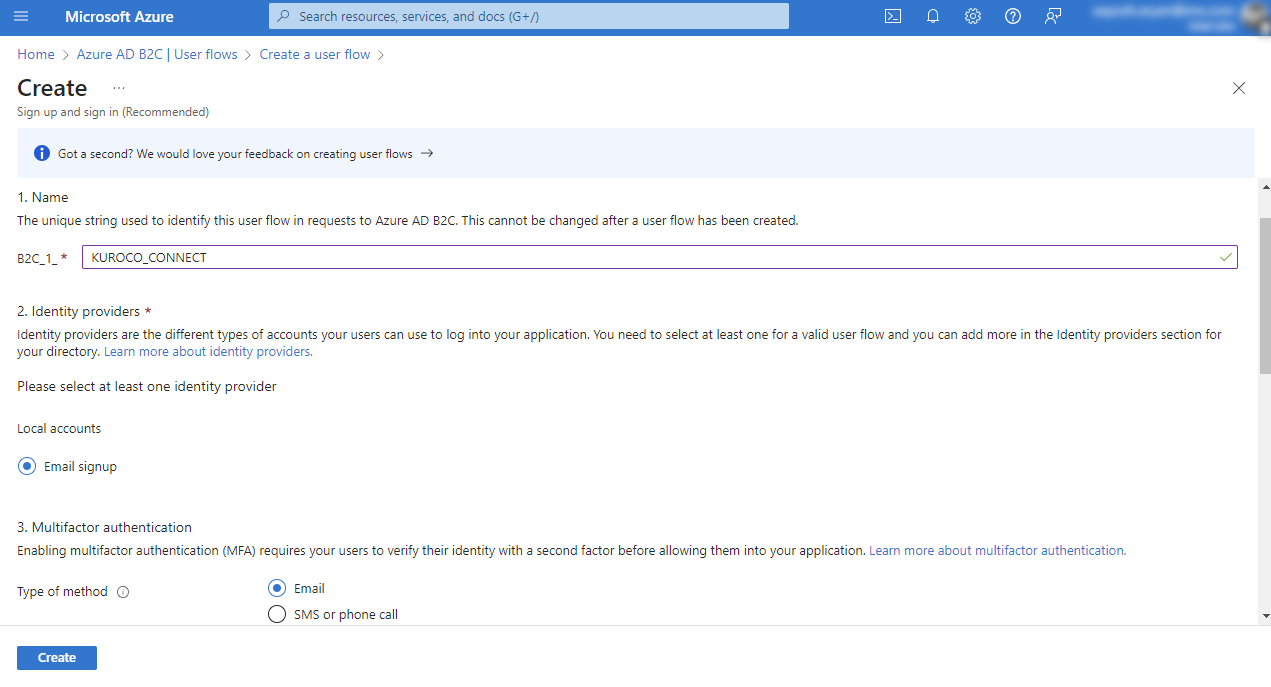
| Field | Description |
|---|---|
| Name | Identifier of the User Flow. This should be unique and also cannot be changed in future. |
| Identity Providers | Select the ways with which users can log into Microsoft IDaaS. For this example, select Email/Password based login. |
| Multifactor Authentication | Select how the users will have their MFA configured with Microsoft Entra ID. For this example, select Email, this is Email OTP based MFA to validate email for user registration. |
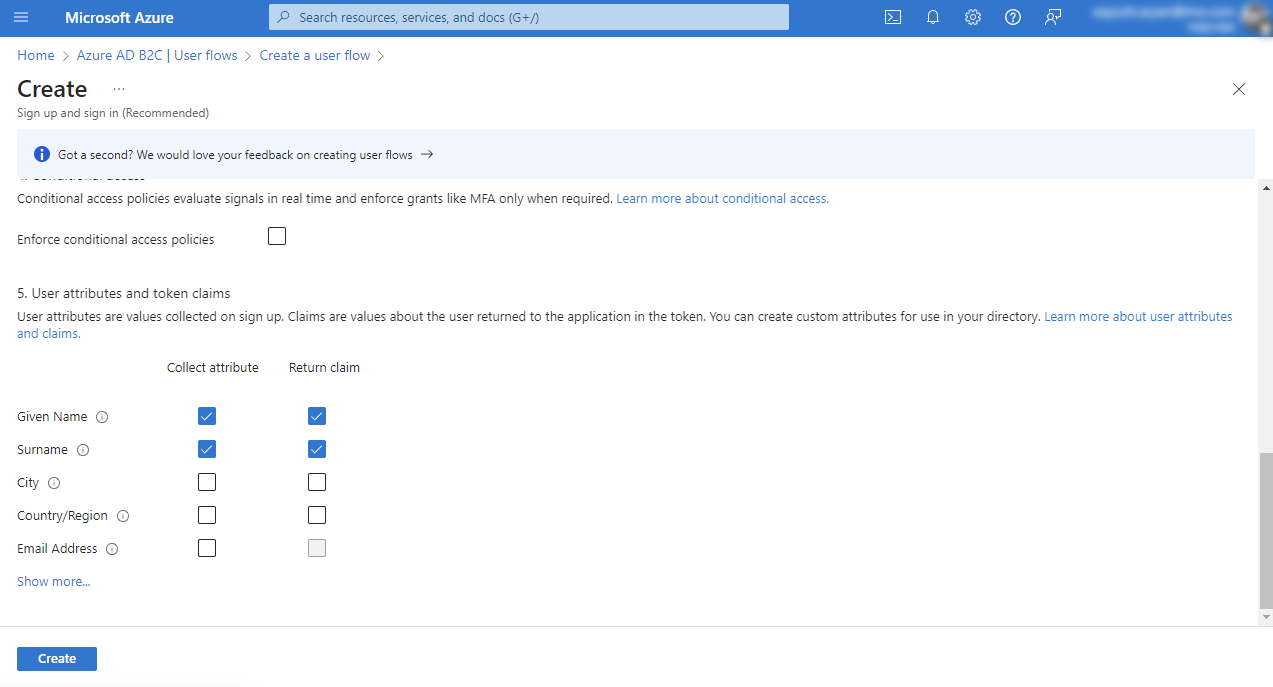
| Useer Attributes and Token Claims | This is the data to be collected from the user and to be passed to Kuroco, if any extra data is configured, that is needed to be set at IDaaS SP Edit screen on Kuroco.For this tutorial, Given Name and Surname will be used to pass to Kuroco. |
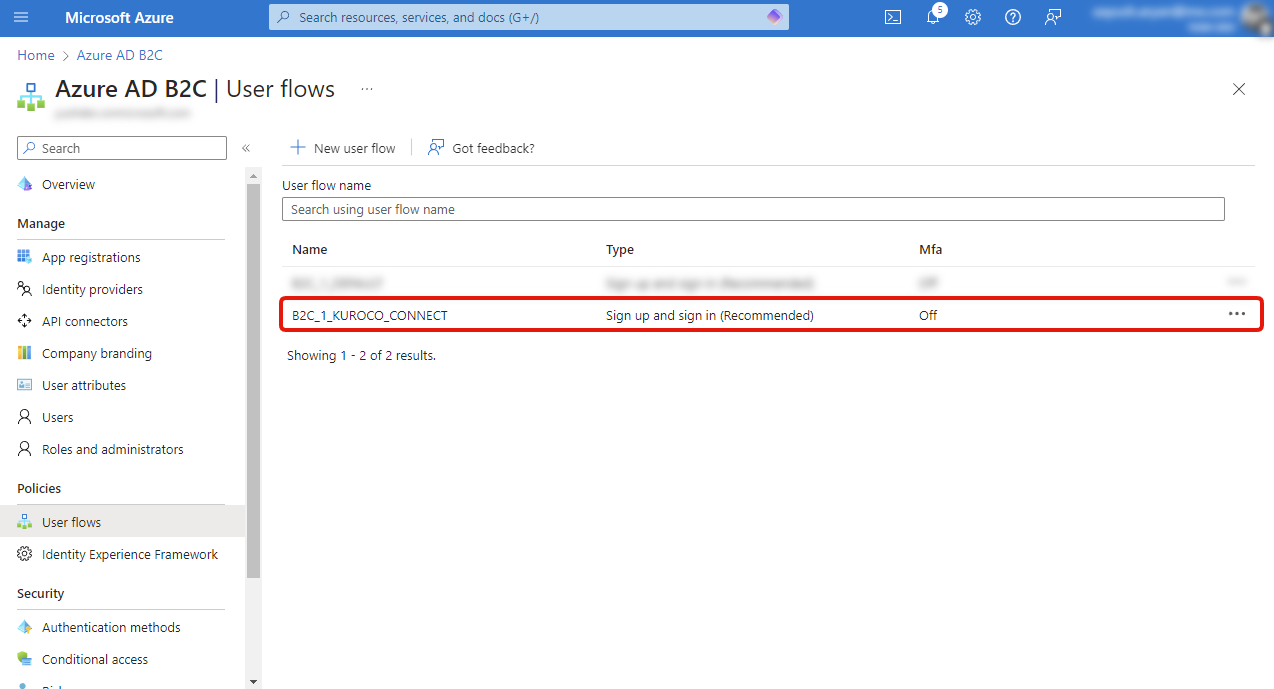
After creation of the User Flow, it will be shown in the User Flow list. Click on the flow to edit it.
(Note: If Email is not required to be passed to kuroco, then this step can be skipped)
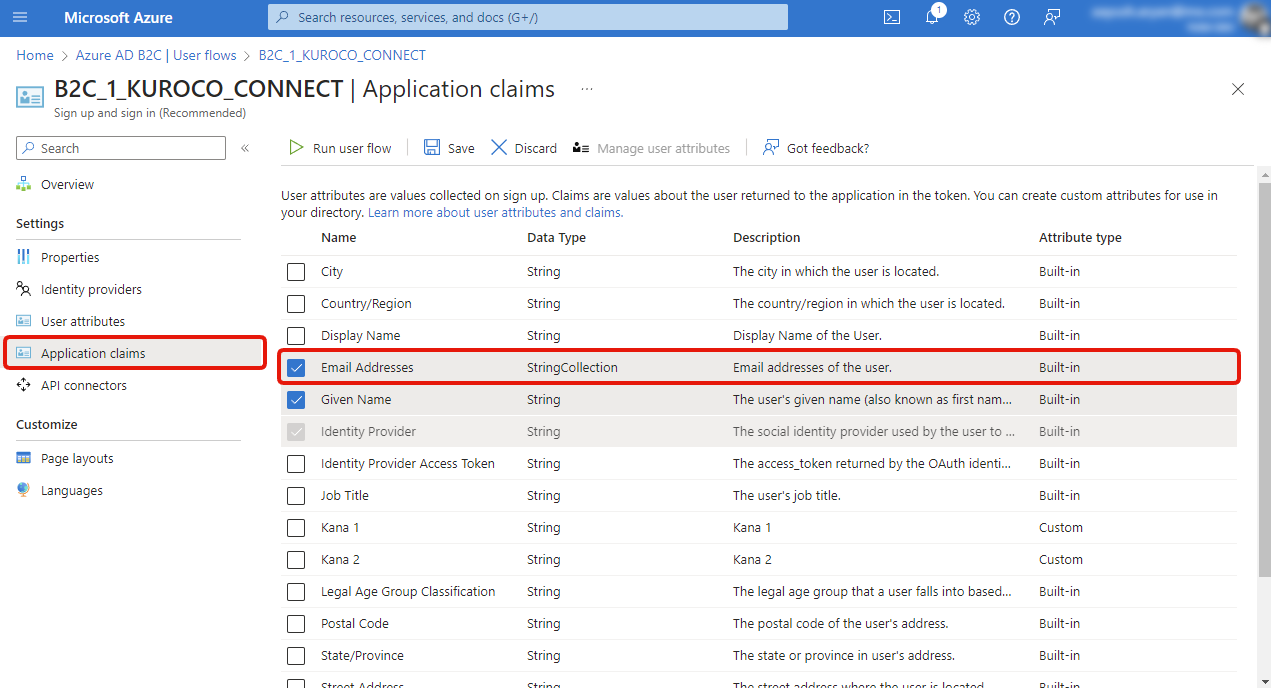
Click on [Application Claims] then check the checkbox of [Email Addresses].
This will pass an array of emails of the user to Kuroco because it is possible for a user to have multiple emails, even though if configured in settings to have only 1 email, structure will be the same.
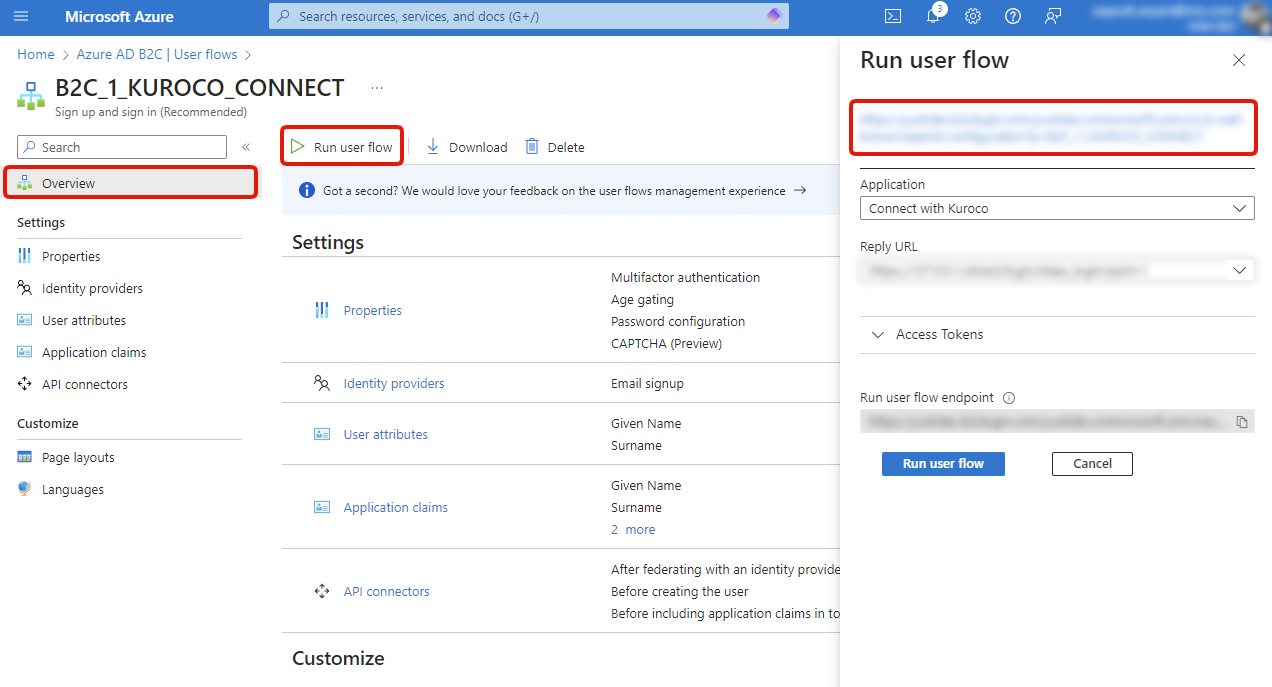
7. Copy Configuration URLs
Click on [Overview], then [Run User Flow] and then open the resource link in a new tab. The format of the link is like this
(https://<AD Name>.b2clogin.com/<AD Domain>/v2.0/.well-known/openid-configuration?p=B2C_1_<User Flow Name>).
The page will be a JSON page, from this, copy [authorization_endpoint], [token_endpoint] and [jwks_uri]. They are required to configure in Kuroco IDaaS SP Edit Admin screen. The format of the URLs is mentioned in the table below.
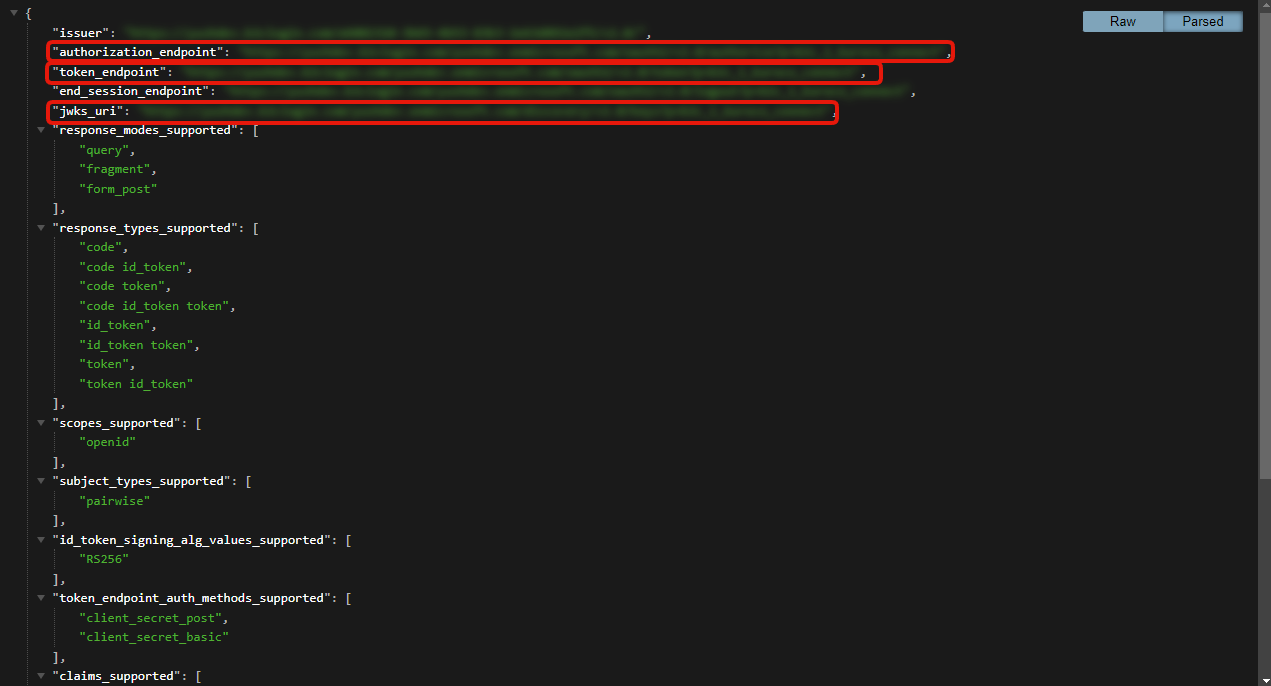
| URL | Format |
|---|---|
| authorization_endpoint | https://<AD Name>.b2clogin.com/<AD Domain>/oauth2/v2.0/authorize?p=b2c_1_<User Flow Name> |
| token_endpoint | https://<AD Name>.b2clogin.com/<AD Domain>/oauth2/v2.0/token?p=b2c_1_<User Flow Name> |
| jwks_uri | https://<AD Name>.b2clogin.com/<AD Domain>/discovery/v2.0/keys?p=b2c_1_<User Flow Name> |
In case when there is only 1 User Flow, instead of User Flow Name, default might be used.
This completes the configuration needed on Microsoft Azure side. Now completion of configuration is needed on Kuroco IDaaS SP Edit Admin screen.
Kuroco IDaaS SP Edit Configuration
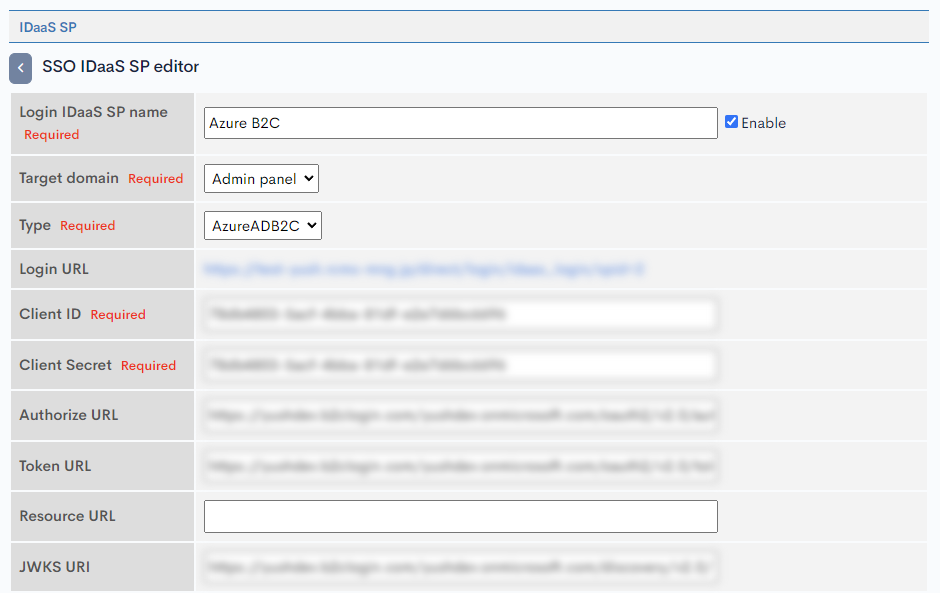
1. Configure the Kuroco IDaaS SP Edit Admin Screen.
On the Kuroco IDaaS SP Edit Admin screen, enter the Copied values of [Client ID], [Client Secret], [Authorize URL], [Token URL] and [JWKS URI]. Keep [Resource URL] as empty.
2. Configure EMail Key
This configuration depends on the business logic. Either Kuroco can use email as a user identifier or the Azure User Object Identifier.
In case, the email is needed to be stored, the [Store the ID in Member Ext Col and link without using email] checkbox should be unchecked.
The configuration for the email keys should be as shown below.
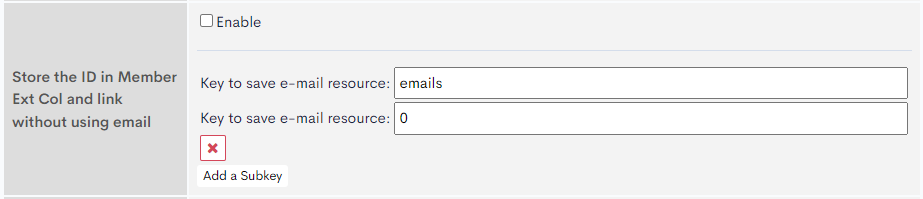
If the email is not needed to be used, then the checkbox can be left checked, in that situation, the ext column where the open_id will be stored needs to be selected.
(Note: The ext column type should be single line text for it to be used)

3. Enable the IDaaS SP Check the checkbox for [Enable] and click [Save].
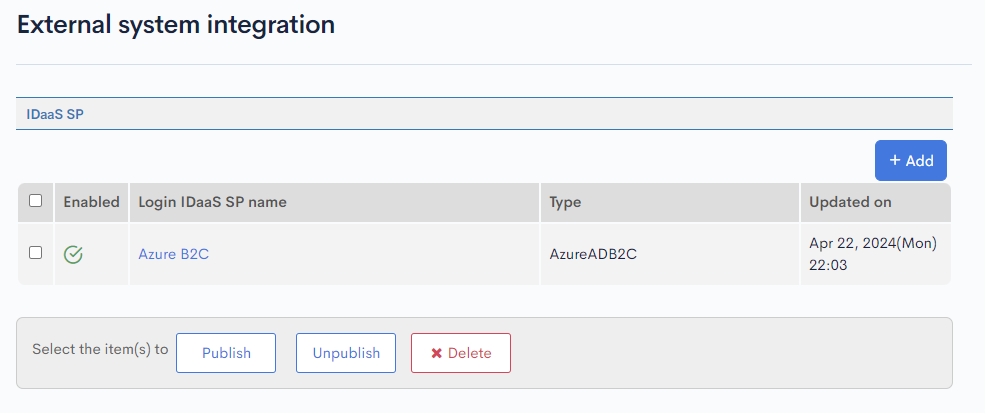
Now the IDaaS SP on Kuroco side is also configured.
How to use
Check the created IDaaS SP page. Click [Login IDaaS SP Name] of the SP configuration which you have created on the SSO IdaaS SP list page.
You can find [Login URL].
Click the URL and it links to the Microsoft Entra External ID Login Page.
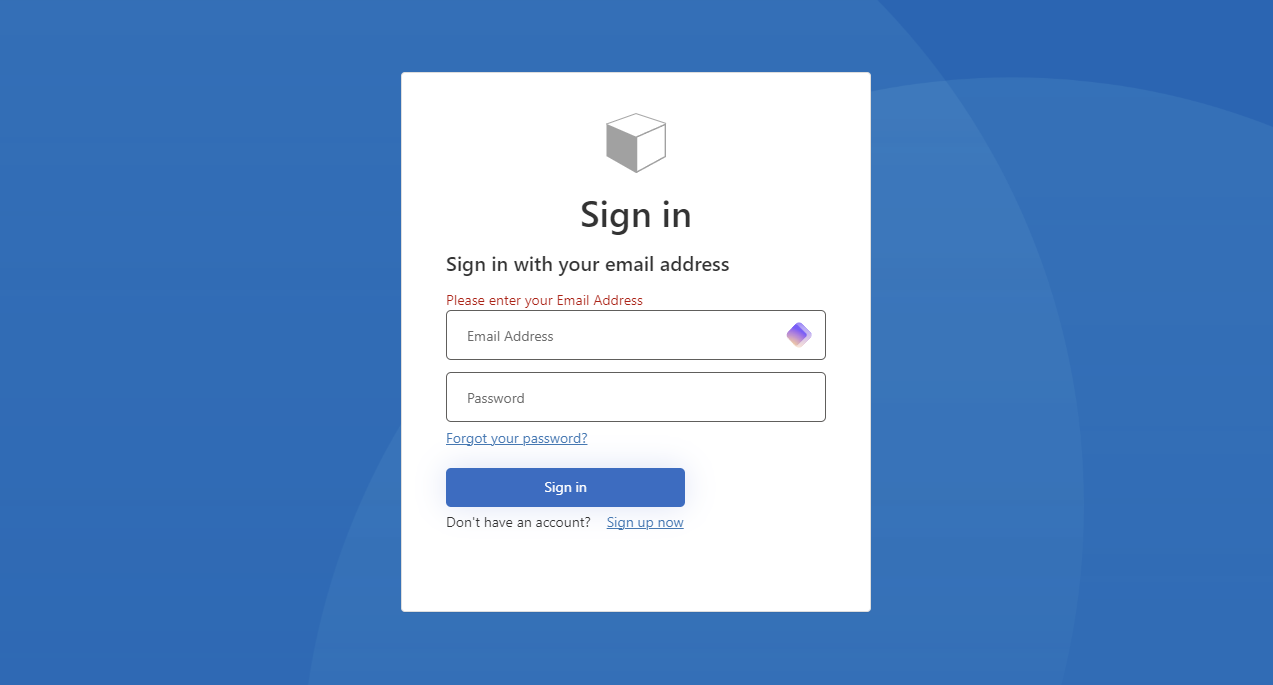
Enter your Microsoft Entra ID User Email and Password here and you can proceed to log into Kuroco SP.
Related documents
Support
If you have any other questions, please contact us or check out Our Slack Community.