Implementing SSO Login Flow in a SPA
Overview
This tutorial explains how to implement the full SSO login flow in a frontend SPA (Single Page Application) that uses Kuroco as its backend API.
While Using Single Sign-On Login in Frontend covers the basic Kuroco configuration and grant_token concept, this tutorial focuses on the frontend implementation details — how to handle the redirect flow, exchange tokens, and restore the user's original page after login.
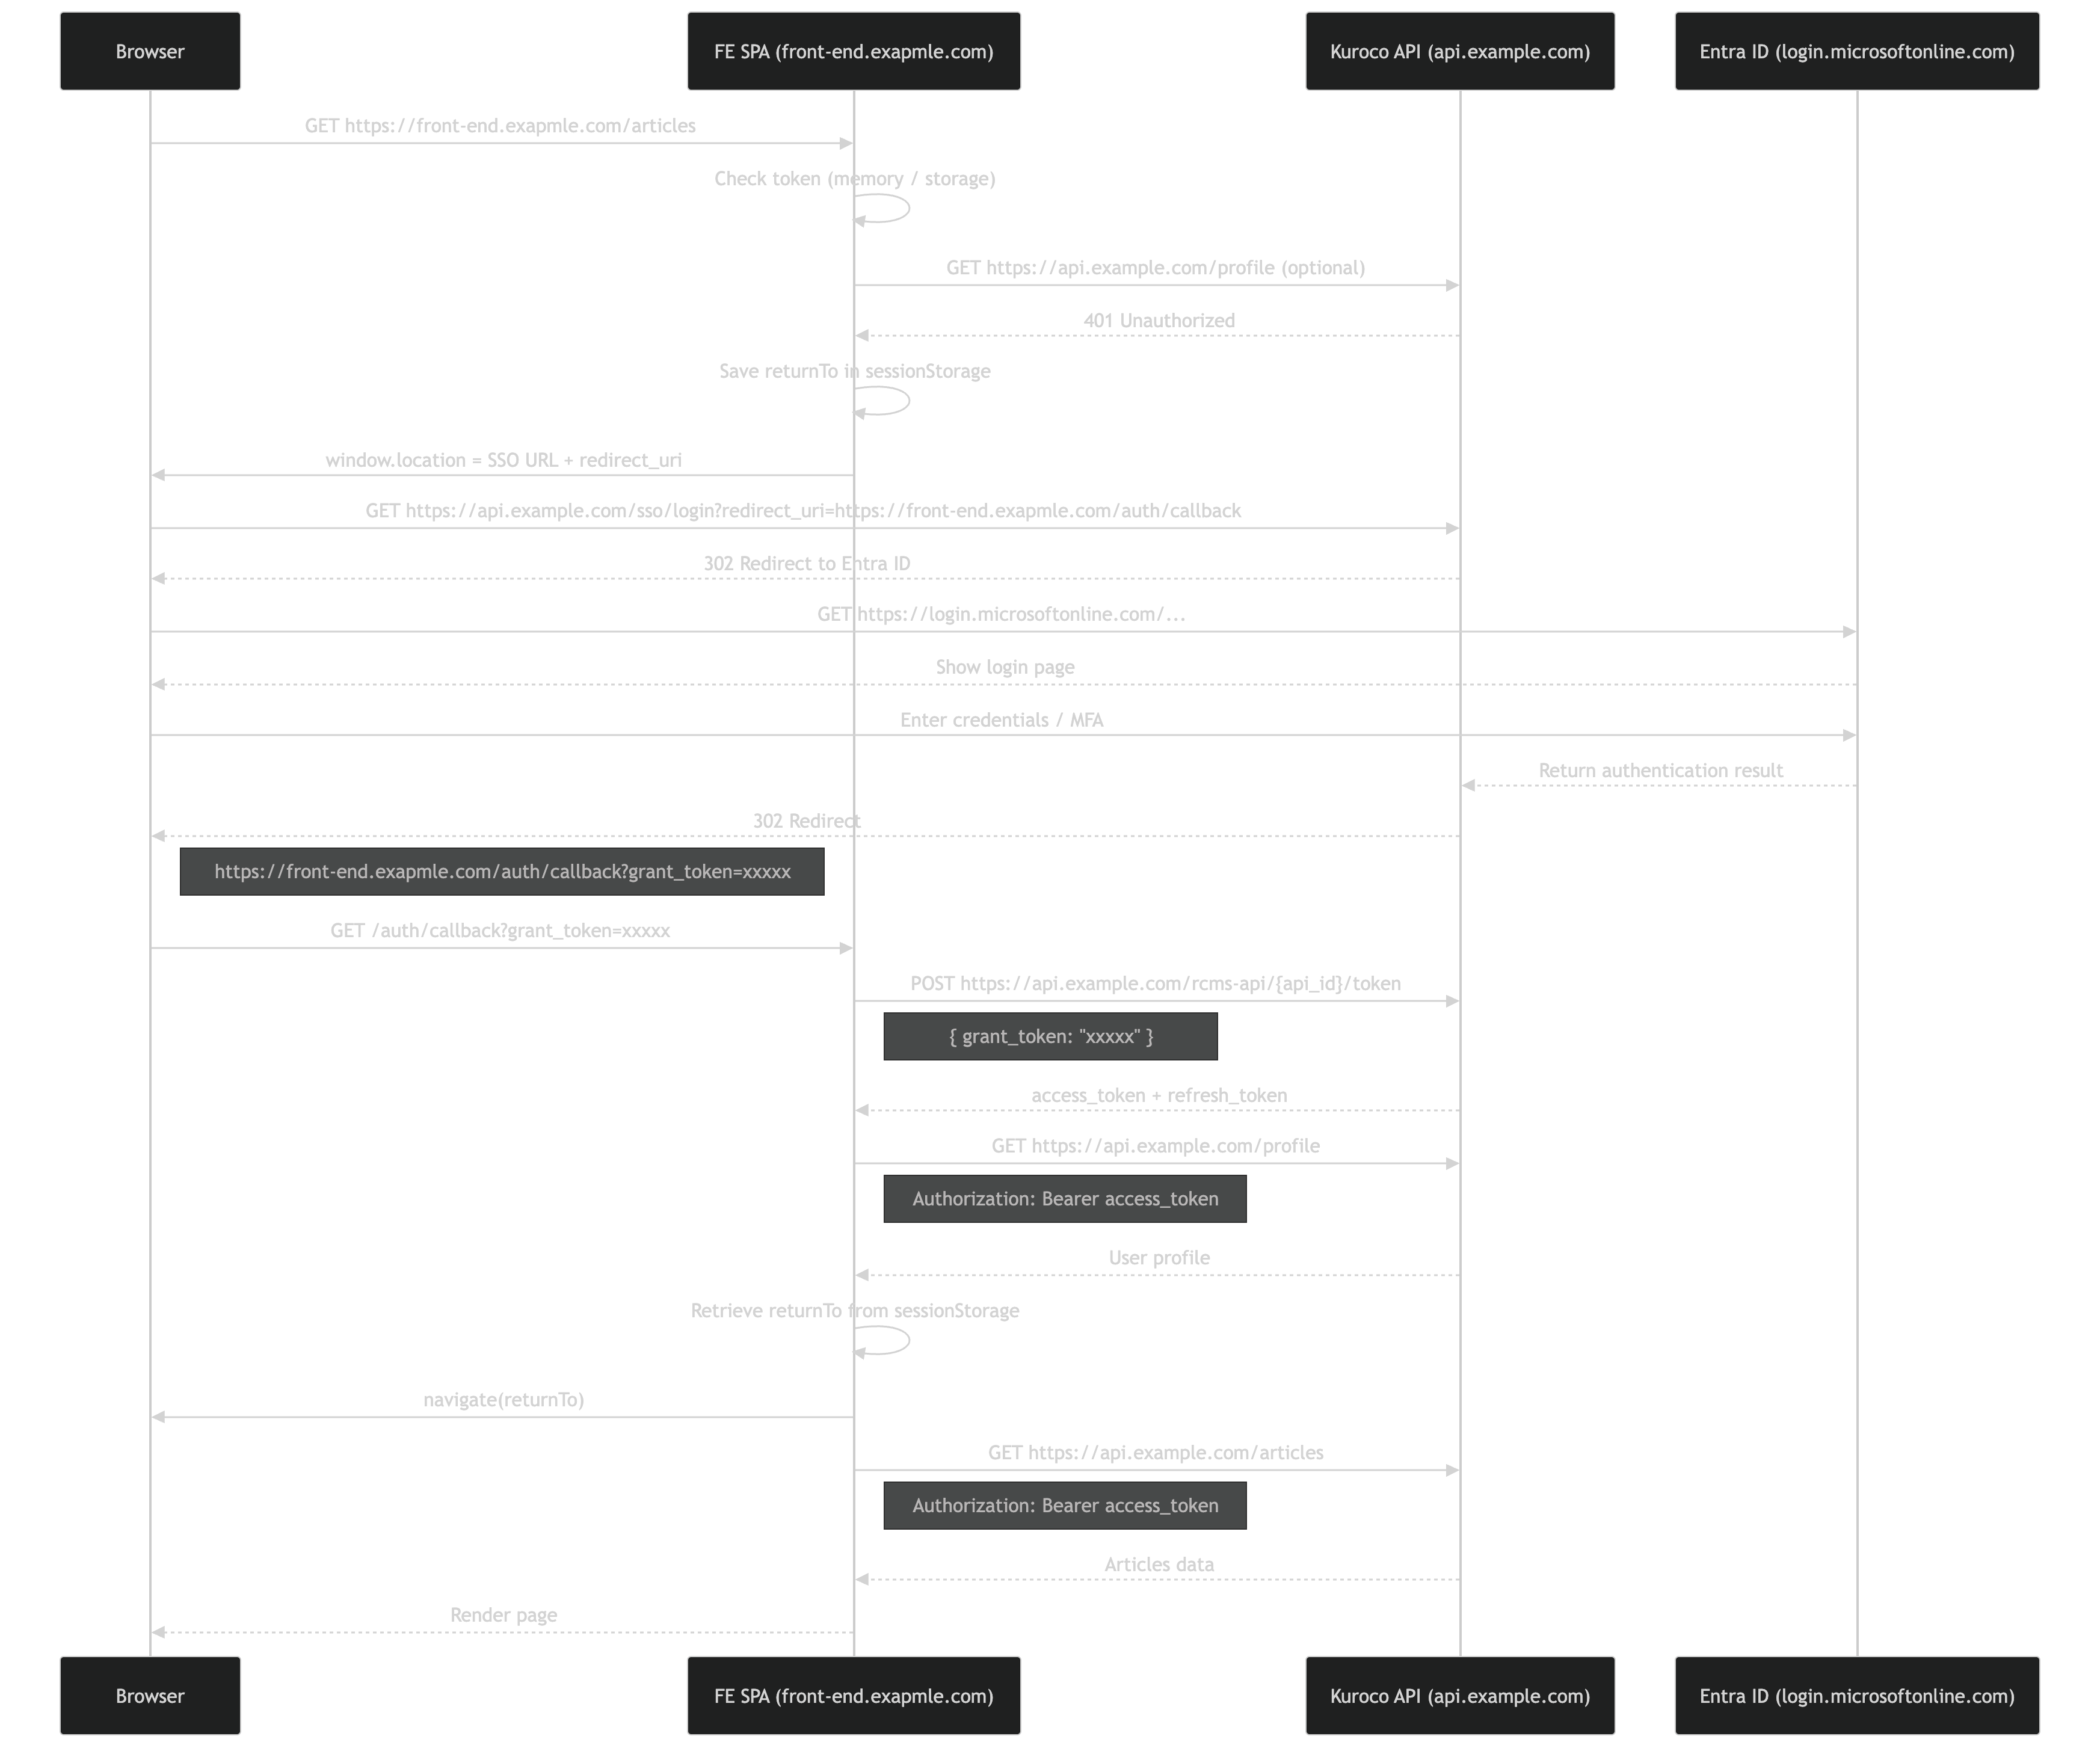
The sequence diagram below shows the complete flow using Microsoft Entra ID as the IdP. The same pattern applies to any SSO provider (OAuth SP, SAML SP, IDaaS SP) configured in Kuroco.
What You Will Learn
- How the SSO redirect flow works end-to-end
- How to save and restore the user's original URL across the SSO redirect
- How to exchange a
grant_tokenfor anaccess_token - How to confirm login and navigate back to the original page
Prerequisites
- A Kuroco project with SSO configured (OAuth SP, SAML SP, or IDaaS SP)
- An API with Dynamic Access Token security and a
tokenendpoint - A frontend SPA (React, Vue, Nuxt, Next.js, etc.)
If you have not yet configured SSO in Kuroco, please refer to the following tutorials first:
- Using Single Sign-On Login in Frontend
- Implementing SSO via OAuth authentication
- Use IDaaS to Implement Microsoft Entra External ID SSO
Flow Overview
The SSO login flow consists of the following steps:
- User accesses a protected page without authentication
- Frontend saves the current URL and redirects to Kuroco's SSO login endpoint
- Kuroco redirects the browser to the external IdP (e.g., Entra ID)
- User authenticates with the IdP
- IdP returns the result to Kuroco, which redirects to the frontend callback URL with a
grant_token - Frontend exchanges the
grant_tokenfor anaccess_tokenandrefresh_token - Frontend confirms login by calling the profile endpoint
- Frontend navigates the user back to their original page
Implementation
Step 1: Detect unauthenticated state
When a user accesses a protected page, check whether they have a valid token. If not, save their current URL so they can be redirected back after login.
const currentPath = window.location.pathname + window.location.search

if (!accessToken) {
  sessionStorage.setItem("post_login_redirect", currentPath)
}
Use sessionStorage instead of localStorage for the redirect URL. It is automatically cleared when the browser tab is closed, which is more appropriate for transient login state.
Step 2: Redirect to SSO login
Redirect the user to Kuroco's SSO login endpoint. The redirect_uri parameter specifies the callback URL where Kuroco will return the user after authentication.
const KUROCO_API = "https://api.example.com"
const CALLBACK_URL = "https://front-end.example.com/auth/callback"

const redirectUri = encodeURIComponent(CALLBACK_URL)
window.location.href = `${KUROCO_API}/sso/login?redirect_uri=${redirectUri}`
The redirect_uri must be a fixed, pre-registered URL. Do not dynamically change it — this is a security requirement. Store the user's actual return destination in sessionStorage instead (as shown in Step 1).
Step 3: Handle the callback
Create a callback page (e.g., /auth/callback) that extracts the grant_token from the URL query parameters.
const params = new URLSearchParams(window.location.search)
const grantToken = params.get("grant_token")

if (!grantToken) {
  // Handle error: redirect to login page or show error
  throw new Error("grant_token not found in callback URL")
}
Step 4: Exchange grant_token for access_token
Send the grant_token to Kuroco's token endpoint to obtain an access_token and refresh_token.
const response = await fetch(
  `${KUROCO_API}/rcms-api/{api_id}/token`,
  {
    method: "POST",
    headers: {
      "Content-Type": "application/json",
    },
    body: JSON.stringify({ grant_token: grantToken }),
  }
)

const data = await response.json()
const { access_token, refresh_token } = data
The grant_token is a one-time-use, short-lived token. It is exposed in the URL, so it must be exchanged for an access token immediately and cannot be reused.
Step 5: Store tokens
Store the tokens securely. In-memory storage is recommended for SPAs.
// Store in memory or secure storage
setAccessToken(access_token)
setRefreshToken(refresh_token)
Step 6: Confirm login
Verify the login by calling the profile endpoint with the new access token.
const profileResponse = await fetch(`${KUROCO_API}/profile`, {
  headers: {
    Authorization: `Bearer ${access_token}`,
  },
})

const user = await profileResponse.json()
Step 7: Redirect to original page
Retrieve the saved URL from sessionStorage and navigate the user back to their original destination.
const redirectPath =
  sessionStorage.getItem("post_login_redirect") || "/"

sessionStorage.removeItem("post_login_redirect")

// Use your router's navigation (e.g., React Router, Vue Router)
navigate(redirectPath)
Token Refresh
When the access_token expires, use the refresh_token to obtain a new one. If the refresh also fails, redirect the user through the SSO flow again.
const refreshResponse = await fetch(
  `${KUROCO_API}/rcms-api/{api_id}/token`,
  {
    method: "POST",
    headers: {
      "Content-Type": "application/json",
    },
    body: JSON.stringify({ refresh_token: refreshToken }),
  }
)

if (!refreshResponse.ok) {
  // Refresh failed — restart SSO flow
  sessionStorage.setItem(
    "post_login_redirect",
    window.location.pathname + window.location.search
  )
  window.location.href = `${KUROCO_API}/sso/login?redirect_uri=${encodeURIComponent(CALLBACK_URL)}`
  return
}

const refreshData = await refreshResponse.json()
setAccessToken(refreshData.access_token)
Key Design Points
Fixed redirect_uri
The redirect_uri passed to the SSO login endpoint must always be the same fixed callback URL (e.g., https://front-end.example.com/auth/callback). The user's actual return destination is managed separately on the frontend using sessionStorage.
One API per authentication scope
In Kuroco, login sessions are scoped per API. If you use SSO login, the user is only authenticated for the API that the SSO is configured against. Keep all endpoints that require authentication under a single API to avoid session issues.
grant_token security
The grant_token is:
- Exposed in the URL (as a query parameter)
- Valid for a single use only
- Short-lived (expires quickly)
Always exchange it for an access token immediately upon receiving it in the callback.
Related Documents
Support
If you have any other questions, please contact us or check out Our Slack Community.