Integrating with Microsoft Teams
This page explains how to set up a Kuroco Agent as a Microsoft Teams Bot.
Once the setup is complete, any message sent to the Bot in a Teams chat will be processed by the Managed Agent registered in Kuroco and replied to automatically.
Prerequisites
- Kuroco admin permissions
- An Azure subscription with permission to create Bot resources
- Microsoft 365 tenant admin permissions (required when installing the Teams app organization-wide)
Overview
① Register an app in Azure (obtain App ID and client secret)
         ↓
② Create an Azure Bot resource
         ↓
③ Enable Teams integration in Kuroco (enter App ID, etc., and create the Teams app package)
         ↓
④ Set the Kuroco URL as the Messaging endpoint in Azure Bot
         ↓
⑤ Add the Teams channel to the Azure Bot
         ↓
⑥ Install the Bot app in Teams
         ↓
⑦ Verify and configure the MCP server and teams_send endpoint in the Kuroco API
         ↓
⑧ Create a Managed Agent in Kuroco
         ↓
⑨ Create a Content Definition and configure Teams + AI Auto-Processing
Message flow:
Teams user sends a message
  → Azure Bot (Messaging endpoint: Kuroco URL)
  → Kuroco receives the message and saves it to the Content Definition
  → AI Auto-Processing triggers (automatically calls Managed Agent)
  → Managed Agent processes the message
  → teams_send (Kuroco MCP) replies in Teams
1. Register an app in Azure
Go to Azure Portal and sign in.
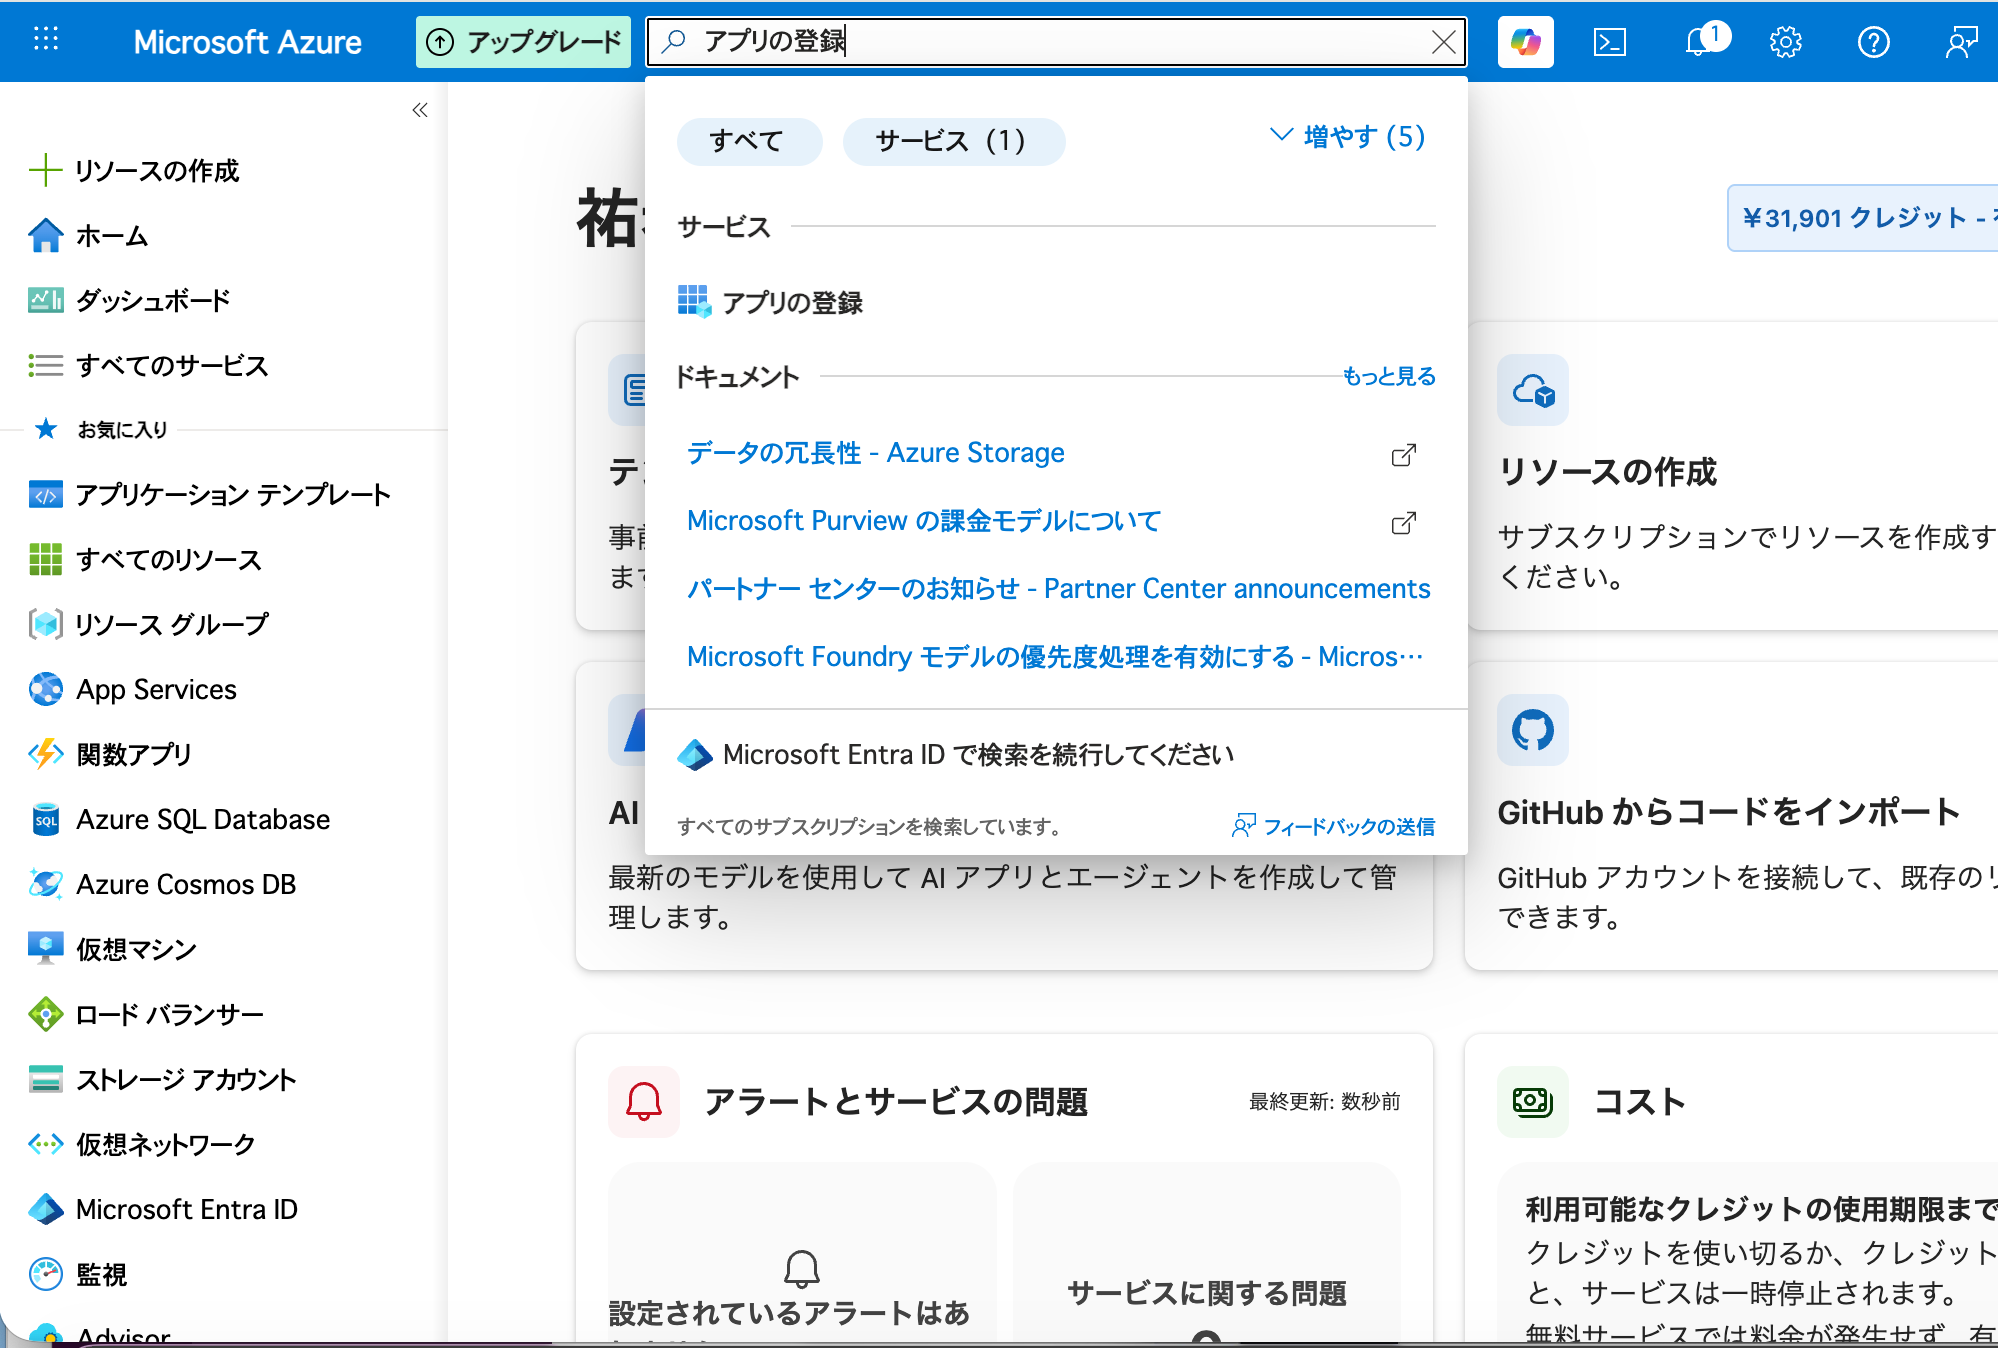
Type "App registrations" in the top search bar and select it.
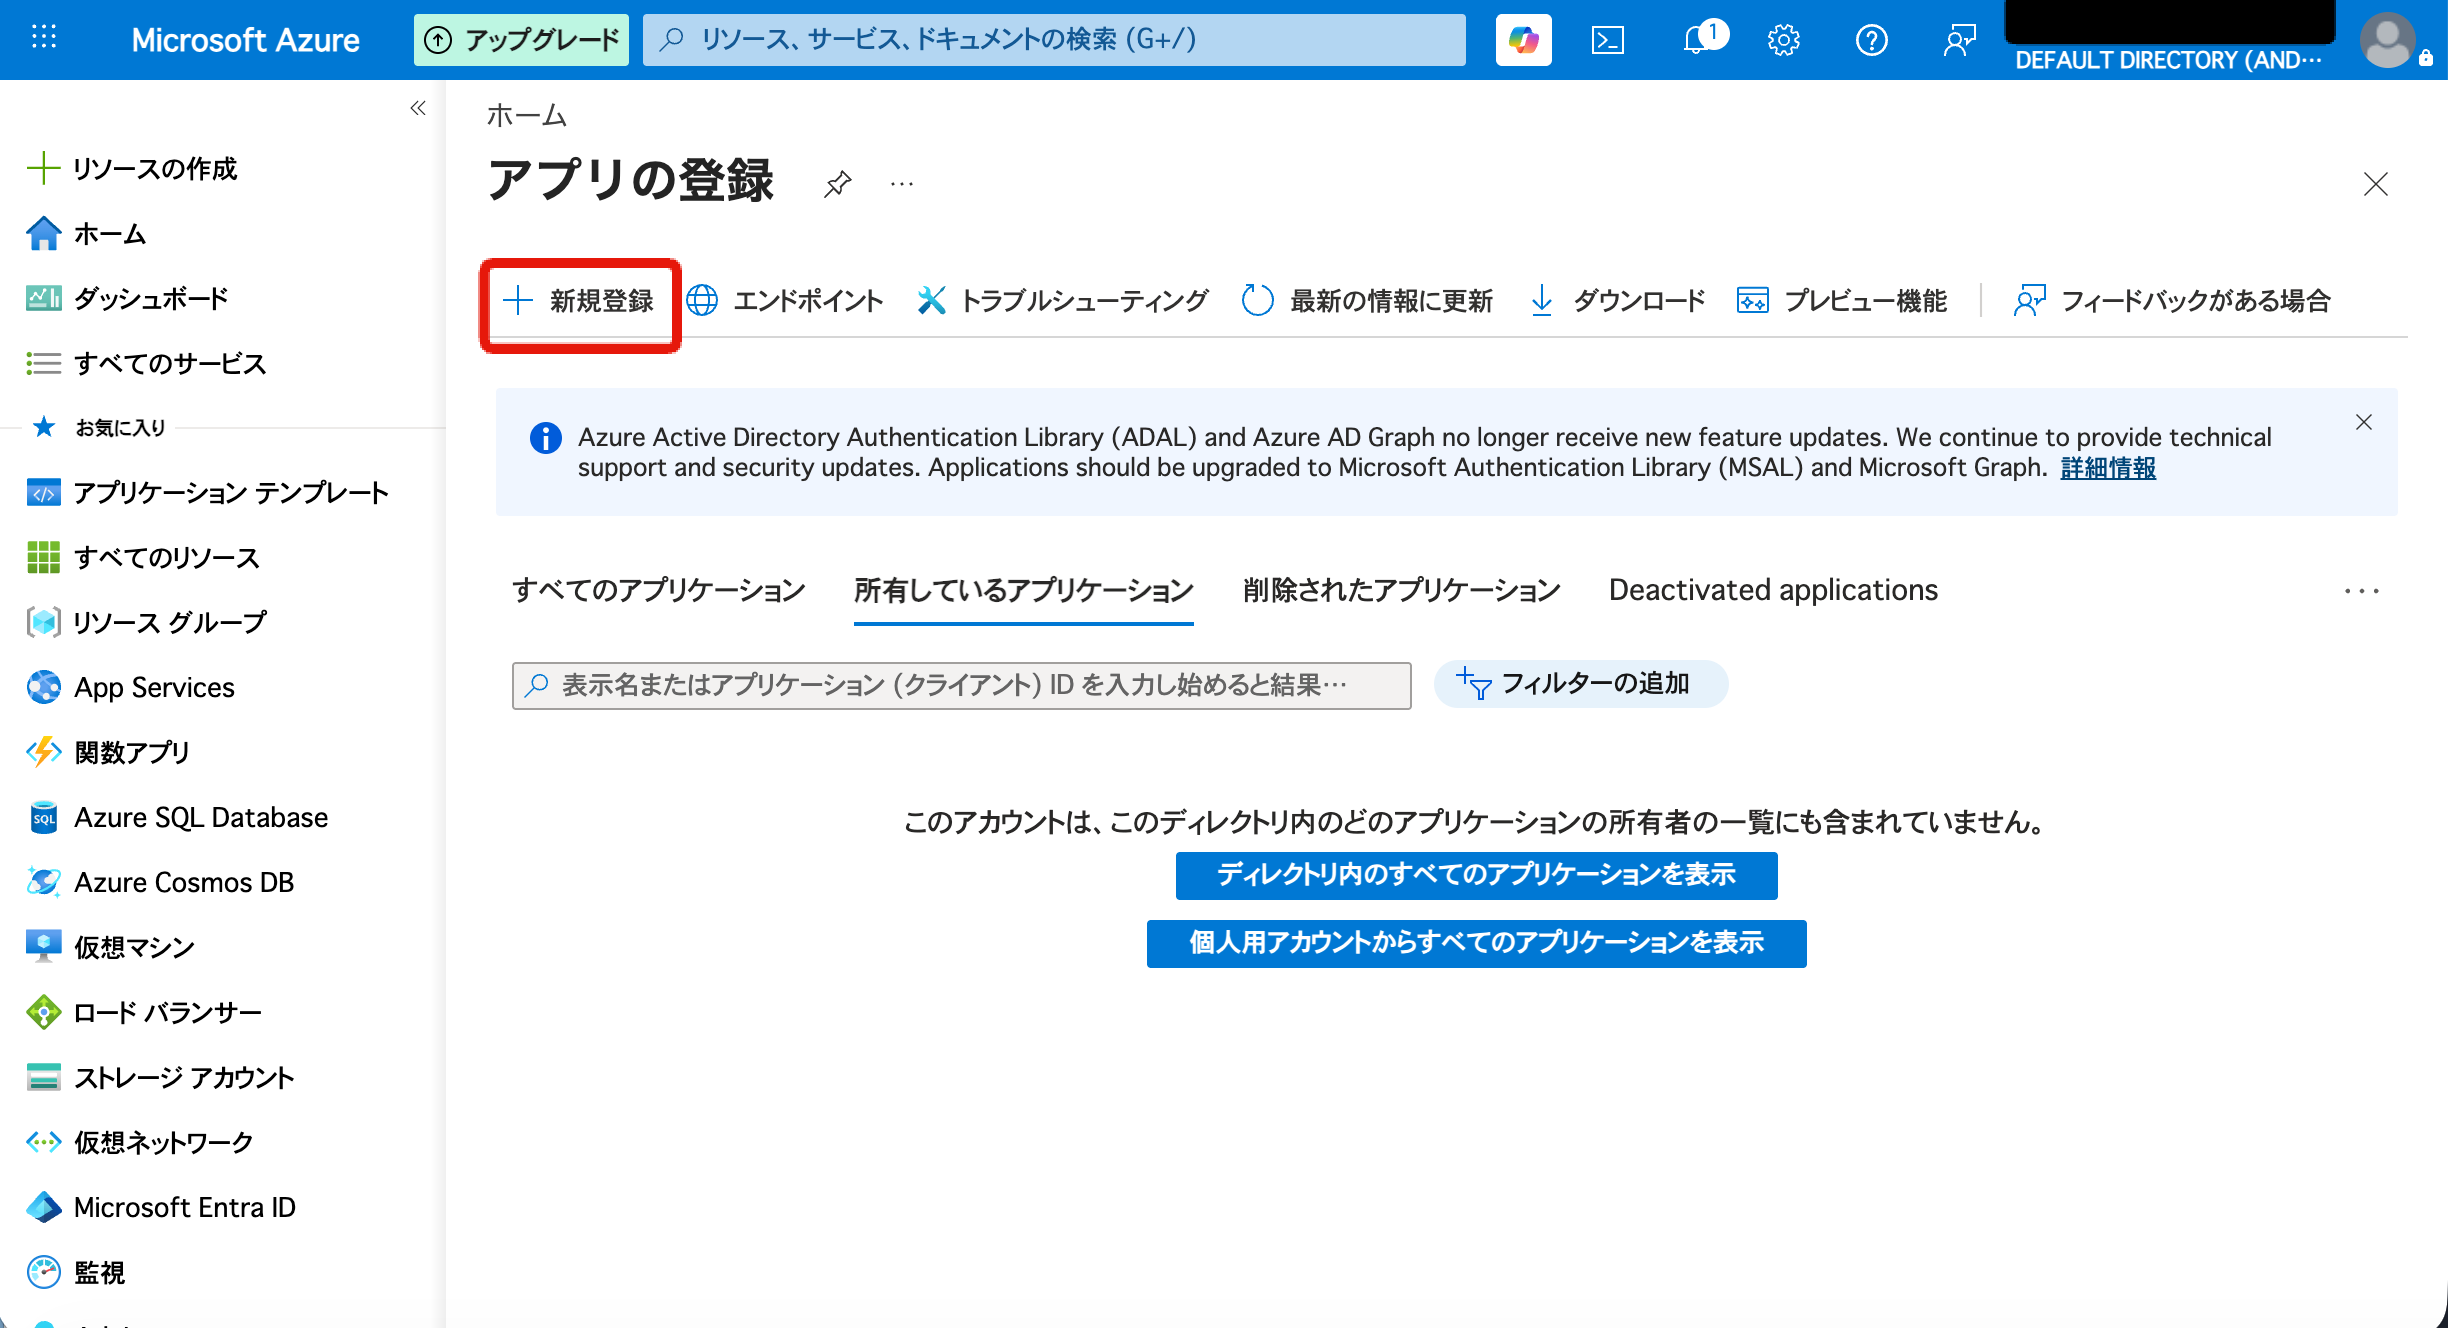
Click "+ New registration".
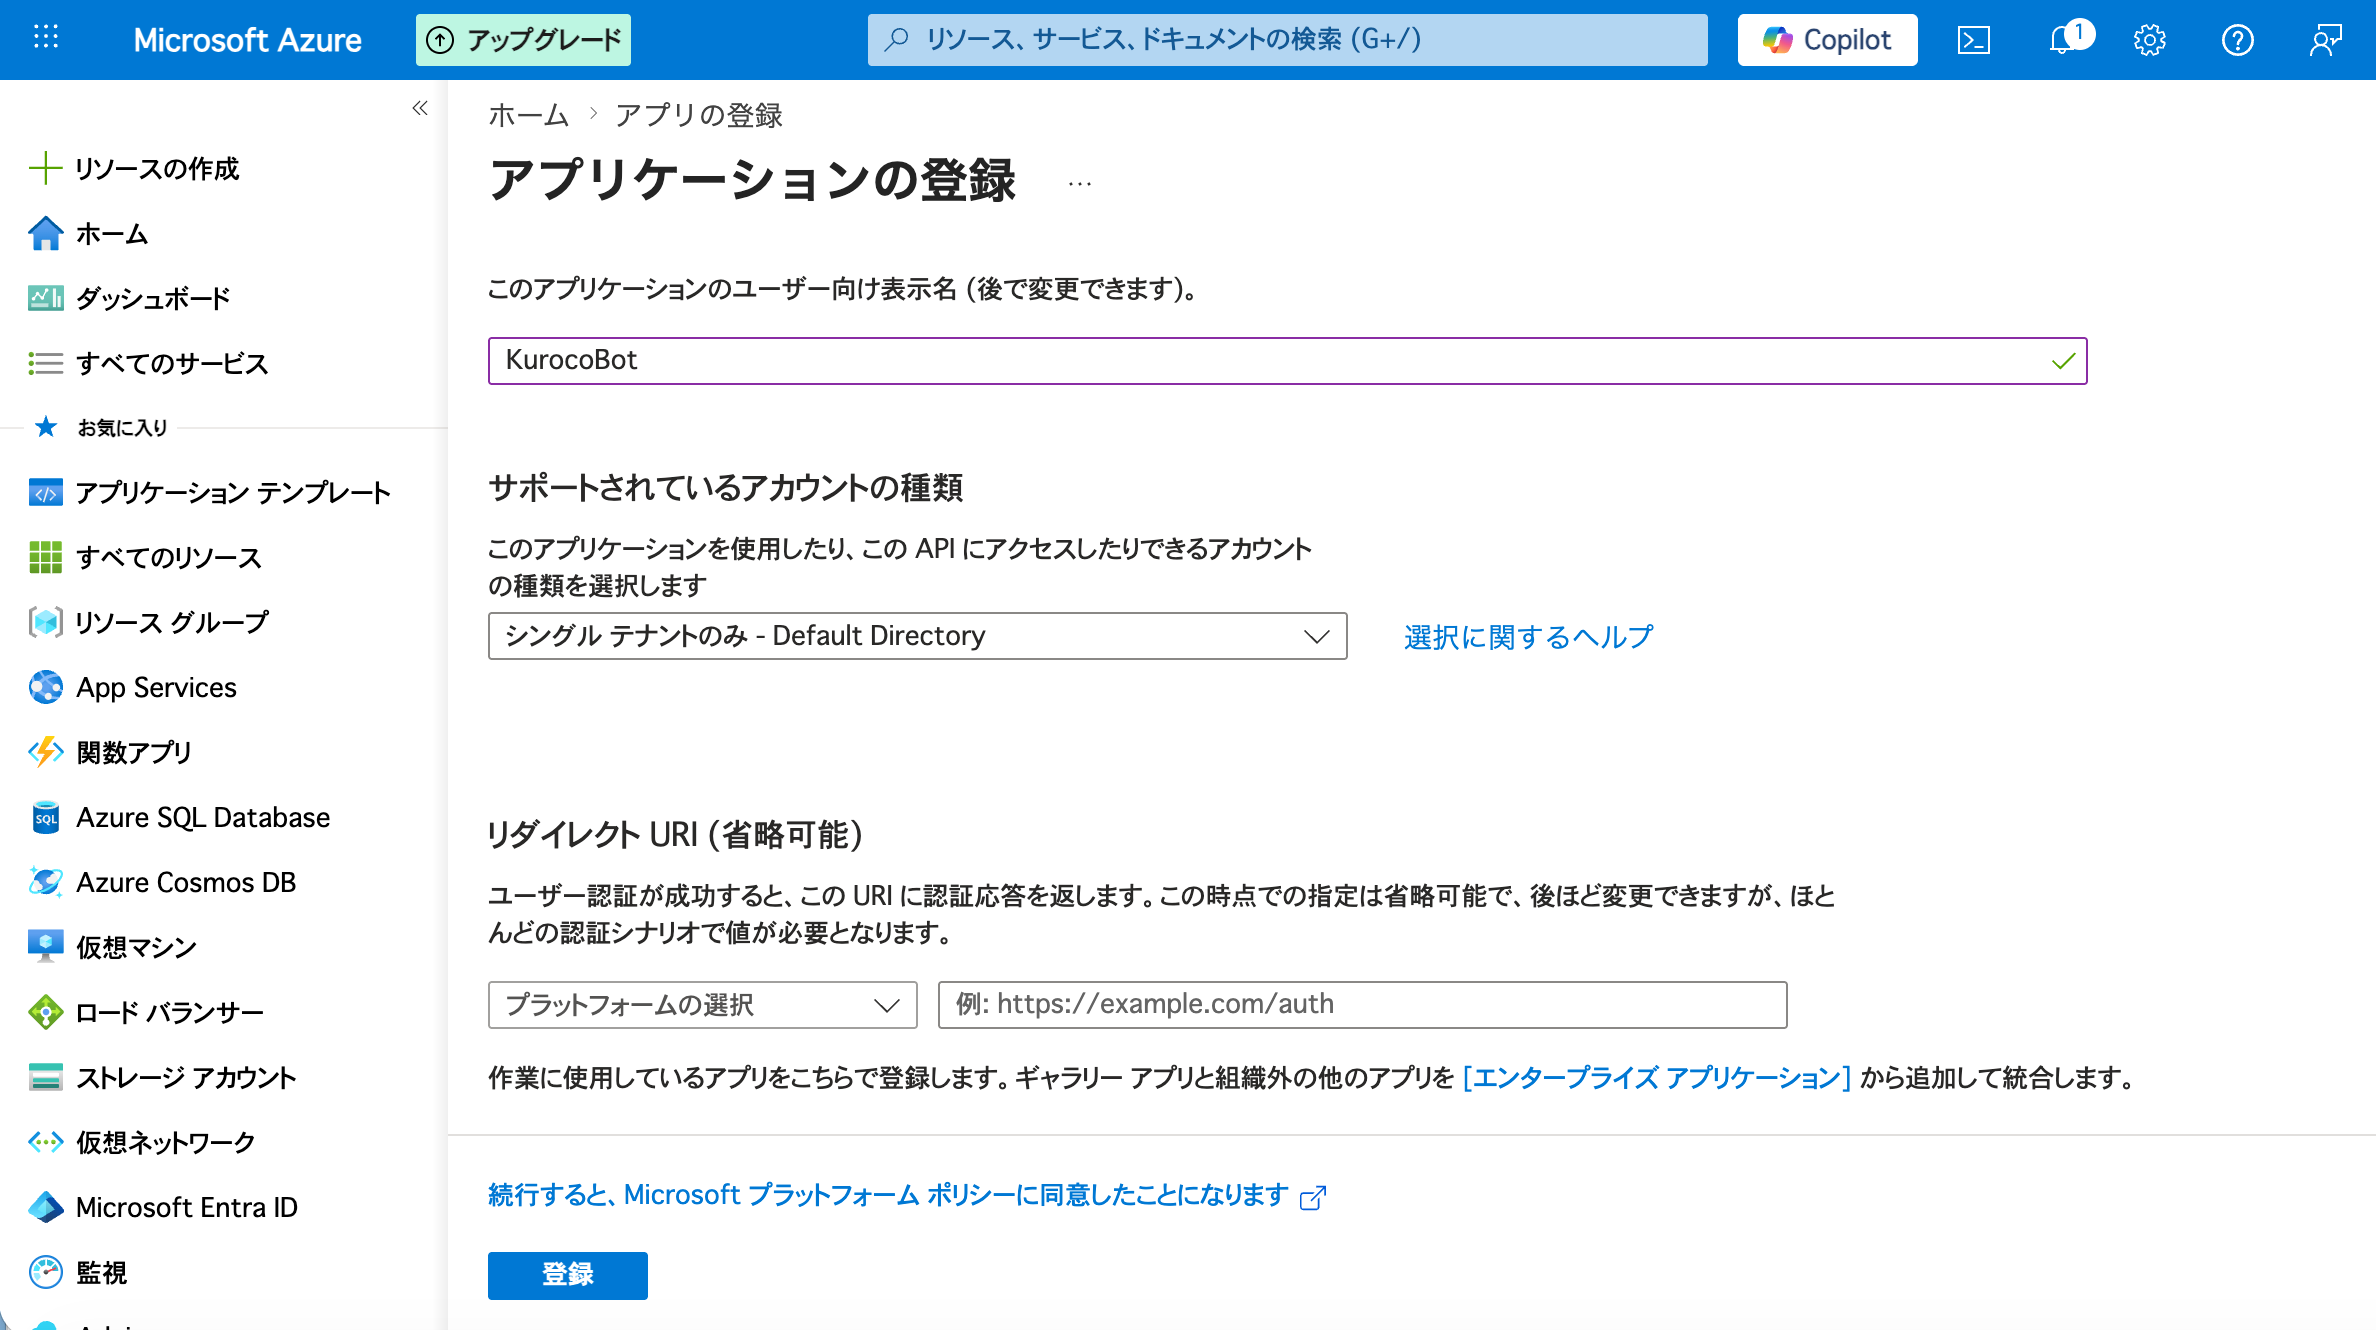
Fill in the following fields and click "Register".
| Field | Value |
|---|---|
| Name | Any name (e.g., KurocoBot) |
| Supported account types | See below |
| Redirect URI | Leave blank |
Select "Supported account types" based on your use case.
| Option | Description | Recommended scenario |
|---|---|---|
| Single tenant only | Only users in your own tenant can use it | Internal Bot (most common) |
| Multiple Entra ID tenants | Can be used across multiple organizations | Providing to multiple companies |
| Any Entra ID tenant + personal Microsoft accounts | Supports both organizational and personal accounts | Including external users |
| Personal accounts only | Personal Microsoft accounts only | Consumer-facing scenarios |
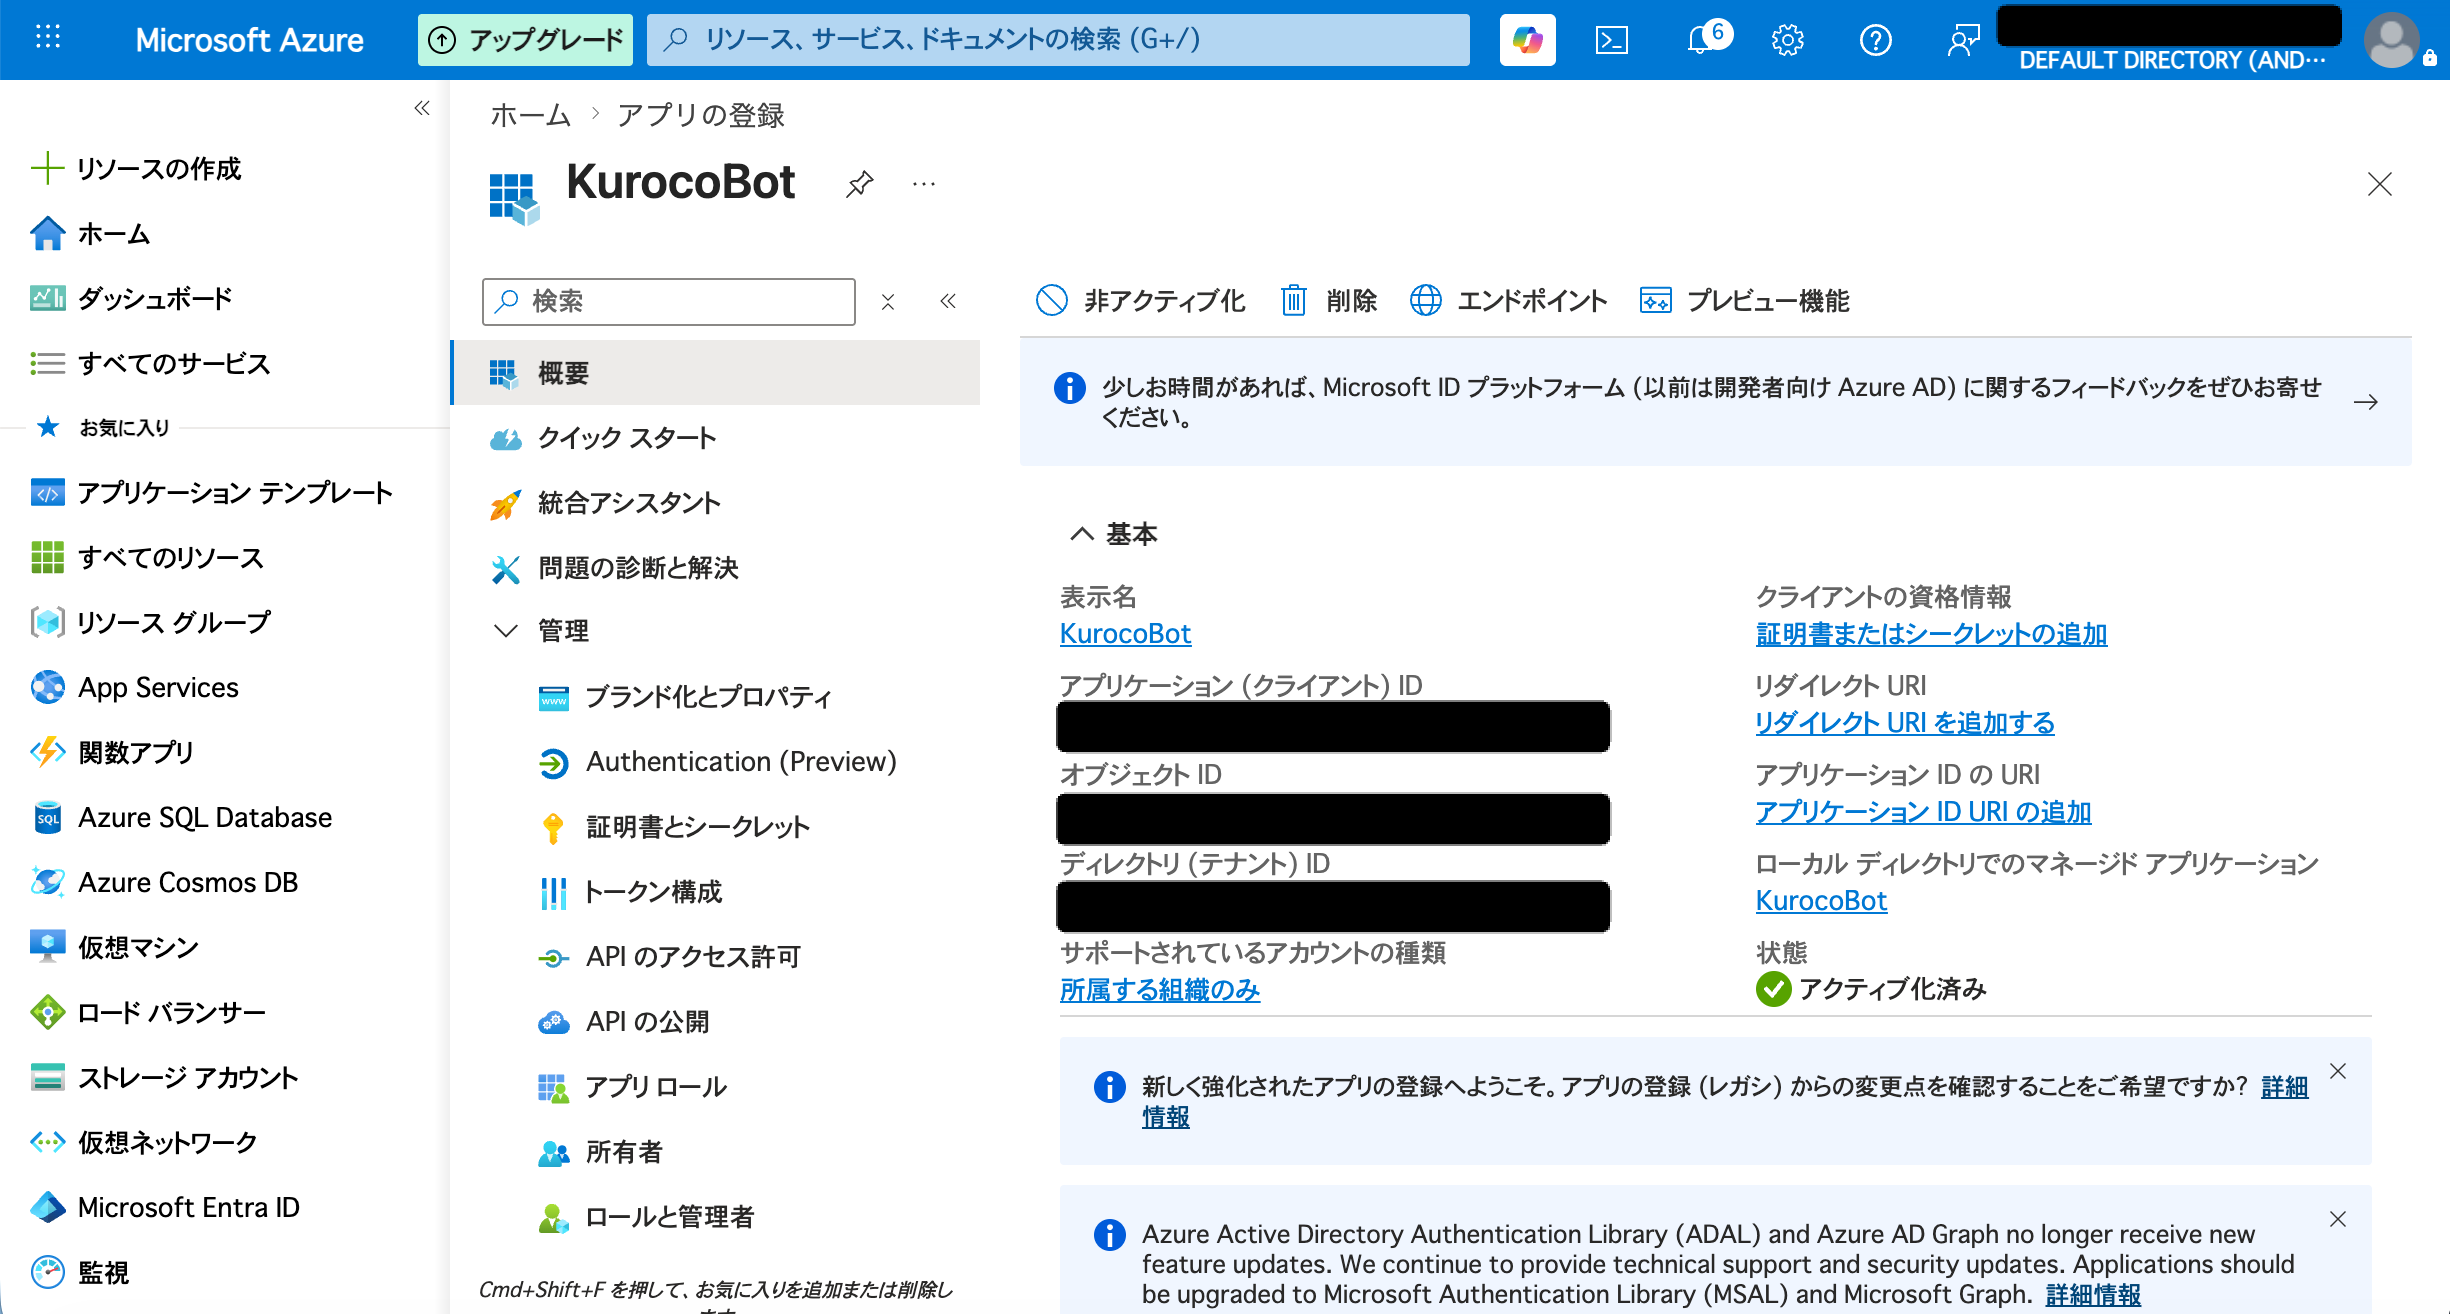
After registration, note the following values shown on the "Overview" screen. You will need them in Step 3 (creating the Azure Bot) and Step 4 (configuring Kuroco).
| Value to note | Location | Used in step |
|---|---|---|
| Application (client) ID | Top of the Overview page | Steps 3 and 4 |
| Directory (tenant) ID | Top of the Overview page | Steps 3 and 4 |
2. Create a client secret
Click "Certificates & secrets" in the left menu.
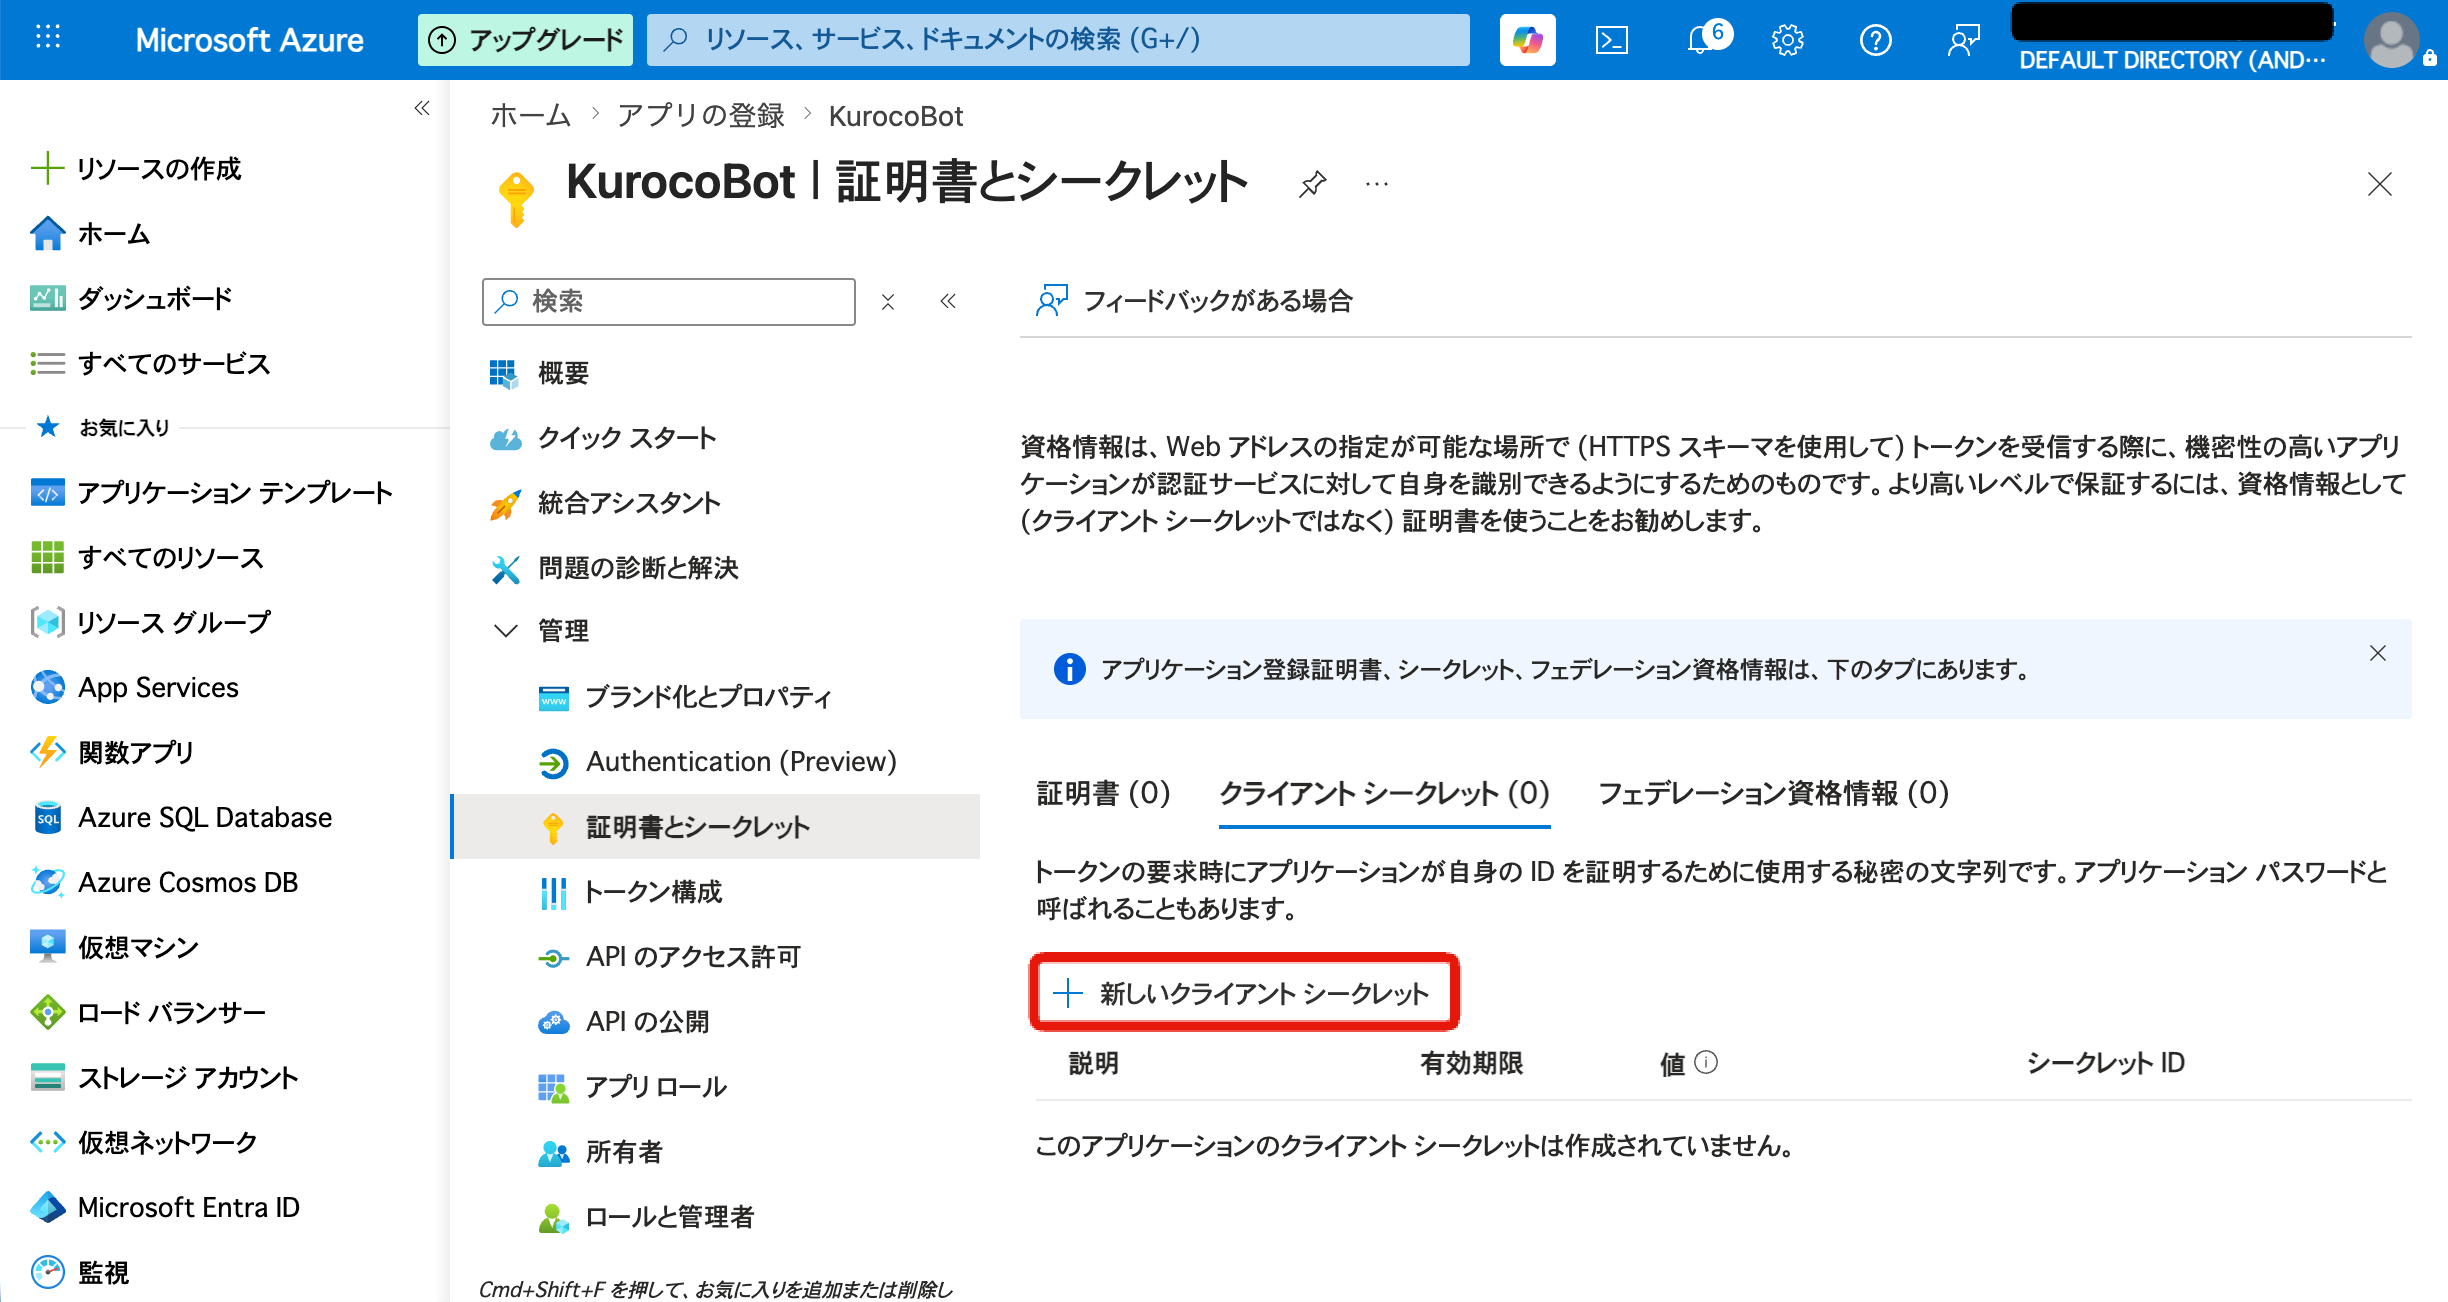
Click "+ New client secret".
Enter a description (e.g., kuroco-teams-bot), select an expiration period, and click "Add".
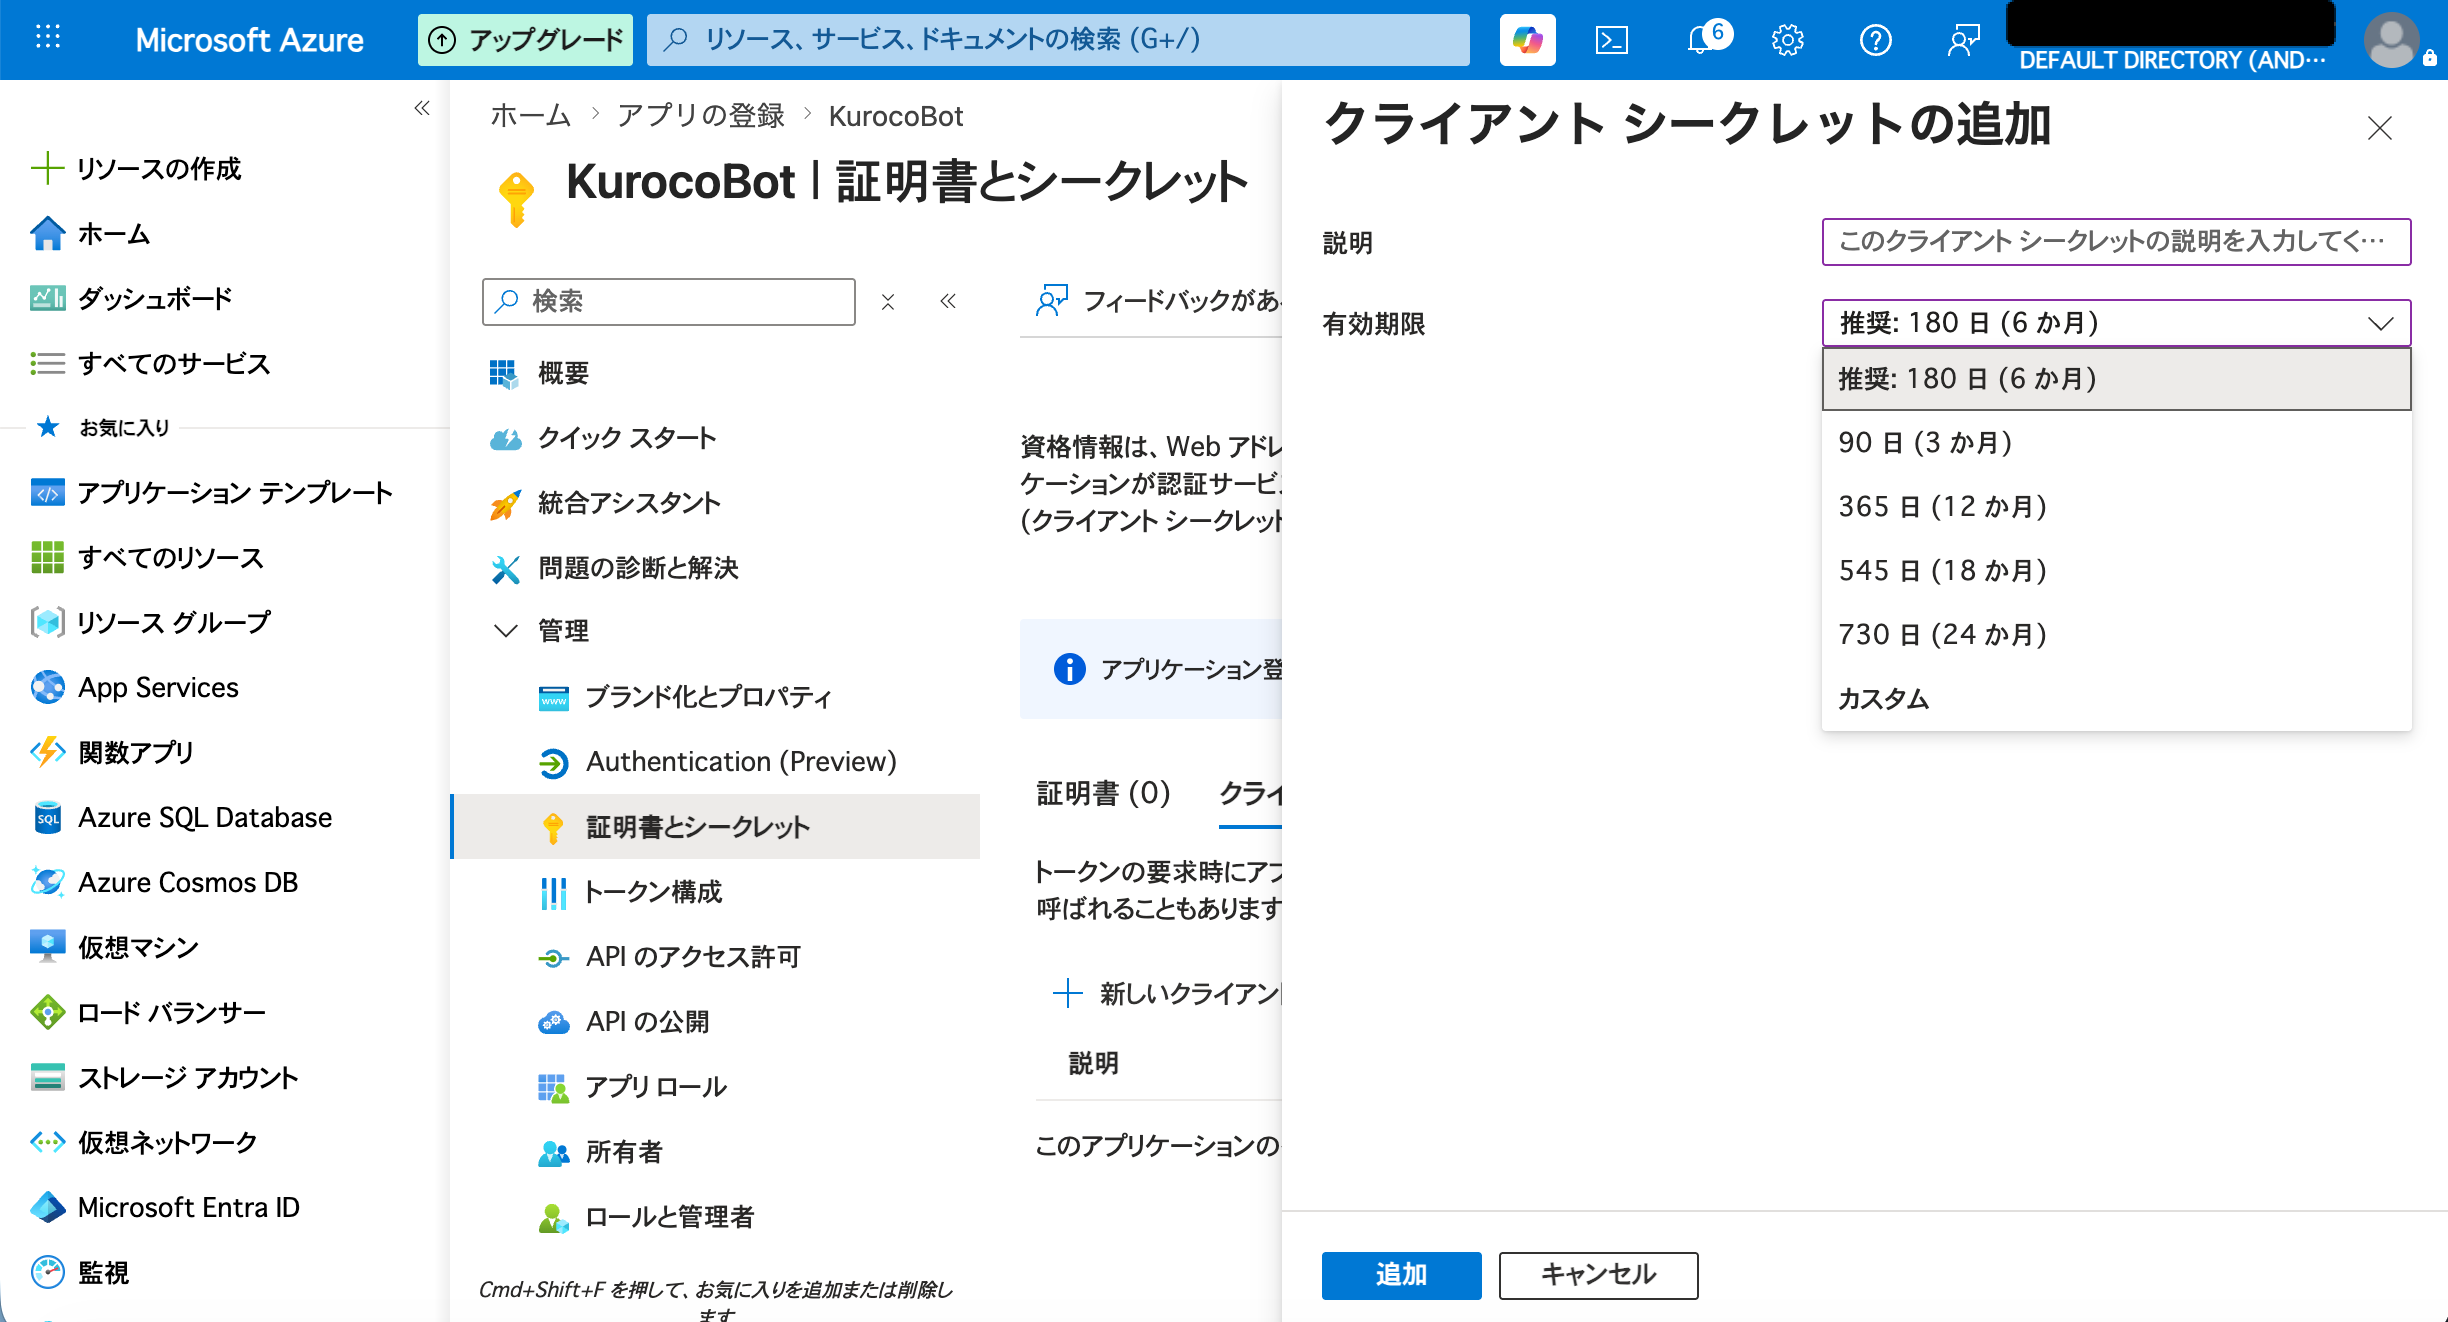
The default expiration is 180 days (6 months). When the secret expires, the Bot will stop working. For production use, set a longer expiration or establish a renewal process before it expires.
Copy the string in the "Value" column of the generated secret and store it in a safe place (e.g., a password manager or your organization's secret storage).
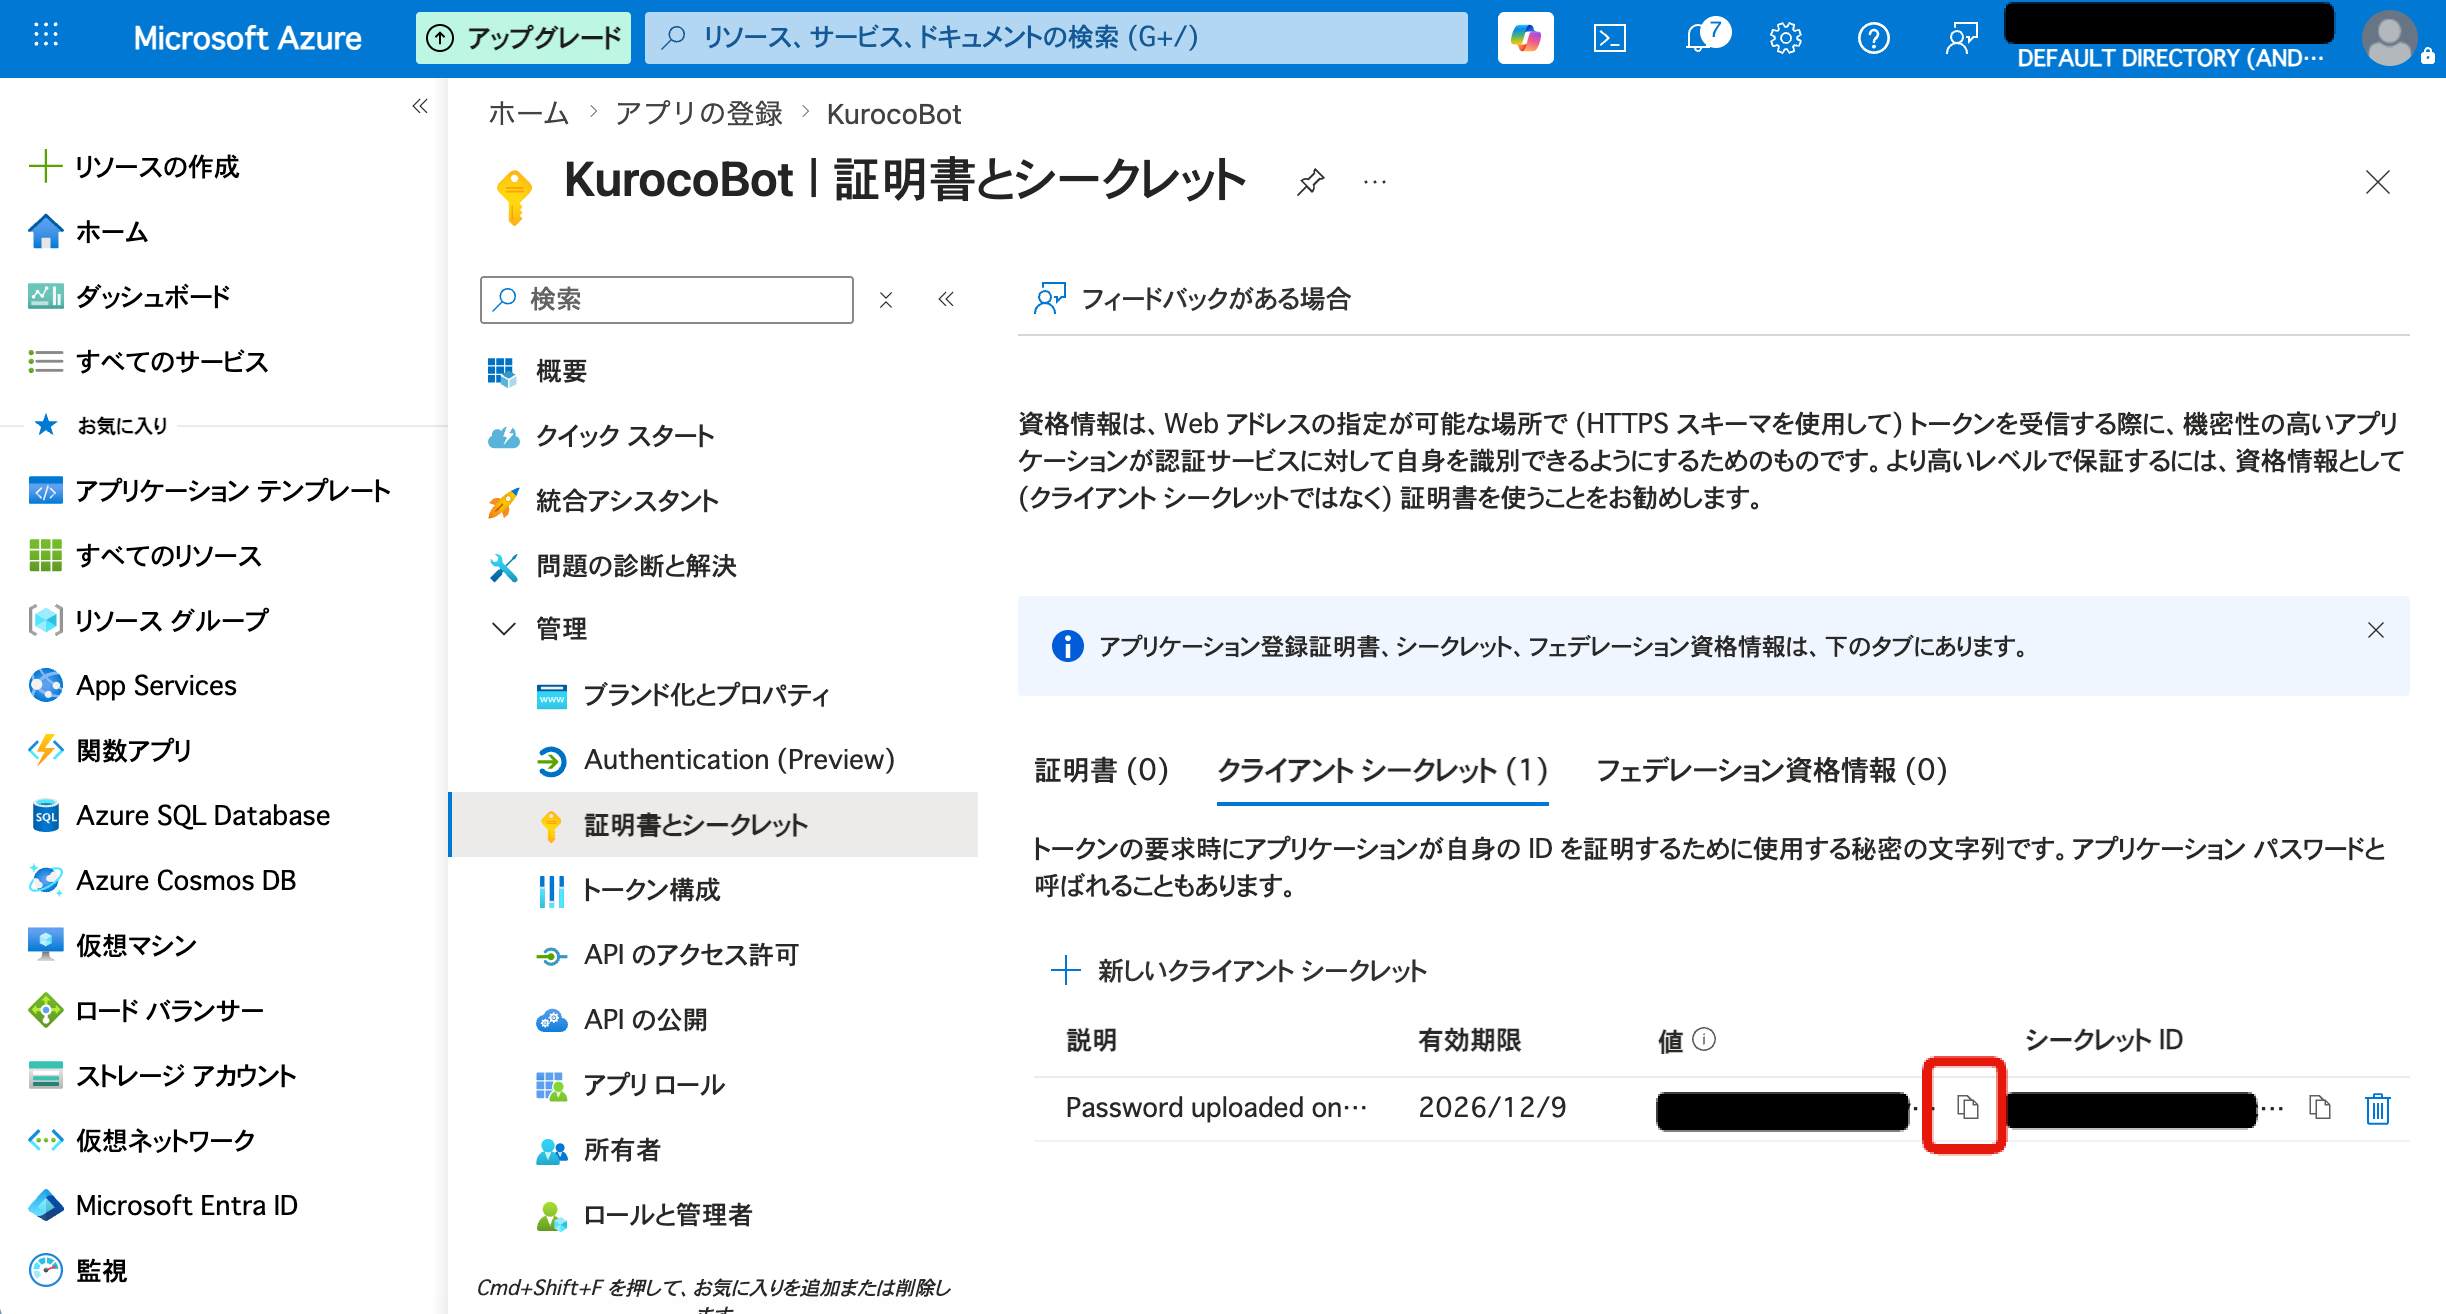
This secret value will not be displayed again once you close this screen. Copy it now.
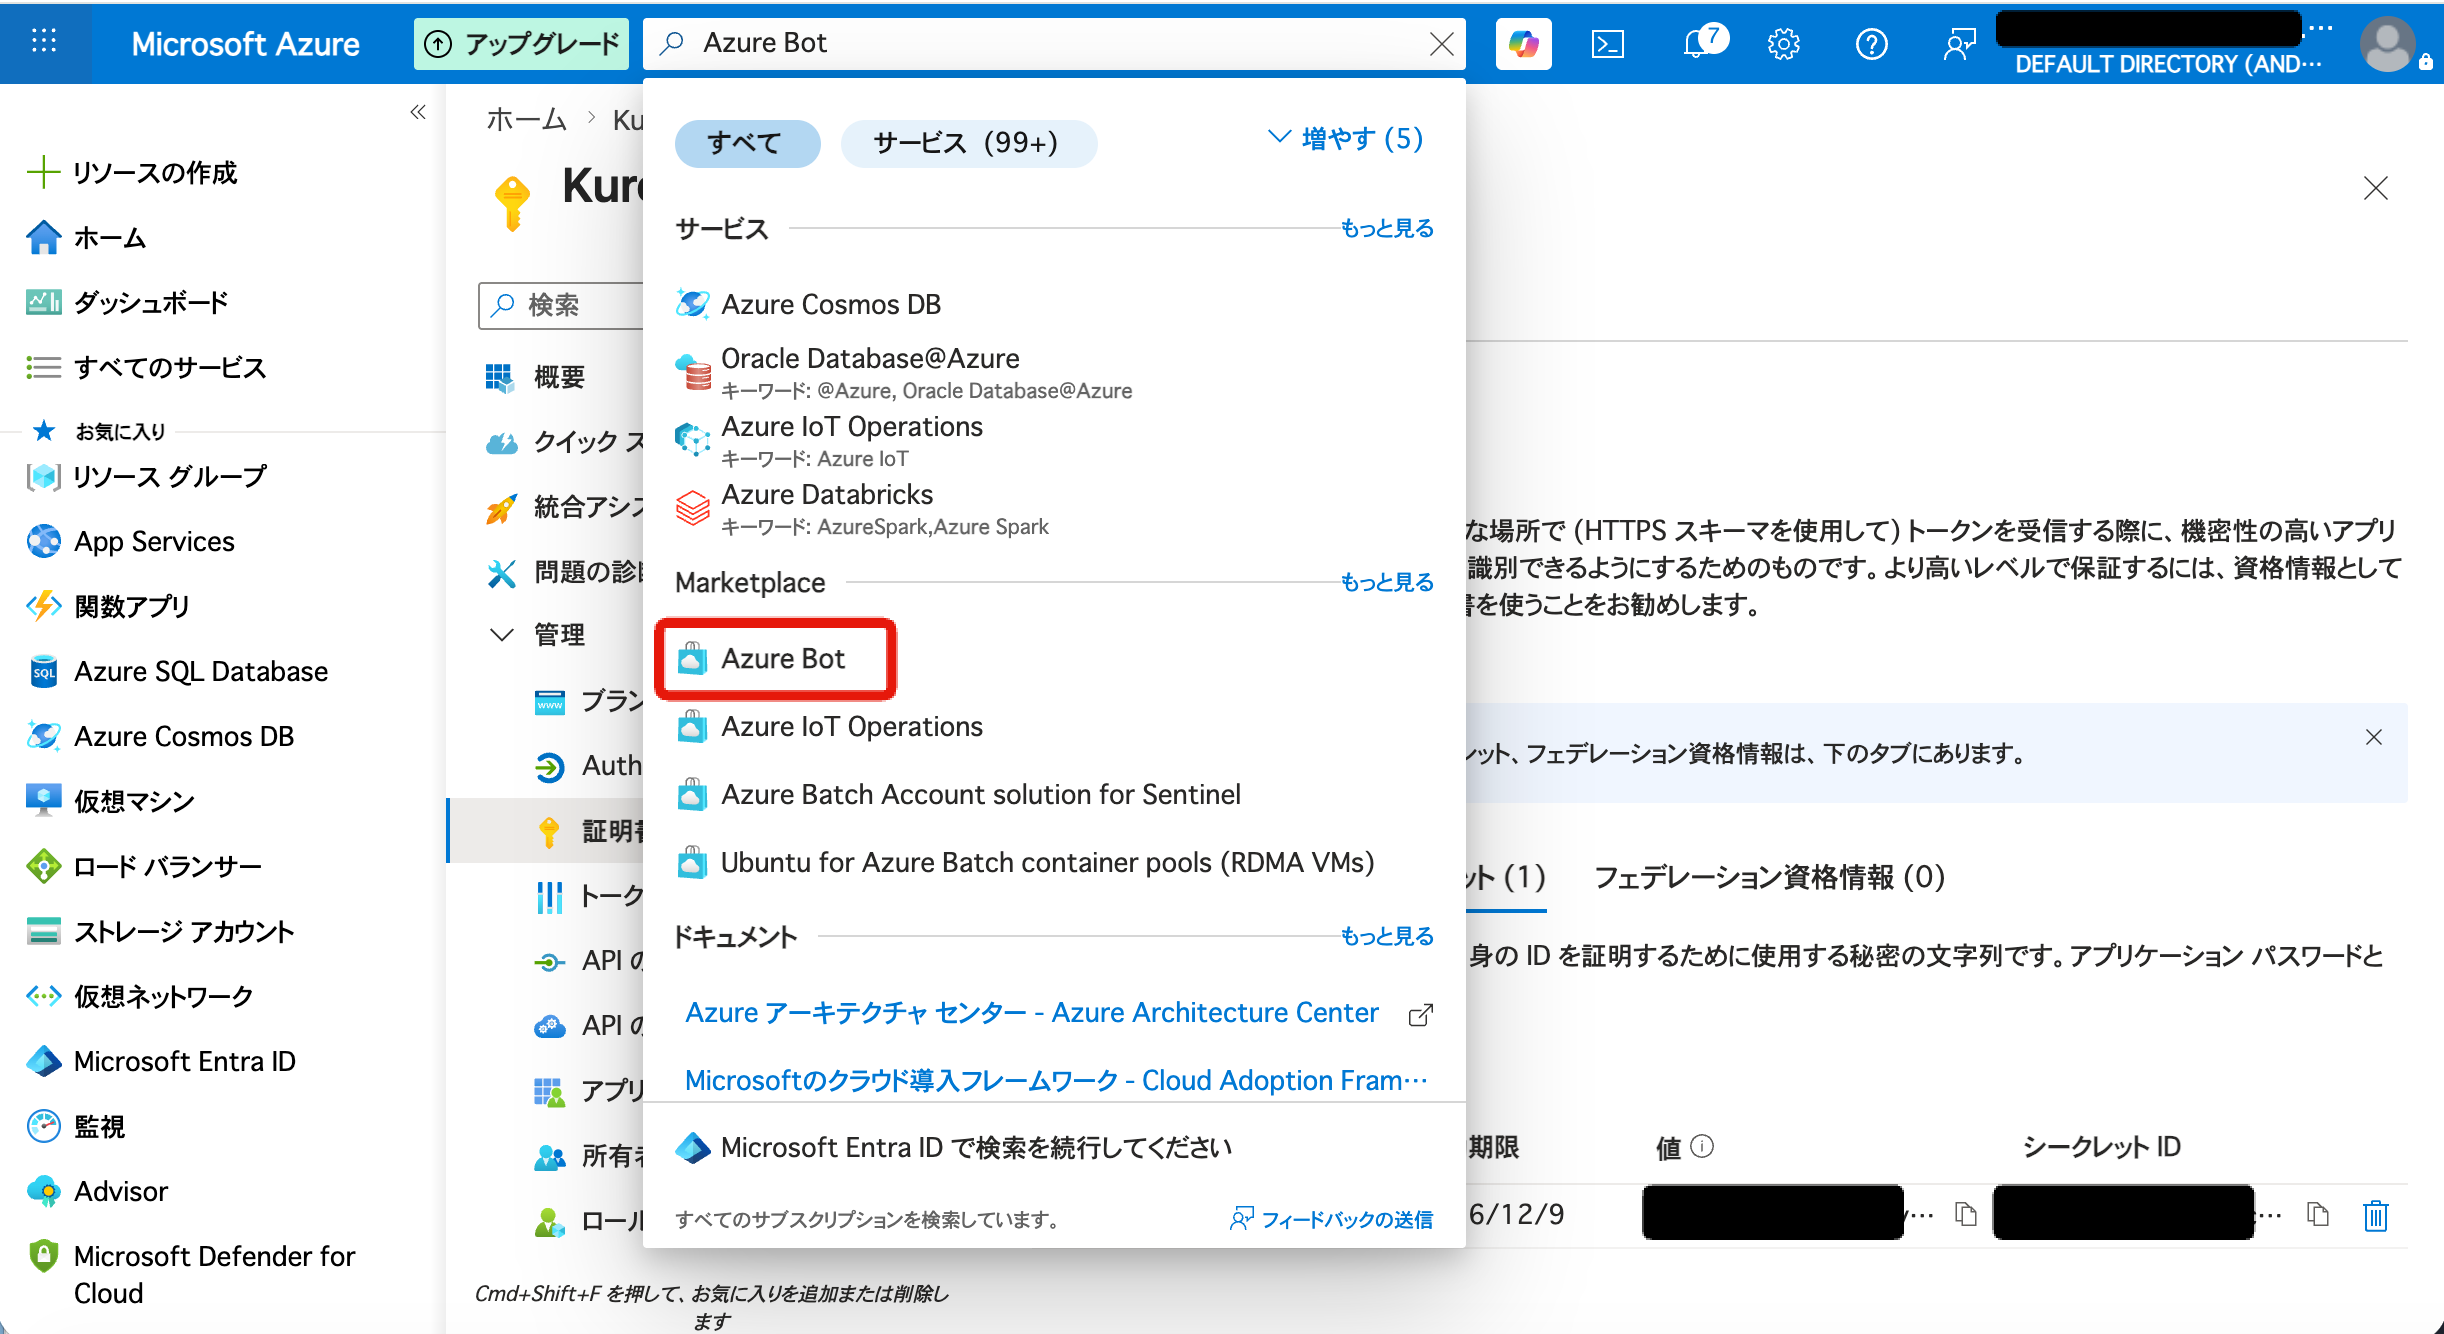
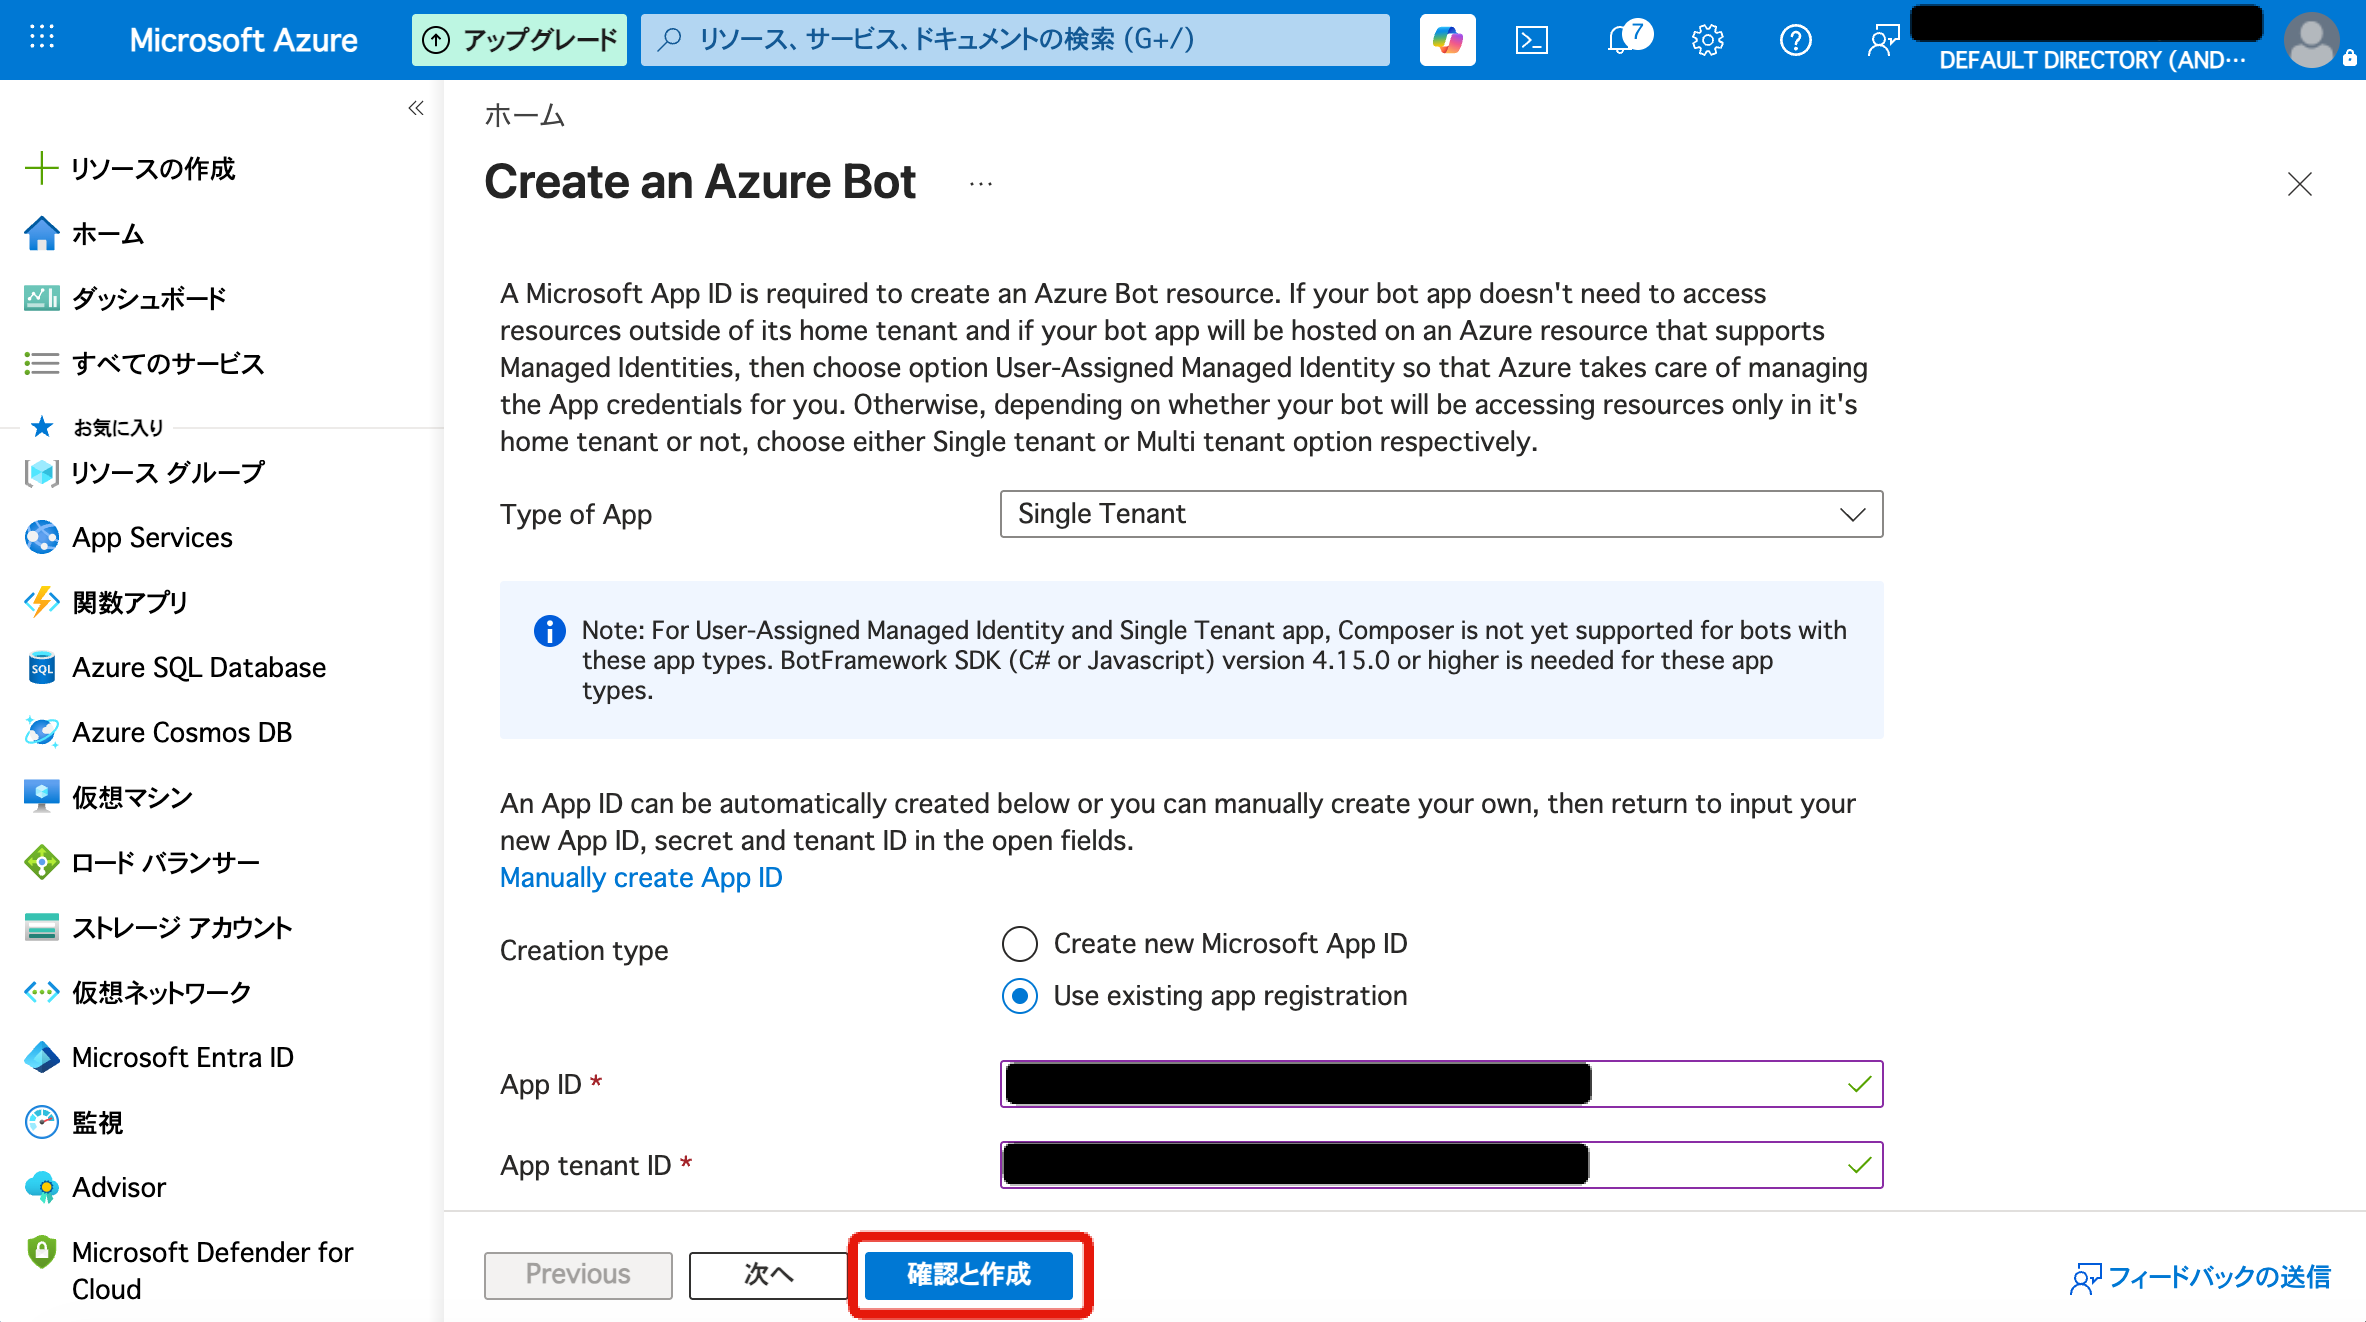
3. Create an Azure Bot resource
Type "Azure Bot" in the Azure Portal search bar. Select "Azure Bot" from the "Marketplace" section of the search results.
Click "+ Create".
On the "Basics" tab, fill in the following fields.
| Field | Value |
|---|---|
| Bot handle | Any name (e.g., KurocoBot) |
| Subscription | Select the subscription to use |
| Resource group | Select an existing one or click "Create new" |
| Data residency | Global (default) |
| Type of App | Single Tenant |
| Creation type | Use existing app registration |
| App ID | Application (client) ID noted in Step 1 |
| App tenant ID | Directory (tenant) ID noted in Step 1 |
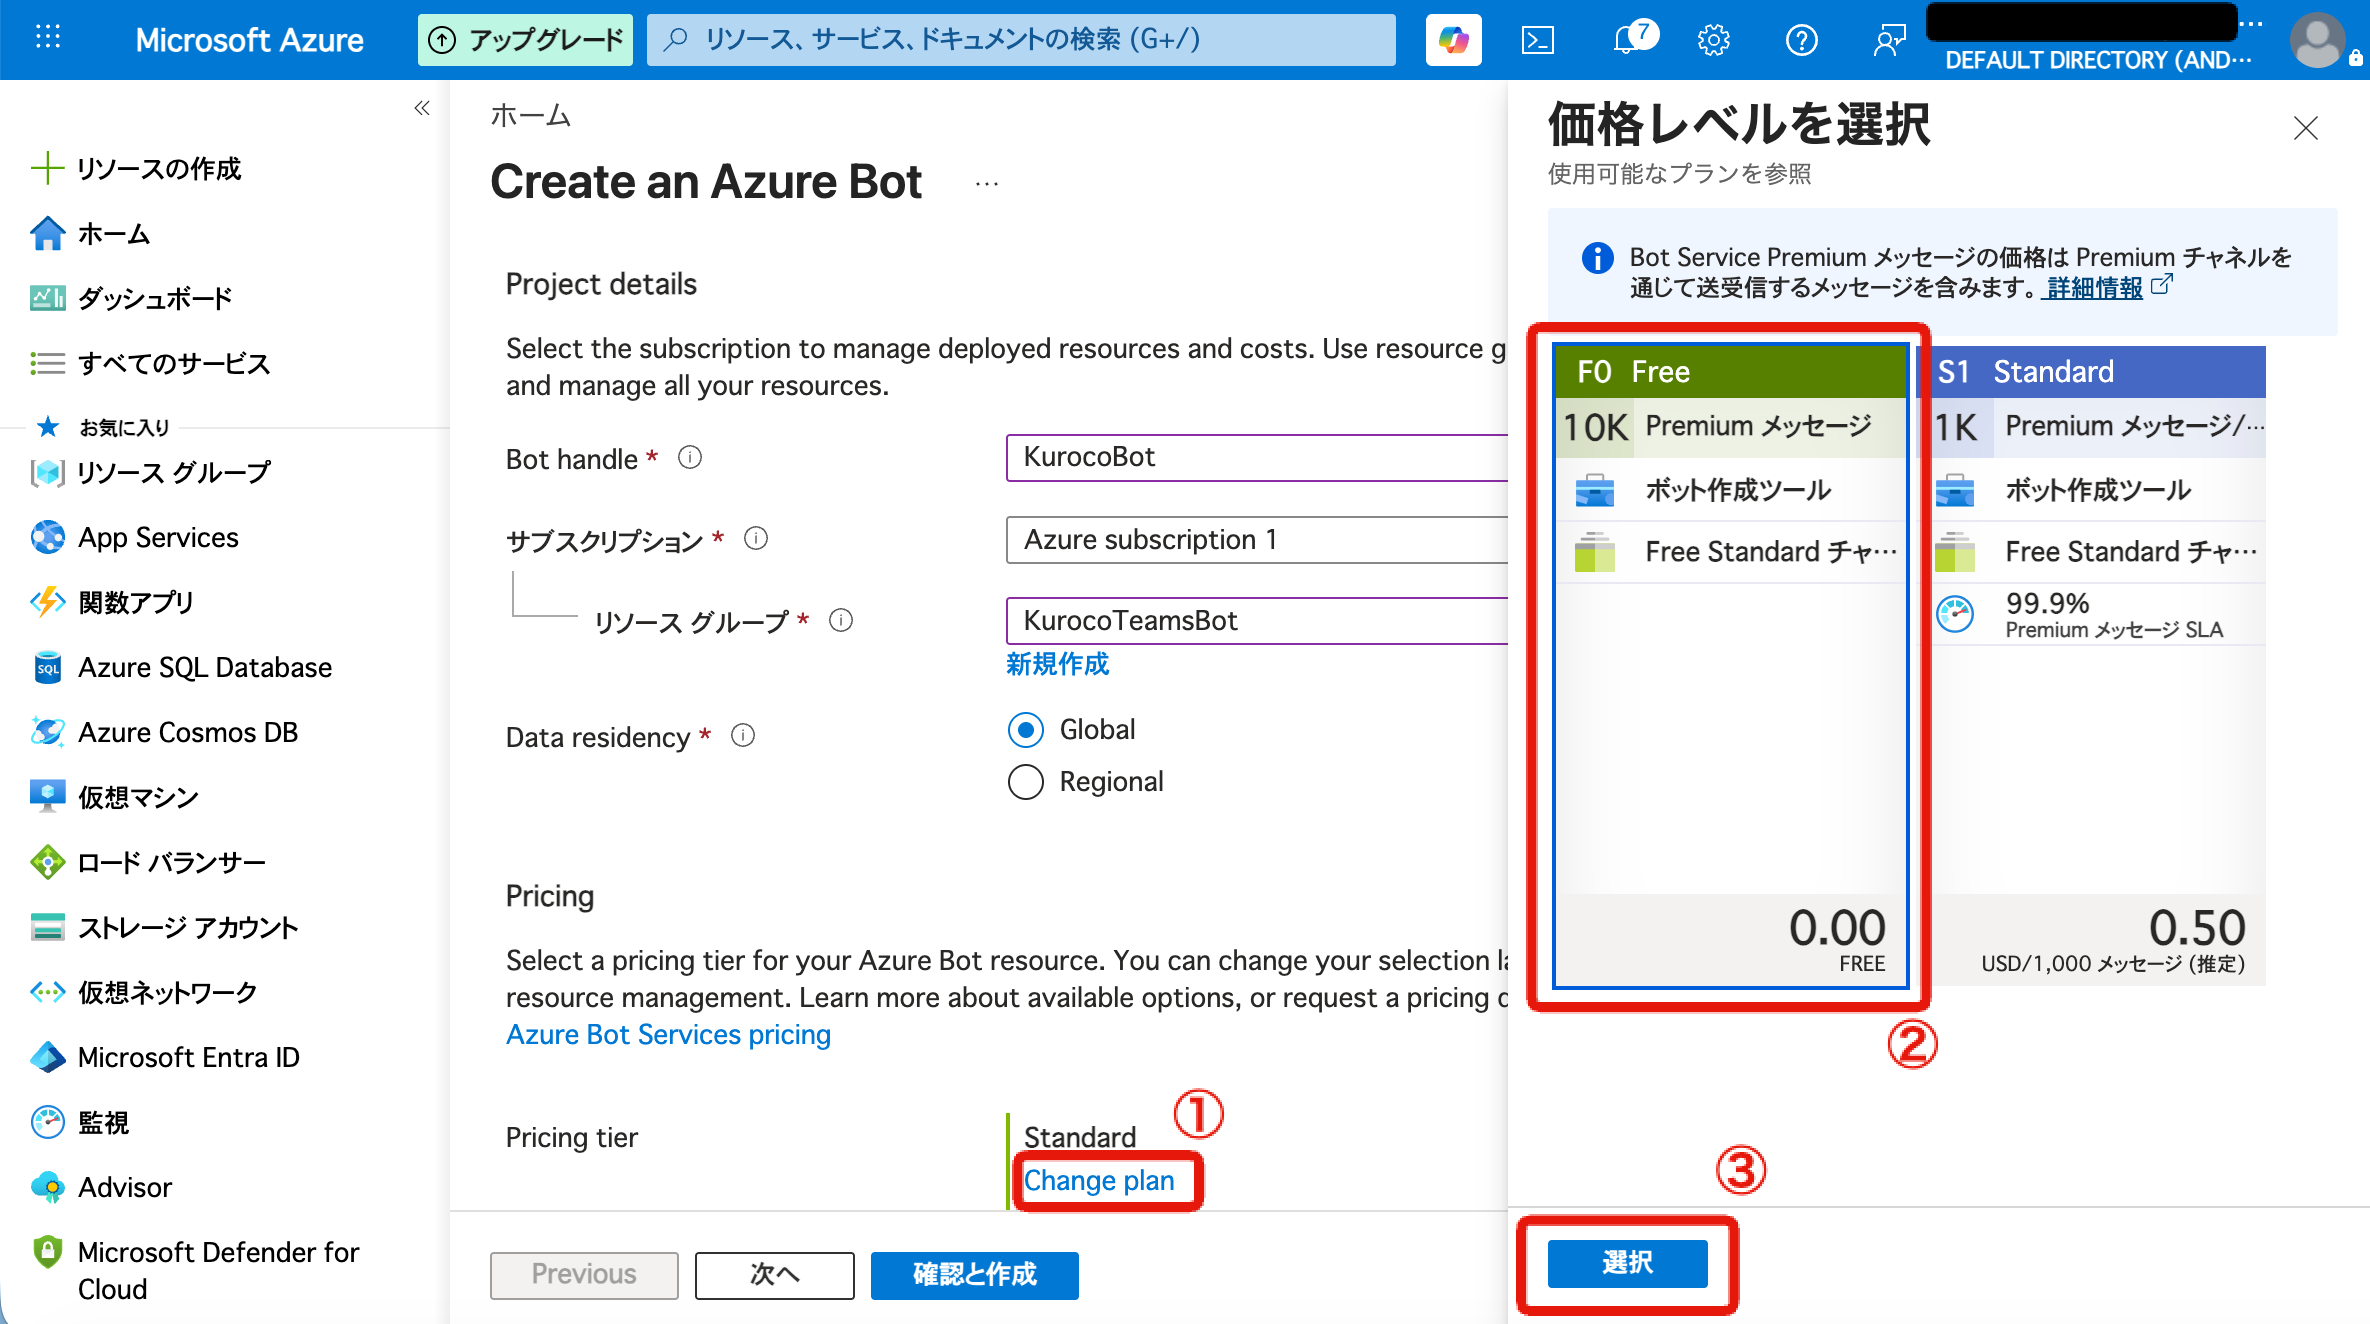
The pricing tier defaults to Standard. For testing or development, switch to F0 (Free): ① click "Change plan", ② select "F0 Free", then ③ click "Select".
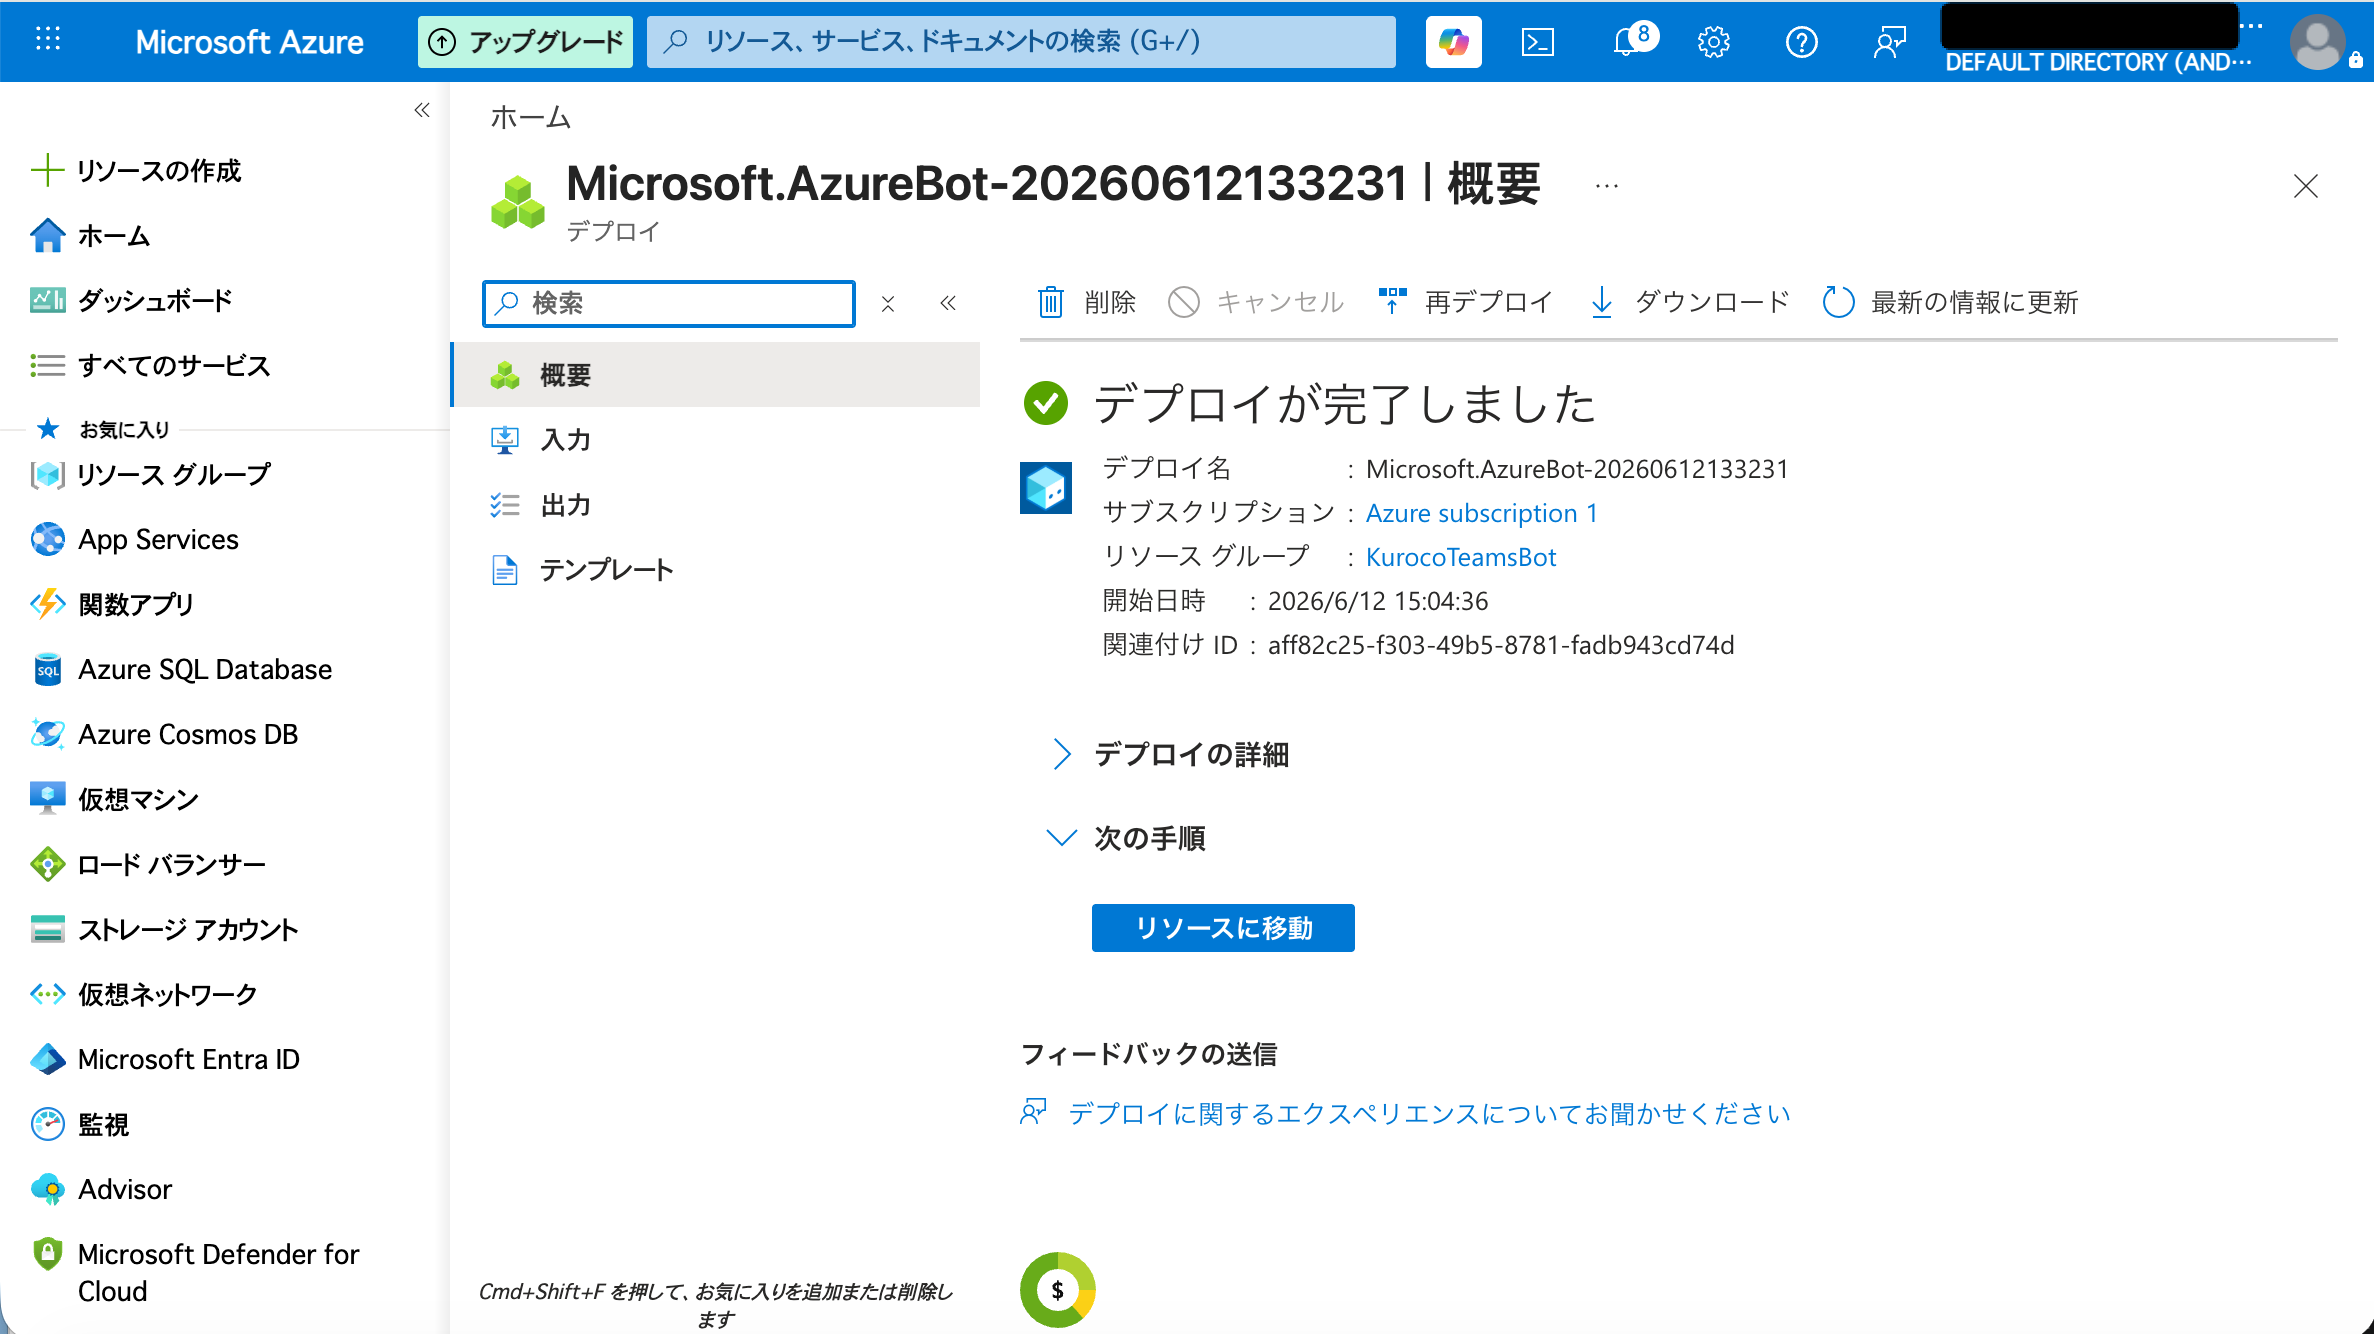
Click "Review + create" → "Create".
Once deployment is complete, click "Go to resource".
4. Enable Teams integration in Kuroco
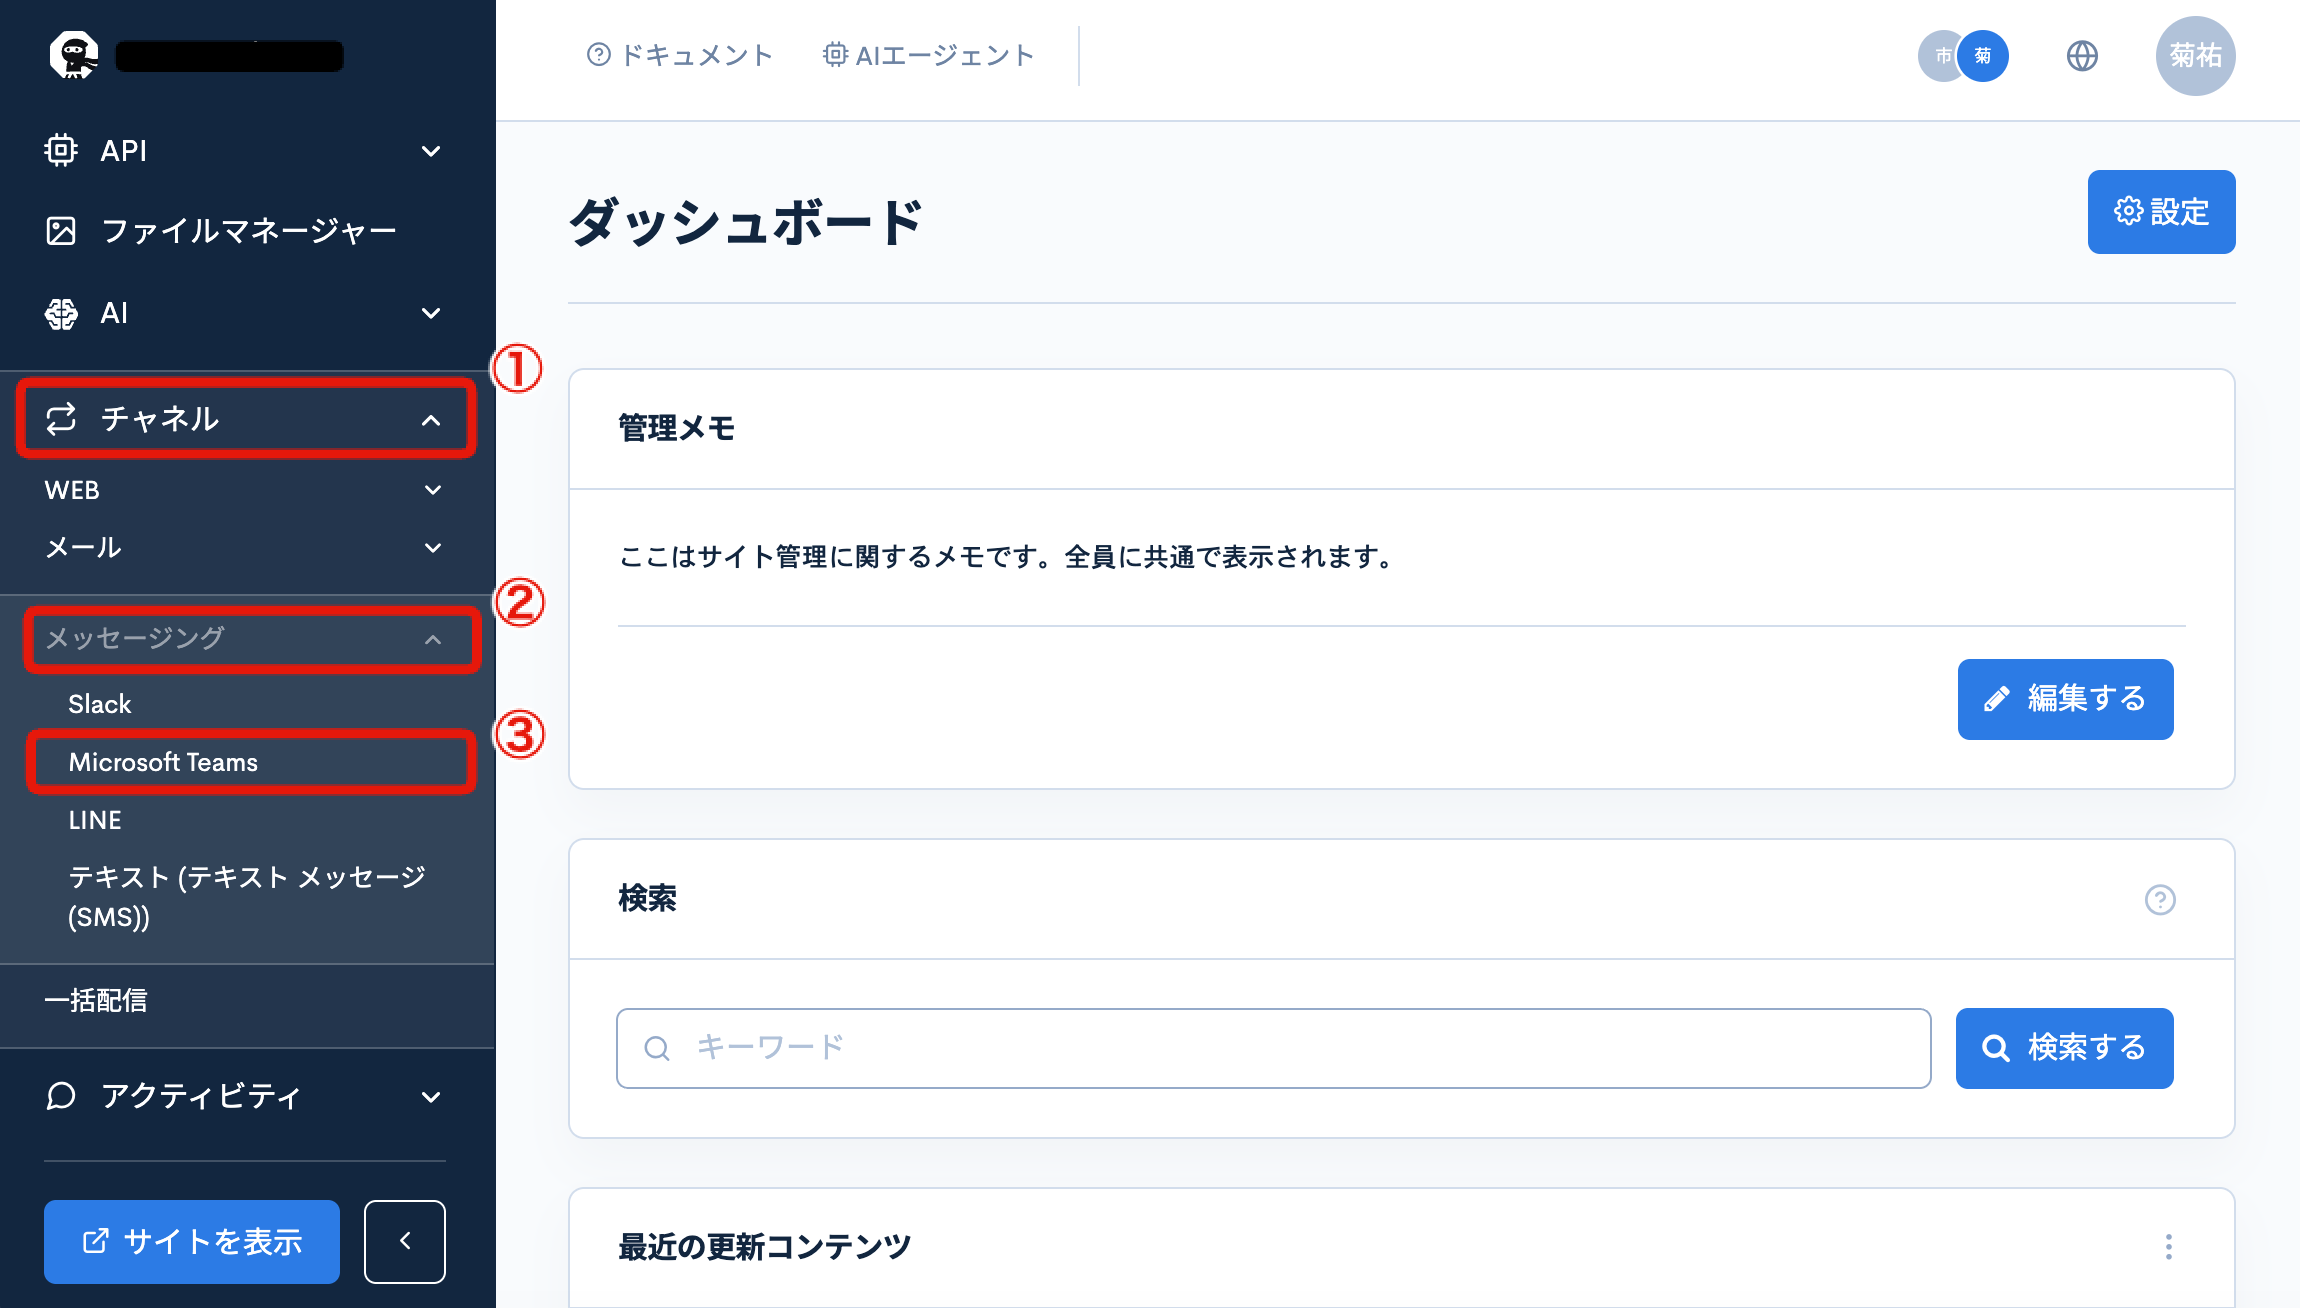
Log in to the Kuroco admin panel and click [Channel] → [Messaging] → [Microsoft Teams] in the left menu.
Switch the "Enable" toggle to ON.
Fill in the following fields.
| Field | Value |
|---|---|
| Microsoft App ID | Application (client) ID noted in Step 1 |
| App Password (client secret) | Secret value noted in Step 2 |
| App type | SingleTenant |
| Tenant ID | Directory (tenant) ID noted in Step 1 |
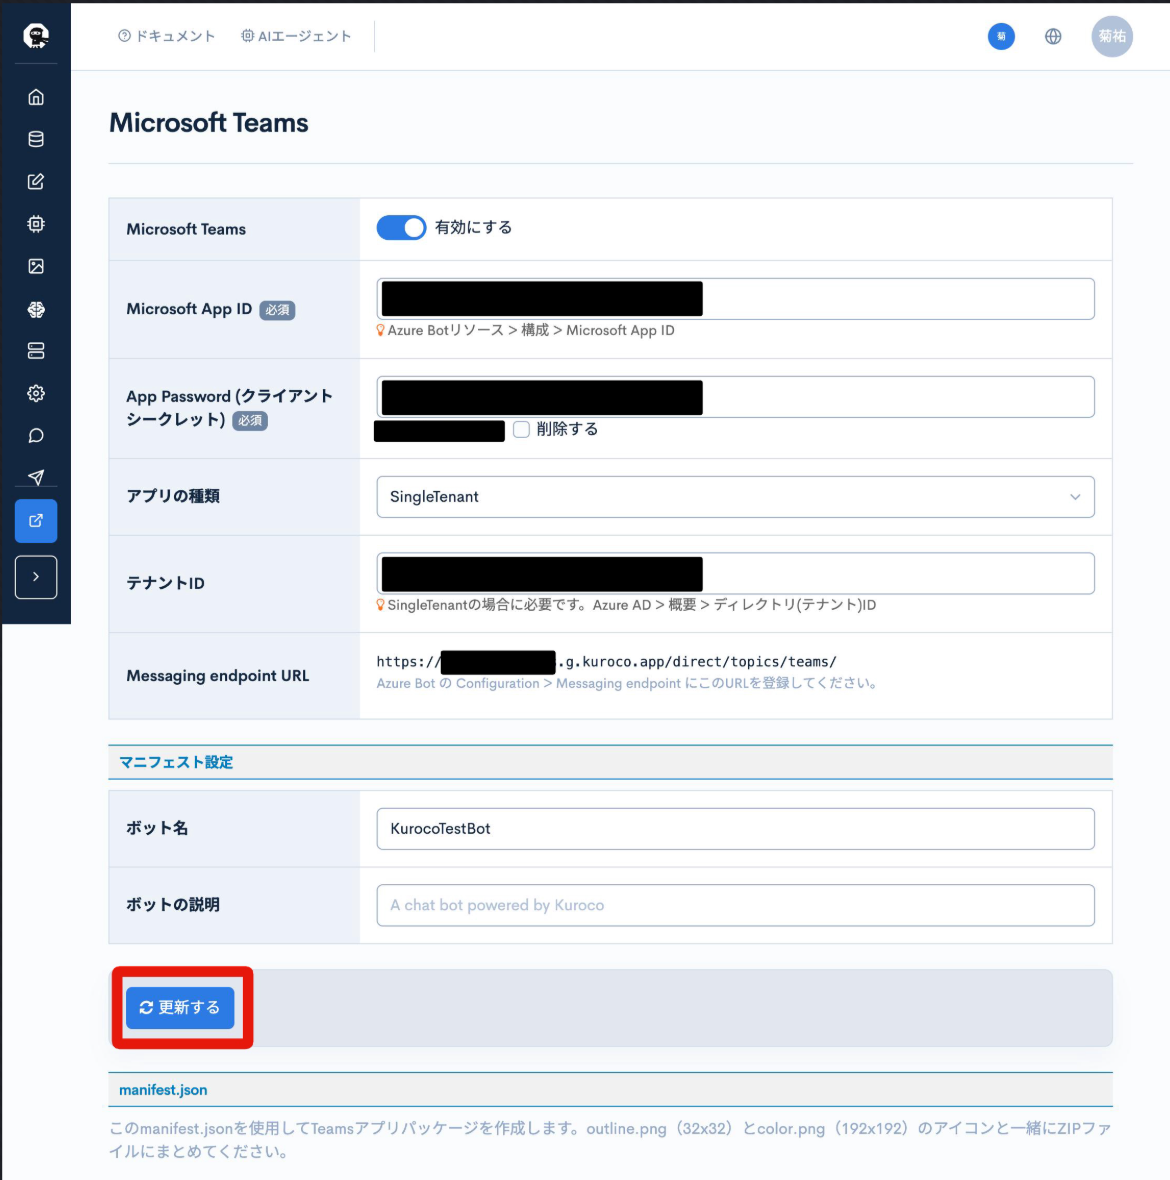
Also fill in the "Manifest settings" section.
| Field | Value |
|---|---|
| Bot name | The name displayed in Teams (e.g., KurocoBot) |
| Bot description | Any description (e.g., A chat bot powered by Kuroco) |
Click "Update".
Note the URL shown in the "Messaging endpoint URL" field on the settings screen.
https://{your-site}.g.kuroco.app/direct/topics/teams/
You will register this URL in Azure Bot in the next step.
Next, while still on the same screen, click "Download manifest.json" in the "manifest.json" section.
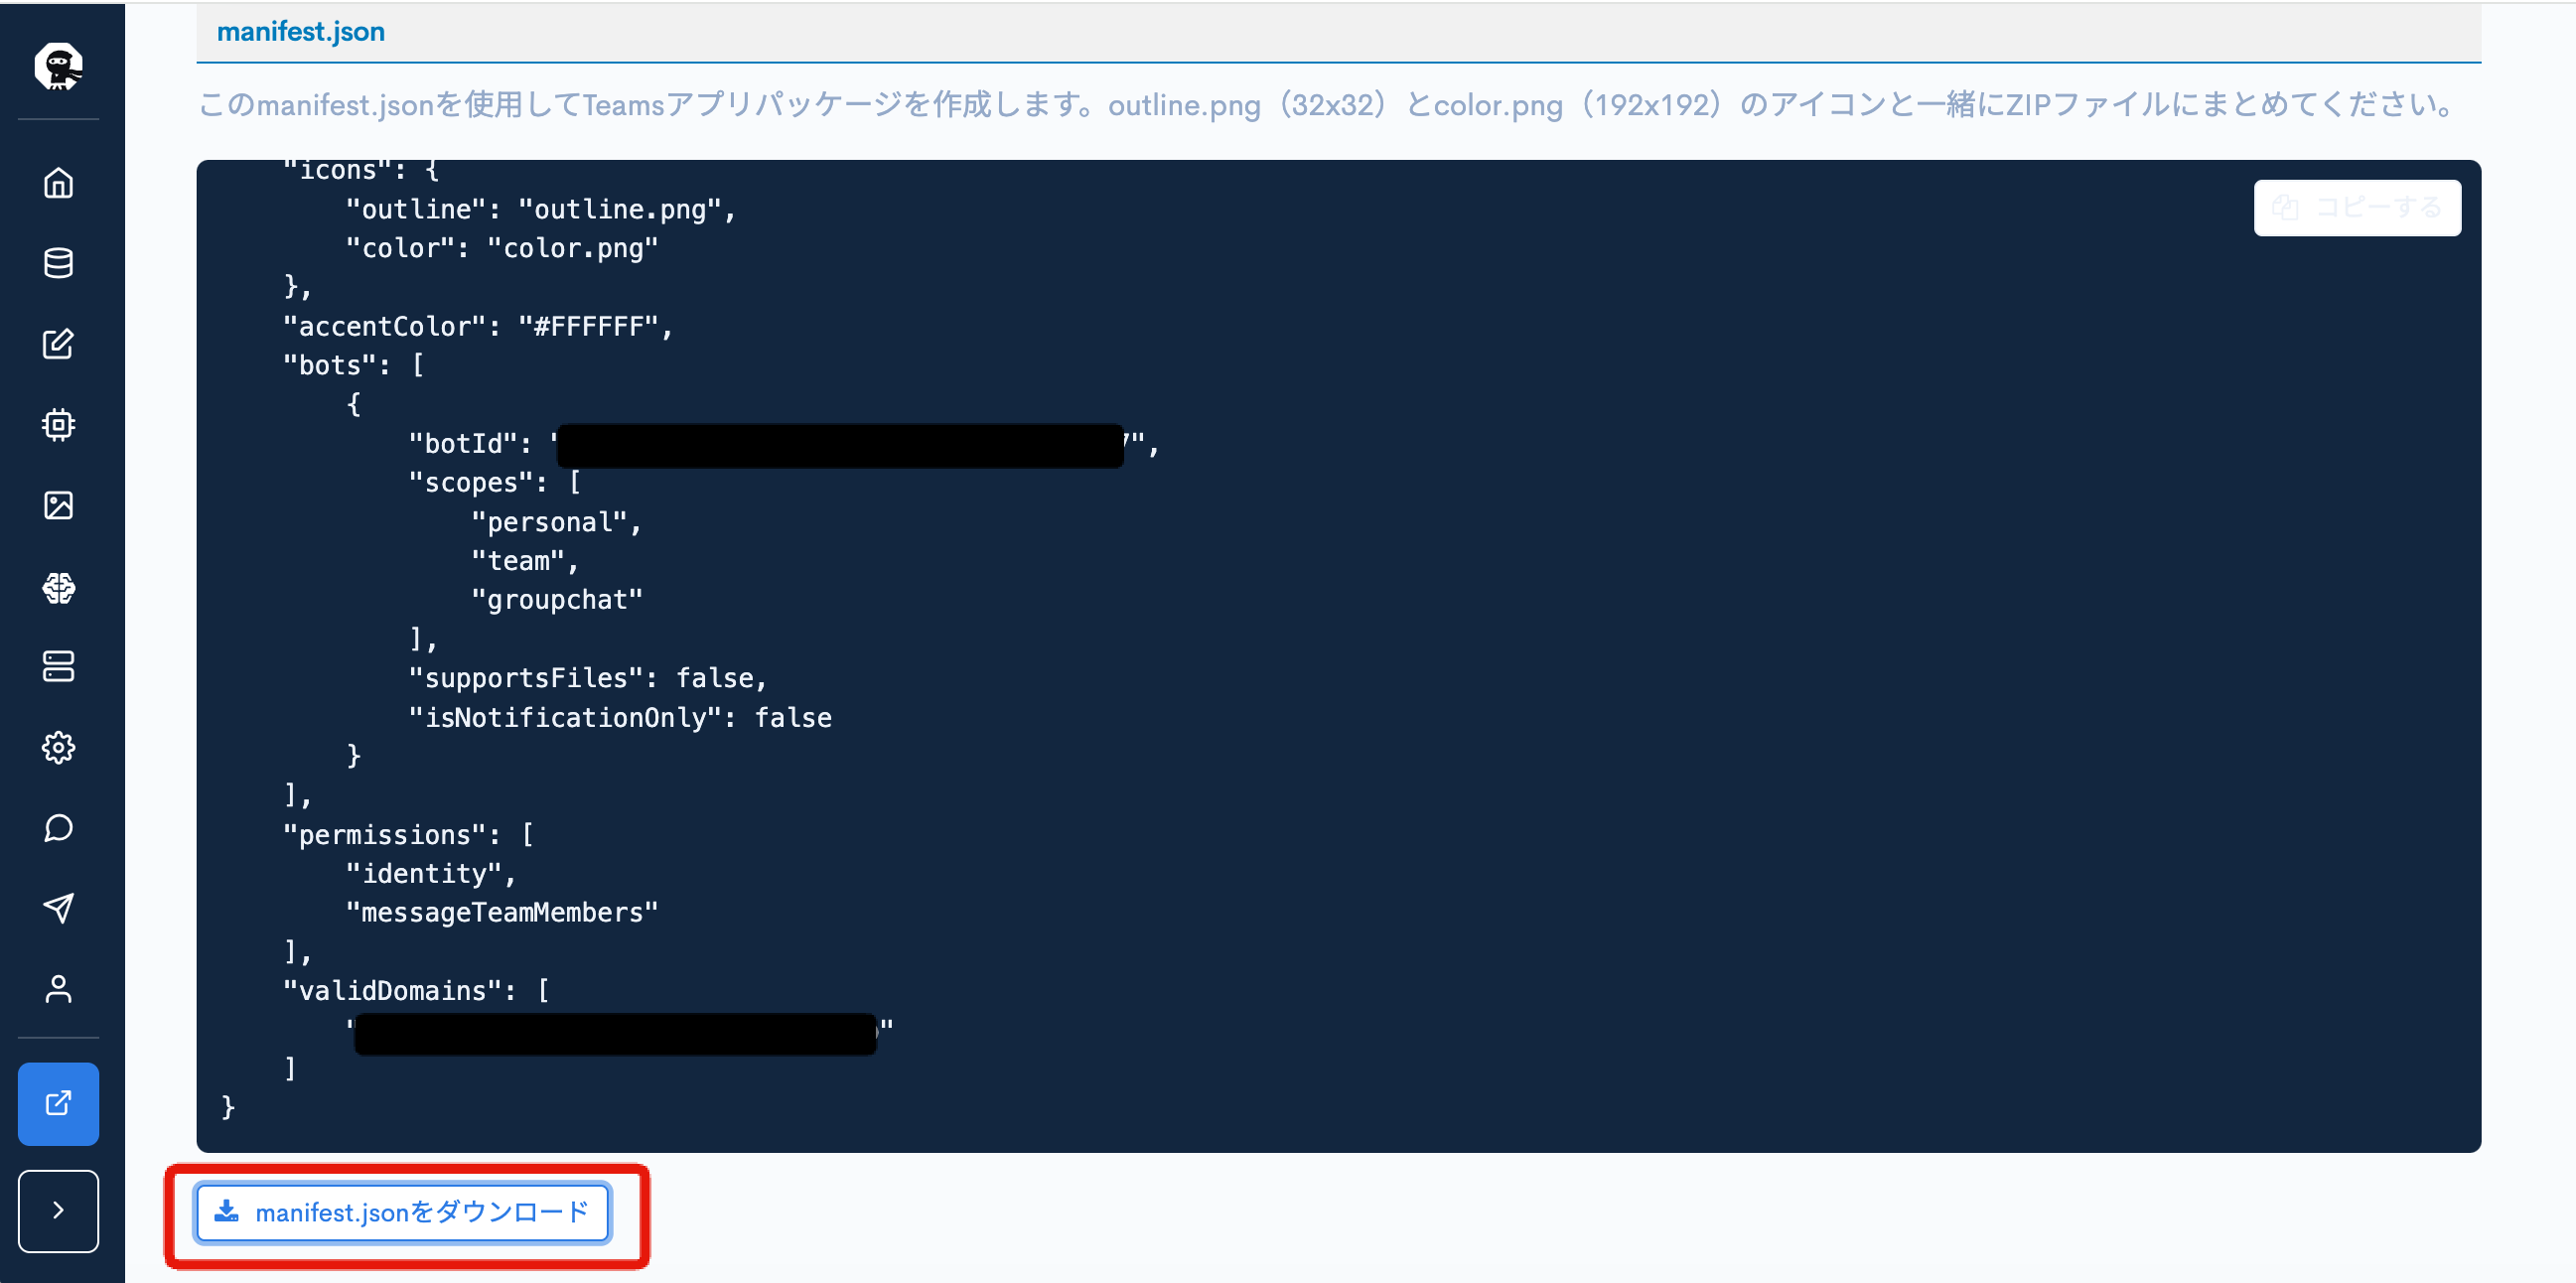
Prepare two icon images of the following sizes.
| File name | Size |
|---|---|
outline.png | 32×32 pixels, transparent PNG |
color.png | 192×192 pixels |
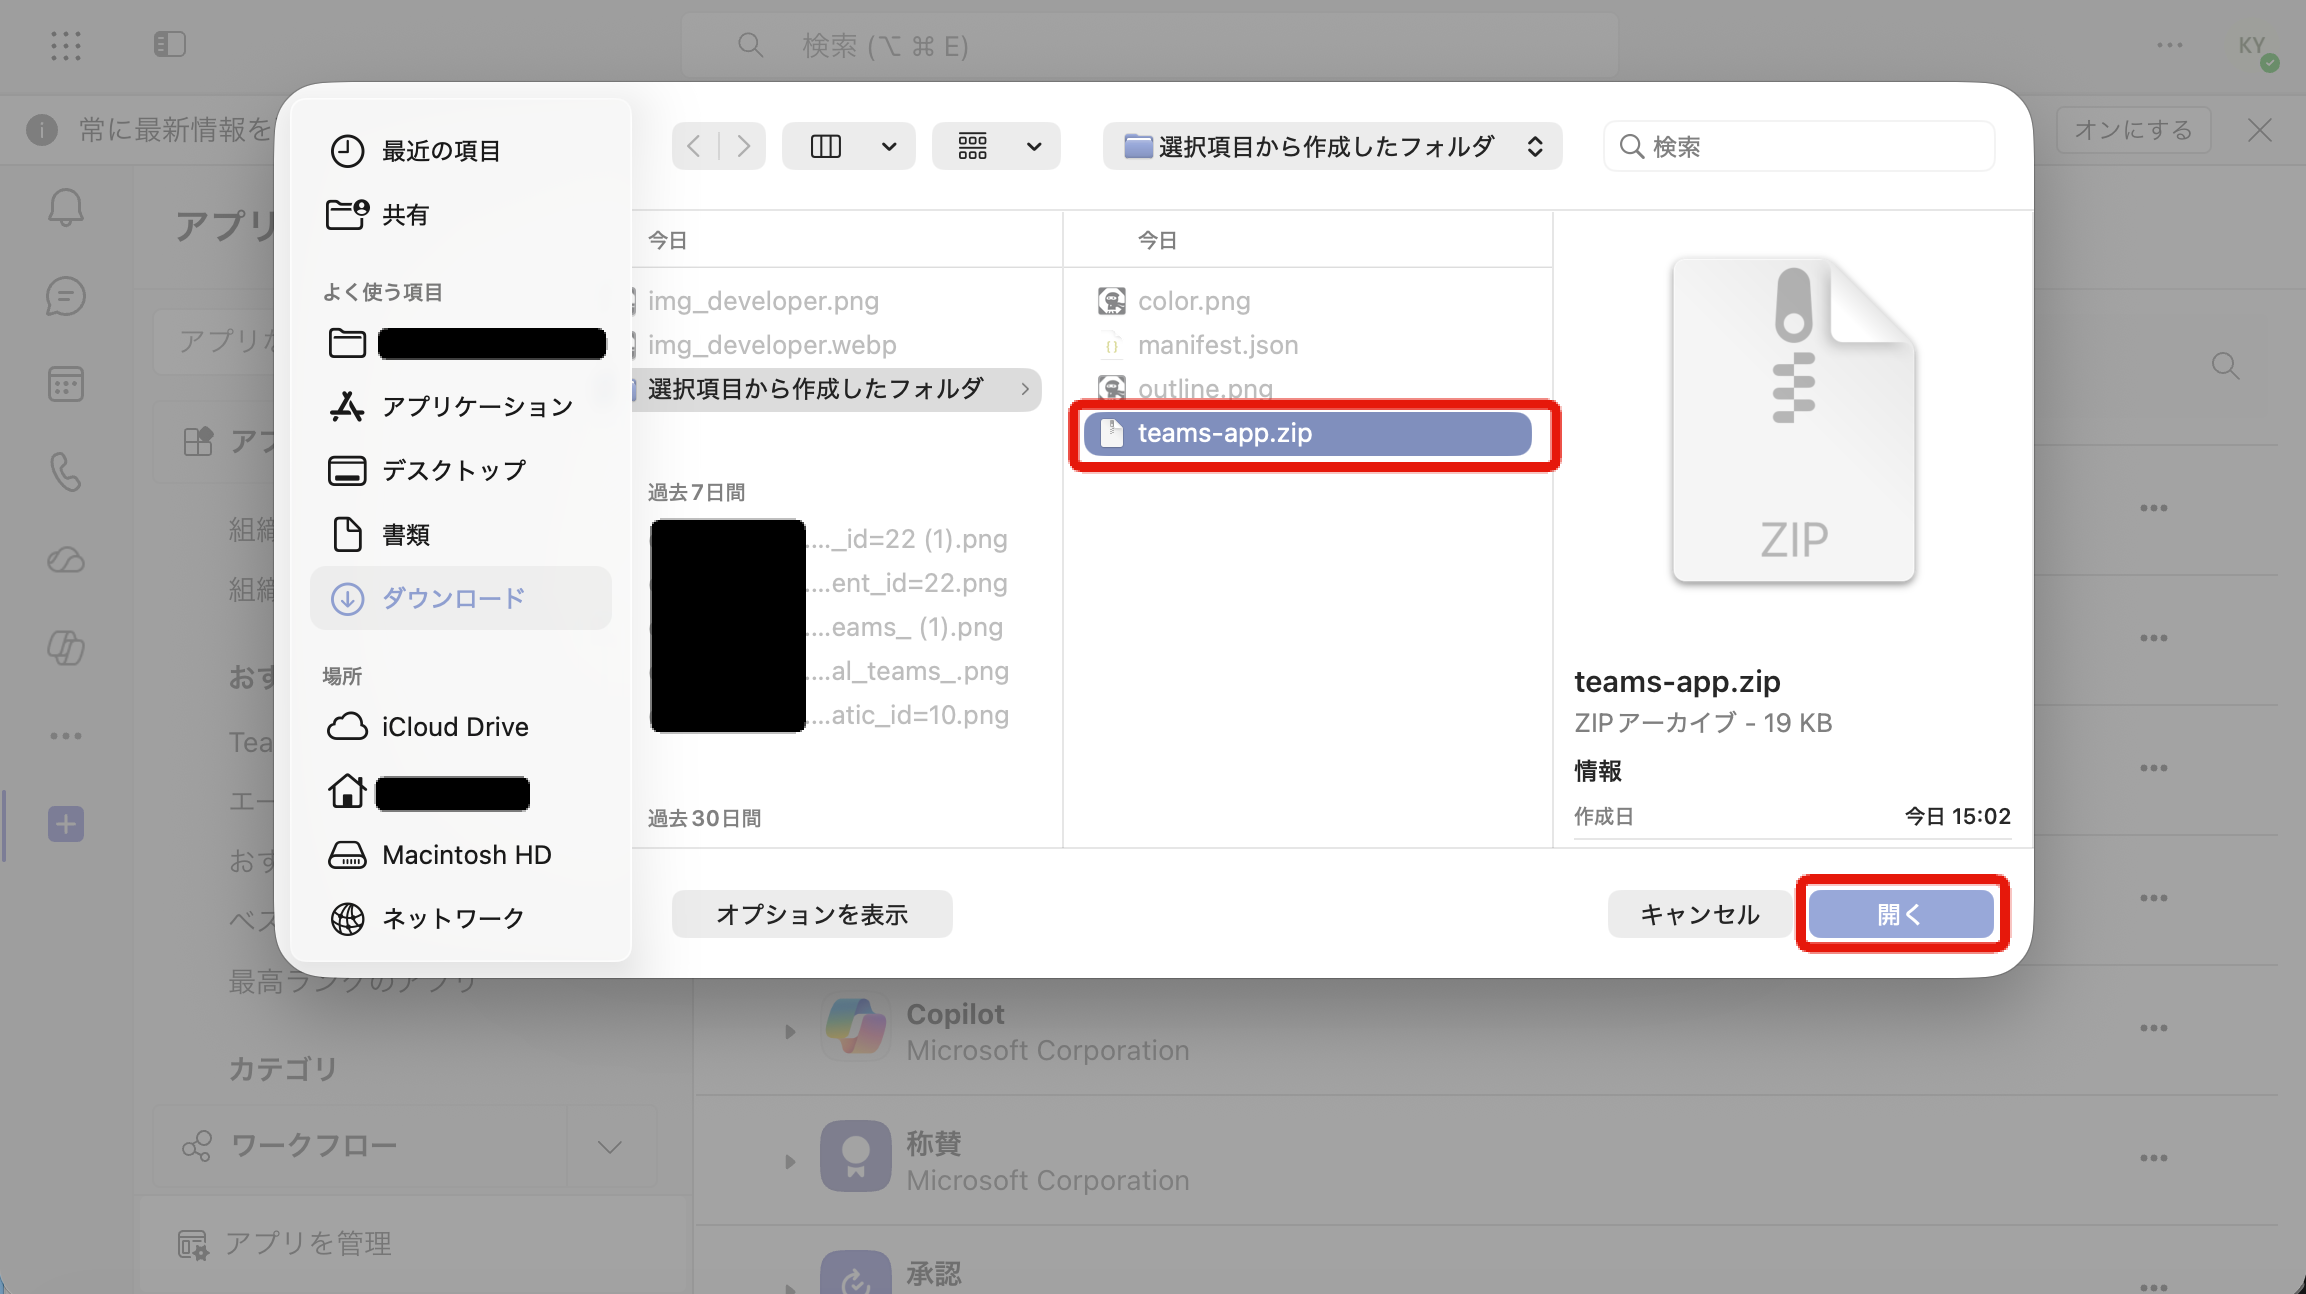
Bundle the following three files into a ZIP file. Do not create any subfolders — include the three files directly in the ZIP.
teams-app.zip
├── manifest.json
├── outline.png
└── color.png
You will use this ZIP file when installing the Bot in Teams (Step 7). Go ahead and create it now while you are on this screen.
5. Set the Messaging endpoint in Azure Bot
Open the Azure Bot resource you created in the Azure Portal and click [Configuration].
Enter the URL noted in Step 4 in the "Messaging endpoint" field.
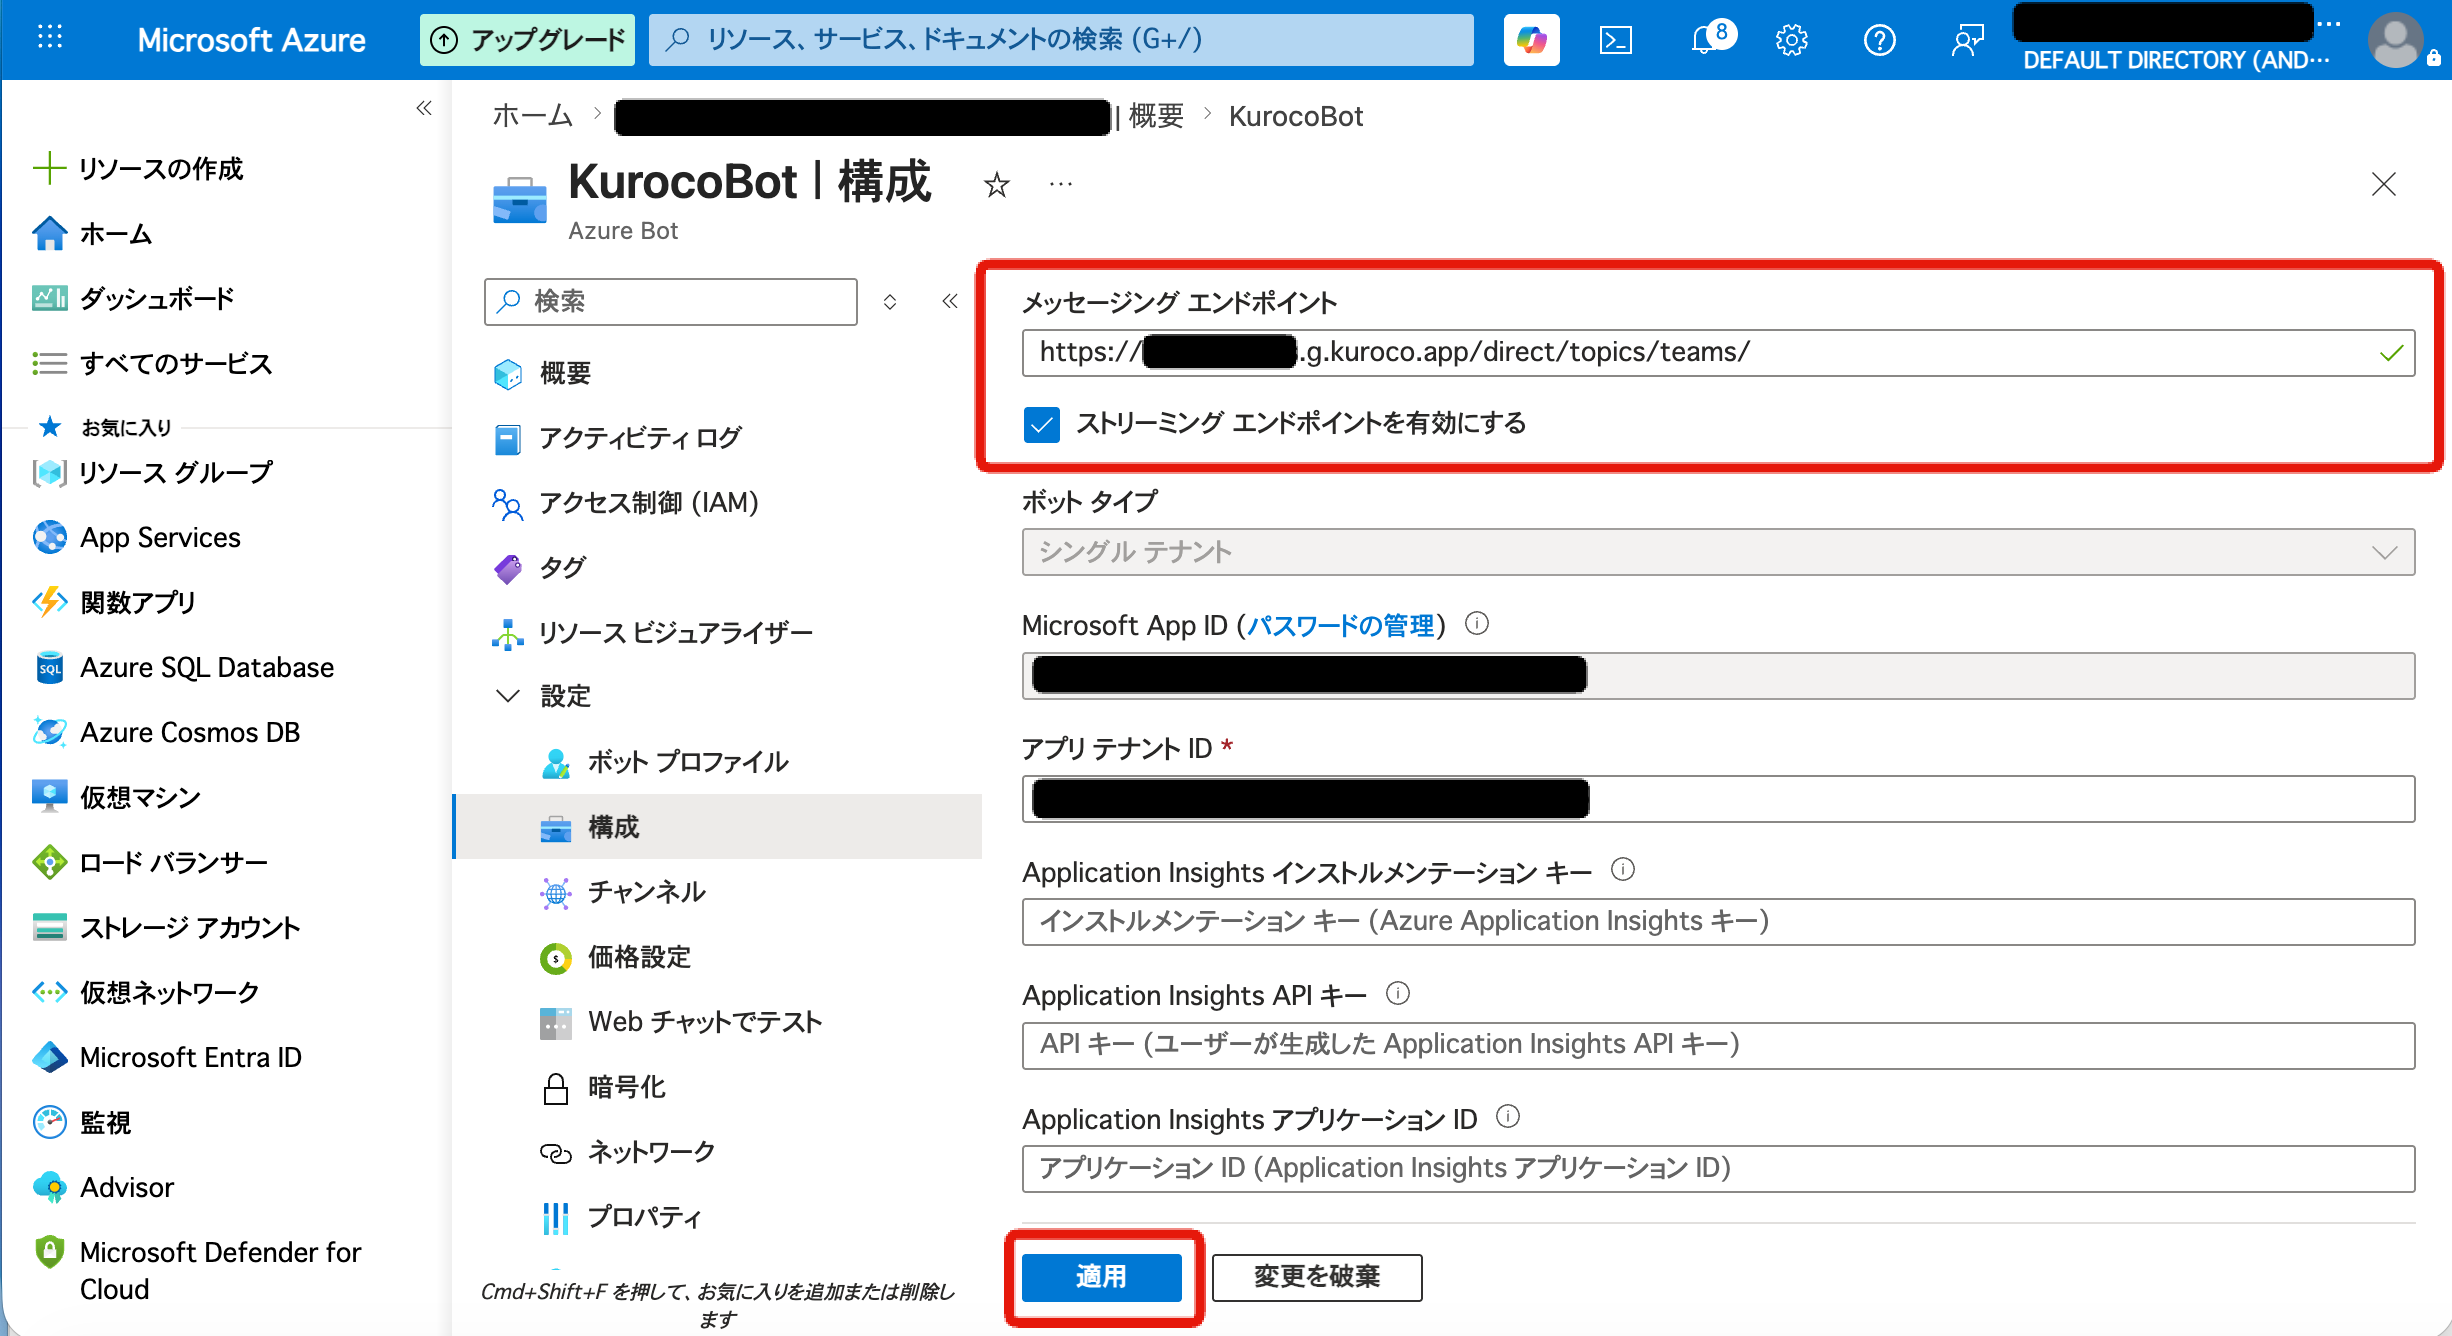
Click "Apply".
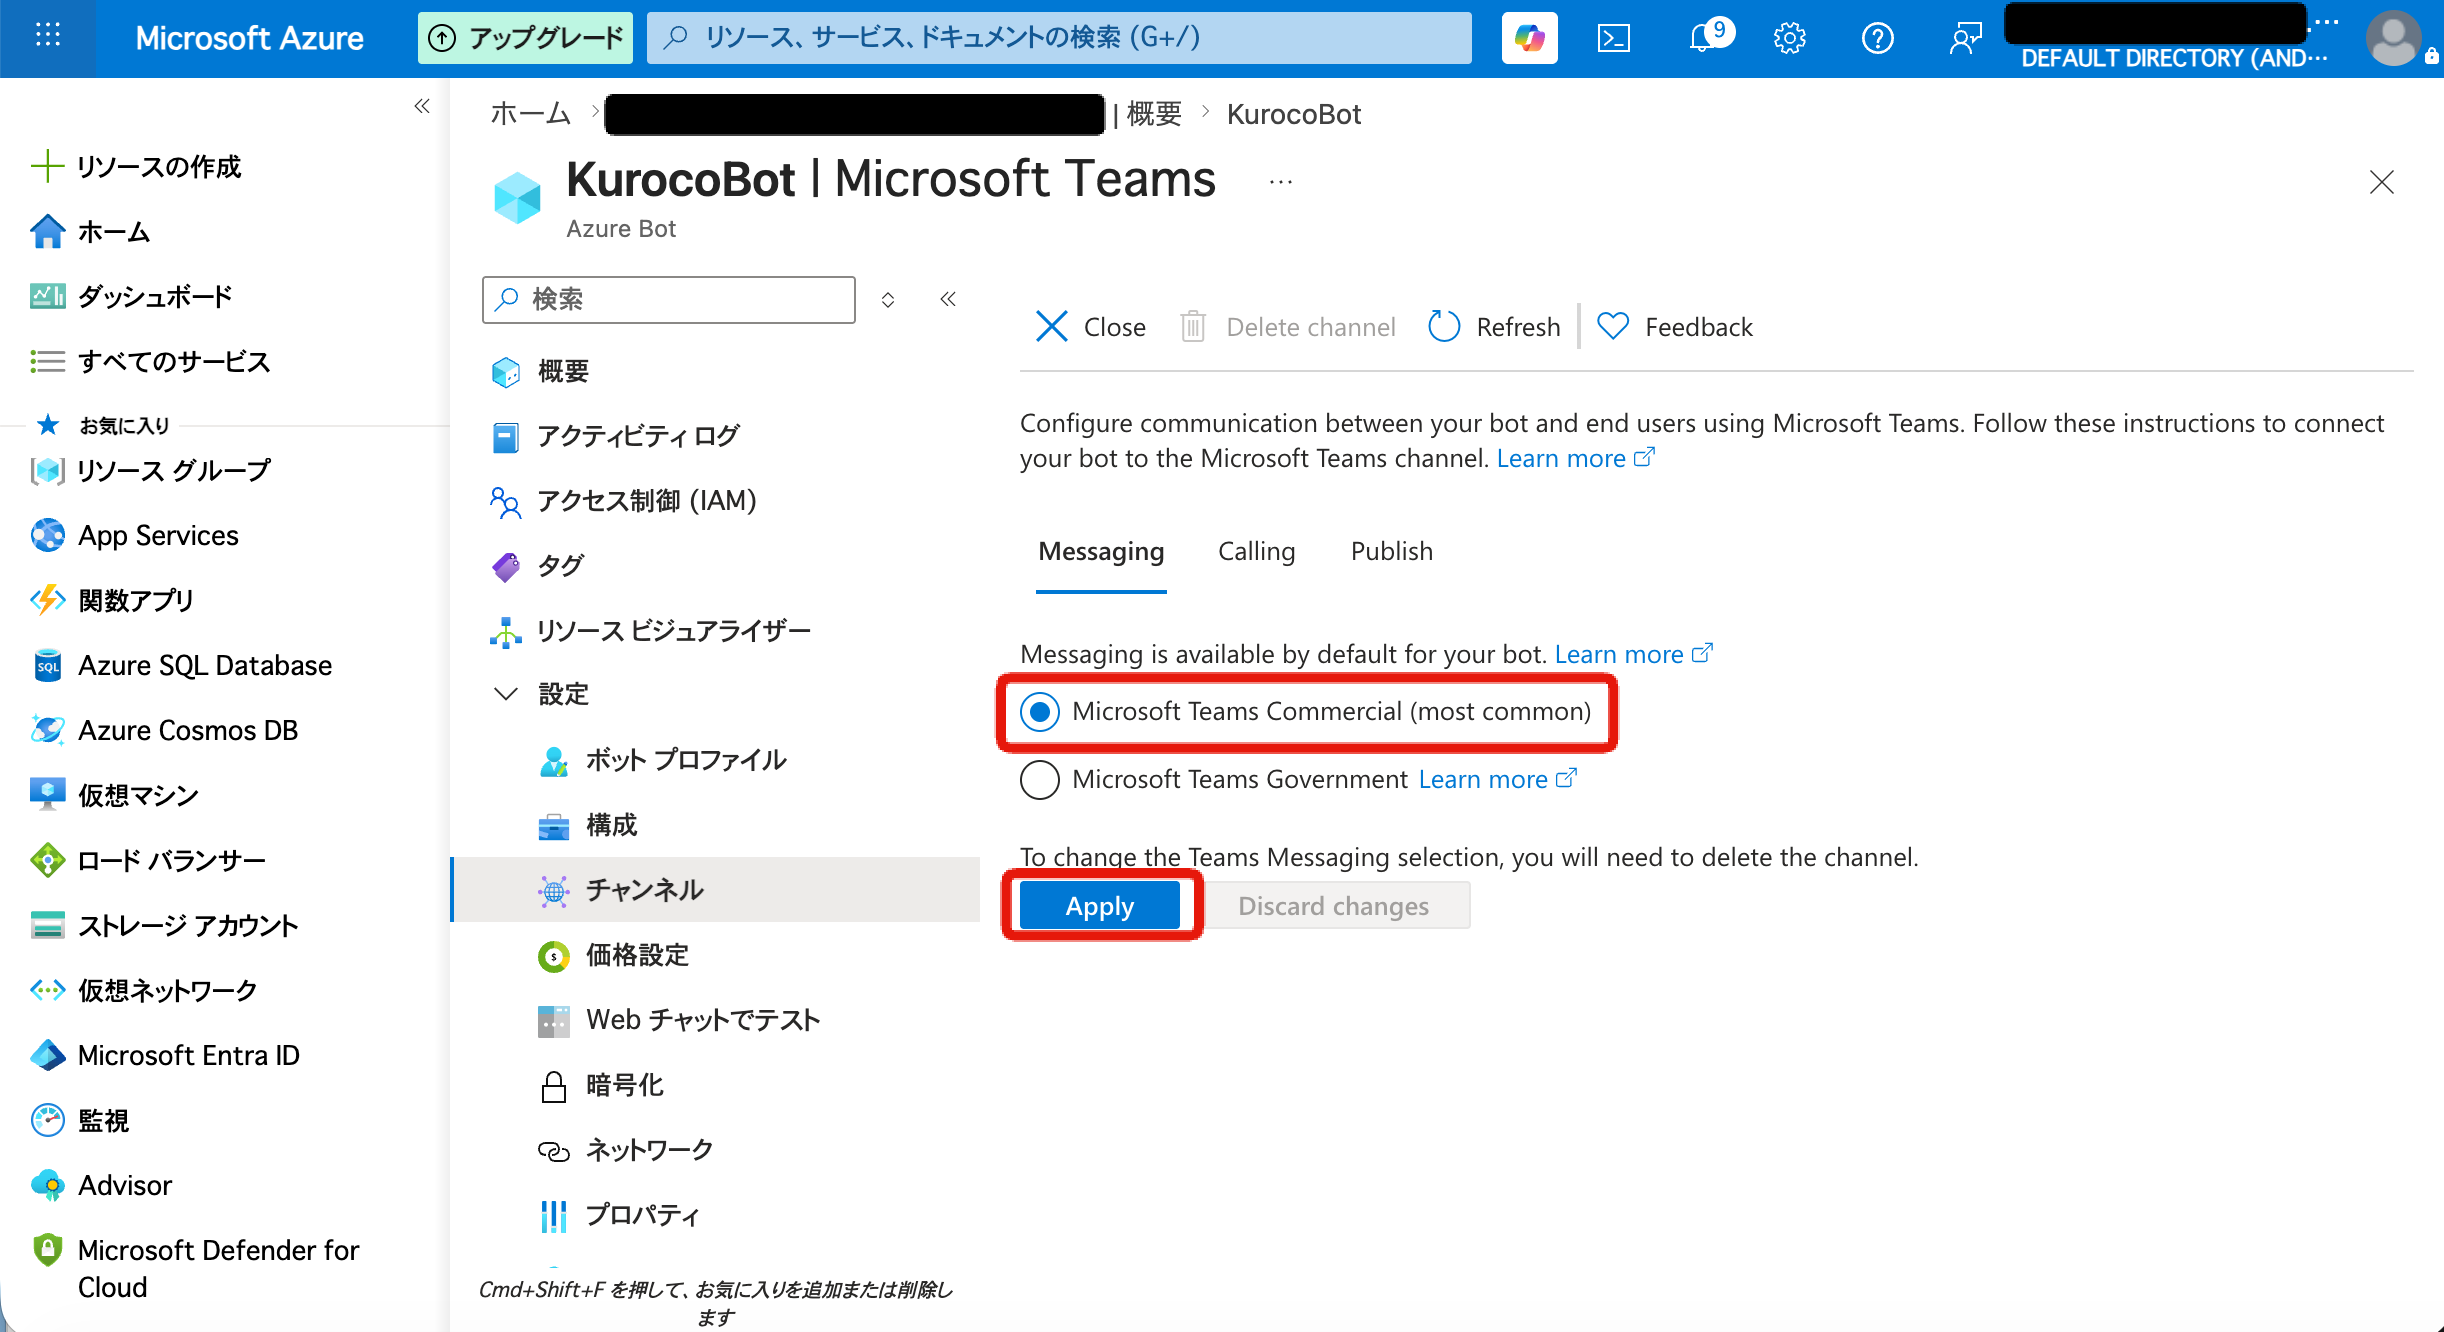
6. Add the Teams channel to the Azure Bot
In the left menu of the Azure Bot resource, click [Channels].
Select "Microsoft Teams".
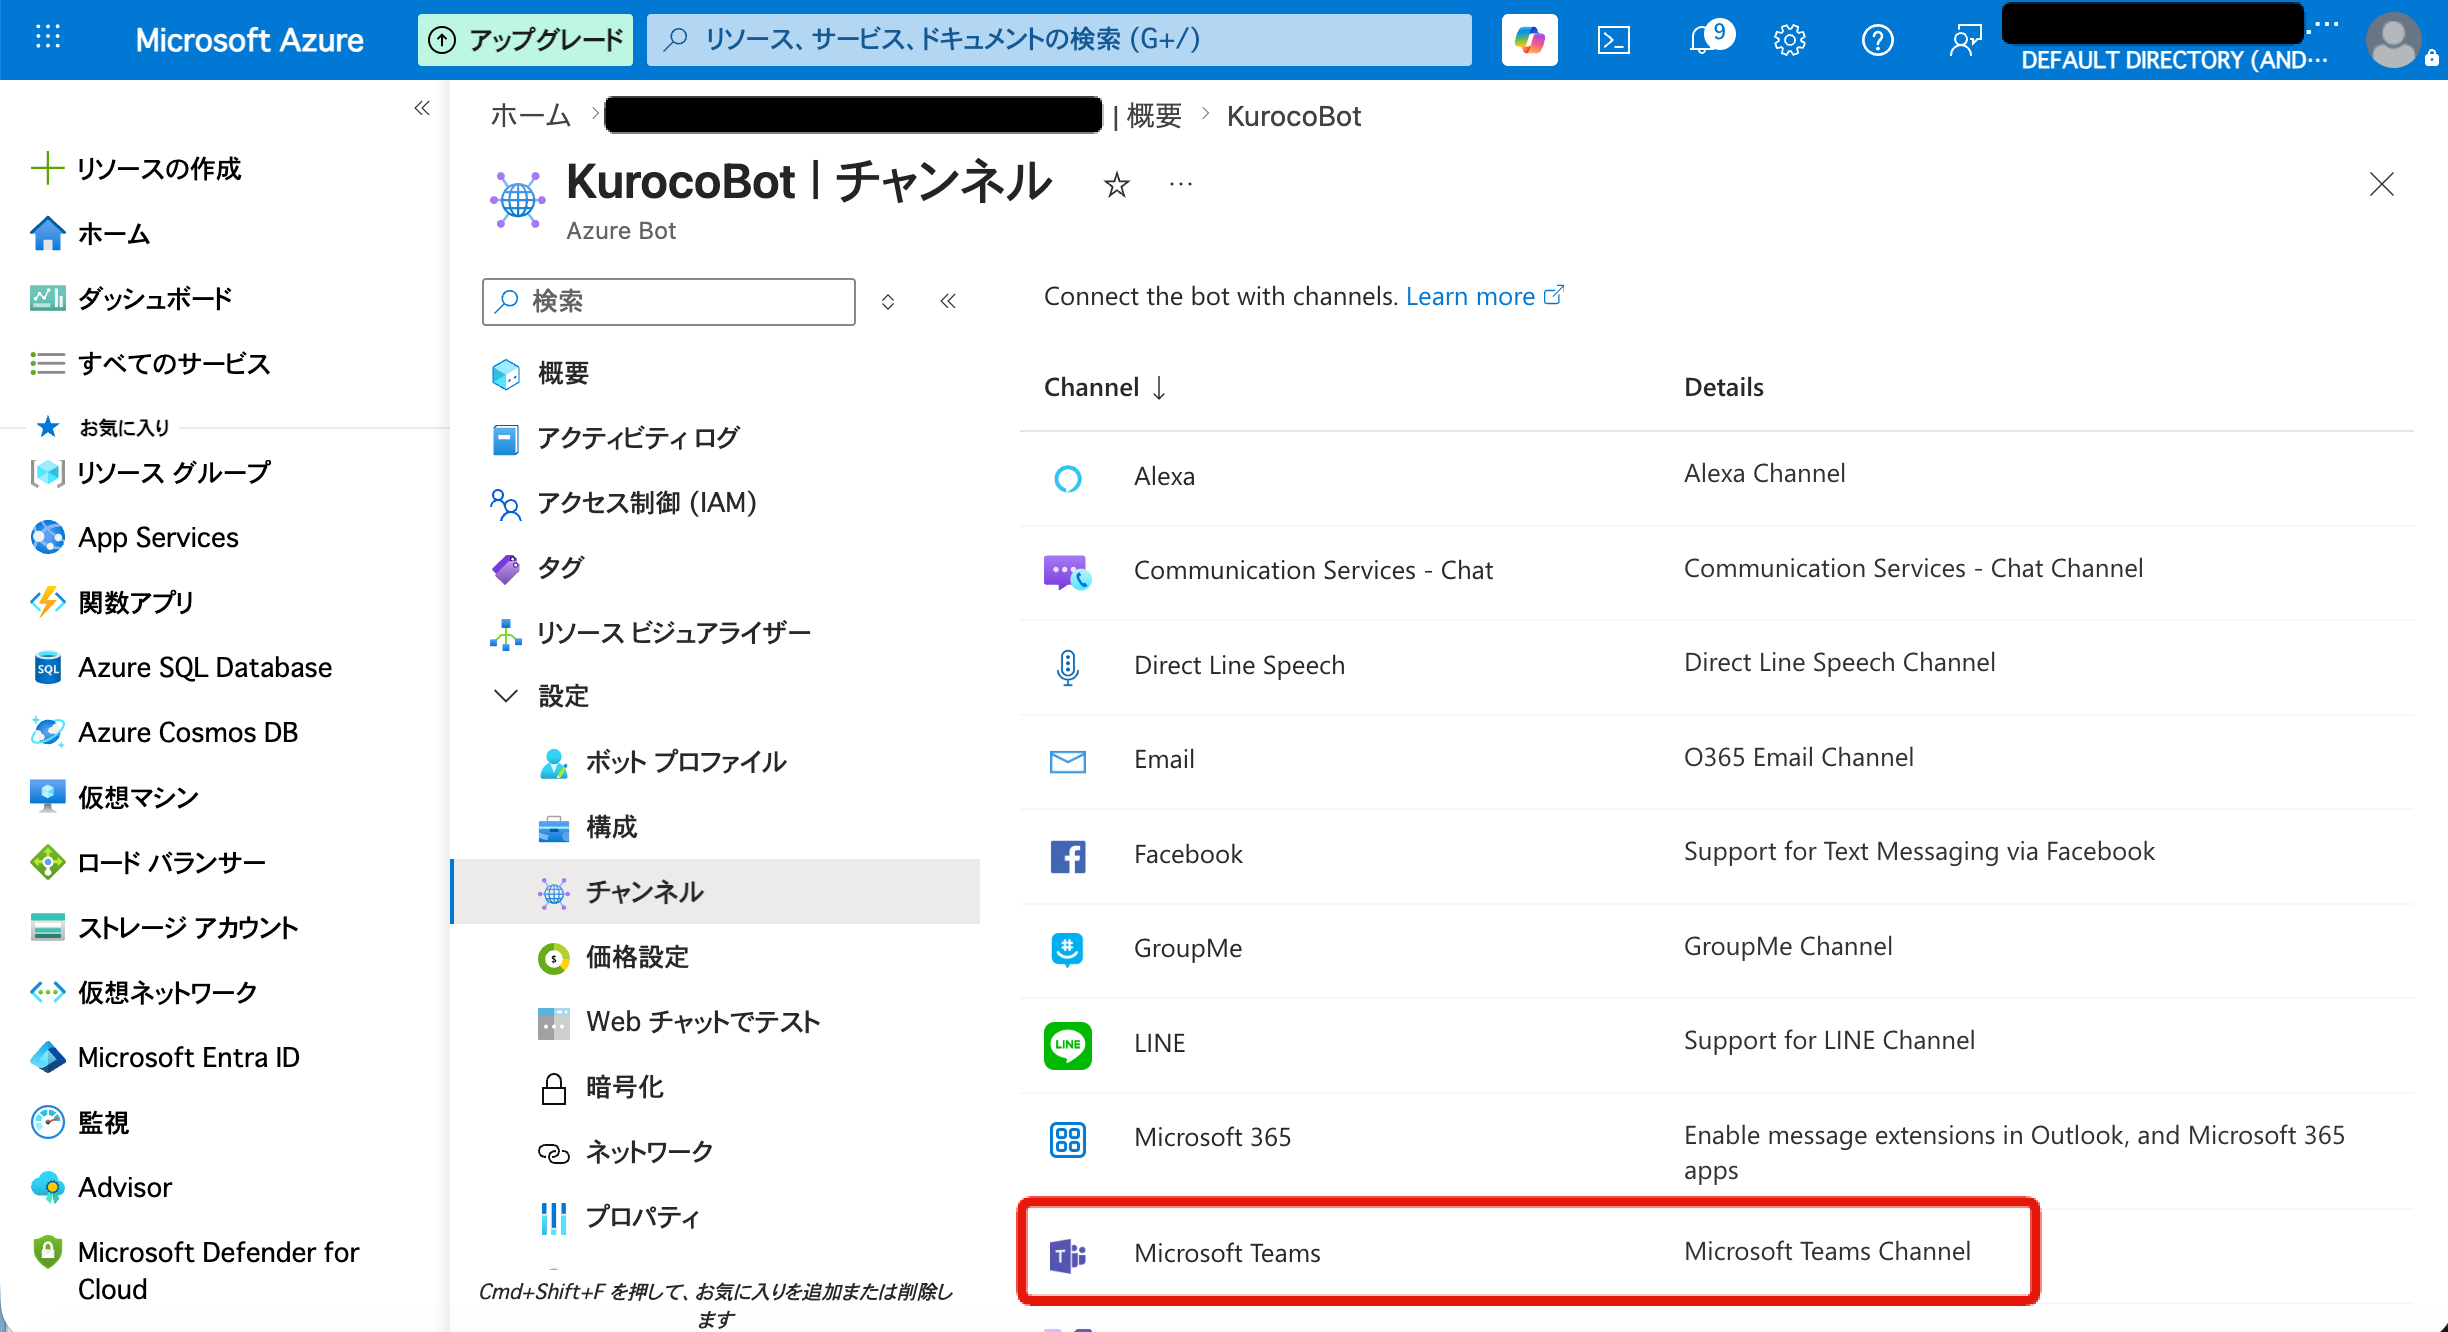
Confirm that "Microsoft Teams Commercial (most common)" is selected, then click "Apply".
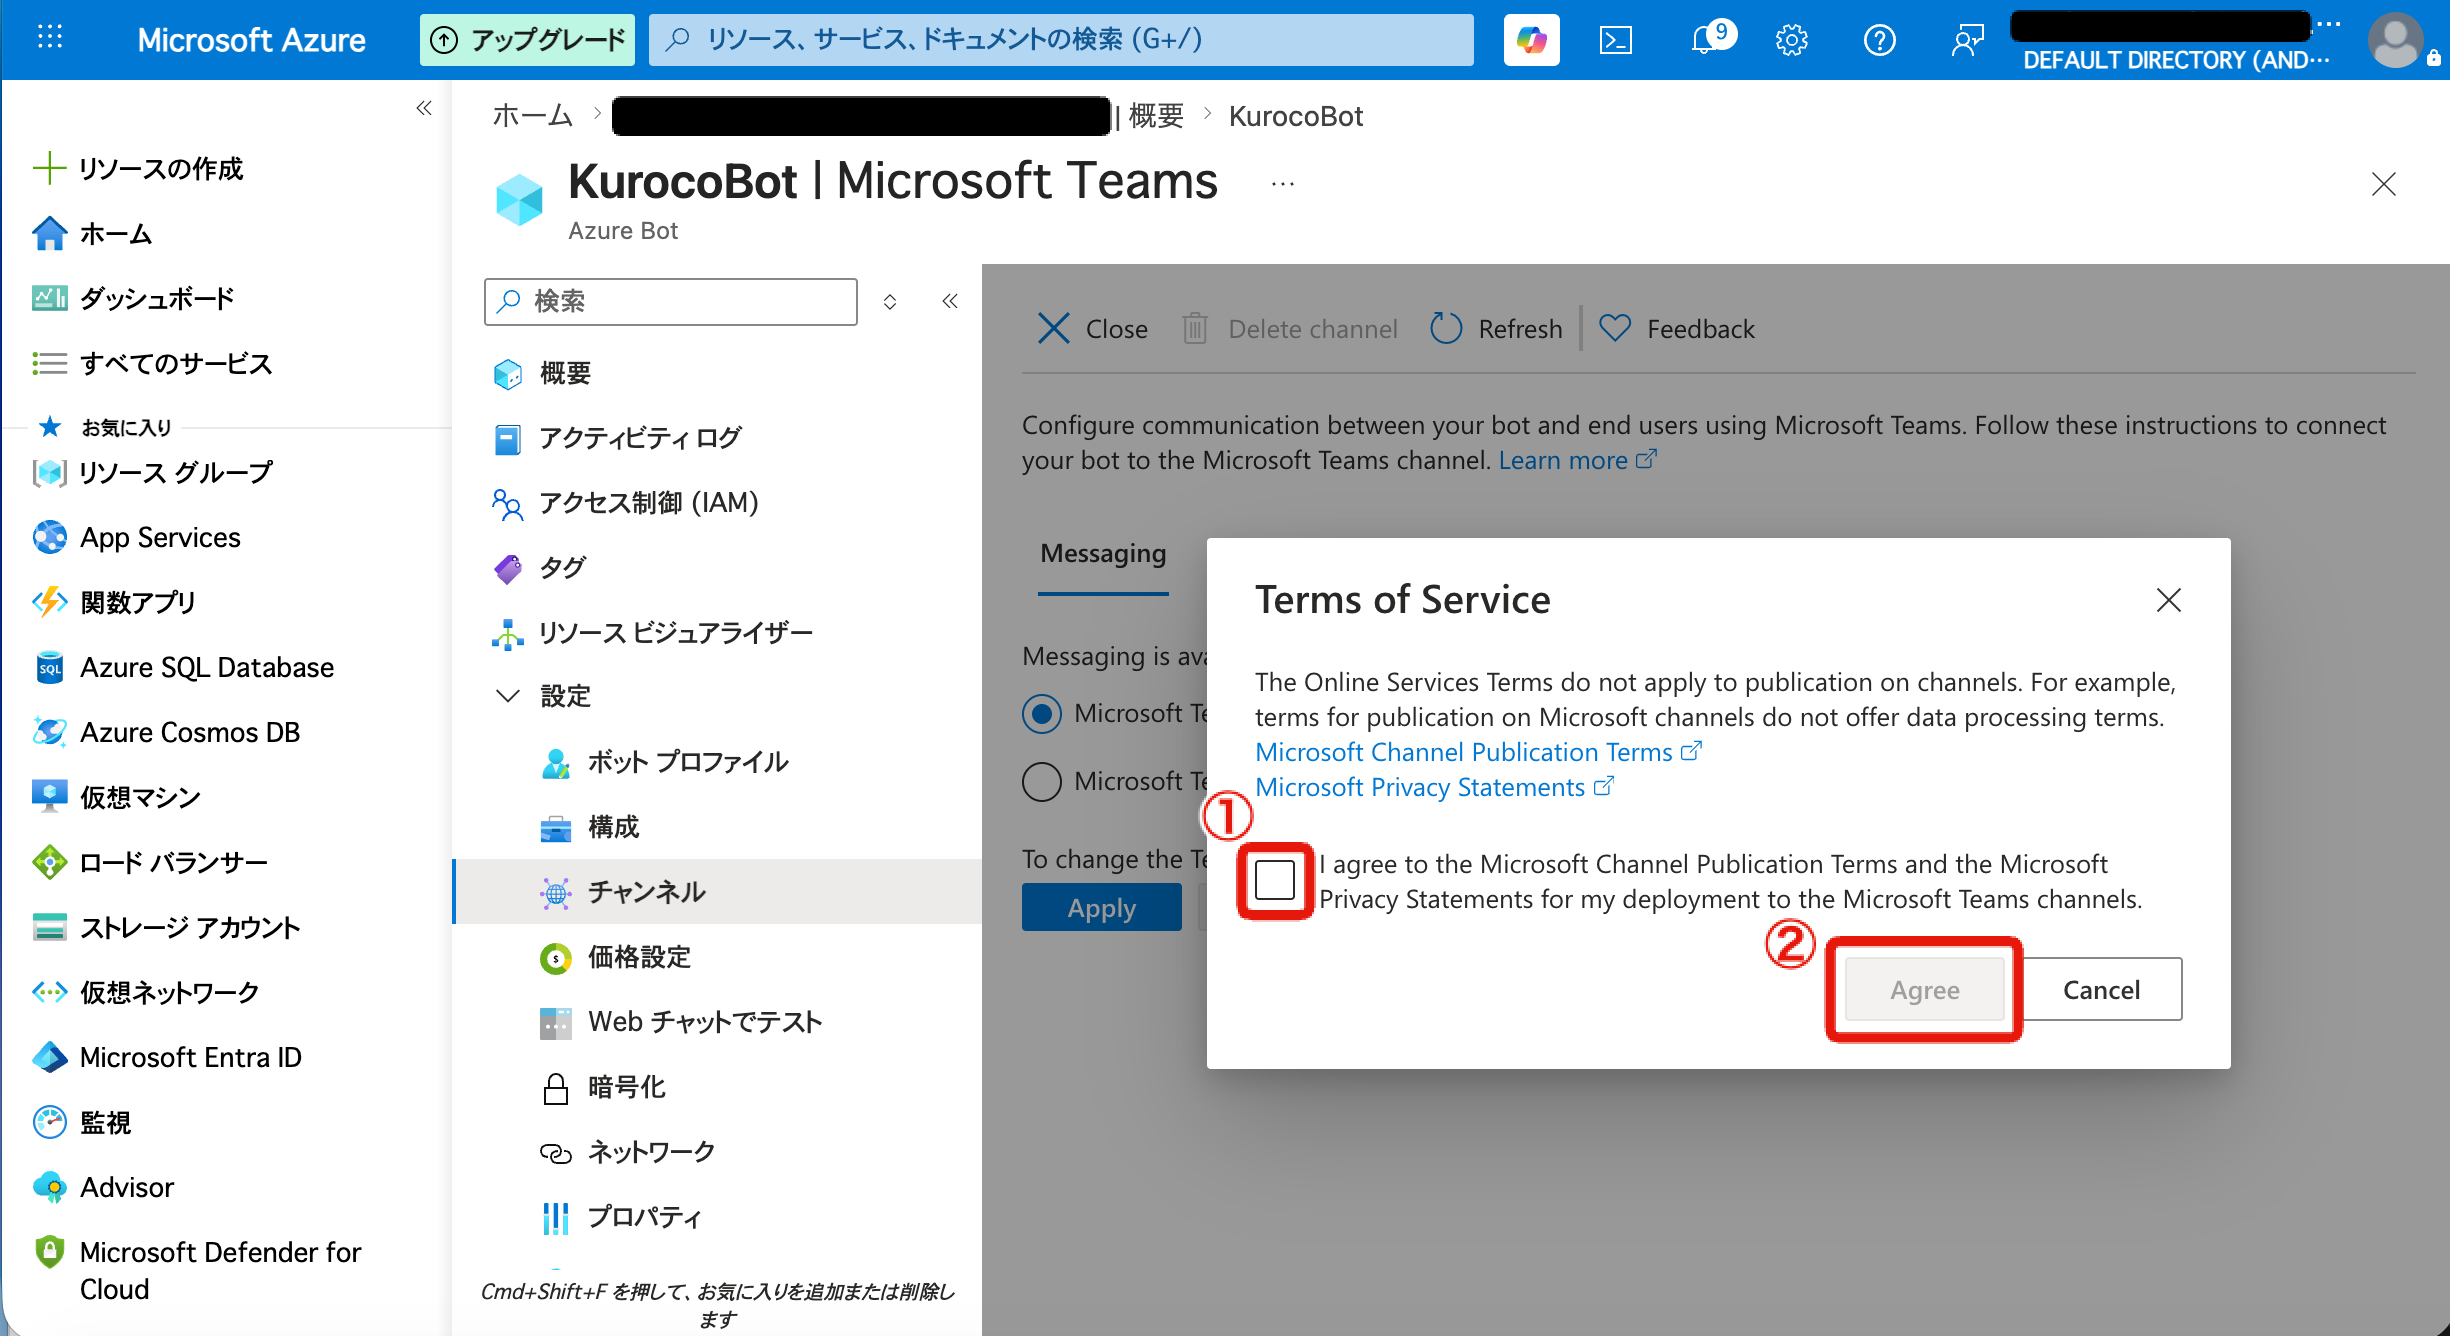
The "Terms of Service" dialog appears. Check the checkbox and click "Agree".
7. Install the Bot app in Teams
Installing organization-wide (for admins)
Go to the Microsoft Teams admin center.
Open [Teams apps] → [Manage apps].
Click "+ Upload" → "Upload a custom app" and select the ZIP file created in Step 4.
This operation requires Microsoft 365 tenant admin permissions. If you do not have permissions, ask your organization's Teams admin.
Sideloading for testing or development
Open the Microsoft Teams desktop app.
Click "Apps" at the bottom of the left menu.
Click [Manage your apps] → [Upload a custom app] and select the ZIP file.
If "Upload a custom app" is not displayed, ask your organization's Teams admin to enable custom app upload permissions.
Search for and add the Bot
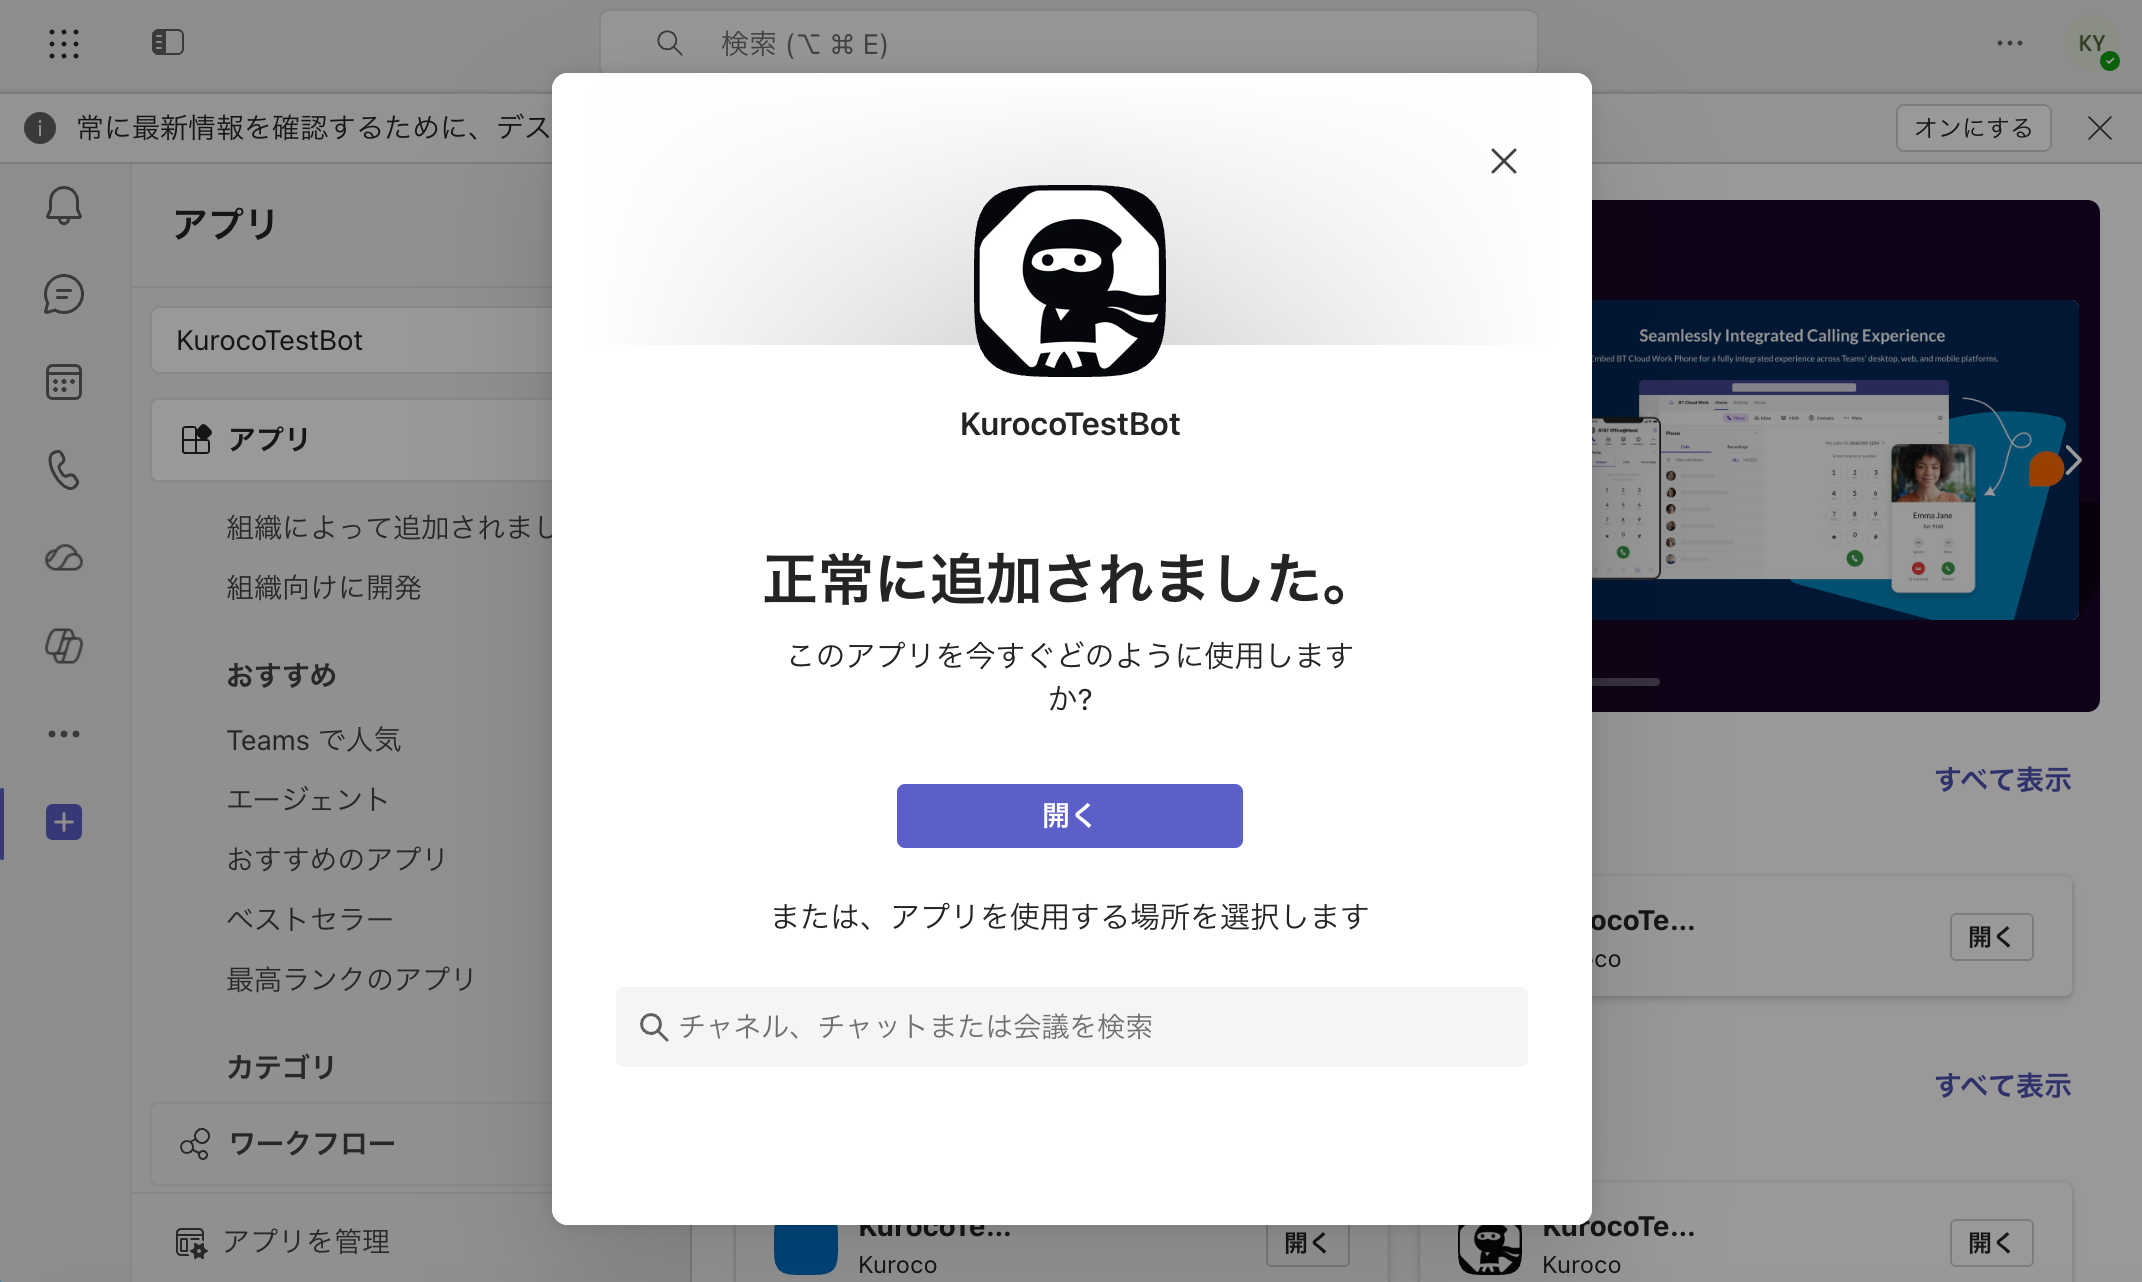
After uploading, type the Bot name in the Teams "Apps" search box and select it.
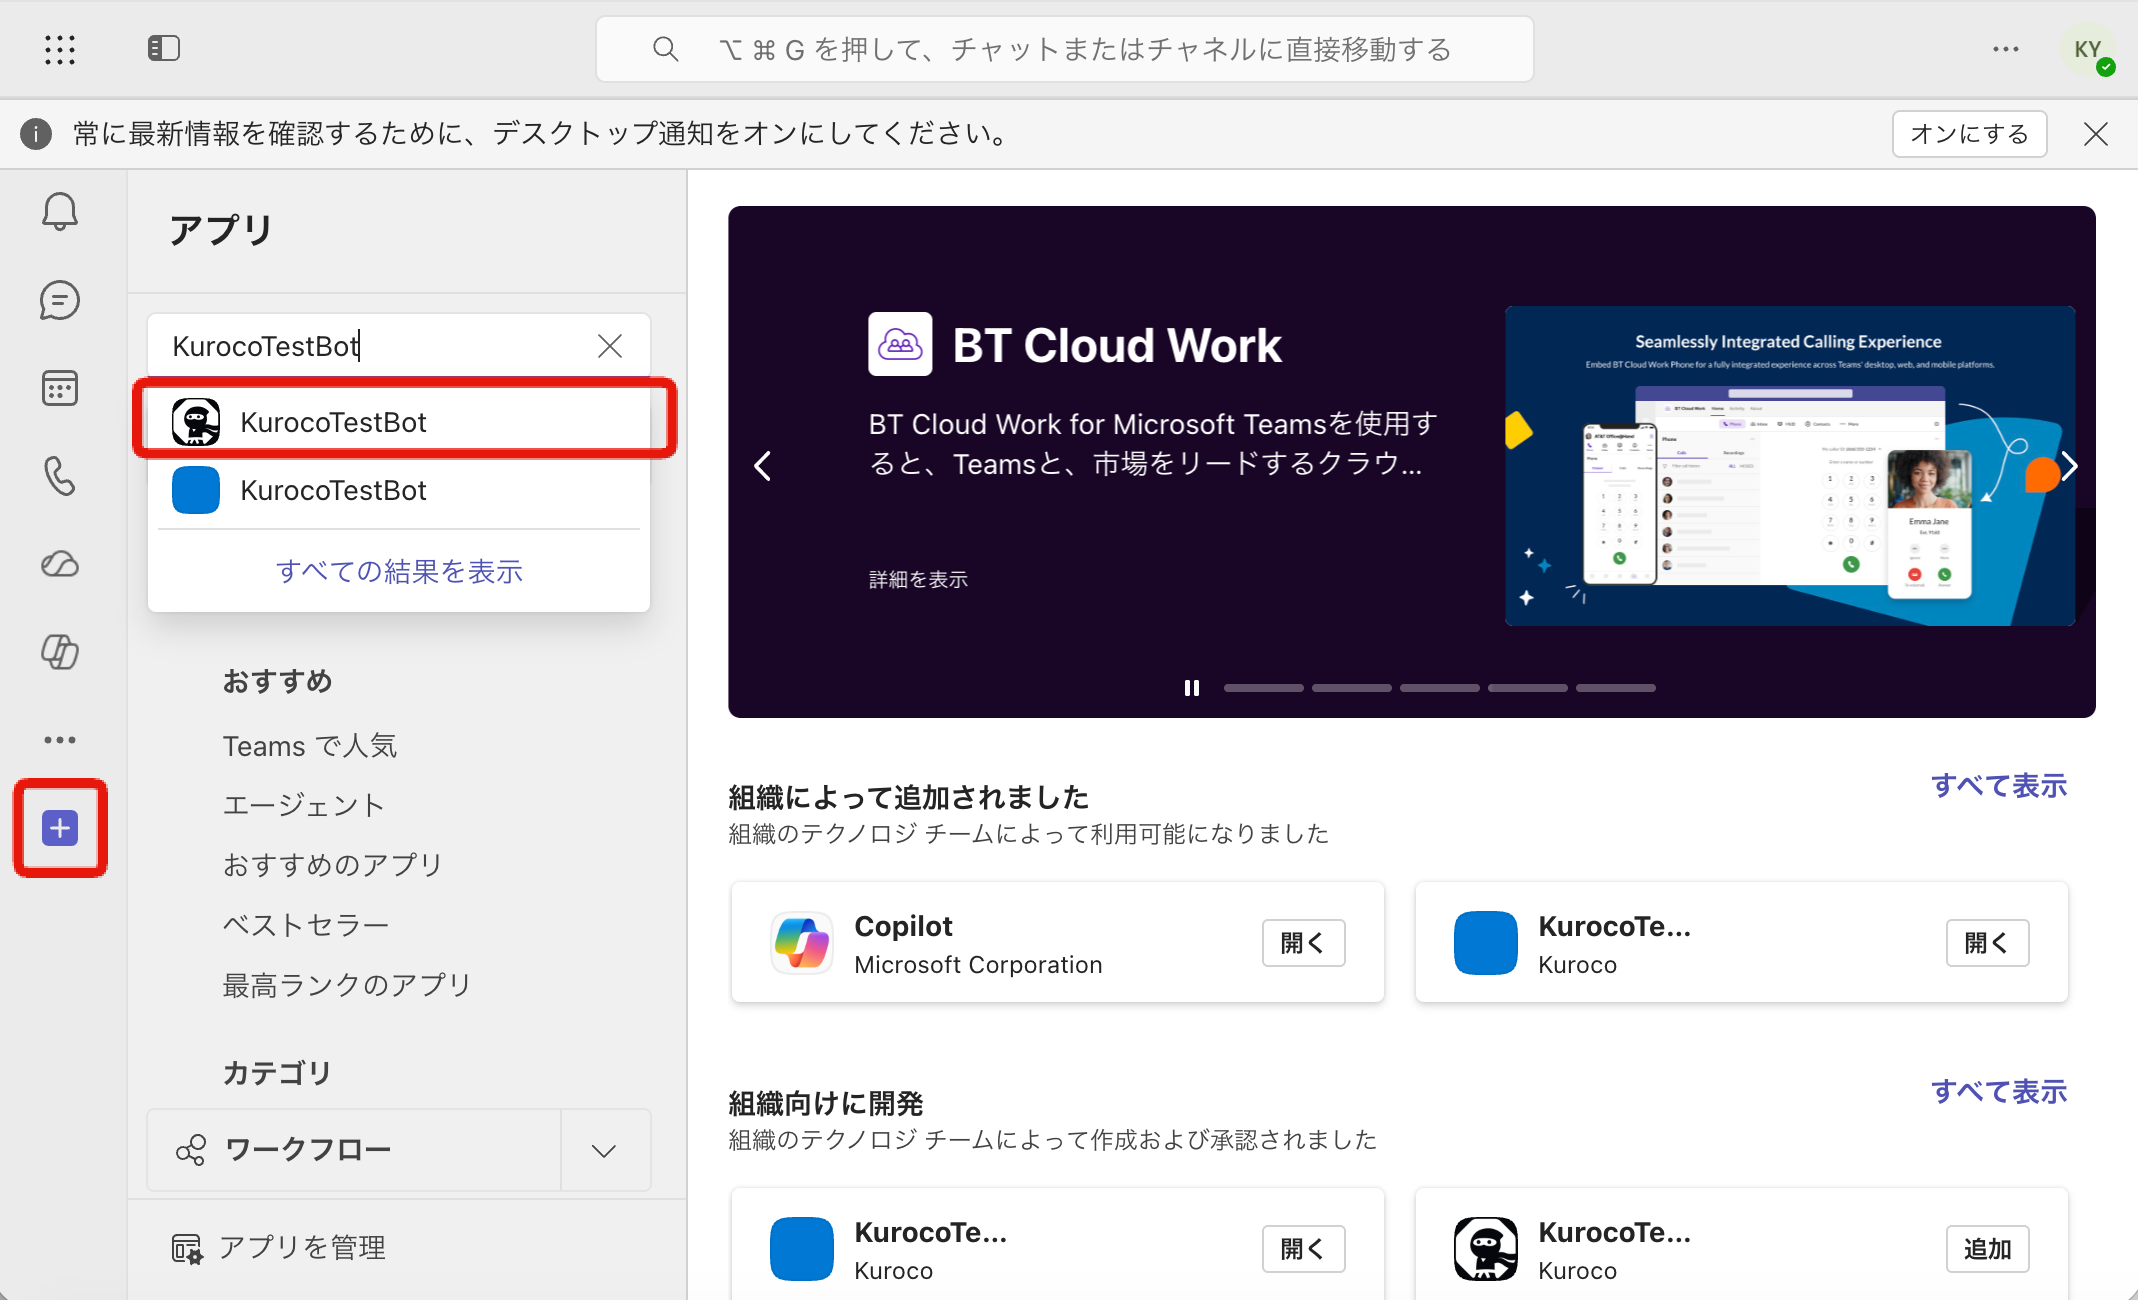
Click "Add".
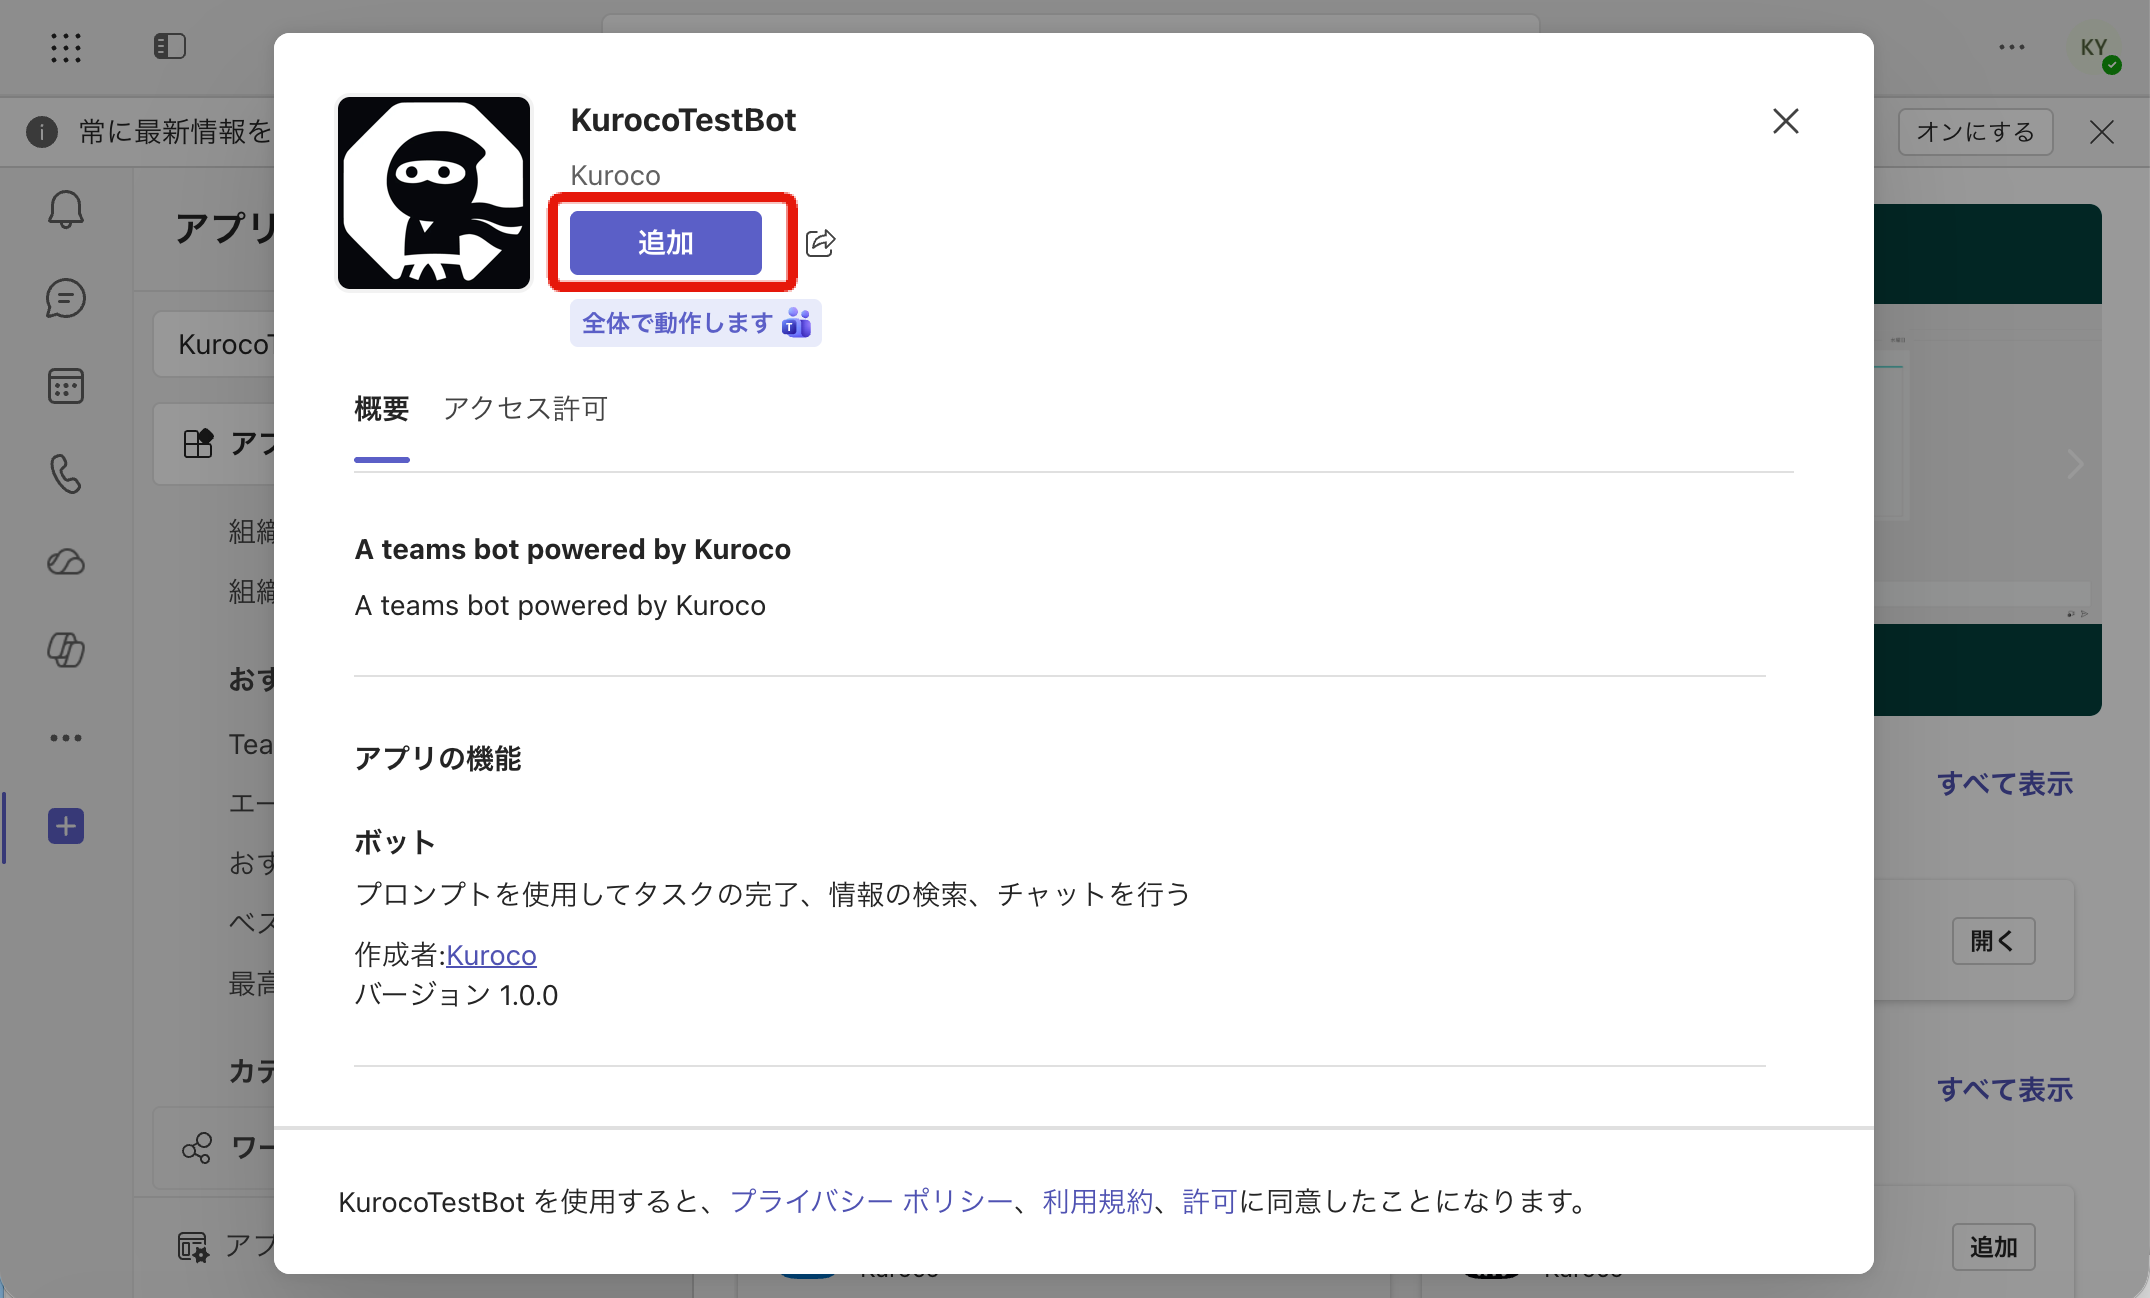
When "Successfully added" is displayed, click "Open".
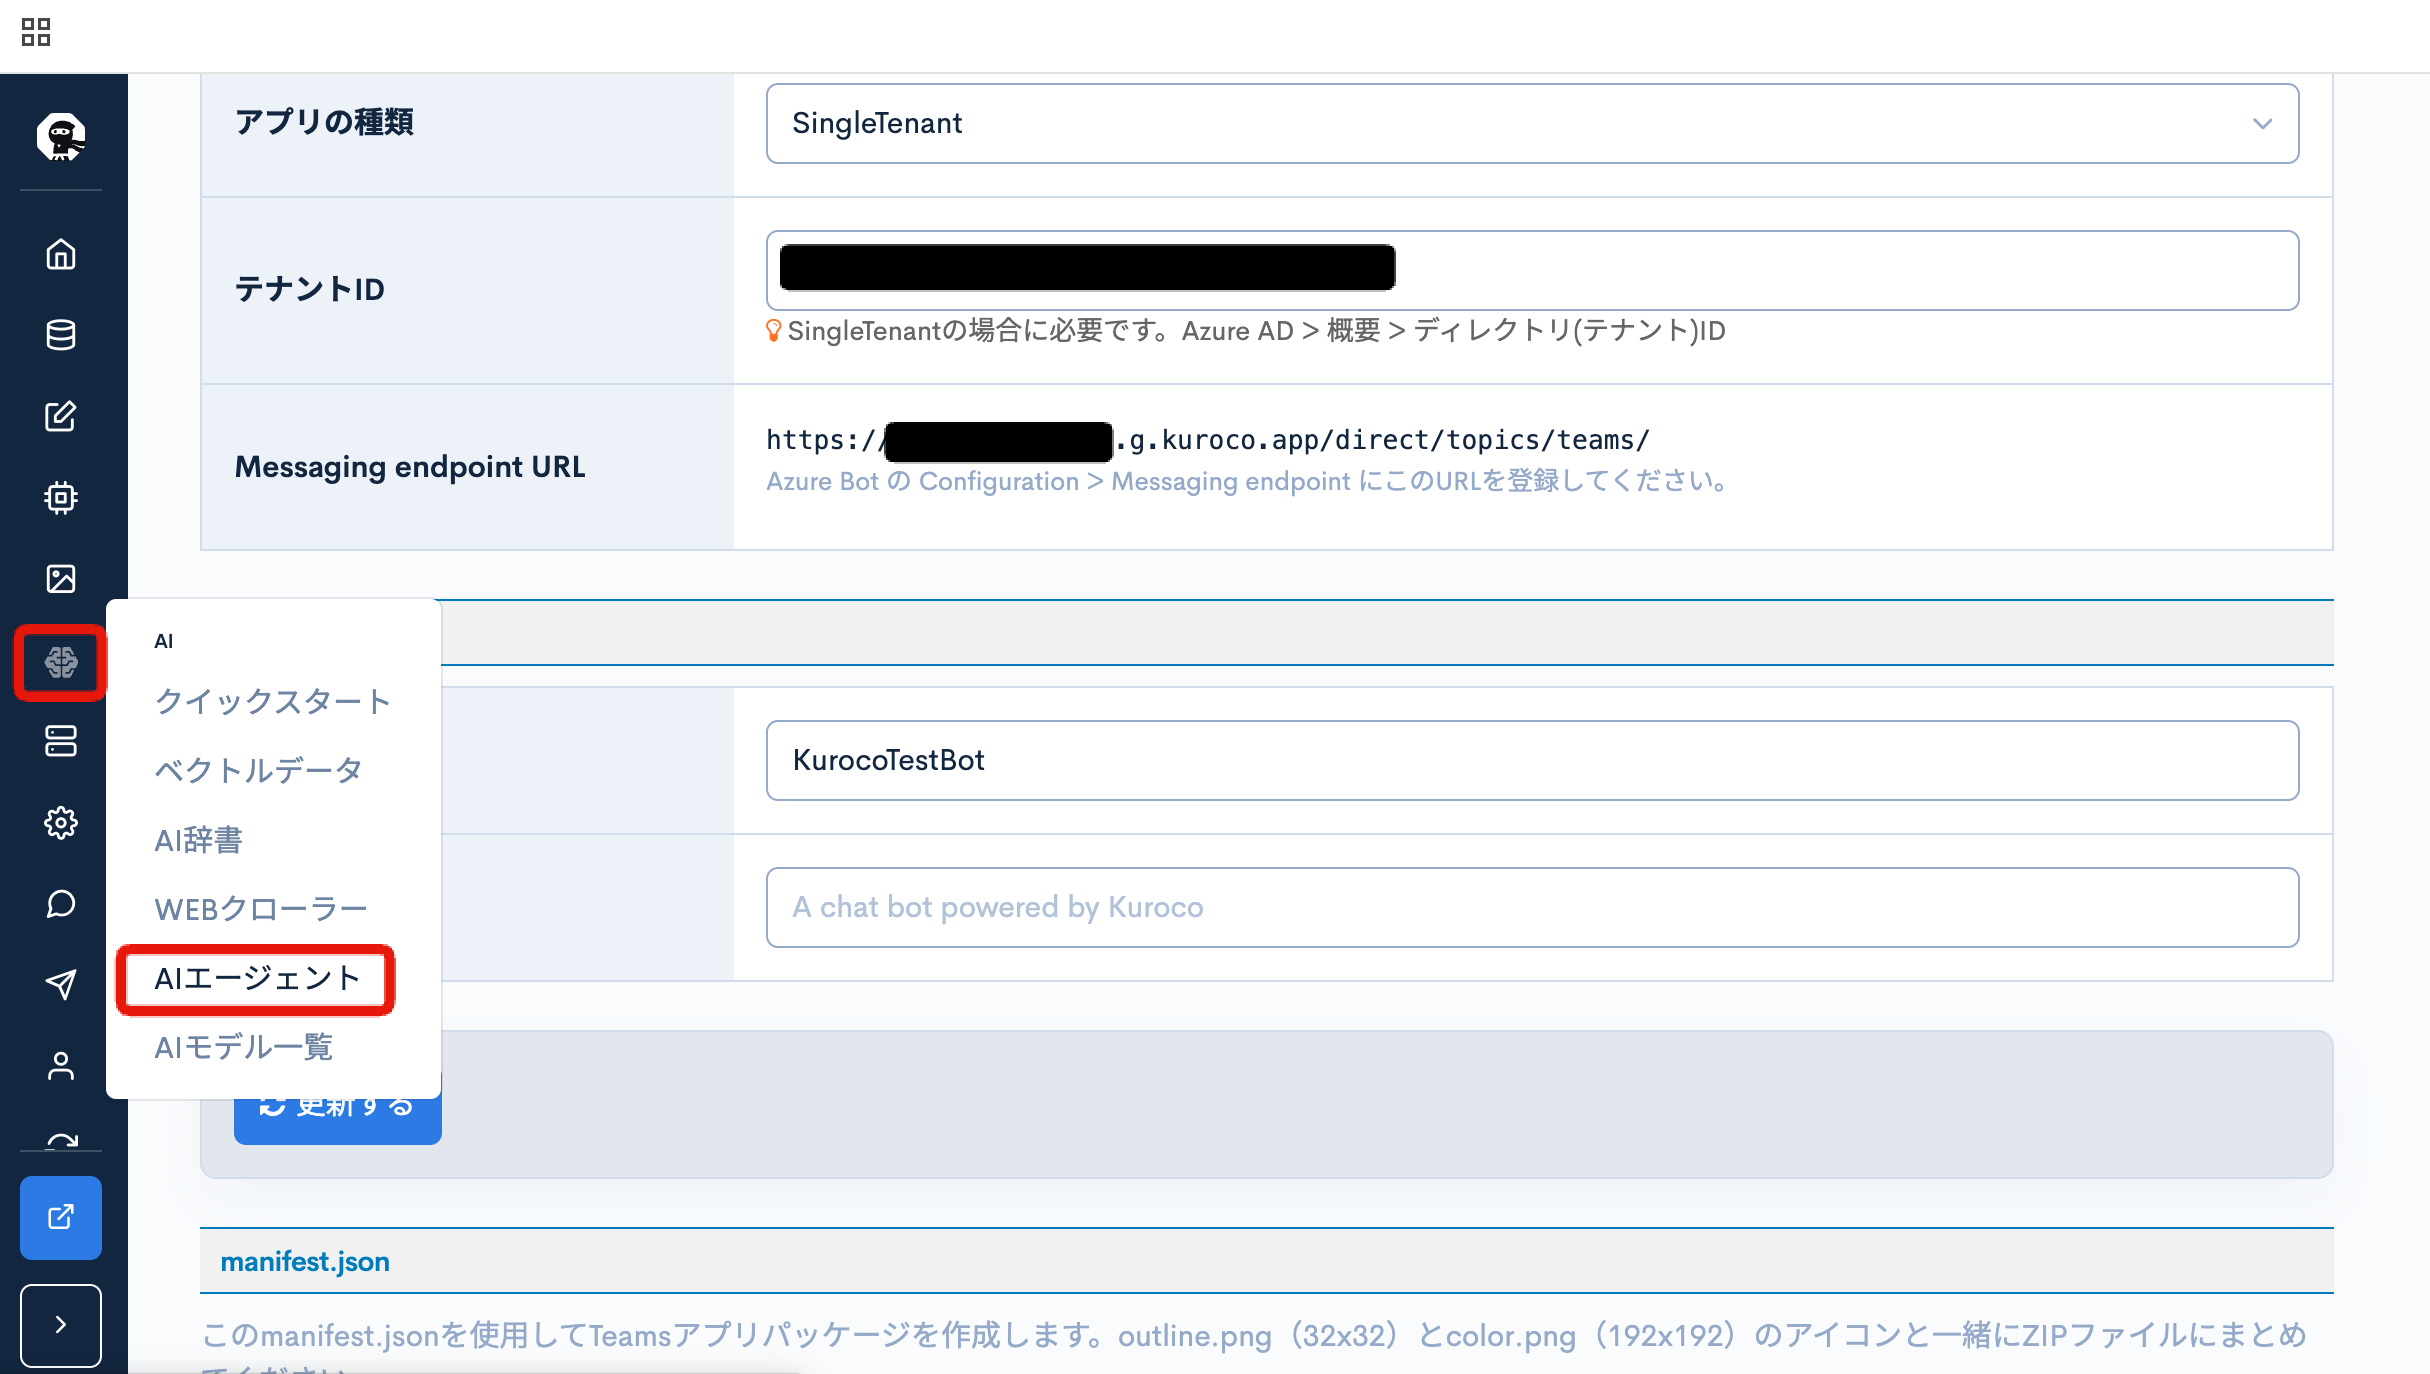
8. Verify the MCP server in the Kuroco API
In the Kuroco admin panel, click the gear icon (Settings) and open the API that contains Teams integration tools such as teams_send.
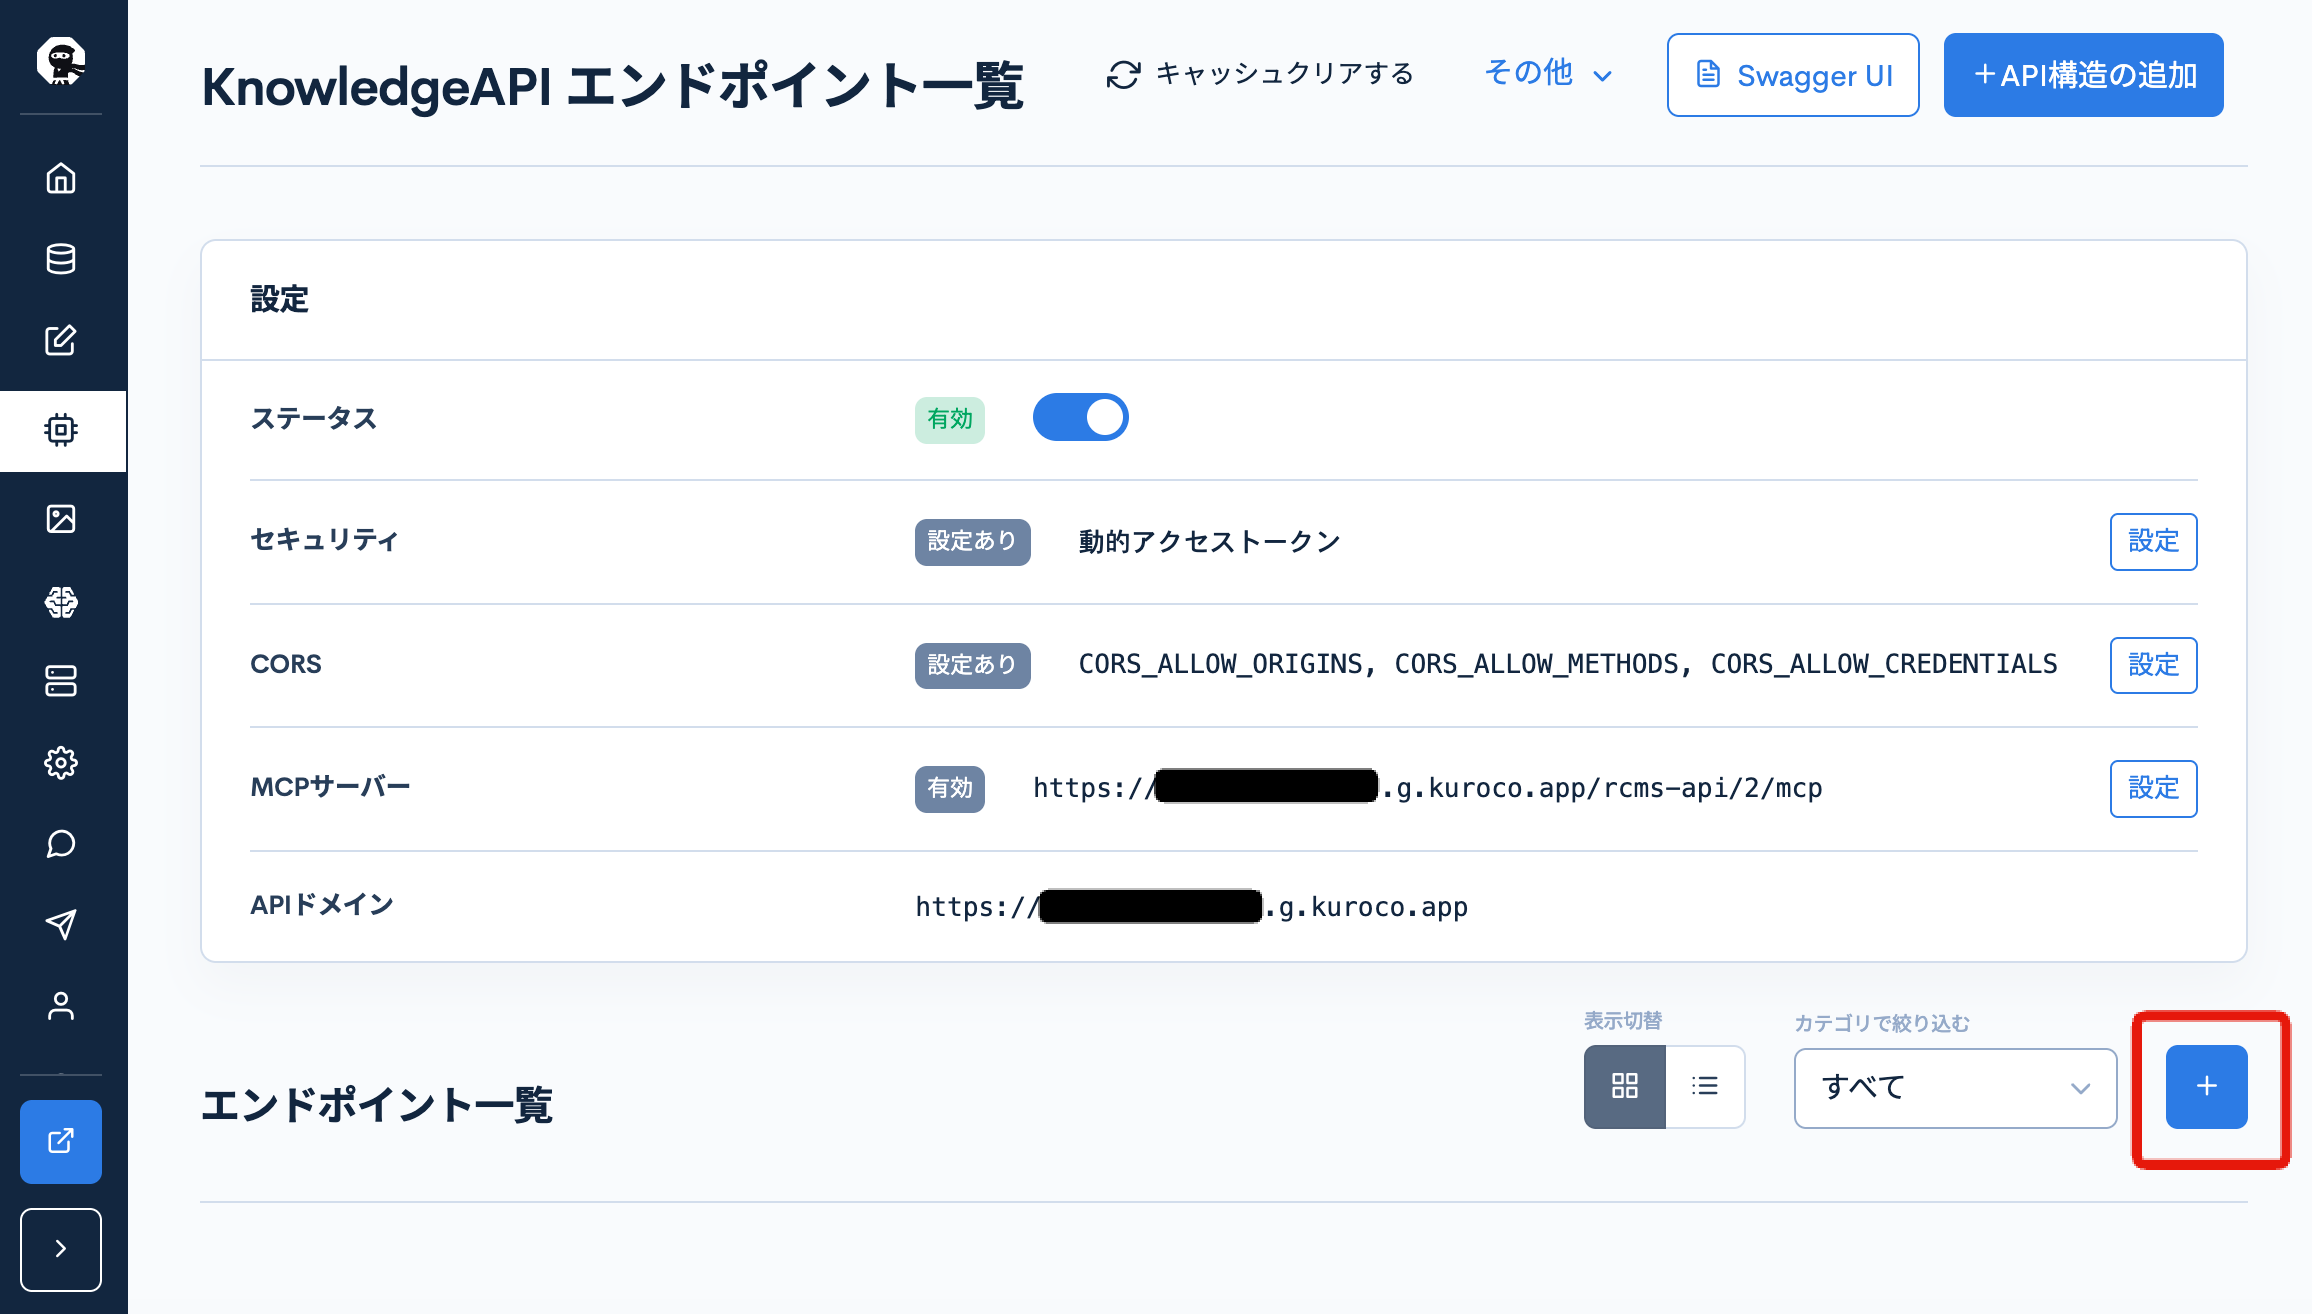
Confirm that "MCP server" is set to "Enabled". The URL displayed is the MCP endpoint you will configure in the Agent in the next step.
https://{your-site}.g.kuroco.app/rcms-api/{id}/mcp
If the MCP server is not enabled, enable it from the "Settings" button. For security, select "Dynamic access token".
Also confirm that teams_send exists in the endpoint list. If it does not, click the "+" button to add it.
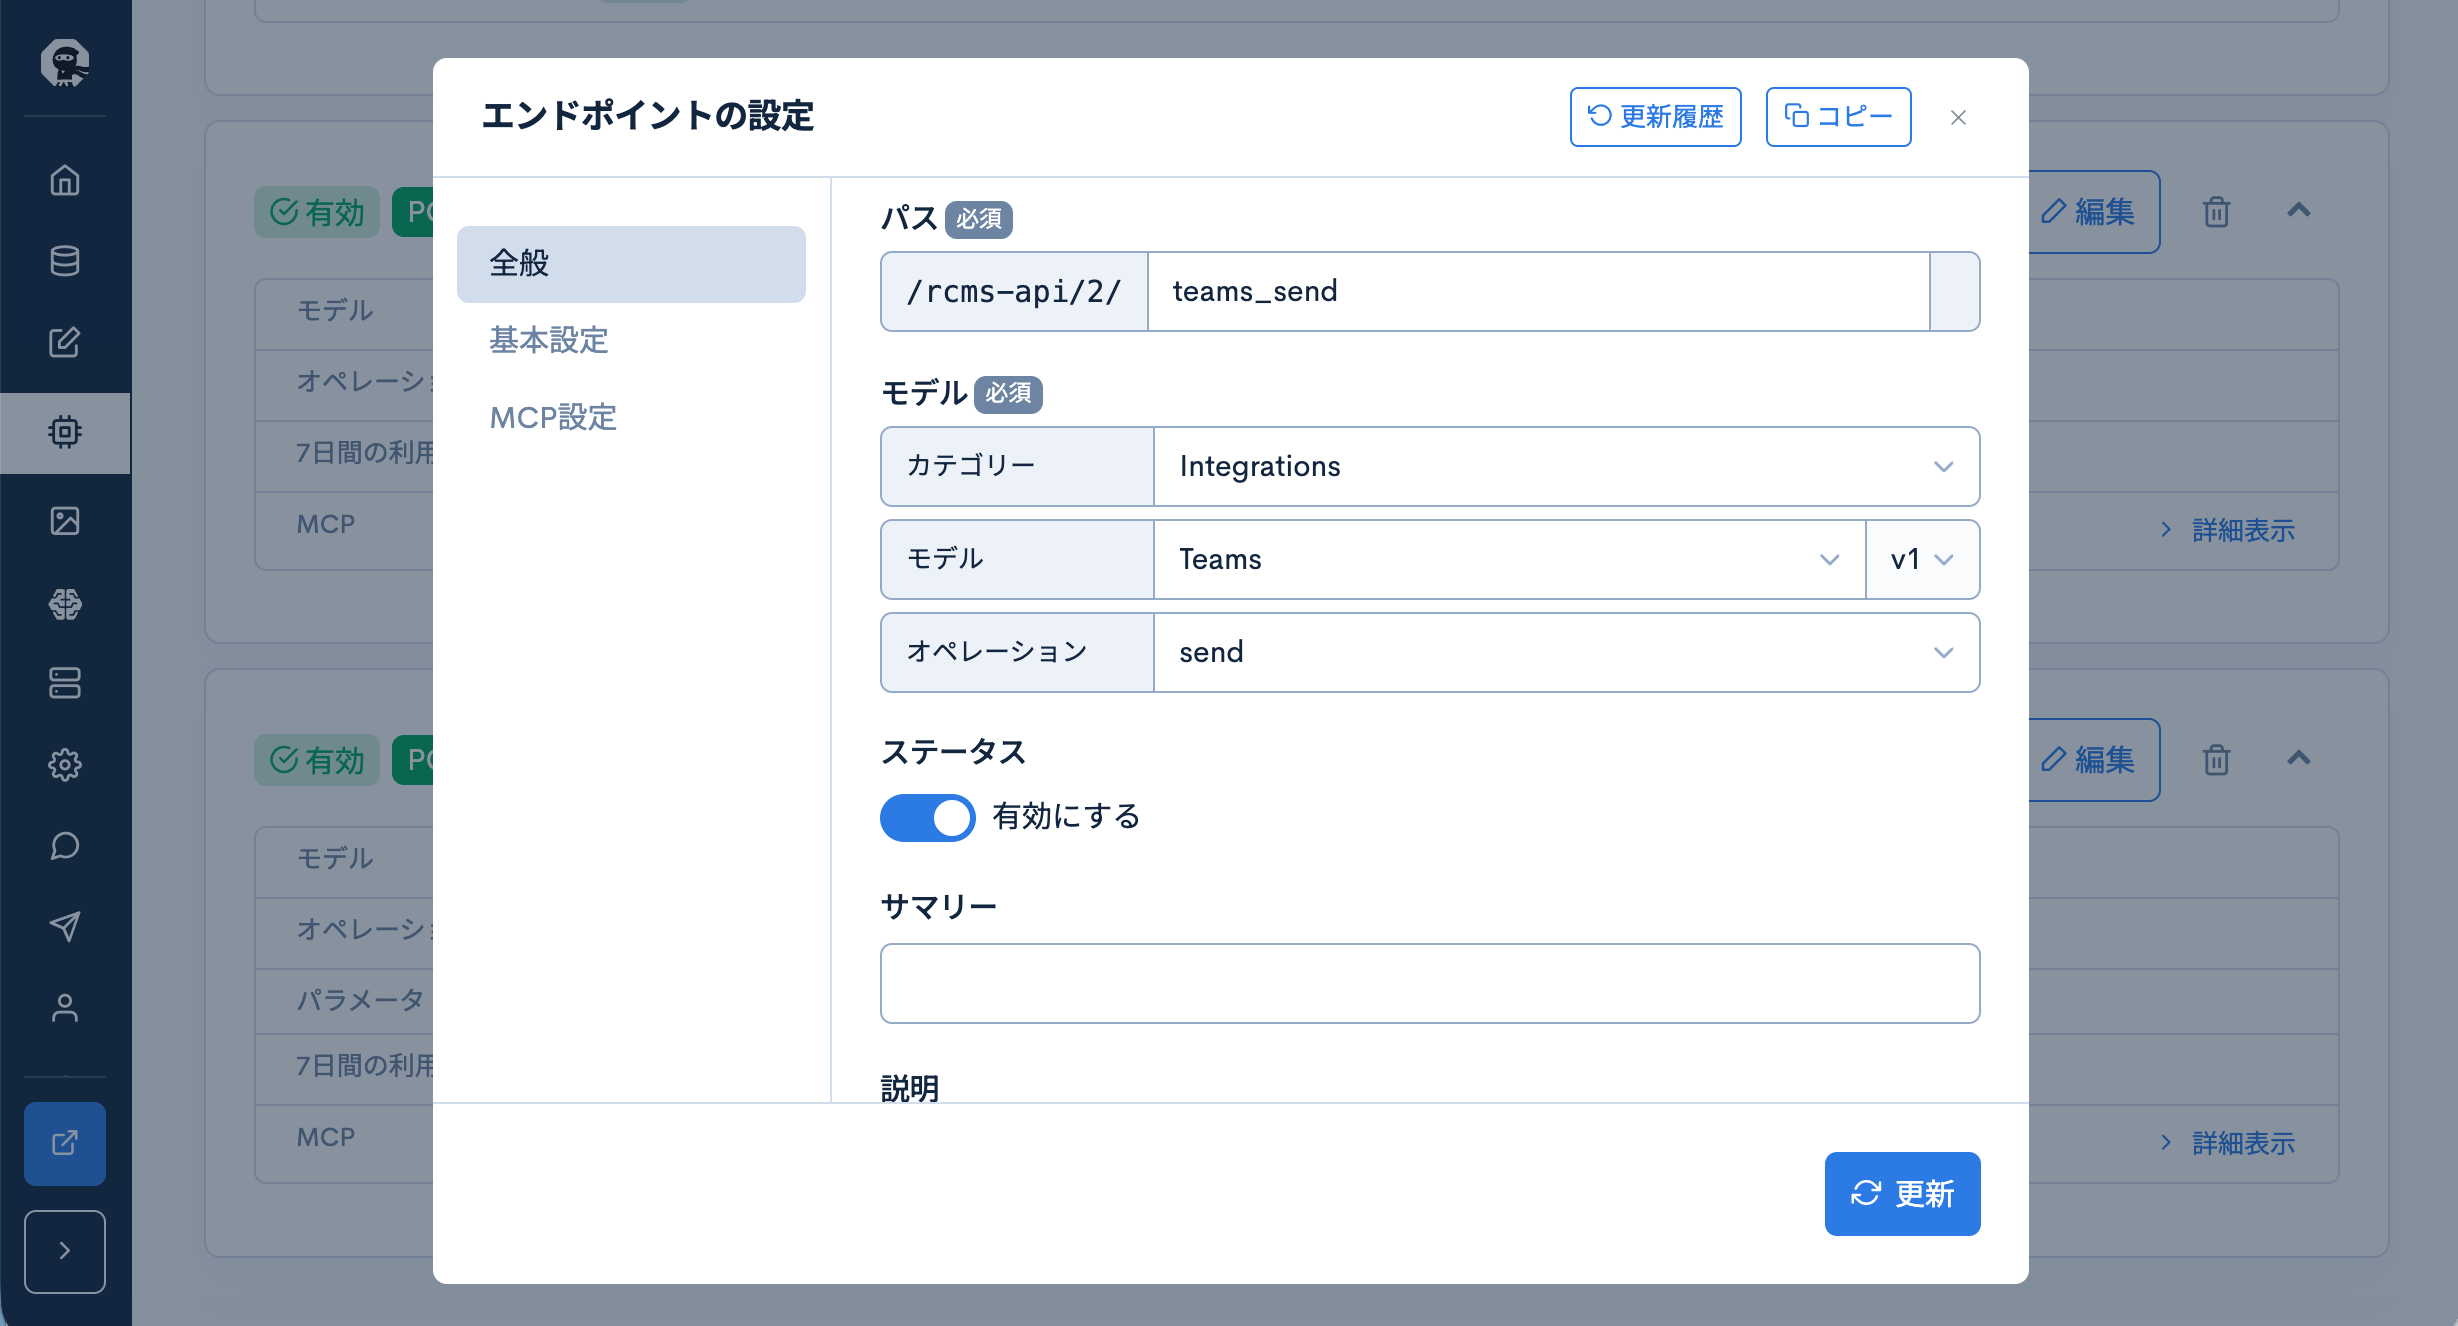
| Field | Value |
|---|---|
| Path | teams_send |
| Category | Integrations |
| Model | Teams |
| Operation | send |
| Status | Switch "Enable" to ON |
Open the "Basic settings" tab from the left menu. Leave the following parameters blank.
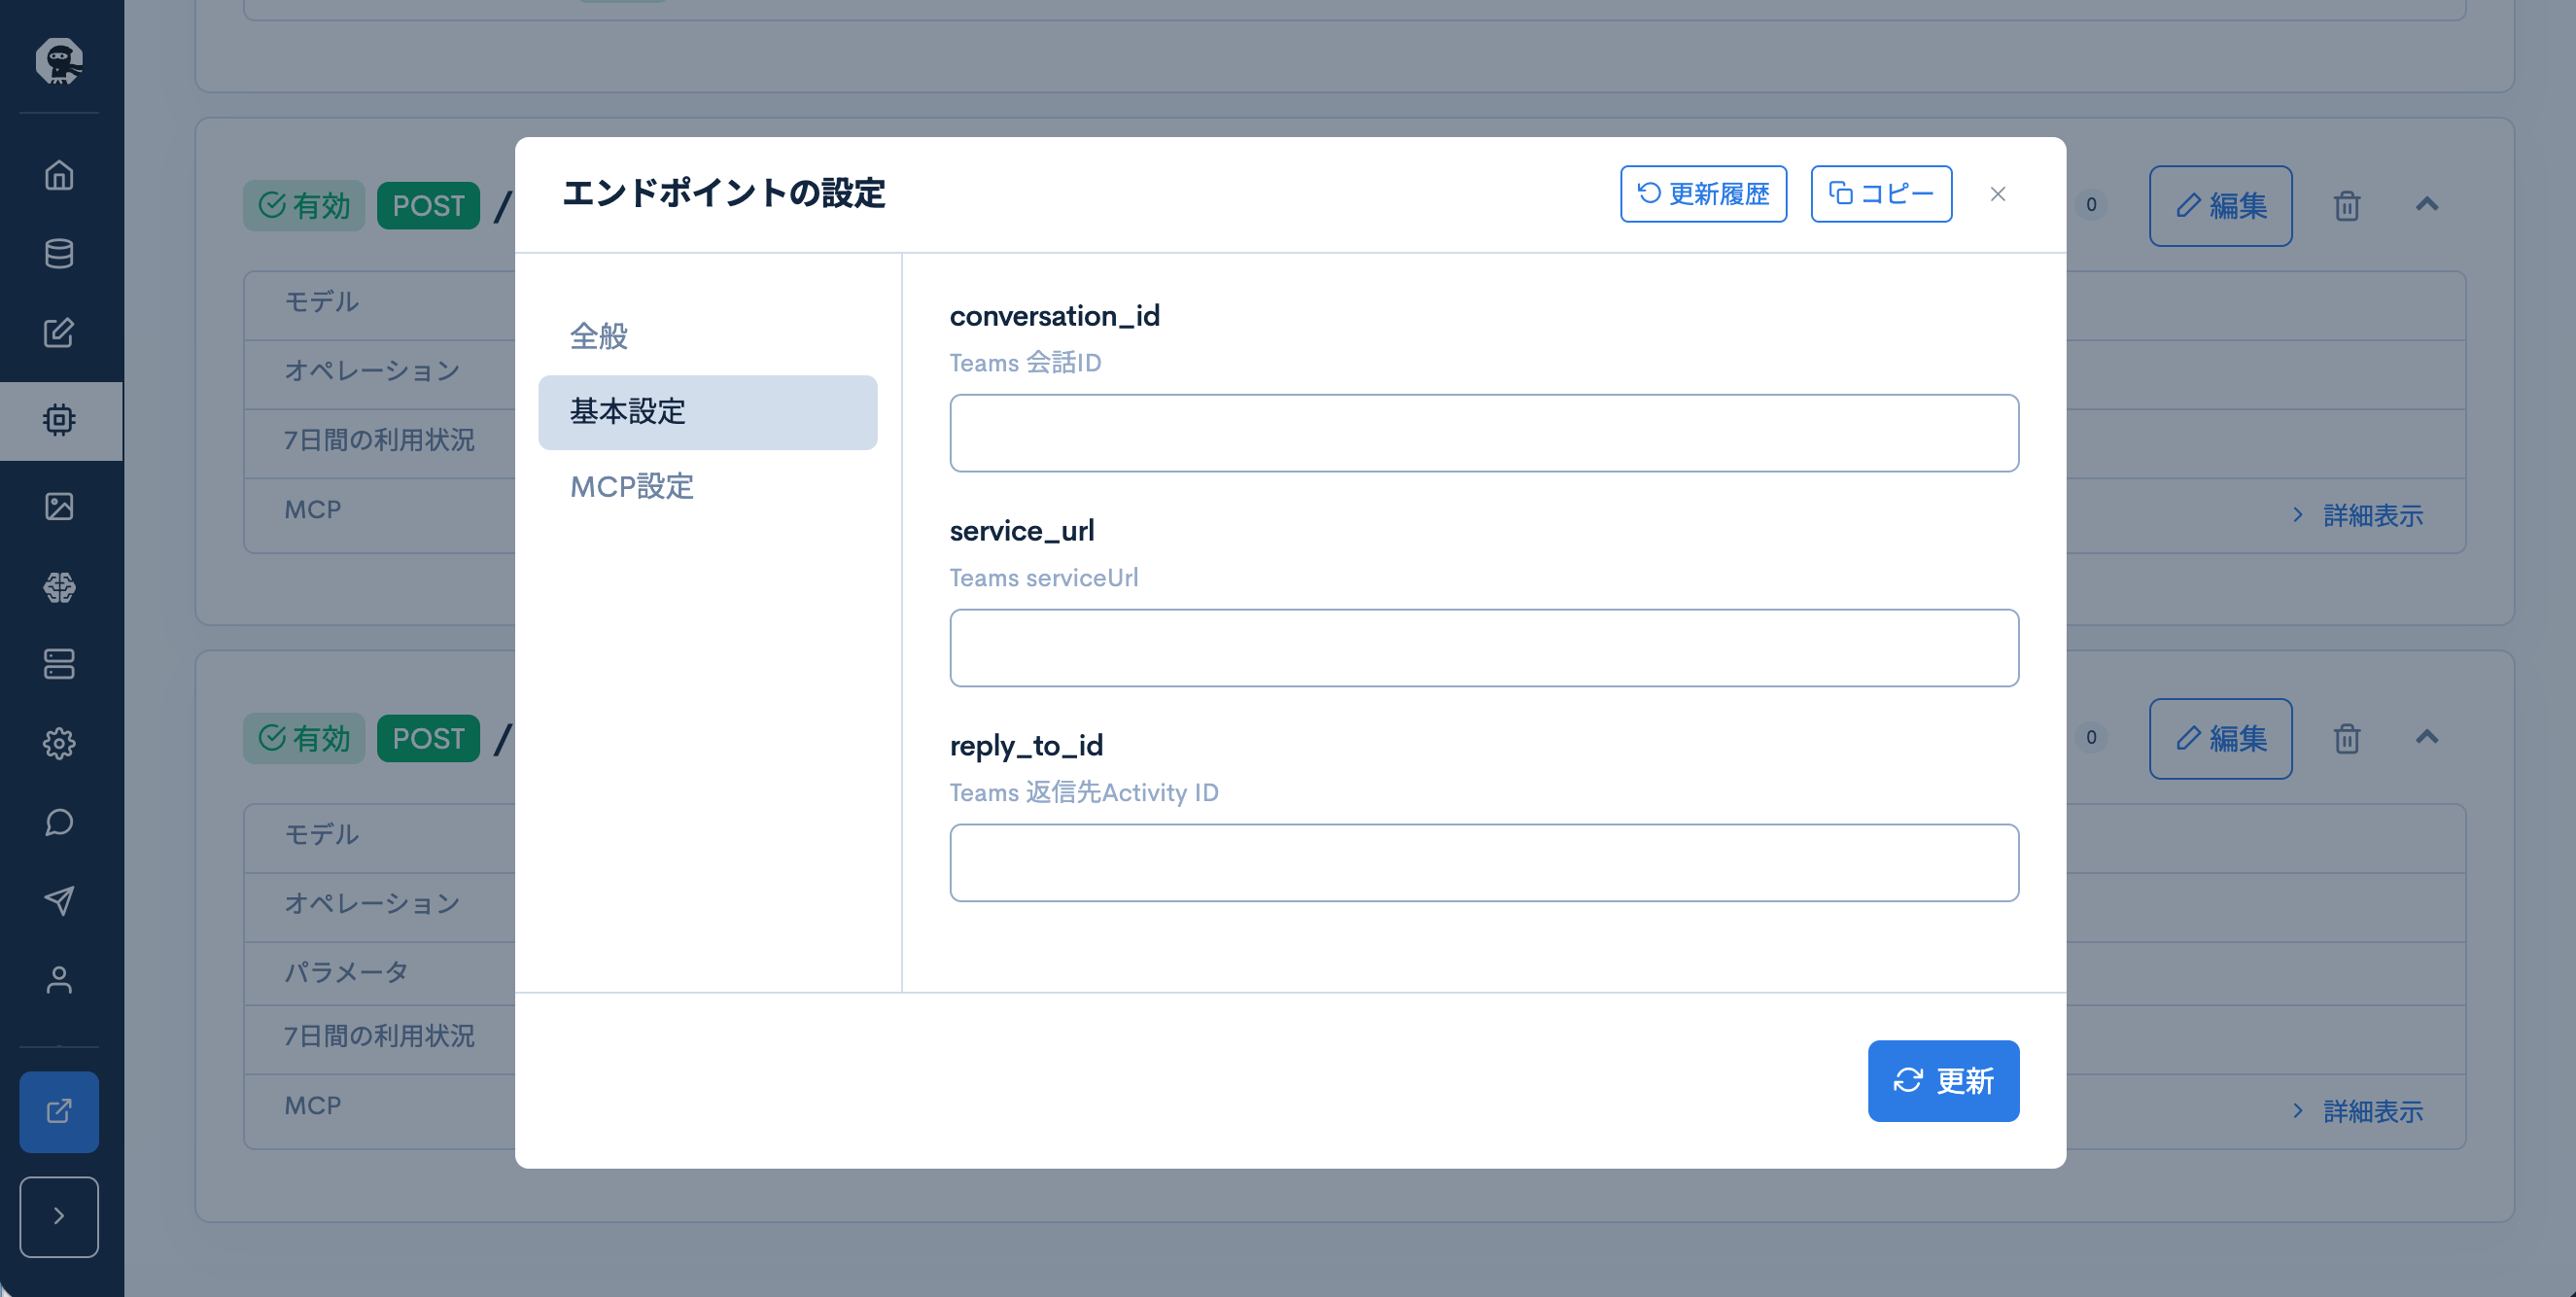
| Parameter | Description | Value |
|---|---|---|
conversation_id | Teams conversation ID | Blank (passed dynamically at runtime) |
service_url | Teams serviceUrl | Blank (passed dynamically at runtime) |
reply_to_id | Teams reply-to Activity ID | Blank (passed dynamically at runtime) |
Open the "MCP settings" tab from the left menu and configure the following.
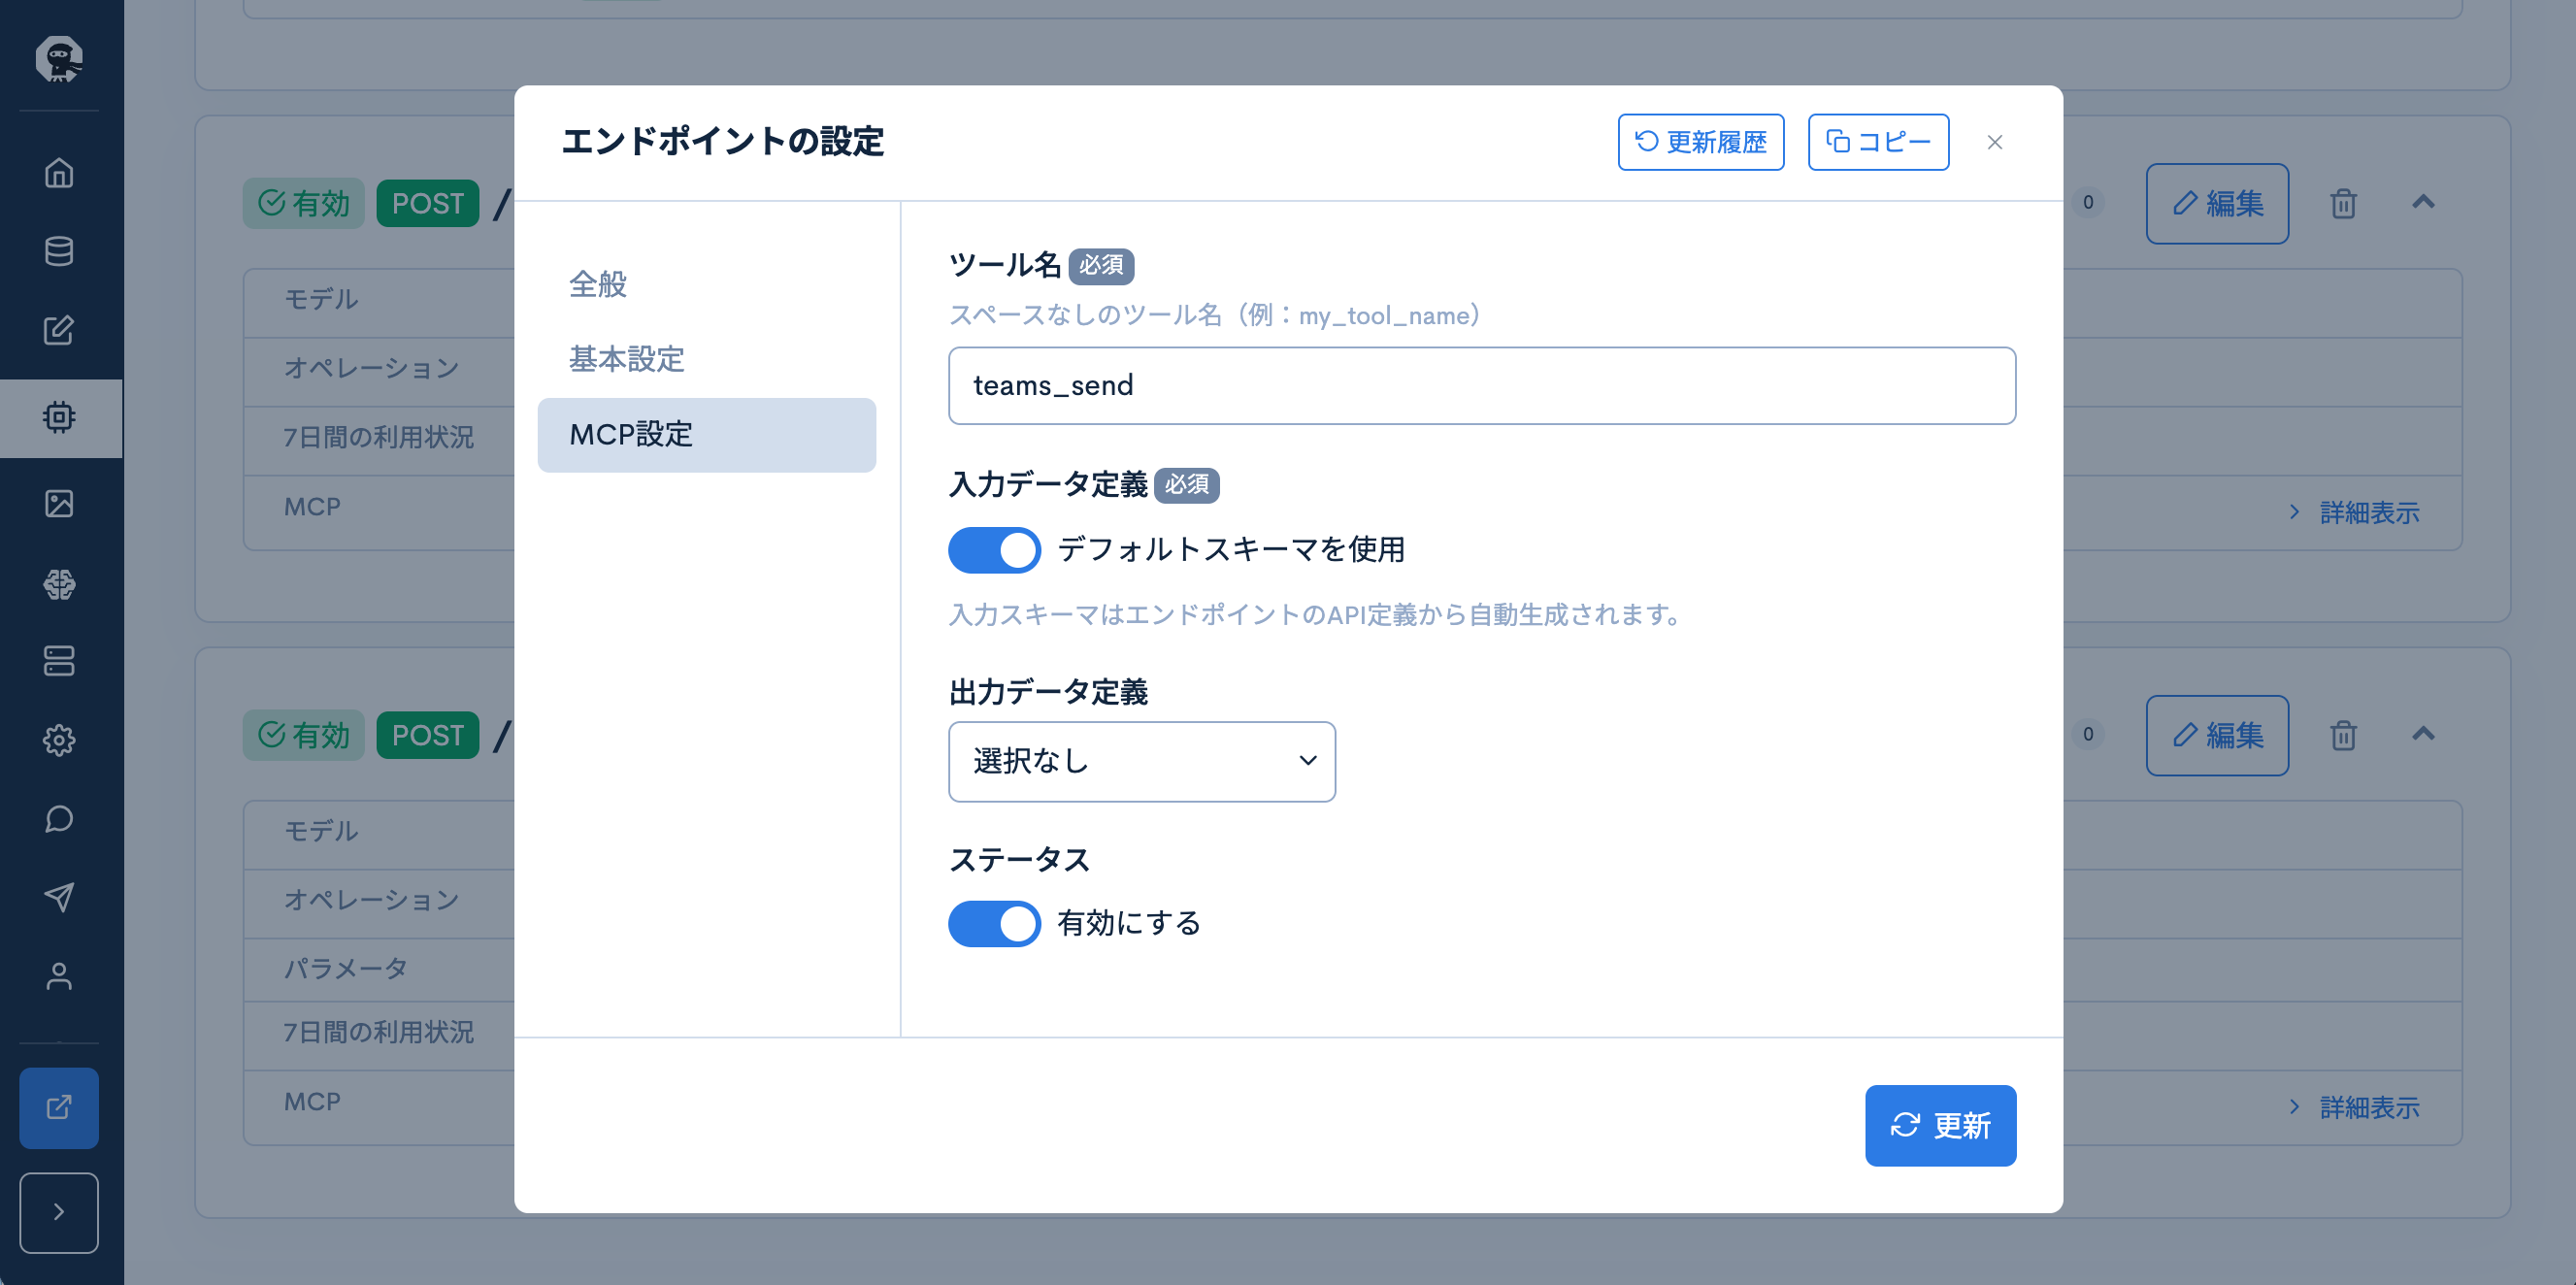
| Field | Value |
|---|---|
| Tool name | teams_send |
| Input data definition | Switch "Use default schema" to ON (auto-generated from the API definition) |
| Output data definition | None |
| Status | Switch "Enable" to ON |
Click "Update".
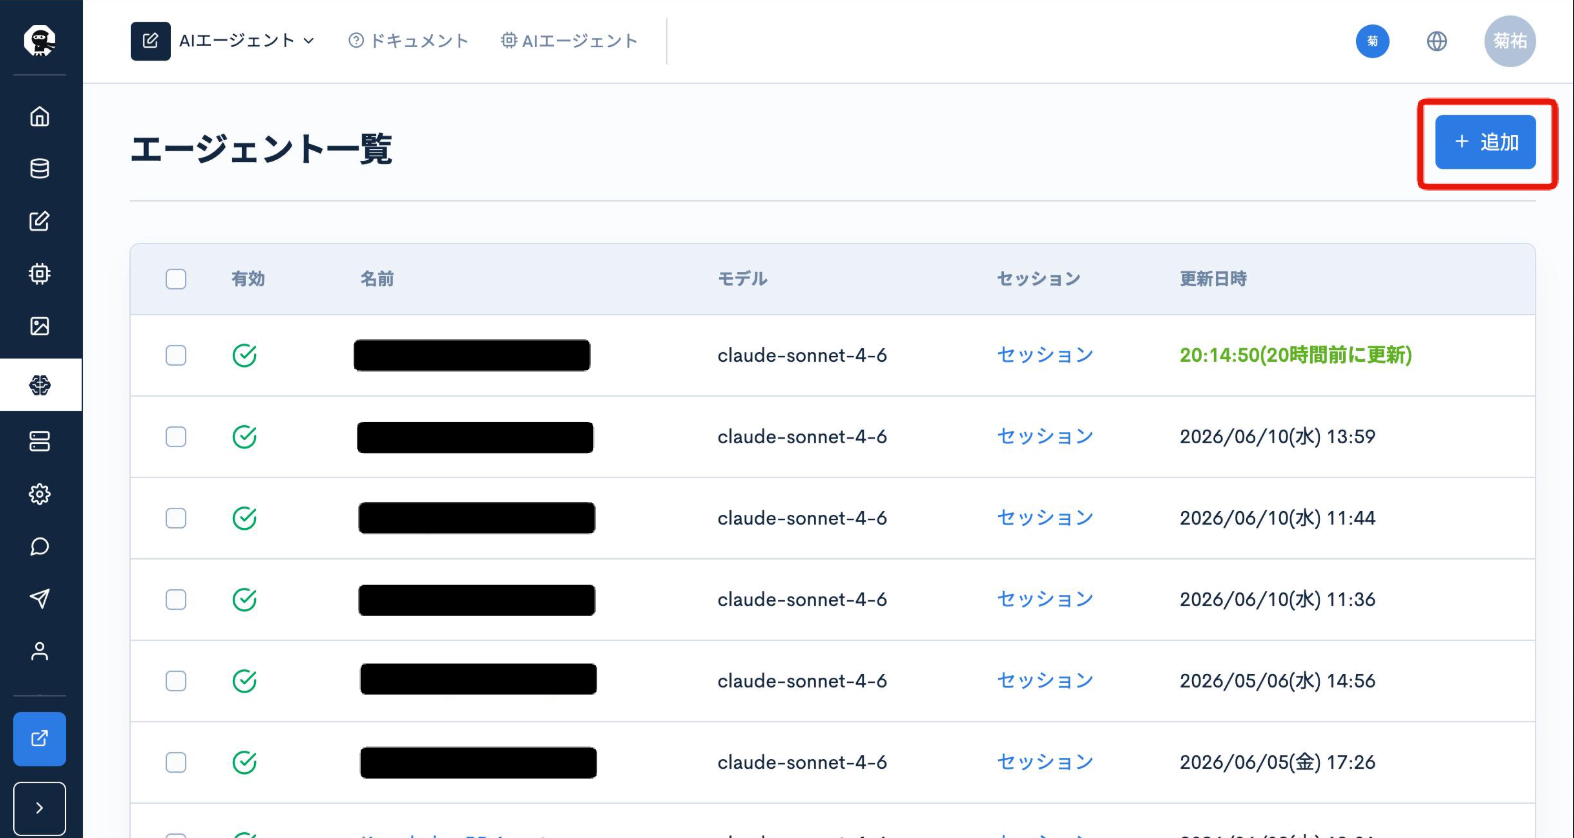
9. Create a Managed Agent in Kuroco
In the Kuroco admin panel, click the brain icon and select "AI Agents".
Click "+ Add" to create a new Agent.
Configure the following fields.
| Field | Value |
|---|---|
| Name | Any name (e.g., Teams Agent) |
| Model | Select the Claude model to use (e.g., claude-sonnet-5) |
| System prompt | See the example below |
| Status | Switch "Enable" to ON |
Example system prompt:
You are an assistant that searches internal knowledge and answers questions in Teams.

## Instructions (follow in order)

### Step 1: Classify intent

Classify the incoming message into one of the following three categories:

- reply: A message that requires a response — questions, consultations, requests, etc.
- knowledge_add: An explicit intent to add or update internal knowledge
  (e.g., "I'd like to share this", "Please add this" — messages that clearly intend to provide information. Messages that sound like questions should be classified as reply.)
- both: Both reply and knowledge_add are needed

When in doubt, default to reply.

---

### Step 2: For reply / both

1. Search for relevant knowledge using the knowledge_search tool
   - Always specify cnt=10
   - Always use vector_search
   - Break the question into 2–3 search queries
   - If the first search is insufficient, search again with different keywords

2. Reply using teams_send (see Teams reply format below)

For both, also execute Step 3 afterward.

---

### Step 3: For knowledge_add / both

1. Duplicate check
   Search for similar documents using knowledge_search (cnt=5, use vector_search)
   - If the content is already sufficiently covered → result = "Existing document found: {title}" → go to 5
   - If adding content to an existing document is appropriate → note the file path → go to 2

2. Check for existing PRs
   Check for existing update PRs for the same content or target file
   - If one exists → result = "Existing PR found: {PR link}" → go to 5
   - If none → go to 3

3. Determine the file path
   Choose the save location based on the following directory structure:
   - Support/ — Support and inquiry responses
   - Kuroco/ — Kuroco CMS usage, settings, API
   - Diverta Inc./ — Internal rules and company information
   - General Q&A/ — Catch-all for questions not covered by other categories
   Use a concise slug for the filename (e.g., email-auto-reply-settings.md)

4. Create Markdown and open a GitHub PR

   # Title

   ## Overview
   (1–2 sentences describing the content)

   ## Details
   (Steps, explanations, code examples, etc.)

   ## Related
   (Related documents and links, if any)

   - Branch name: knowledge/update/{YYYYMMDD-HHMMSS}
   - Create or update the file at the determined path
   - Open a PR (title: docs: {summary of content}; include the source in the body)
   - PR requires review (do not auto-merge)
   - result = "PR created: {PR URL}" → go to 5

5. Report the result using teams_send

---

### Step 4: Record a query_log (required for all intents)

Pass only the following fields (do not include topics_id):
{
  "subject": "Key point of the message (within 200 characters)",
  "source": "teams",
  "maxDense": "0.9",
  "hitCount": 5
}
- Pass maxDense as a string (e.g., "0.9")
- maxDense criteria:
  - "0.9"–"1.0": A clear answer was found in the knowledge base
  - "0.5"–"0.8": Partially answered but information was incomplete
  - "0.0"–"0.4": No relevant knowledge was found
- hitCount is the total number of hits from knowledge_search (integer)
- For knowledge_add only: hitCount=0, maxDense="0.0" is acceptable

---

## Teams reply format (important)

In the message field of teams_send, enter text that will be displayed as-is in Teams.

Do not use:
- Markdown syntax
- Bullet list markers "-" or "*"
- Heading markers "##" or "###"
- Bold, italic, code blocks, or tables
- Markdown link syntax [label](URL)

Reply format:
{Answer based on search results. Use numbered lists for steps and bullet points for key items.}

Reference sources:
・{subject}: {URL}

## How to write reference sources (important)
- Always use the following URL template:
  https://{your-site}.g.kuroco-mng.app/management/topics/topics_edit/?topics_id=TOPICS_ID
  Replace TOPICS_ID with the topics_id (number) from the search result
- Use the subject field from the search result as the display text
- Do not use GitHub URLs (github.com/...) or ext_2 file paths as reference sources
- Use only {your-site}.g.kuroco-mng.app

## Notes
- If the information is not in the search results, honestly say "No relevant knowledge found"
- Do not supplement with assumptions or external knowledge. Use only search results.
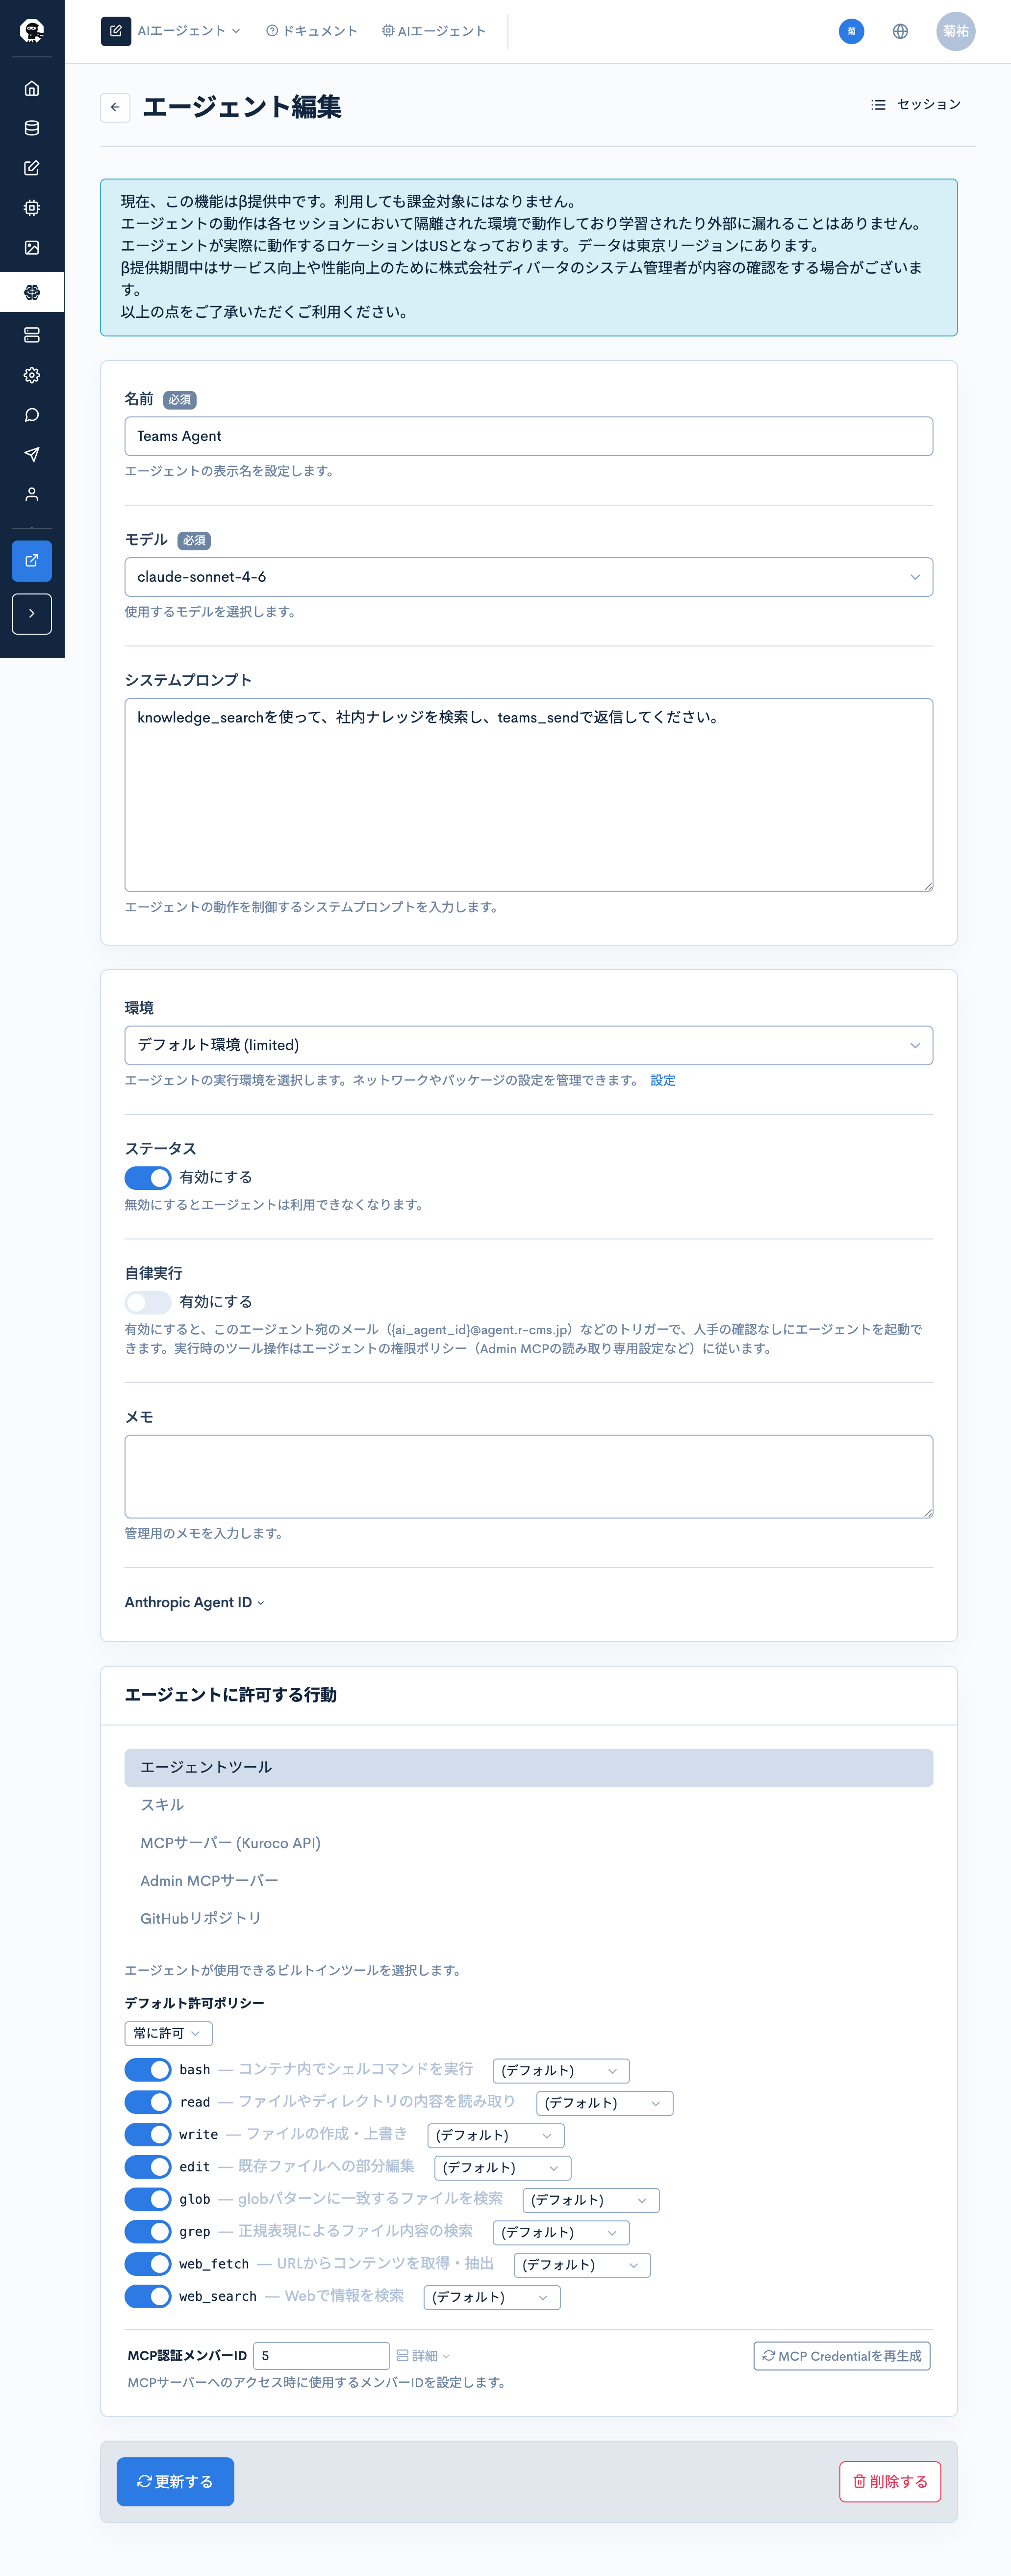
In the "Permitted Agent actions" section, configure the following.
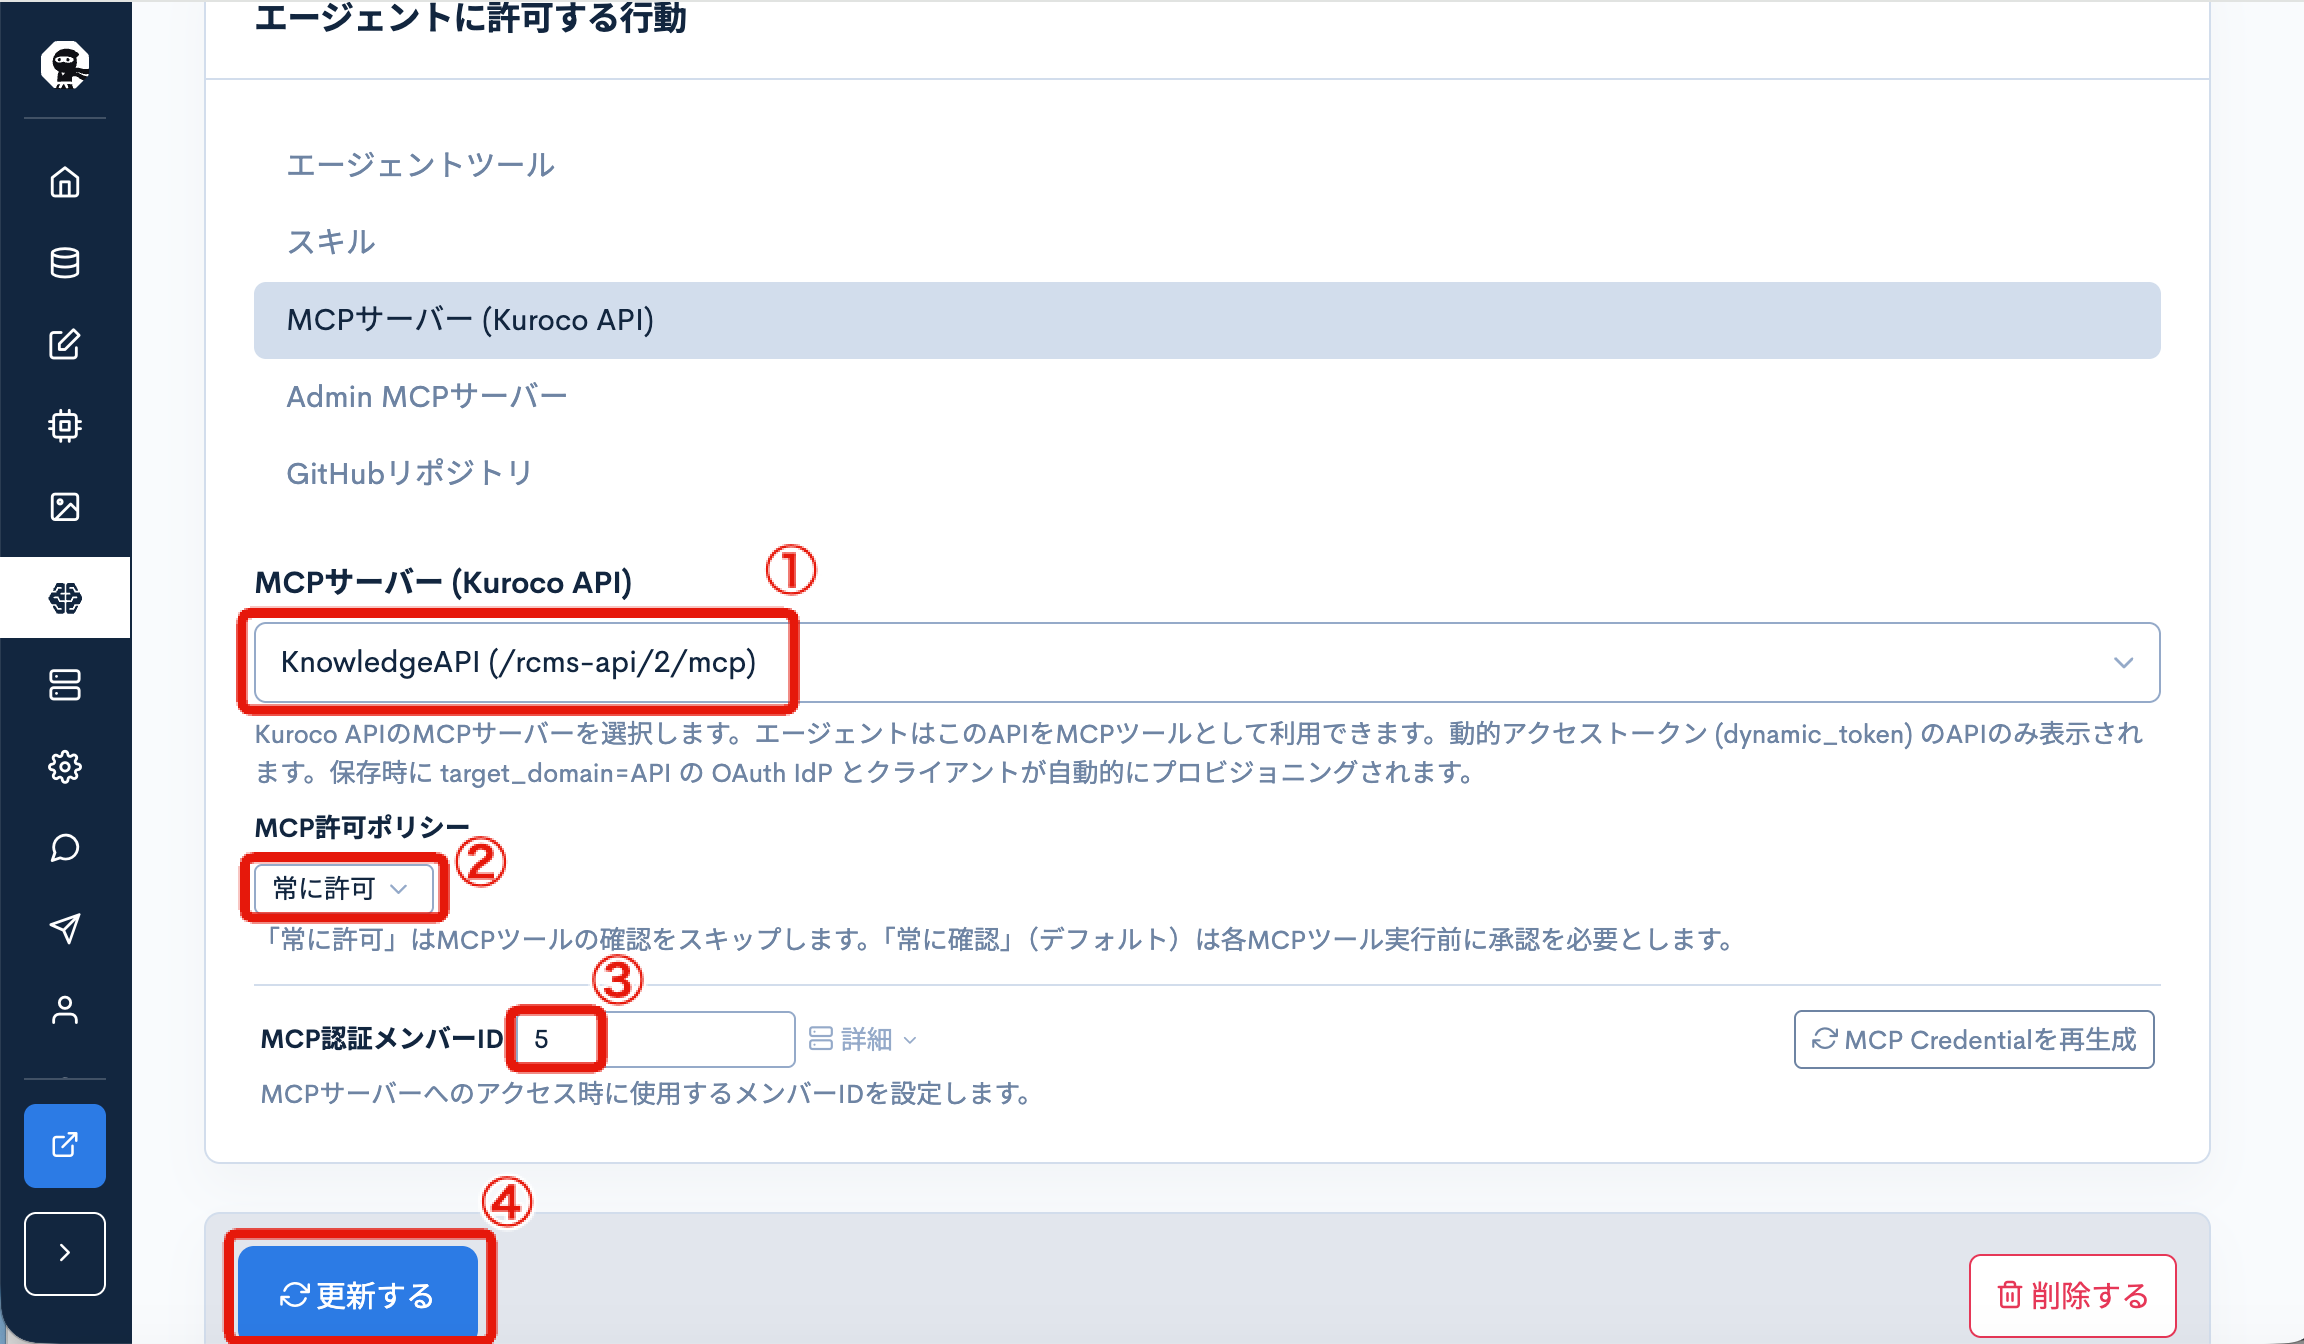
| Setting | |
|---|---|
| ① MCP server (Kuroco API) | Select the API confirmed in Step 8 (the one containing Teams integration tools such as teams_send) |
| ② MCP permission policy | Select "Always allow" (required for the Agent to execute tools autonomously) |
| ③ MCP auth member ID | Enter your Kuroco member ID |
| ④ Update | Click to save |
Click "Update" to save.
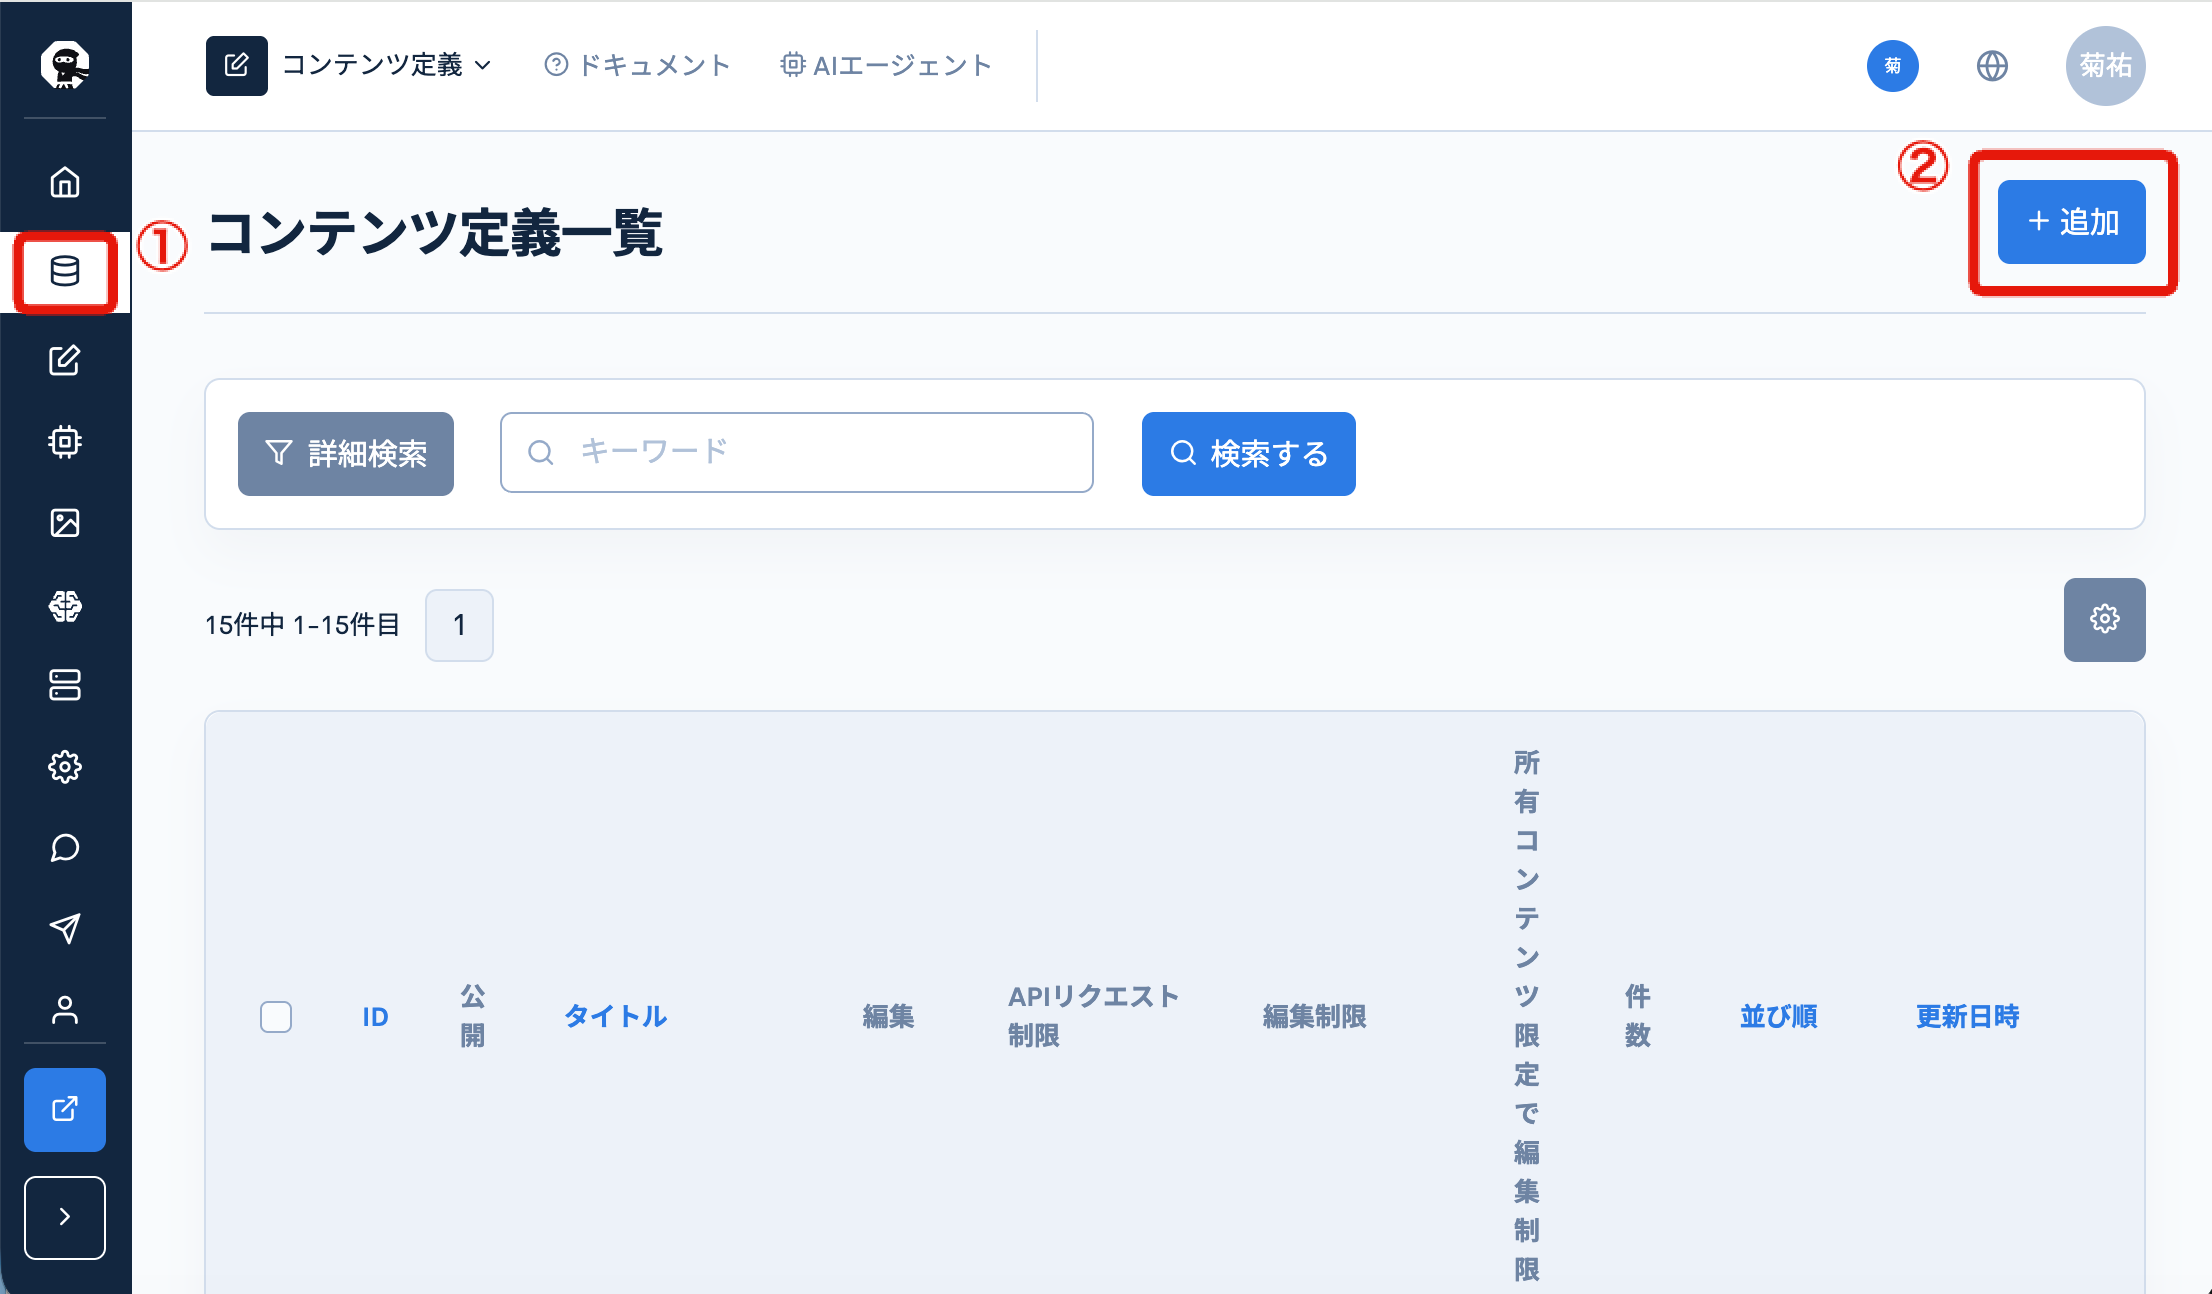
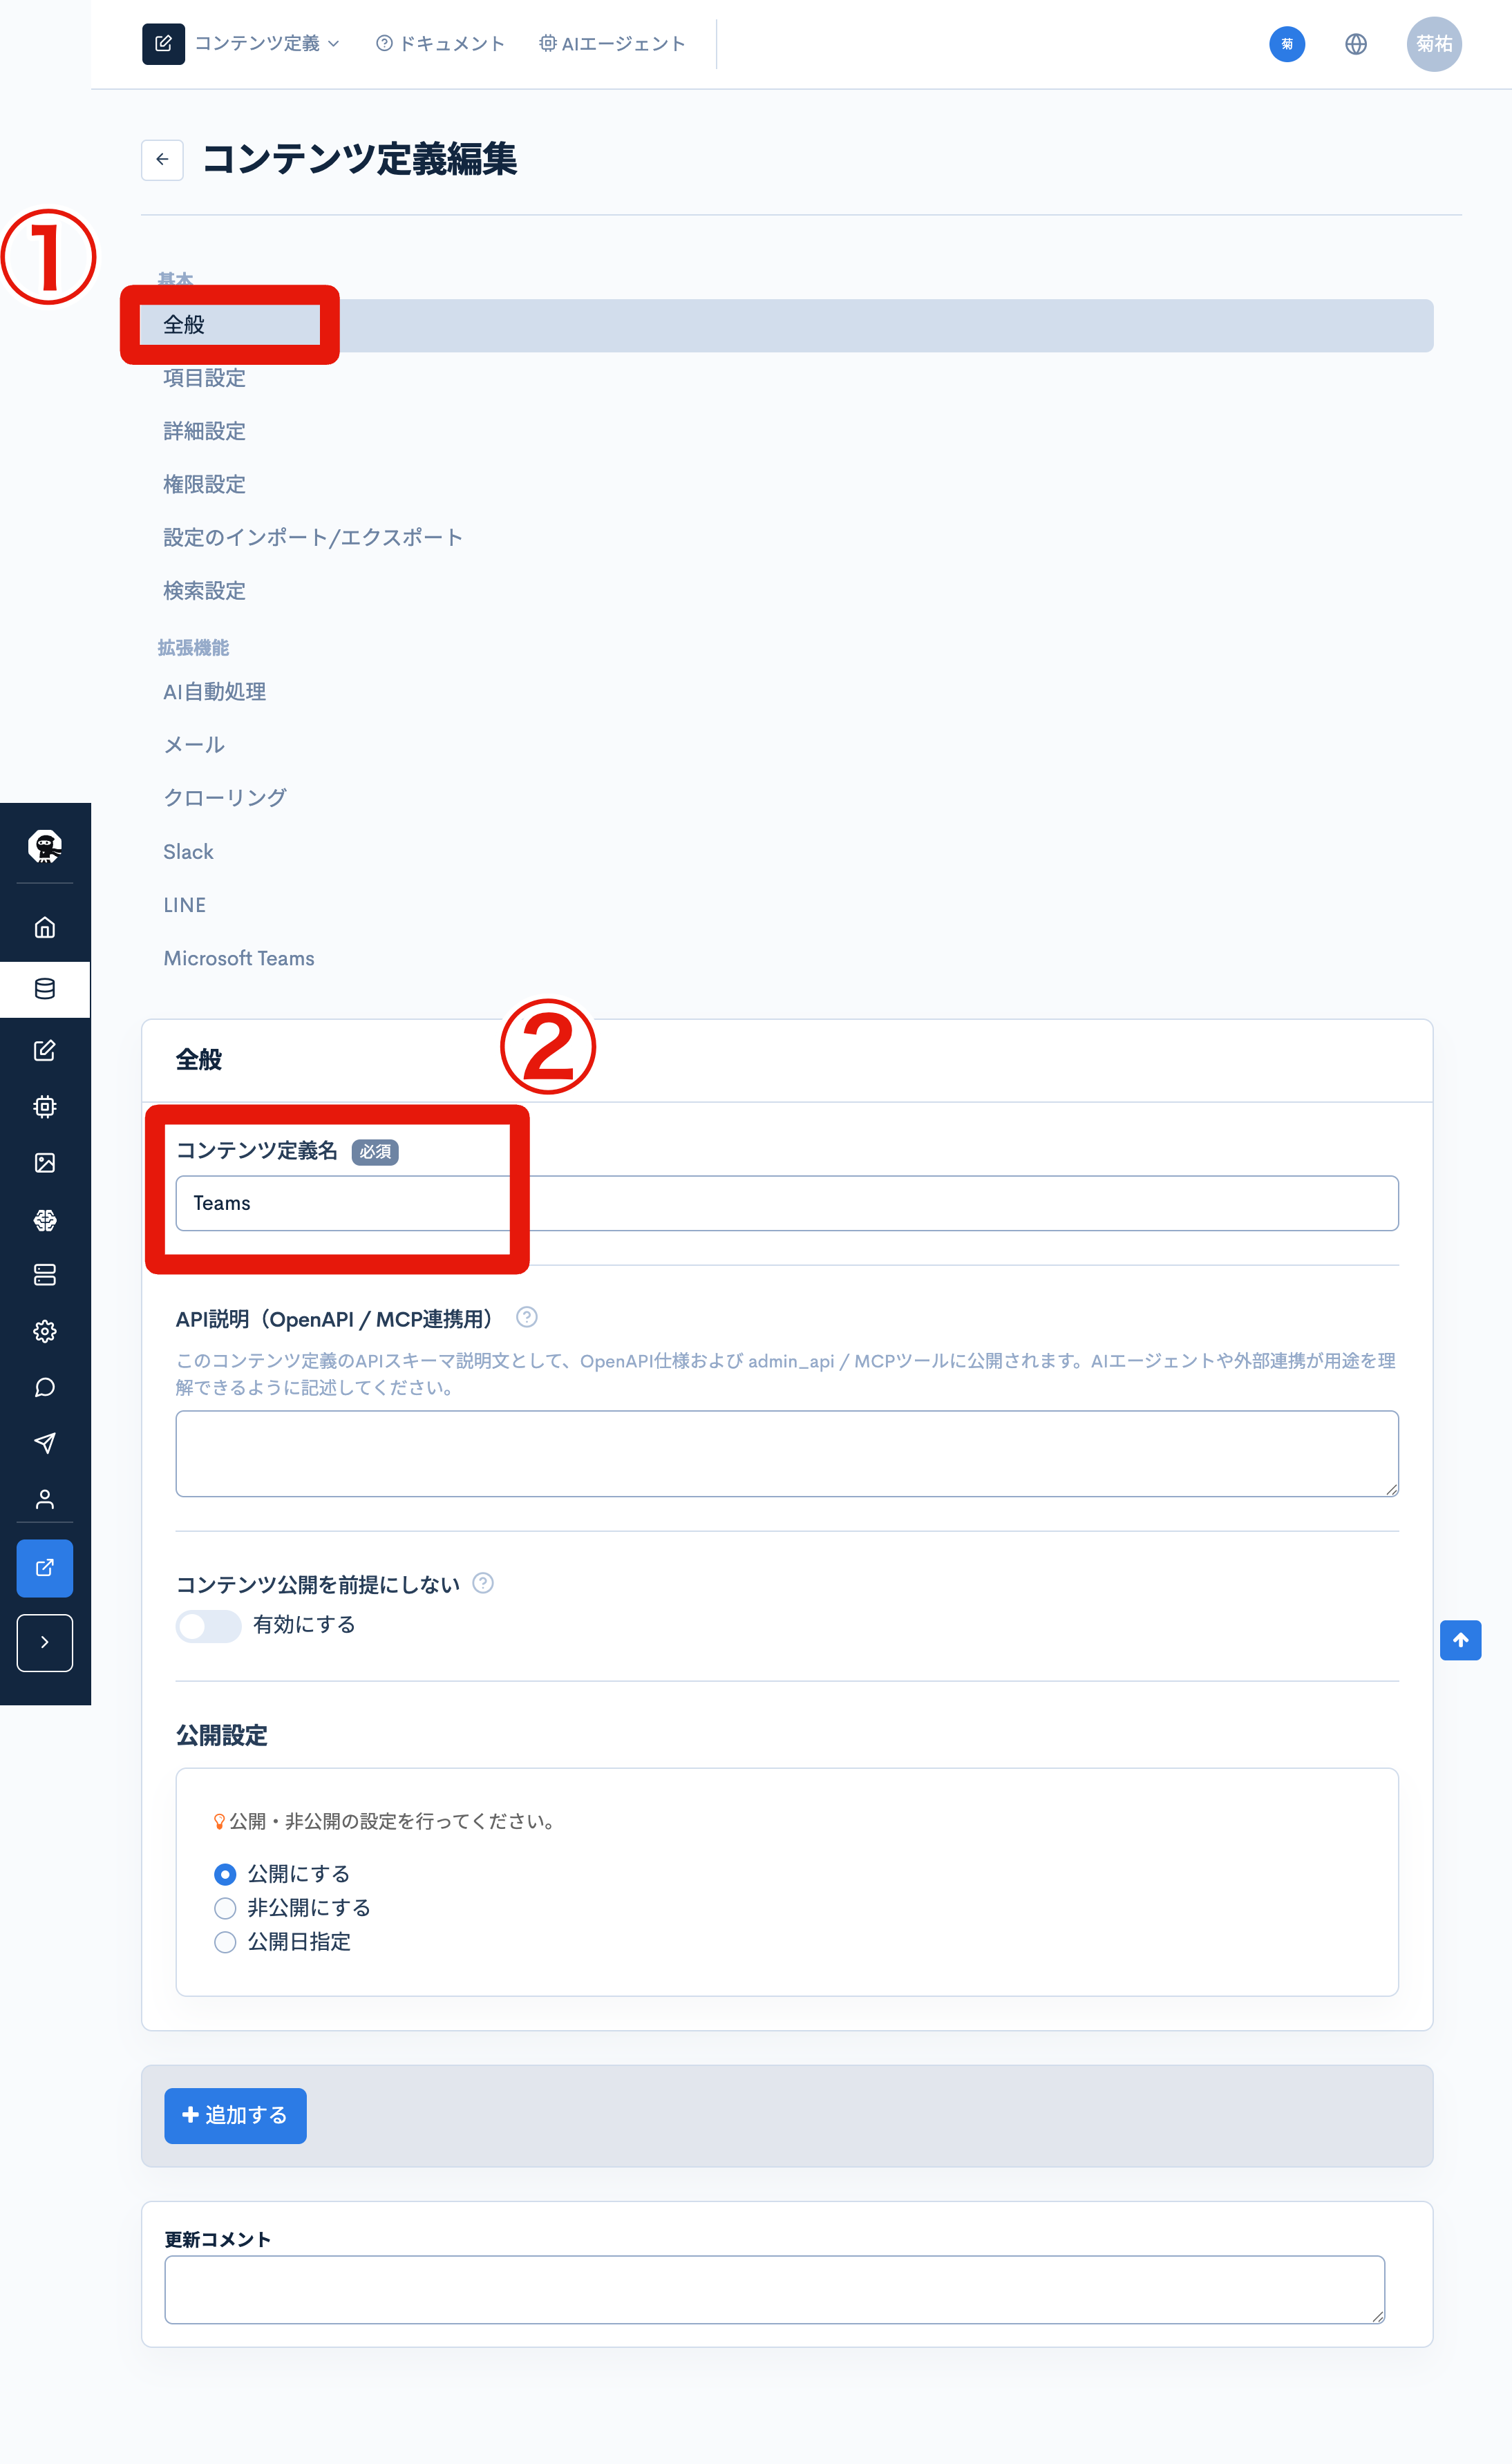
10. Create a Content Definition and configure Teams and AI Auto-Processing
In the Kuroco admin panel, click "Content" and select "Content Definitions". Click "+ Add" to create a new Content Definition.
On the "General" tab, configure the following.
| Field | Value |
|---|---|
| Content Definition name | Any name (e.g., Teams) |
Open the "Microsoft Teams" tab from the left menu and configure the following.
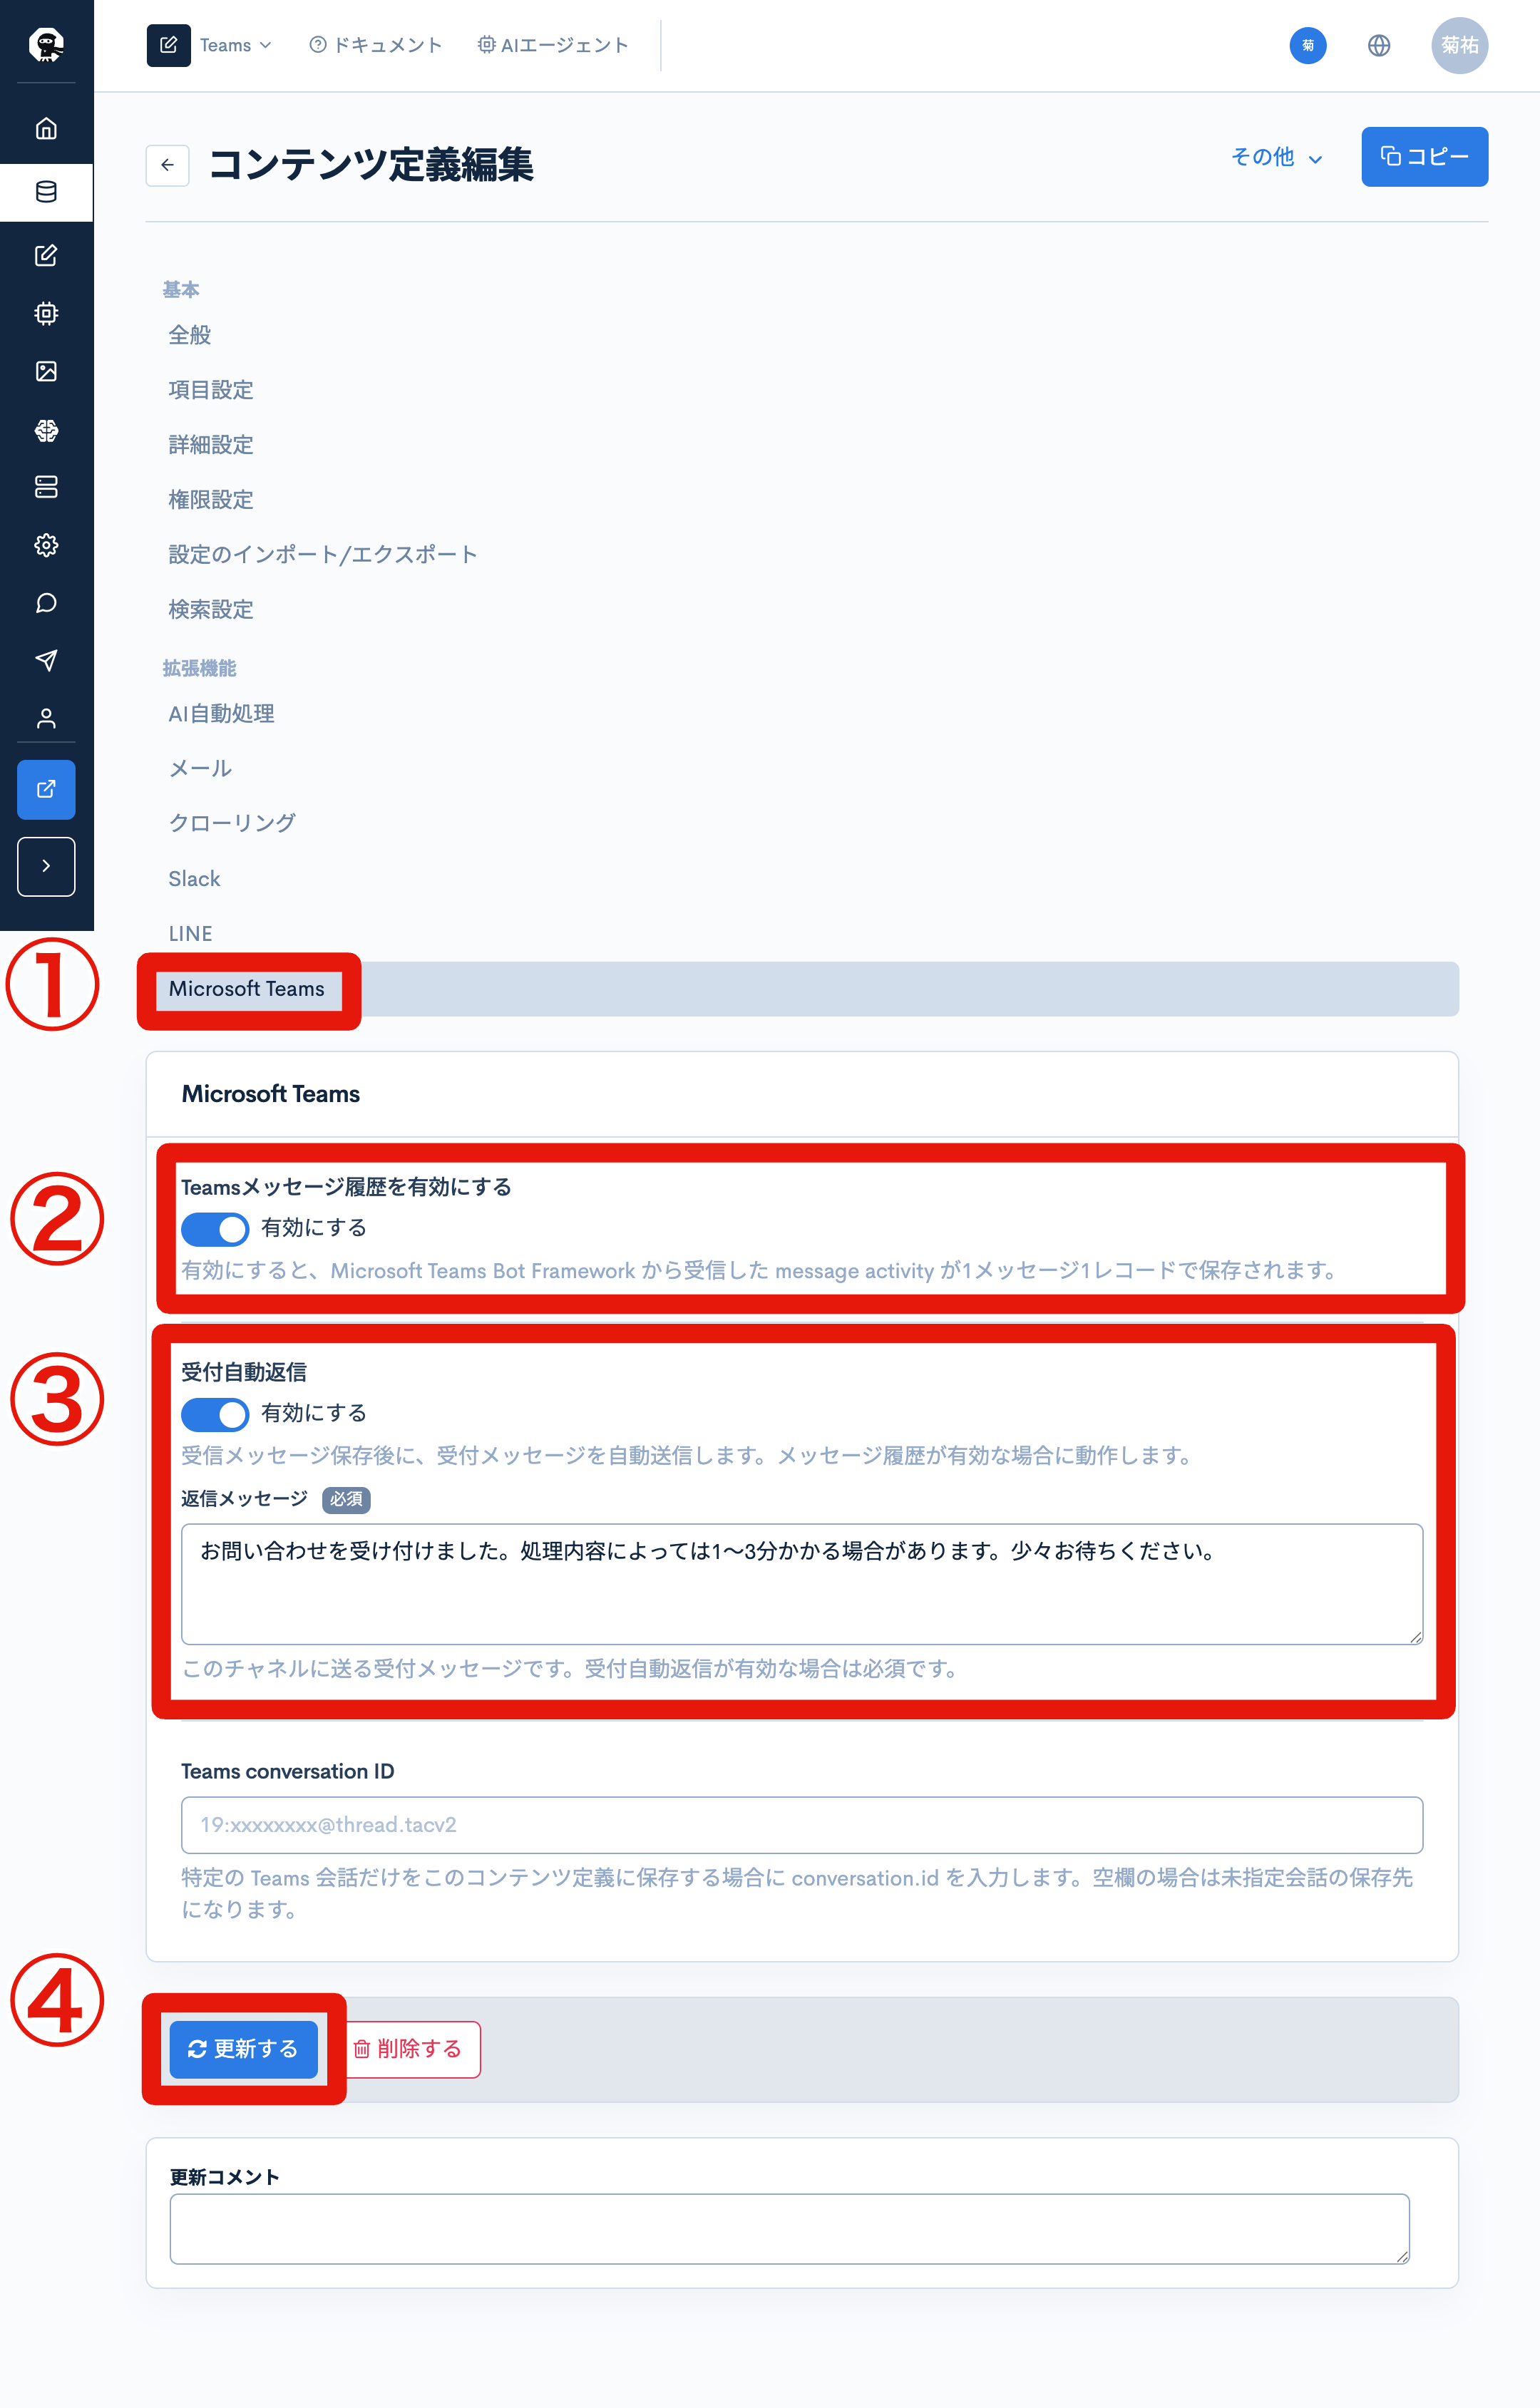
| Field | Value |
|---|---|
| Enable Teams message history | ON |
| Auto-reply on receipt | ON |
| Reply message | Any message (e.g., Your inquiry has been received. Please note that processing may take 1–3 minutes.) |
| Teams conversation ID | Leave blank (targets all channels) |
Open the "AI Auto-Processing" tab from the left menu and configure the following.
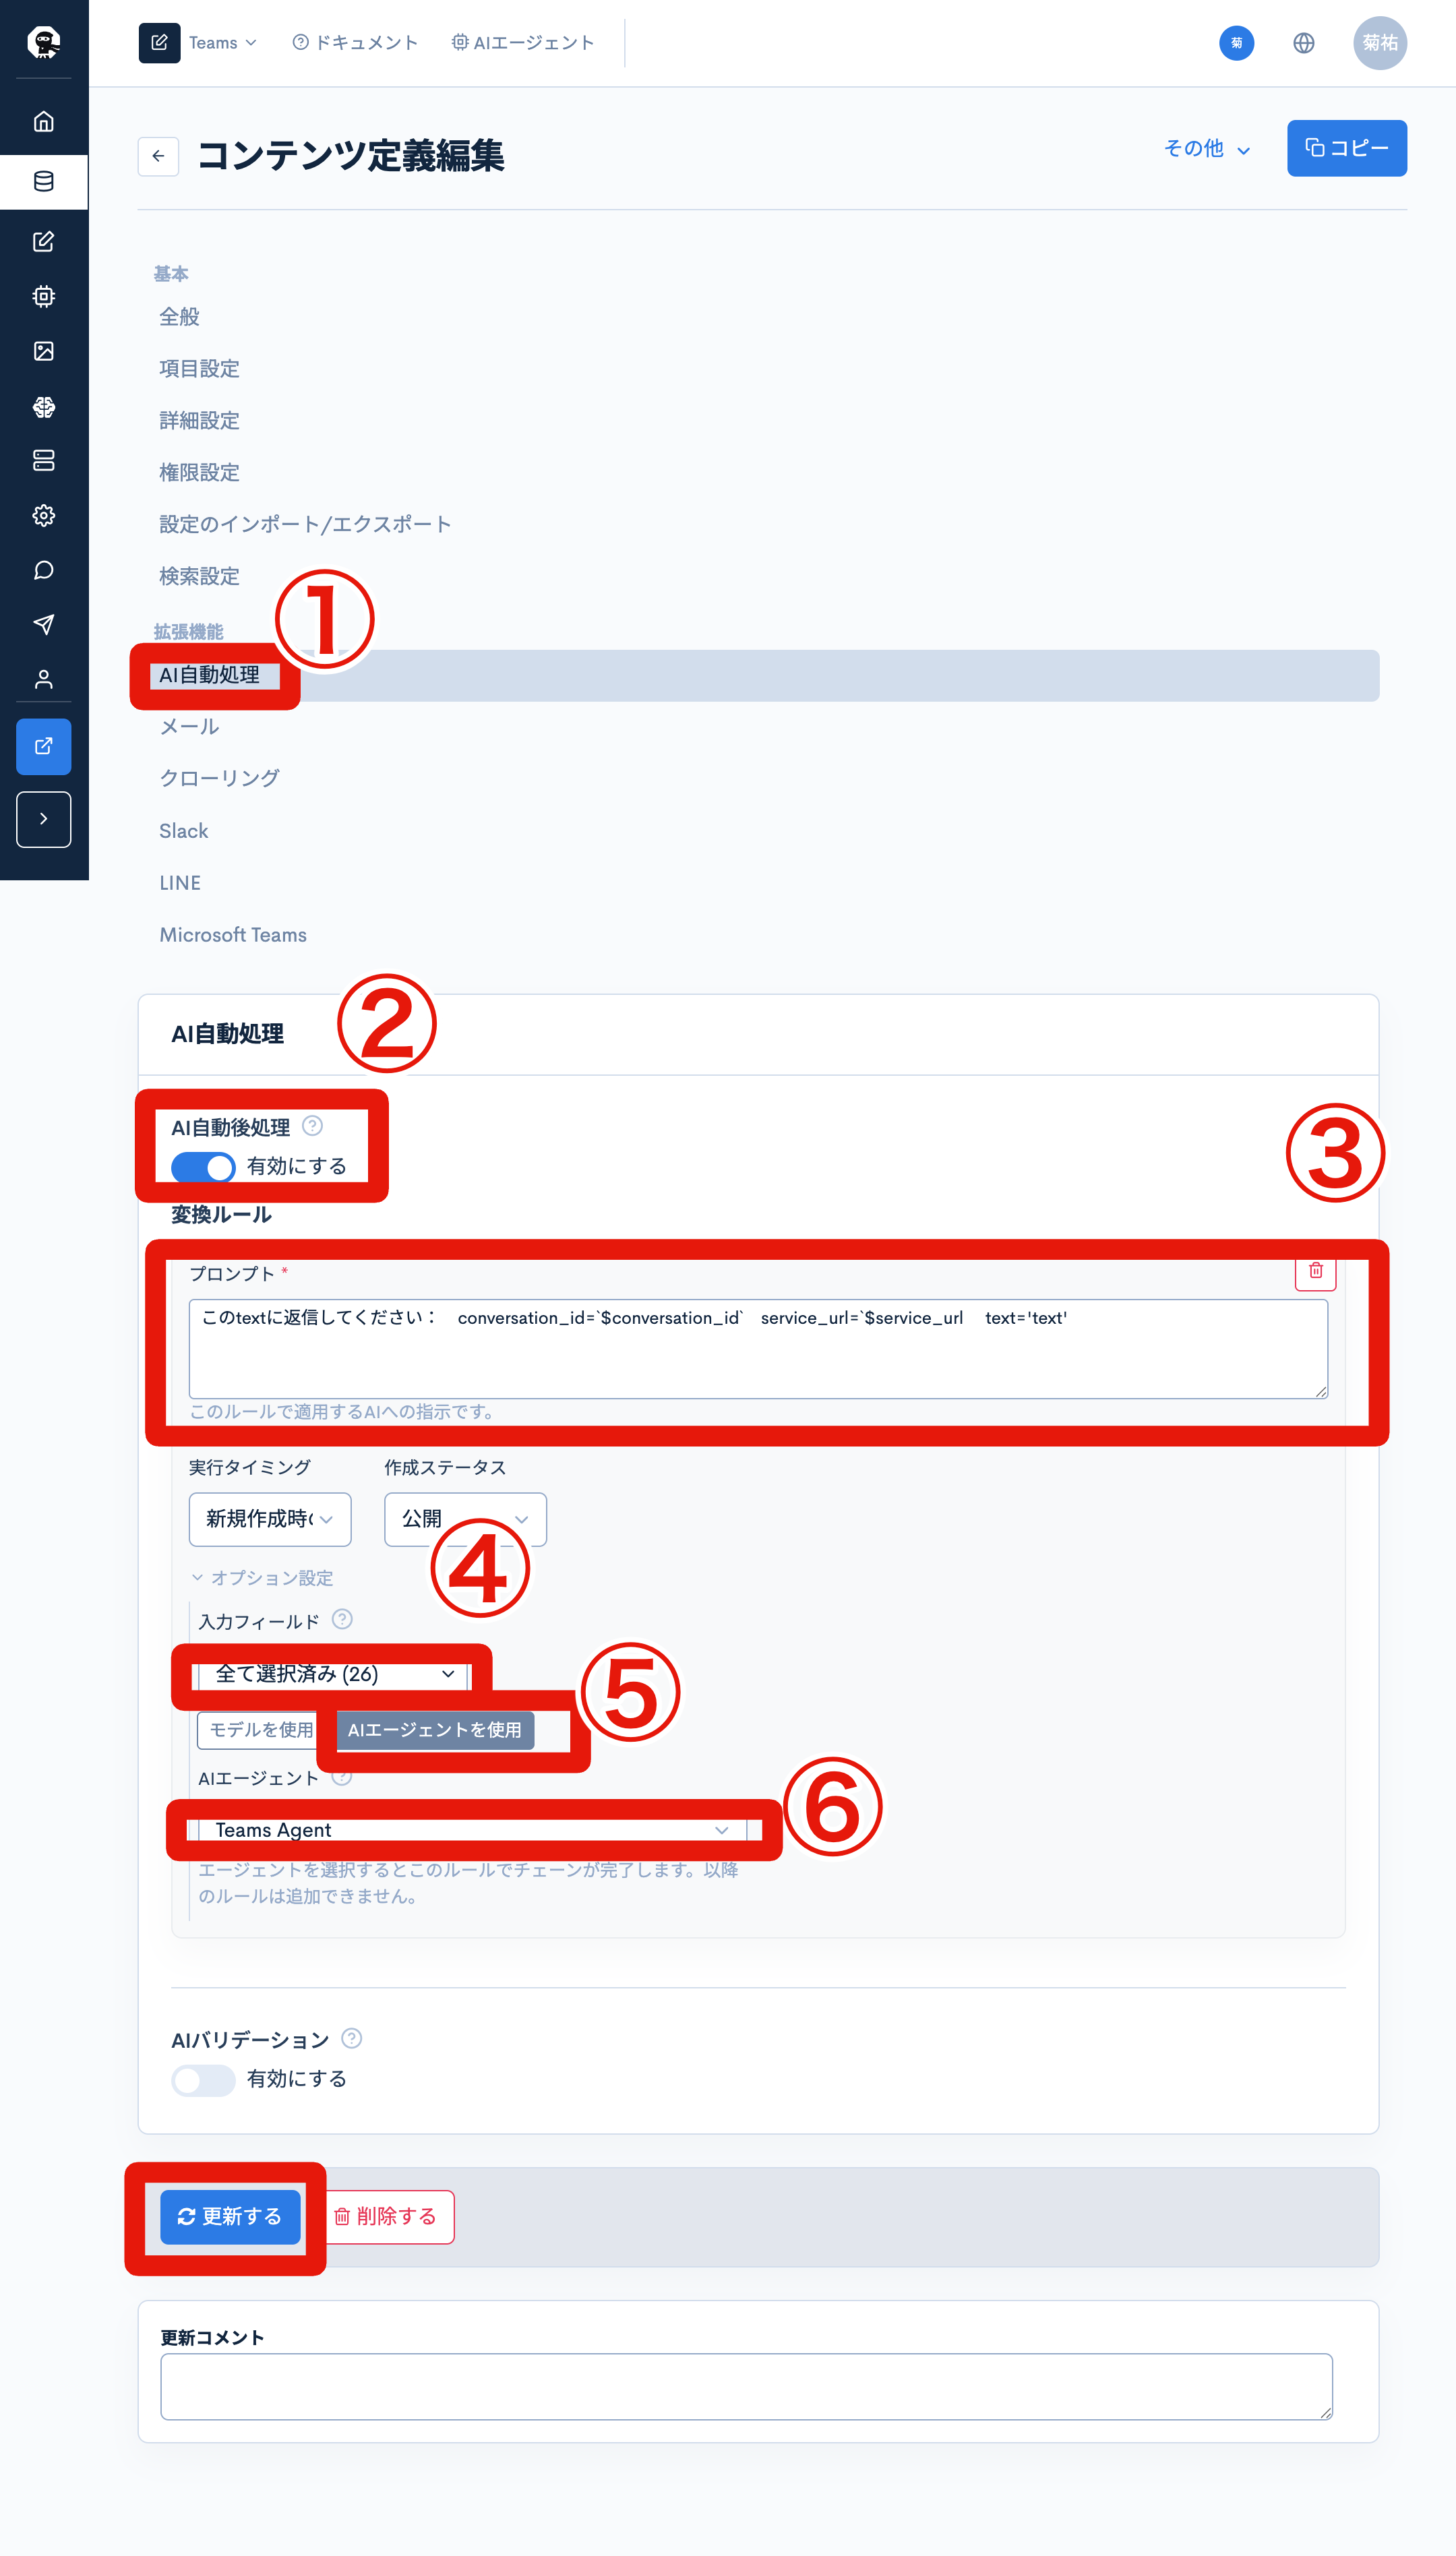
Switch "AI Auto Post-Processing" to "Enable".
Click "+ Add" in the "Conversion rules" section and configure the following.
| Field | Value |
|---|---|
| Prompt | Please reply to this text: conversation_id='$conversation_id' service_url='$service_url' text='$text' |
| Execution timing | On new creation |
| Creation status | Published |
| Input fields | All selected |
| Use AI Agent | Select |
| AI Agent | Select the Agent created in Step 9 (e.g., Teams Agent) |
Once you select "Use AI Agent", no more rules can be added. Selecting an Agent completes the rule chain.
Click "Update" to save.
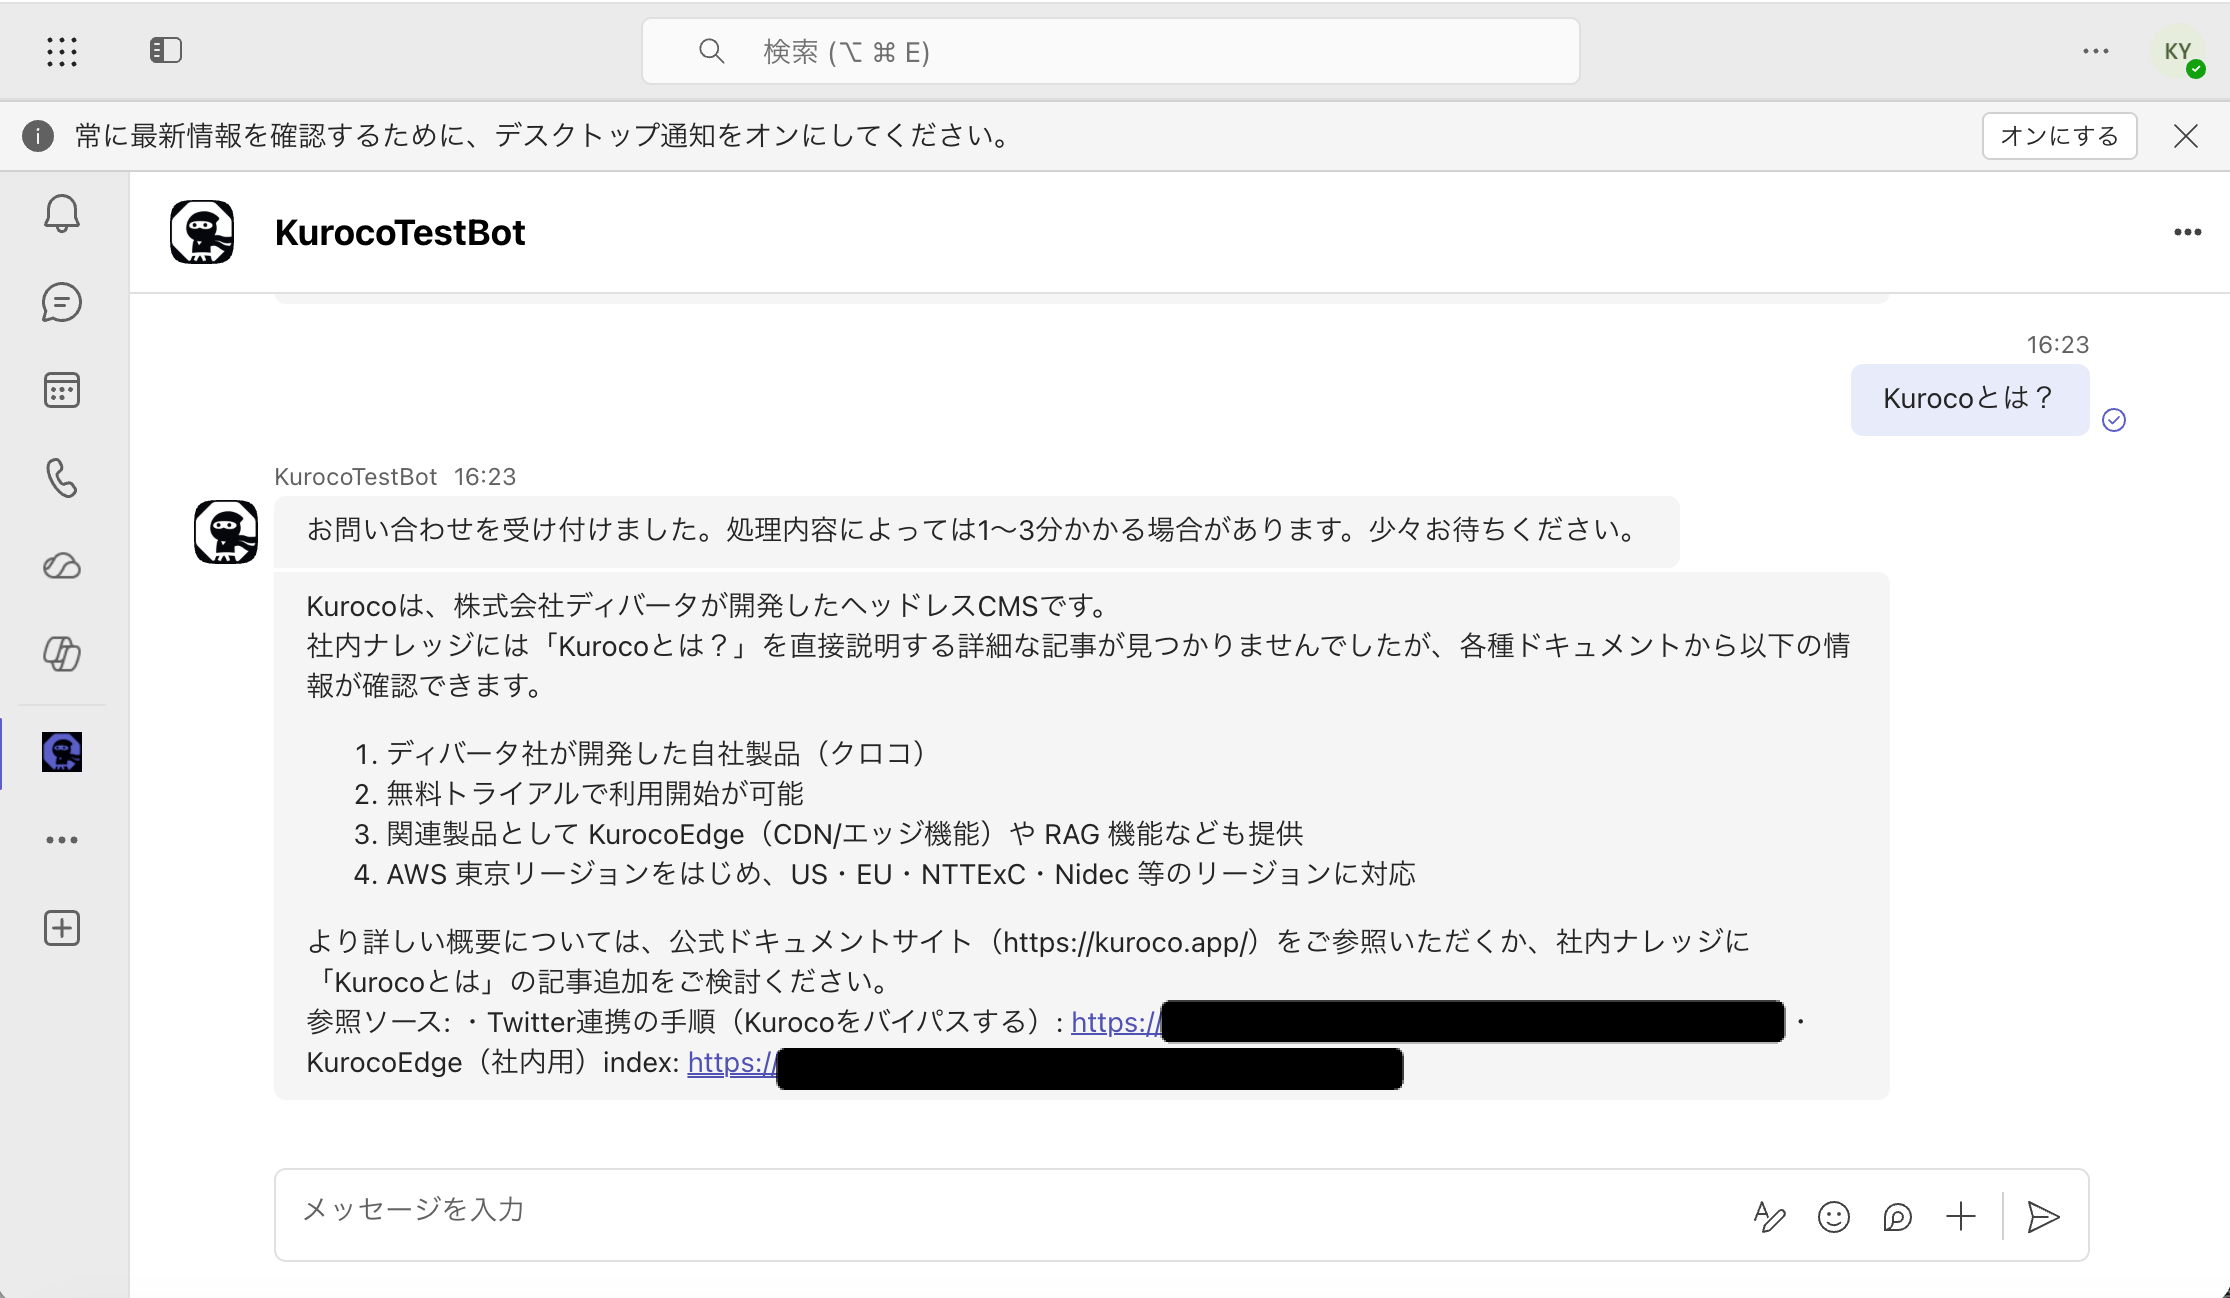
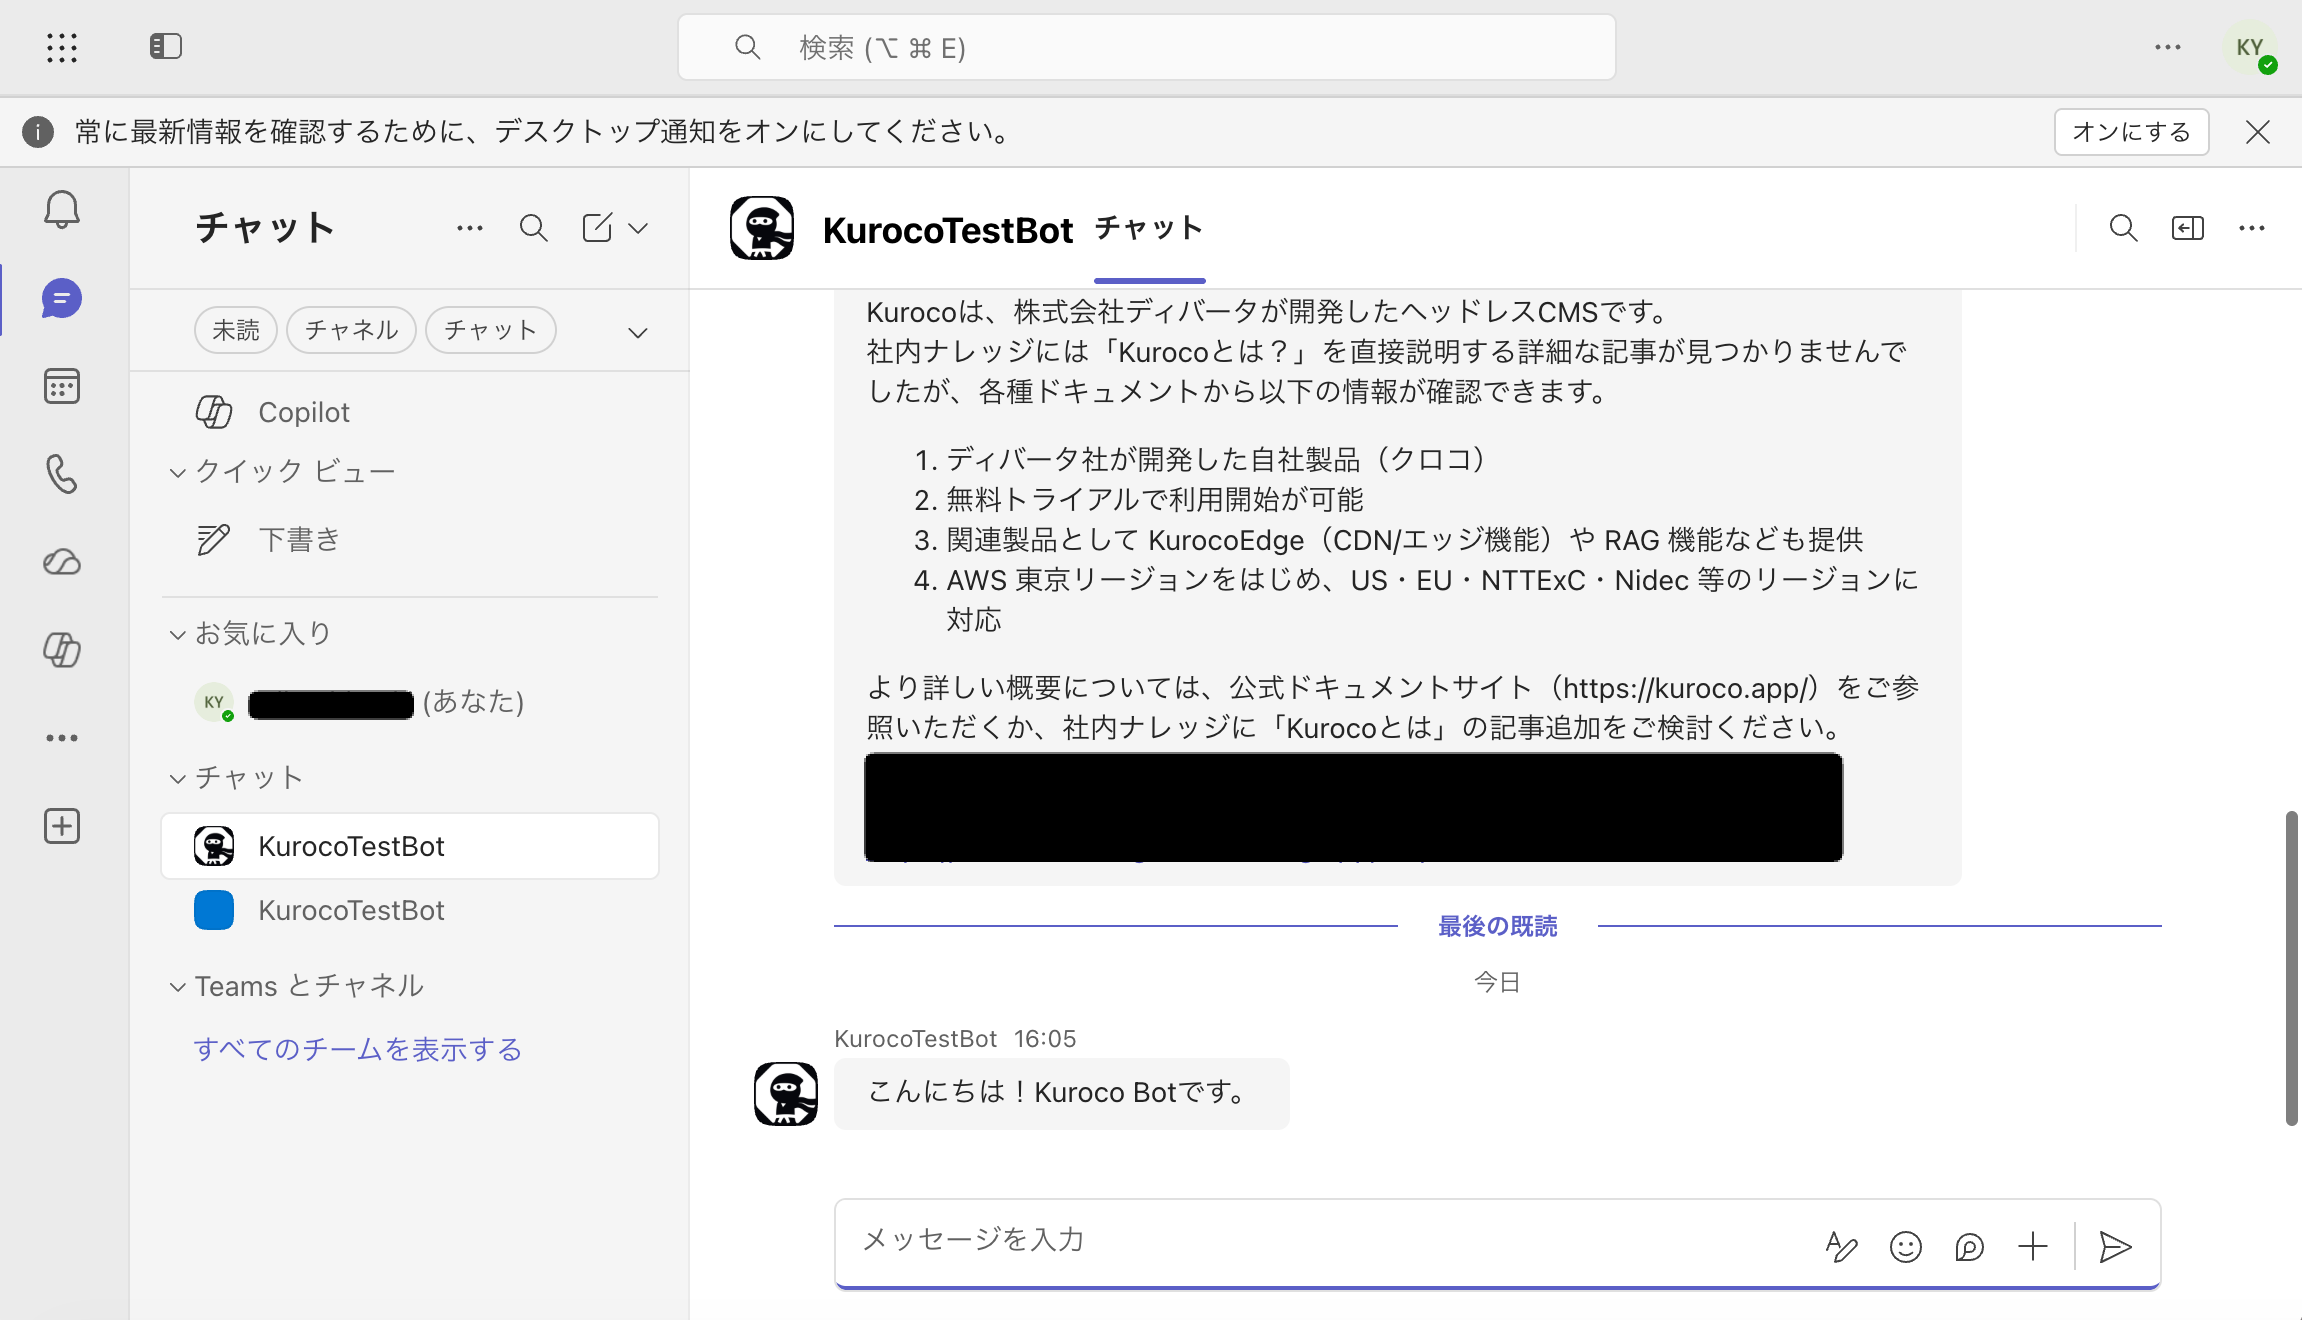
Verification
The Bot chat screen opens. Send a message and confirm that the Agent replies.
Send a test message from the Kuroco admin panel (optional)
Once you exchange a message with the Bot during verification, the conversation information with Teams is saved in the content definition you created in step 10. You can use this conversation information to test the Bot's send behavior directly from the Kuroco admin panel, without opening the Teams app.
Instead of resending a message from Teams every time you adjust the Managed Agent's system prompt or reply format, you can reuse the conversation information you obtained once and repeatedly test sending from the Kuroco side only.
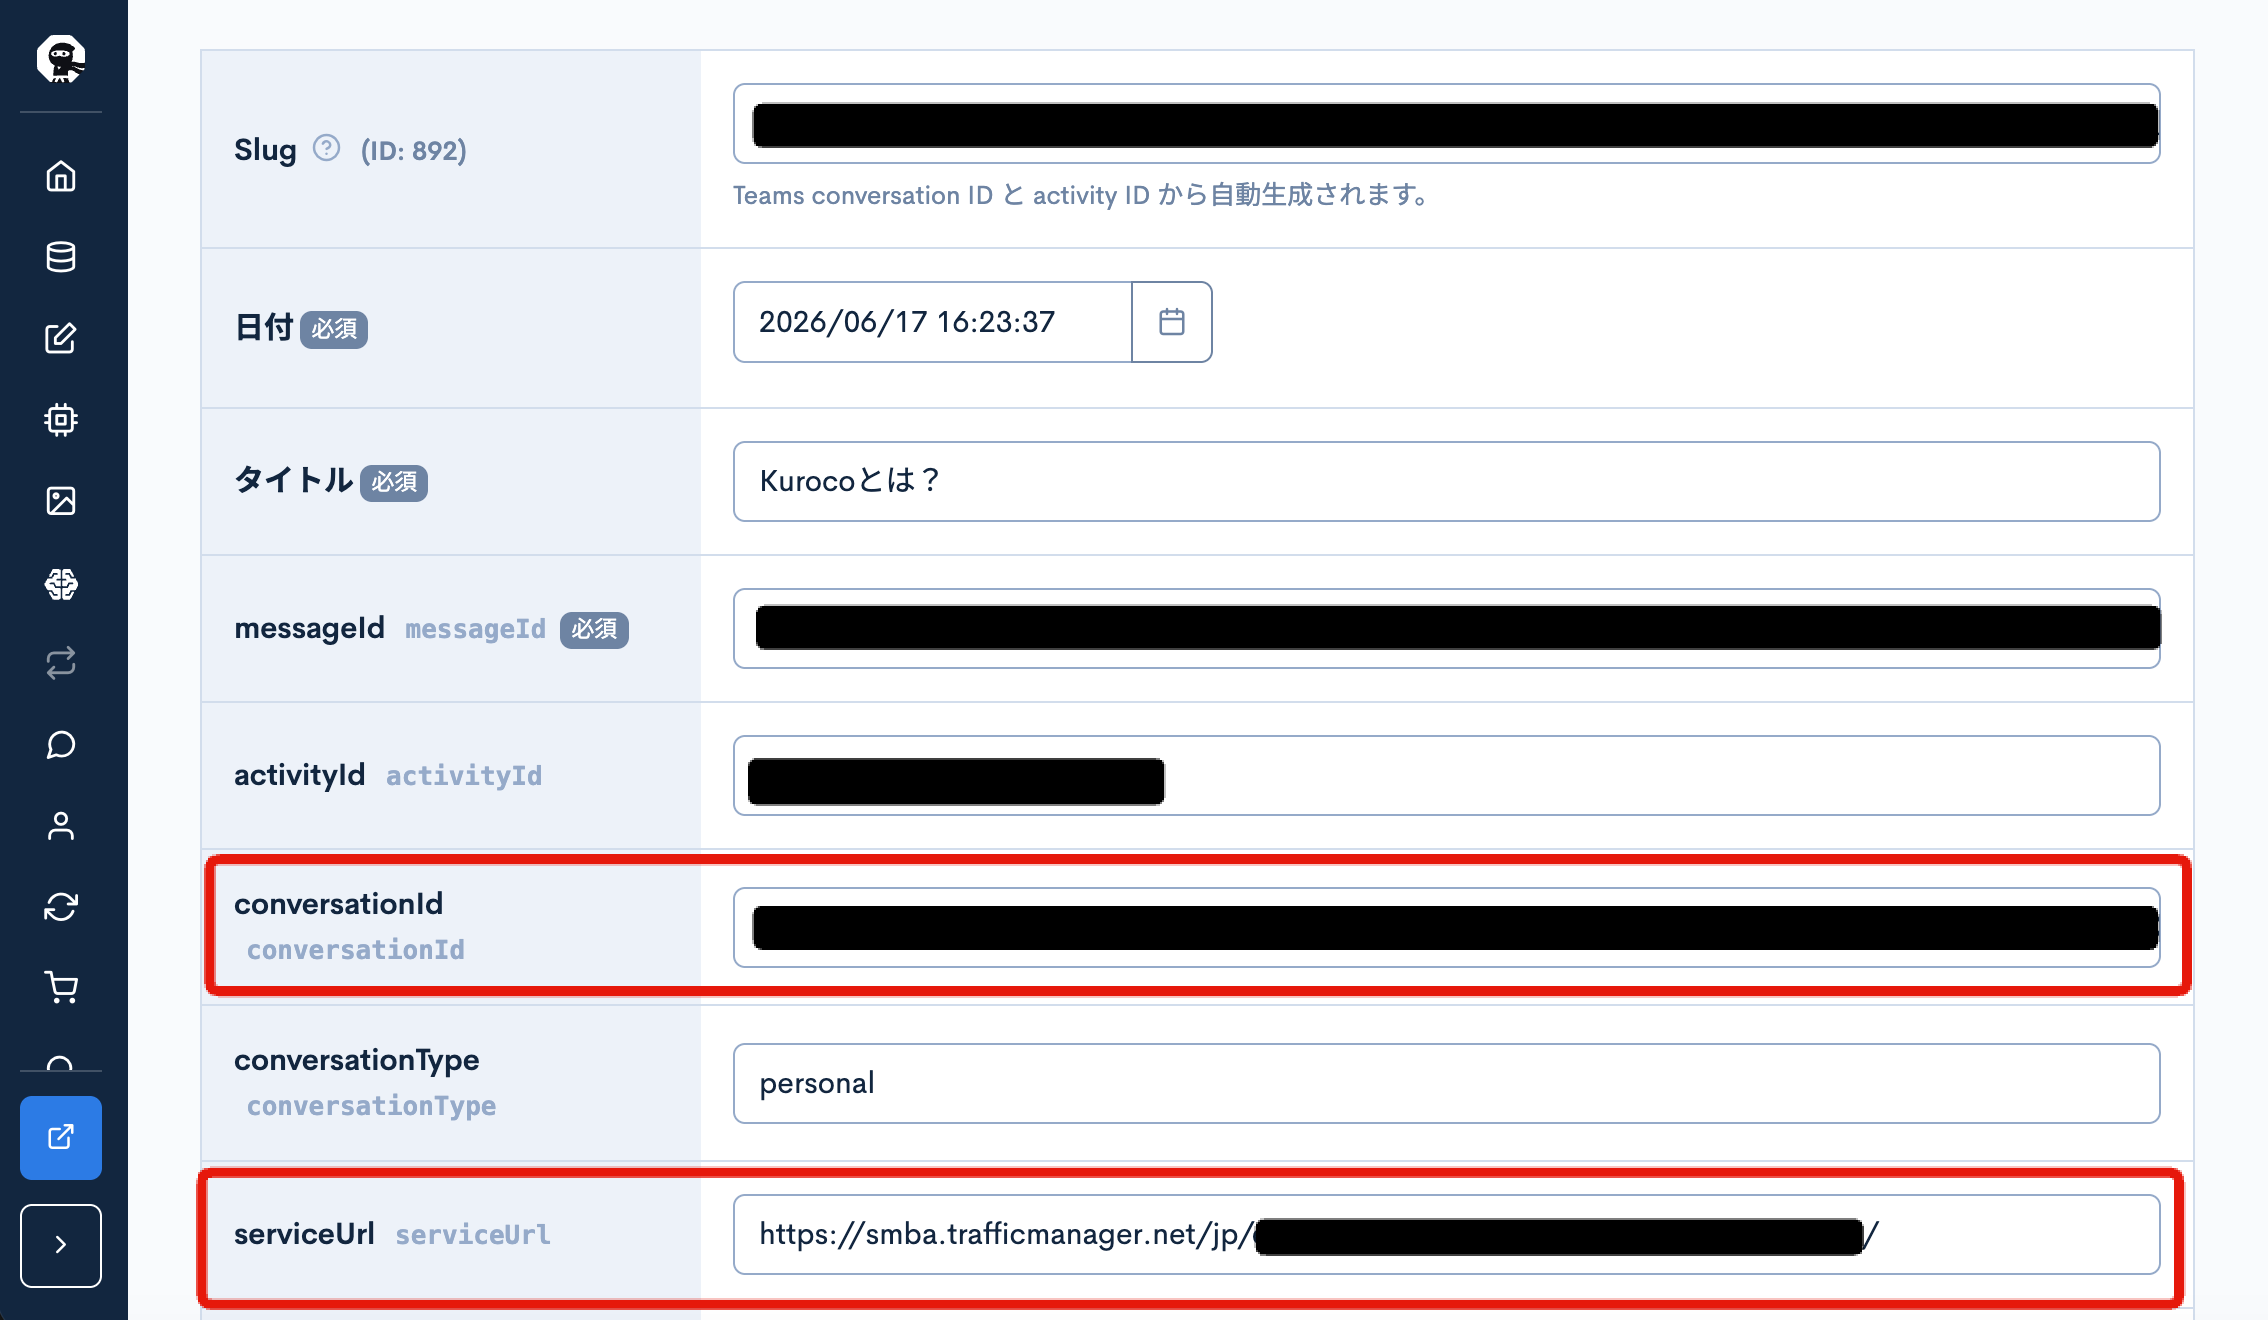
Check the conversation information
In the Kuroco admin panel, open the list for the content definition you created in step 10 (e.g., Teams), and click the record you want to check.
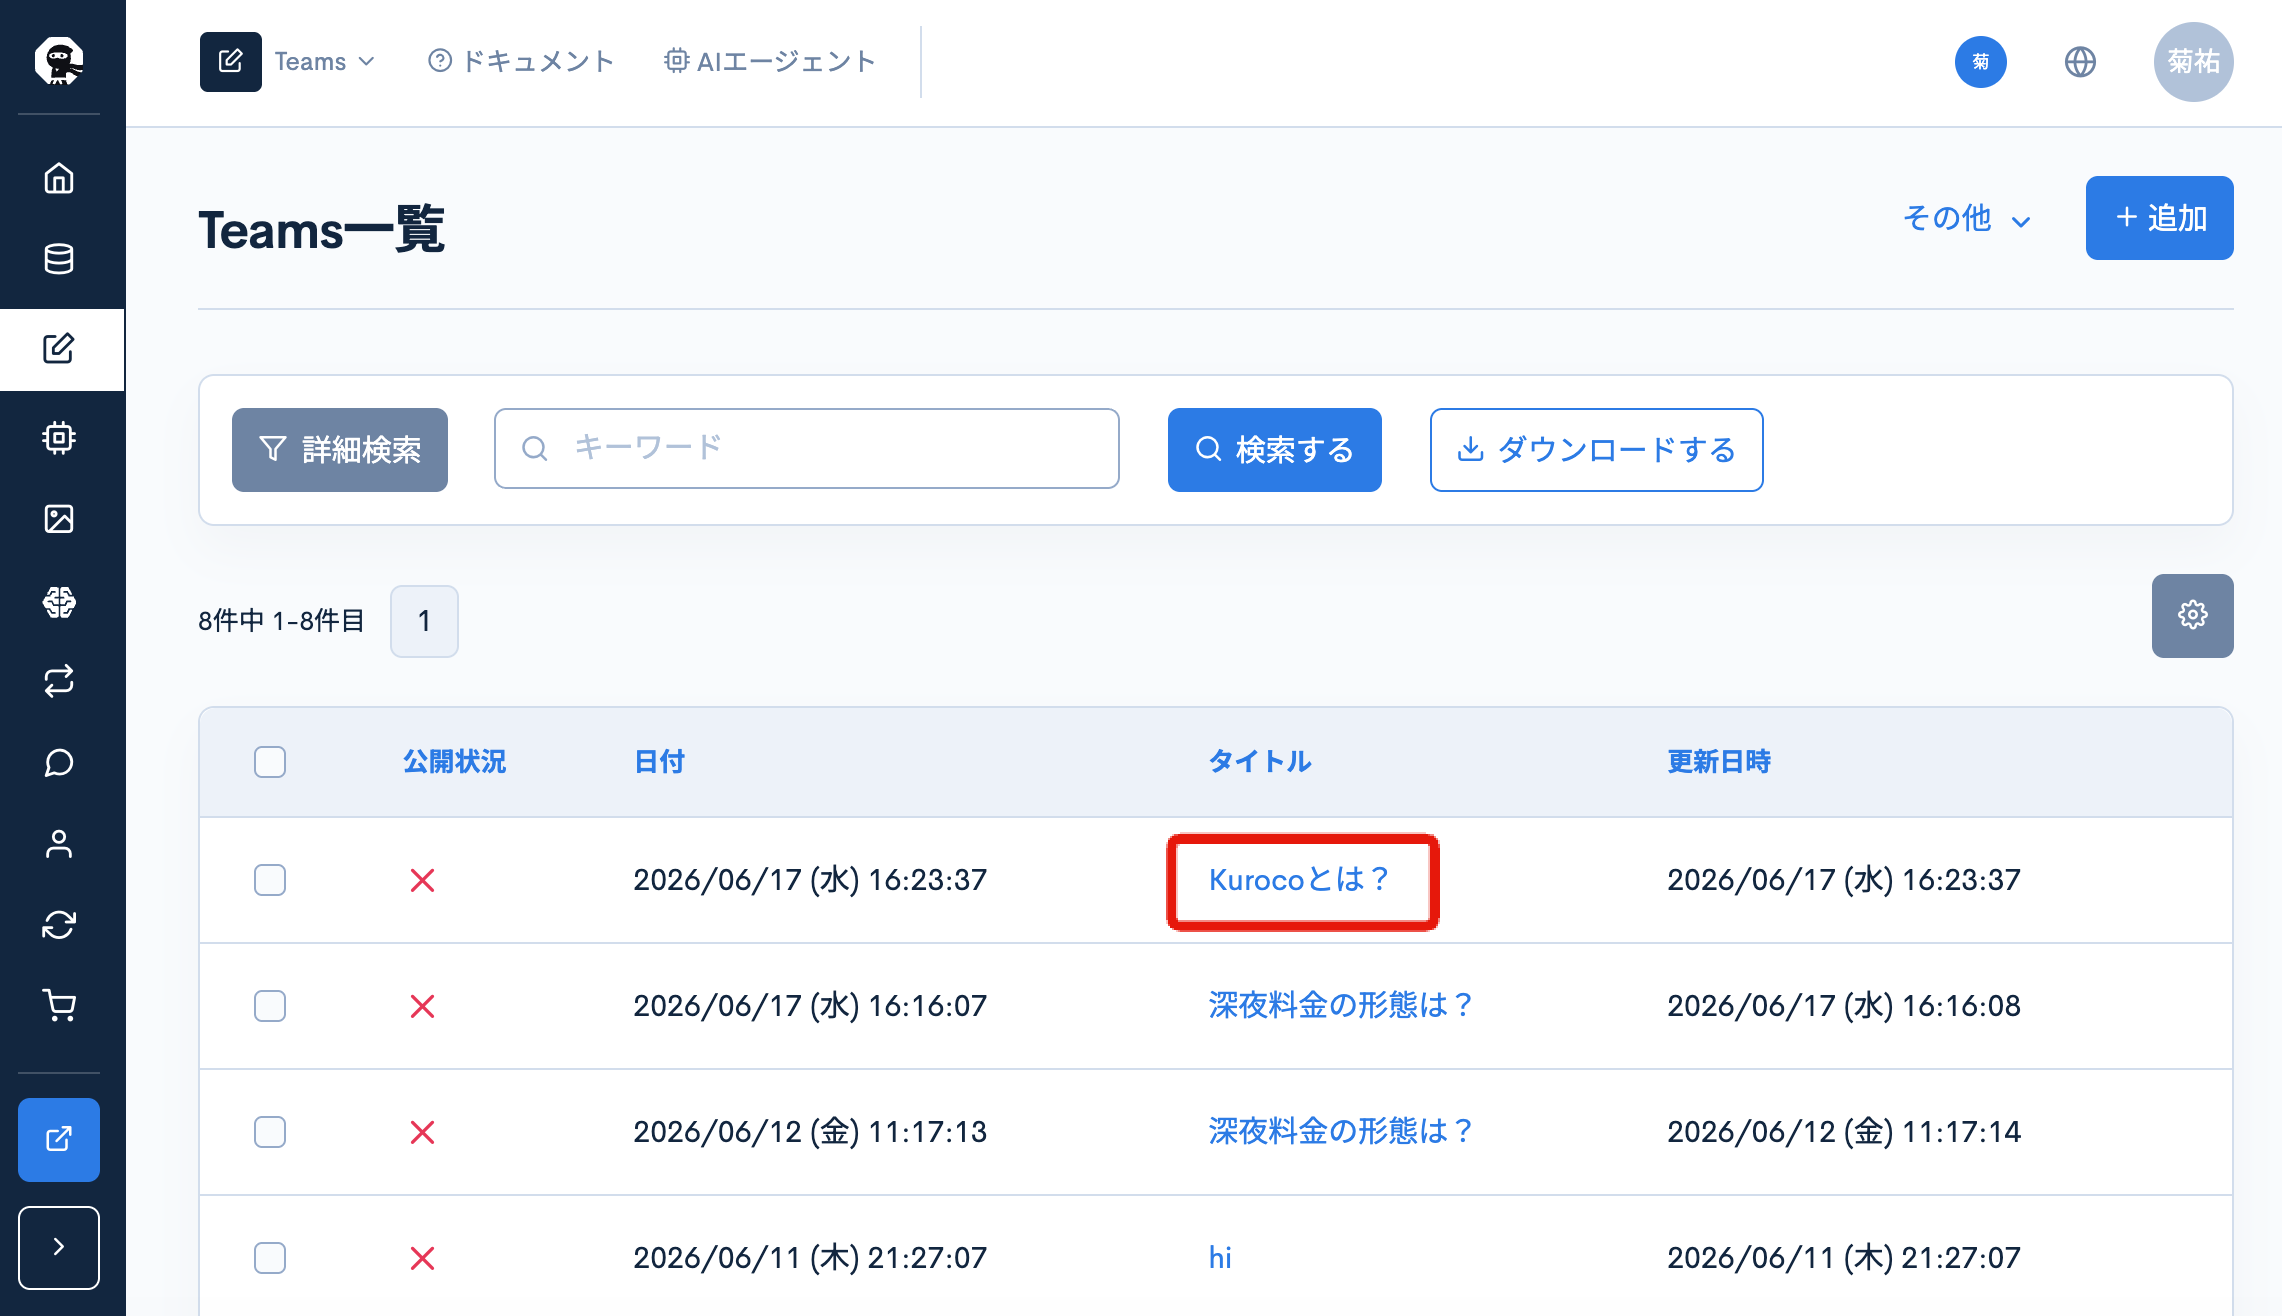
On the detail screen, note the following values.
| Item | Location |
|---|---|
| conversationId | conversationId field |
| serviceUrl | serviceUrl field |
Send a test message
Open the [Channel] → [Messaging] → [Microsoft Teams] settings screen and enter the following in the "Test" section at the bottom.
| Item | Input value |
|---|---|
| Teams serviceUrl | The serviceUrl you noted above |
| Teams conversation ID | The conversationId you noted above |
| Message | Any message content |
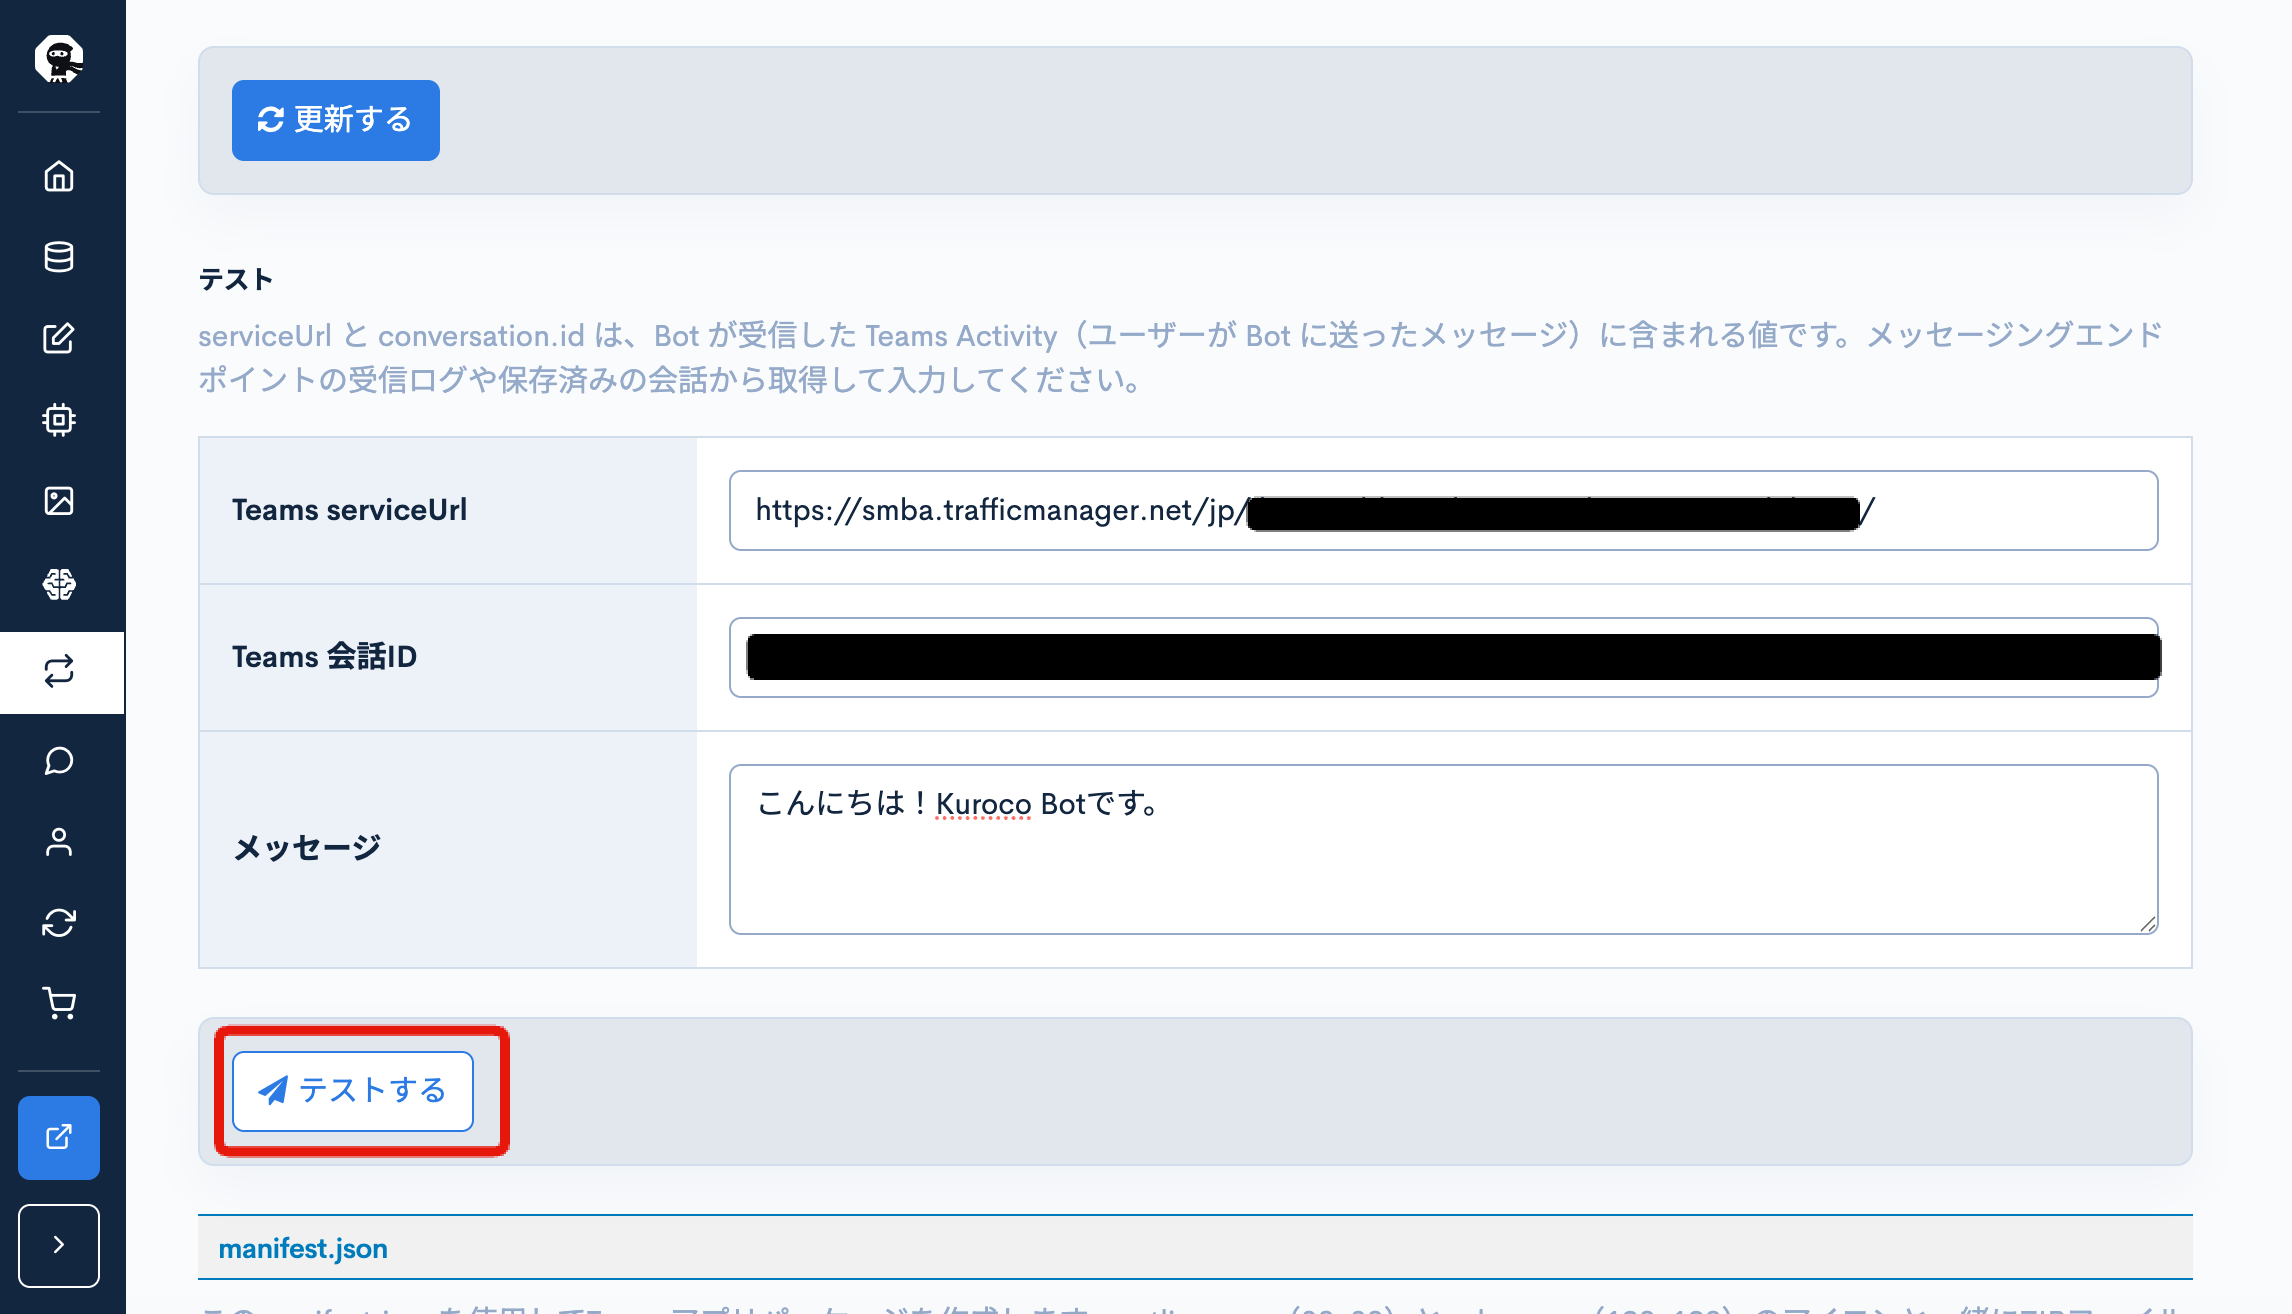
Click "Test" to send the message to Teams. Confirm that the message arrives in Teams.
Troubleshooting
| Symptom | What to check |
|---|---|
| Bot does not reply to messages | Verify that the Azure Bot Messaging endpoint is correct and check the Kuroco trigger settings |
| Authentication error | Verify that the Kuroco App ID and App Password are correct |
| App not found in Teams | Check the ZIP file structure (no subfolders; three files at the root) |
| Agent does not start | Check the AI Auto-Processing (conversion rules) settings on the Kuroco side |
Support
If you have any other questions, please contact us or check out Our Slack Community.